This is the multi-page printable view of this section. Click here to print.
Elastx Documentation
- 1: AI and Other Services
- 1.1: Announcements
- 2: Cloud Connect
- 3: Data Security Manager (beta)
- 4: DBaaS
- 4.1: Announcements
- 4.2: DBaaS Getting Started
- 4.3: FAQ
- 4.4: Managed Service
- 4.5: Overview
- 4.6: Reference
- 4.6.1: Datastore Statuses
- 4.6.2: Glossary
- 4.6.3: Notifications
- 4.6.4: Observability
- 4.6.4.1: Metrics
- 4.6.4.1.1: Introduction
- 4.6.4.1.2: MySQL And MariaDB
- 4.6.4.1.3: PostgreSQL
- 4.6.4.1.4: Redis
- 4.6.4.1.5: System
- 4.6.4.1.6: Valkey
- 4.6.5: Products
- 4.6.5.1: MariaDb
- 4.6.5.1.1: Backup
- 4.6.5.1.2: Configuration
- 4.6.5.1.3: Importing Data
- 4.6.5.1.4: Limitations
- 4.6.5.1.5: Overview
- 4.6.5.1.6: Restore
- 4.6.5.1.7: TLS Connection
- 4.6.5.2: MSSQLServer
- 4.6.5.2.1: Configurations
- 4.6.5.2.2: Limitations
- 4.6.5.2.3: Overview
- 4.6.5.2.4: User Management
- 4.6.5.3: MySQL
- 4.6.5.3.1: Backup
- 4.6.5.3.2: Configuration
- 4.6.5.3.3: Importing Data
- 4.6.5.3.4: Importing Data From AWS RDS
- 4.6.5.3.5: Importing Data From GCP
- 4.6.5.3.6: Limitations
- 4.6.5.3.7: Overview
- 4.6.5.3.8: Restore
- 4.6.5.3.9: TLS Connection
- 4.6.5.3.10: User Management
- 4.6.5.4: PostgreSQL
- 4.6.5.4.1: Backup
- 4.6.5.4.2: Configuration
- 4.6.5.4.3: Extensions
- 4.6.5.4.4: Importing Data
- 4.6.5.4.5: Limitations
- 4.6.5.4.6: Restore
- 4.6.5.5: Redis
- 4.6.5.5.1: Backup
- 4.6.5.5.2: Configuration
- 4.6.5.5.3: User Management
- 4.6.5.6: Valkey
- 4.6.5.6.1: Backup
- 4.6.5.6.2: Configuration
- 4.6.5.6.3: User Management
- 4.6.6: Supported Databases
- 4.7: Changelog
- 4.8: DBaaS Guides
- 4.8.1: Backup and Restore via CLI
- 4.8.2: Backup and Restore via DBaaS UI
- 4.8.3: Config Management
- 4.8.4: Create Datastore From Backup
- 4.8.5: Database Db Management
- 4.8.6: Database User Management
- 4.8.7: Datastore Settings
- 4.8.8: DBaaS with Terraform
- 4.8.9: Deploy A Datastore
- 4.8.10: Event Viewer
- 4.8.11: Firewall
- 4.8.12: Logs Viewer
- 4.8.13: Observability
- 4.8.14: Parameter Group
- 4.8.15: Promote A Replica
- 4.8.16: Reboot A Node
- 4.8.17: Restore Backup
- 4.8.18: Scale A Datastore
- 4.8.19: Terraform Provider
- 4.8.20: TLS For Metrics
- 4.8.21: Upgrade Lifecycle Mgmt
- 4.8.22: Connect Kubernetes with DBaaS
- 5: Elastx Cloud Platform API (beta)
- 5.1: ⚡ Quick Start Guide
- 6: Elastx Identity Provider
- 6.1: Overview
- 7: Kubernetes CaaS
- 7.1: Announcements
- 7.2: Overview
- 7.3: Getting started
- 7.3.1: Accessing your cluster
- 7.3.2: Auto Healing
- 7.3.3: Auto Scaling
- 7.3.4: Cluster configuration
- 7.3.5: Cluster upgrades
- 7.3.6: Kubernetes API whitelist
- 7.3.7: Order a new cluster
- 7.3.8: Recommendations
- 7.4: Guides
- 7.4.1: Cert-manager and Cloudflare demo
- 7.4.2: Change PV StorageClass
- 7.4.3: Ingress and cert-manager
- 7.4.4: Install and upgrade cert-manager
- 7.4.5: Install and upgrade ingress-nginx
- 7.4.6: Load balancers
- 7.4.7: Migration to Kubernetes CaaS v2
- 7.4.8: Persistent volumes
- 7.4.9: Your first deployment
- 7.5: Changelog
- 7.5.1: Changelog for Kubernetes 1.34
- 7.5.2: Changelog for Kubernetes 1.33
- 7.5.3: Changelog for Kubernetes 1.32
- 7.5.4: Changelog for Kubernetes 1.31
- 7.5.5: Changelog for Kubernetes 1.30
- 7.5.6: Changelog for Kubernetes 1.29
- 7.5.7: Changelog for Kubernetes 1.28
- 7.5.8: Changelog for Kubernetes 1.27
- 7.5.9: Changelog for Kubernetes 1.26
- 7.5.10: Changelog for Kubernetes 1.25
- 7.5.11: Changelog for Kubernetes 1.24
- 7.5.12: Changelog for Kubernetes 1.23
- 7.5.13: Changelog for Kubernetes 1.22
- 7.5.14: Changelog for Kubernetes 1.21
- 7.5.15: Changelog for Kubernetes 1.20
- 7.5.16: Changelog for Kubernetes 1.19
- 7.5.17: Changelog for Kubernetes 1.18
- 7.5.18: Changelog for Kubernetes 1.17
- 8: Mail Relay
- 8.1: Overview
- 8.2: Announcements
- 8.3: Email and DNS
- 8.4: FAQ
- 8.5: Getting started
- 9: OpenStack IaaS
- 9.1: Announcements
- 9.2: Changelog
- 9.2.1: Changelog for OpenStack Train
- 9.2.2: Changelog for OpenStack Ussuri
- 9.2.3: Changelog for OpenStack Wallaby
- 9.2.4: Changelog for OpenStack Yoga
- 9.3: Overview
- 9.4: Network
- 9.5: Guides
- 9.5.1: Adjutant
- 9.5.2: Affinity Policy
- 9.5.3: API access
- 9.5.4: Application credentials
- 9.5.5: Application credentials - Access Rules
- 9.5.6: Barbican
- 9.5.7: Billing
- 9.5.8: Detach & Attach interface on a Ubuntu instance
- 9.5.9: EC2 Credentials
- 9.5.10: Getting started with OpenStack
- 9.5.11: Octavia
- 9.5.12: Swift getting started
- 9.5.13: Swift projects
- 9.5.14: Swift S3 compatibility
- 9.5.15: Terraform Backend
- 9.5.16: Volume Attachment Limits
- 9.5.17: Volume Backup & Restore
- 9.5.18: Volume migration
- 9.5.19: Volume Retype
- 9.5.20: Windows volume offline after restart
- 10: The Vault (Technical Preview)
- 10.1: Knowledge base
- 10.1.1: FAQ
- 10.2: Backup solutions
- 11: Varnish CDN
- 12: Virtuozzo PaaS
- 12.1: Announcements
- 12.2: Guides
- 12.2.1: Catch-all VirtualHost with 301 redirect on Apache
- 12.2.2: Change public IP without downtime
- 12.2.3: Copy a SQL database
- 12.2.4: Copy files between environments
- 12.2.5: Enable IPv6
- 12.2.6: Enable X11-Forwarding on VPS
- 12.2.7: FAQ
- 12.2.8: Force HTTPS on Apache behind Nginx load balancer
- 12.2.9: Force HTTPS with Tomcat
- 12.2.10: Log real client IP behind a proxy
- 12.2.11: Nginx LB HTTP to HTTPS redirect
- 12.2.12: Nginx redirect to HTTPS
- 12.2.13: Node.JS NPM Module Problems
- 12.2.14: PHP max upload file size
- 12.2.15: Redirect nginx
- 12.2.16: Restrict phpMyAdmin access
- 12.2.17: SMTP on port 25 not working
1 - AI and Other Services
1.1 - Announcements
2024-06-04 AI services now available
Starting with AI to create business value can seem like a complex process. To help our customers to get started with AI we have launched a few different AI introduction services that offer a structured and proven approach to get started. They allow each business to choose which steps to implement and when, based on their unique situation and needs.
The following AI services are now available.
GPU and Private Language Model
Our Private Language Model as a Service is designed to provide you with a secure, cost-effective way to test and verify our future generative AI services within your system.
AI Introduction
AI Introduction is a collaborative starter package by Algorithma and Elastx, designed to efficiently and swiftly kickstart your AI journey.
Responsible AI Training
Join us at our location or invite us to yours for an in-depth session on information security and responsible AI.
GPU and Private Language Model
Our Private Language Model as a Service is designed to provide you with a secure, cost-effective way to test and verify our future generative AI services within your system.
Customized AI Projects
In collaboration with you, Algorithma and Elastx plan and execute tailored AI projects.
You can find information, specifications and pricing here, https://elastx.se/en/ai-services/.
If you have any general questions or would like to sign-up please contact us at hello@elastx.se. For technical questions please register a support ticket at https://support.elastx.se.
2024-02-01 DDoS protection now included
We are happy to announce that we are now adding our DDoS protection to all Elastx Cloud Platform customers for free. This is yet another step in our mission to provide the best cloud platform for business critical services with sensitive data. Your services will now be protected from L3/L4 volumetric DDoS attacks by our inline protection.
If you already are an Elastx customer you do not need to do anything, the DDoS protection service will be enabled automatically. If you are currently subscribing to our DDoS protection service, your subscription will be updated accordingly.
This will apply from 2024-02-01.
L4 proxy and Geo Fencing
We have also added an anycast L4 proxy service with an optional Geo Fencing function.
You can find information, specifications and pricing here, https://elastx.se/en/ddos-protection.
If you have any general questions or would like to sign-up please contact us at hello@elastx.se.
Any technical questions please register a support ticket at https://support.elastx.se.
2023-05-02 Cloud Colocation
We are happy to announce these platform news that will help you to run applications on Elastx Cloud Platform with enhanced security.
Cloud Colocation
Cloud Colocation is a service that enables customers to host their own hardware in the same data centers as the Elastx platform. This could, for example, be hardware security modules (HSM) for storing and managing secrets if required to manage that on your own.
Customers can acquire individual rack units or a separate section in a rack and will receive a dedicated, fast, and private network connection to connect to the desired network in the Elastx platform via Cloud Connect. Customers can also interconnect with other cloud platforms using Elastx Cloud Exchange.
Physical access to the space is provided, and on-site staff is available to offer assistance if needed. Mounting equipment, including cables and rack screws, is included.
Cloud Colocation has been available since 2023-03-04
2023-01-27 Elastx Cloud Platform pricing adjustment
To Elastx Customers and Partners,
We are trying to avoid a general price increase on all services, even though the current high inflation is affecting us hard. We are investing in new more efficient technology to compensate for the increased cost derived from product vendors, utility services, financial service and internal costs. We have identified a few selected services where we need to perform price adjustments to be able to continue the development in a sustainable way.
The new pricing will apply from 2023-03-01.
We will adjust the pricing on Professional Services and also reduce the number of different types to a minimum to make it easier.
| Service | Current price | New price |
|---|---|---|
| Professional Services CloudOps Engineer | 1150 SEK / Month | 1500 SEK / Month |
| Professional services CloudOps Engineer non office hours | 2300 SEK / Month | 3000 SEK / Month |
We will adjust the pricing on Application Monitoring in order to be able to keep the high service levels and continue the development of the service.
| Service | Current price | New price |
|---|---|---|
| Application Monitoring Basic | 495 SEK / Month | 2900 SEK / Month |
| Application Monitoring Advanced | 7900 SEK / Month | 14900 SEK / Month |
2 - Cloud Connect
General
Cloud Connect is a service for customers to make a physical connection to Elastx public cloud.
Locations
The service is offered in our availability zones:
- Elastx STO1
- Elastx STO2
- Elastx STO3
Customers can also connect at “Private Peering Facilities” locations on PeeringDB.
Media
The service only allows fiber-based connections. The following physical media is supported. Customer needs to specify which media they want to connect with.
10G ports:
- 1000BASE-LX (1310 nm)
- 10GBASE-LR (1310 nm)
100G ports:
- 100GBASE-LR4 (1310 nm)
Data Plane Protocols
- MTU 1500 is default. This can be increased to MTU 9000.
- VLAN encapsulation (IEEE 802.1Q) is recommended. All (1-4093) VLAN numbers are available.
- Link Aggregation Control Protocol (IEEE 802.3ad) is supported.
Control Plane Procotols
- Border Gateway Protocol (BGP) is recommended.
Border Gateway Protocol (BGP)
Elastx currently supports IPv4 Address Family (AFI 1) Unicast (SAFI 1).
Private peering
Customer can advertise any network, including 0/0 for default routing. Elastx needs to informed of the networks prior to advertisement.
Any AS numbers within 64512–65534, 4200000000–4294967294 (RFC 6996) can be used. With the exception of reservation 4258252000-4258252999.
Public AS numbers can be approved after ownership verification.
Public peering
Customer can only advertise networks assigned by Elastx. AS numbers are assigned by Elastx.
Public AS numbers can be approved after ownership verification.
3 - Data Security Manager (beta)
3.1 - File System Encryption for Linux
File System Encryption for Linux
This is a quick setup guide for File System Encryption (FSE) using Elastx Data Security Manager.
- Log in to Elastx DSM https://hsm.elastx..cloud and enter the account you want to use.
- Create a Group and set a name. A group can contain multiple secrets but if you want to use quorum approvals you can only manage one FSE per group.
- Create an app and set a name.
- Select the default API Key and the authentication method.
- Assigning the app to the group you just created.
- Get the API Key, select the app you created, under Info > API Key, press the “VIEW API KEY DETAILS” button.
- Log in to the Linux machine where you want to encrypt data. (These instructions are made for Ubuntu 24.04)
- Install fuse.
sudo apt install libfuse2 - Download and install the FSE agent.
wget https://download.fortanix.com/clients/FSE/1.10.147/fortanix-dsm-fseagent-1.10.147.deb
sudo apt install ./fortanix-dsm-fseagent-1.10.147.deb - Create a directory where the configuration and the encrypted files will be stored and a mount point
sudo mkdir /fse /data - Configure the file system
sudo fortanix-dsm-fseagent -dsm -init /fse- Enter the DSM Endpoint: https://hsm.elastx.cloud
- Enter the Api Key: <api key>
There is no text echo, paste the key and press enter.
- Mount the filesystem
sudo fortanix-dsm-fseagent --allow_other /fse /data- Enter the Api Key: <api key>
(twice)
- Enter the Api Key: <api key>
- Install fuse.
- If you want to automatically mount the filesystem at boot do the following.
- Add the API key to file
/etc/fse-auto-mount/api_keys/1.conf - Add the mount command to file
/etc/fse-auto-mount/mount_cmd/1.conf - Reload systemd to apply the changes
sudo systemctl daemon-reload - Enable the service
sudo systemctl enable fse-auto-mount@1.service
- Add the API key to file
- Done
You can find the full documentation here.
4 - DBaaS
4.1 - Announcements
2026-03-31 Elastx Cloud Platform - Compute, Storage and DBaaS
Pricing adjustment
We have absorbed rising operational costs rather than pass them on to you. Despite significant inflationary pressure across the industry, we have managed to keep our prices stable.
The primary driver for our price adjustment is a sharp increase in hardware costs, which have risen 150–250% in the last 6 months. This is a market-wide development entirely outside our control, and one we have worked hard to shield you from for as long as possible. We have reached a point where continuing to do so would compromise our ability to maintain and develop the platform in a sustainable way.
Effective July 1, we will apply a 10% price adjustment to all Compute, Storage and DBaaS services.
We do not take this decision lightly. It is the first time we have increased prices on most of these services, and it reflects the reality of today’s hardware market rather than any change in our commitment to you.
This change will take effect starting July 1, 2026.
Pricing adjustments
We will adjust the pricing on the following services.
| Service | Price increase |
|---|---|
| Compute | 10% |
| Block storage | 10% |
| Object Storage | 10% |
| DBaaS | 10% |
2024-10-14 MSSQL DBaaS now available
We are excited to announce that we now have Microsoft SQL Server available in Elastx Database as a Service.
Elastx DBaaS automatically ensures your databases are reliable, secure, and scalable so that your business continues to run without disruption. You can achieve high availability and disaster protection by configuring replication and backups to protect your data. Backups and multi-node datastores are disaster protected as they are running over multiple availability zones which in our case are geographically separated data centers. Automatic failover makes your database highly available.
The following services are included as standard in our prices: 24x7 support, Threat Intelligence, DDoS protection, encrypted traffic between our availability zones and data encryption at rest.
You can find detailed information, specifications and pricing here, https://elastx.se/en/mssql-dbaas.
If you have any general questions or would like to sign-up please contact us at hello@elastx.se. Any technical questions please register a support ticket at https://support.elastx.se.
2024-04-12 ECP DBaaS Generally Available
We are happy to announce that the following services are now generally available (GA) in Elastx Cloud Platform (ECP).
- MySQL DBaaS
- MariaDB DBaaS
- PostgreSQL DBaaS
- Redis DBaaS
The ECP DataBase as a Service gives you a fully managed database with the possibility to run your database in a high availability and disaster protected environment.
It has been available as a public tech-preview since november 2023. A number of updates and features have been added during this period and the service has now reached a maturity level where we can offer this service to all customers.
You can find information, specifications and pricing here, https://elastx.se/en/database. Service documentation is available here, https://docs.elastx.cloud/docs/dbaas/.
If you have any general questions please contact us at hello@elastx.se and you can sign-up for the service here, https://elastx.se/en/signup. Any technical questions please register a support ticket at https://support.elastx.se.
4.2 - DBaaS Getting Started
CCX is a comprehensive data management and storage solution that offers a range of features including flexible node configurations, scalable storage options, secure networking, and robust monitoring tools. It supports various deployment types to cater to different scalability and redundancy needs, alongside comprehensive management functions for users, databases, nodes, and firewalls. The CCX project provides a versatile platform for efficient data handling, security, and operational management, making it suitable for a wide array of applications and workloads.
Deployment Solutions
Our deployment solutions offer customizable configurations for various node types, designed to support both dynamic and ephemeral storage requirements across multiple cloud environments. This includes comprehensive support for a wide range of cloud regions and instances, ensuring flexibility and scalability.
Database Support
Our platform is compatible with a diverse array of database types, including:
- MariaDB
- MySQL
- PostgreSQL
- Cache 22 (deprecated and will be removed in a future release. It is replaced with Valkey)
- Valkey
- Microsoft SQL Server
Node Configurations
We provide support for various node configurations to meet your database needs:
- Replica nodes for MariaDB, MySQL, PostgreSQL, Redis, and Microsoft SQL Server (Single server and Always-On)
- Galera clusters for MariaDB and MySQL
Monitoring and Management
Our platform features advanced monitoring capabilities, offering detailed performance analysis through extensive charts. It enables efficient management of nodes, including:
- Datastore scaling
- Volume scaling
- Promote replica to primary
- Node repair mechanisms
User and Database Administration
We offer sophisticated tools for managing database users and their permissions, ensuring secure access control.
Network Security
Our firewall configuration options are designed to enhance network security, providing robust protection for your data.
Event Logging
The event viewer tracks and displays a comprehensive history of operations performed on the datastore, enhancing transparency and accountability.
Backup and Recovery
Our backup solutions include:
- Incremental and full backup options for comprehensive data protection
- Point-in-time recovery capabilities
- Automated cloud backup uploads with customizable retention periods
- Restoration from separate volumes to optimize datastore space utilization
Customizable Settings
We offer customizable settings for various operational database parameters, allowing for tailored database management.
Account Management
Our platform facilitates user account creation and management, streamlining the login and registration process.
Billing and Payments
Our billing and payment processing tools are designed to simplify financial transactions, including the management of payments and invoices.
Feature Matrix
Each datastore has different features and are suitable for different use cases. Below is a feature matrix showing what operational feature is supported on each datastore:
| MySQL | MariaDb | PostgreSQL | Valkey/Cache22 | MS SQLServer (single server) |
MS SQLServer (Always-on, std license) |
|
|---|---|---|---|---|---|---|
| Scale nodes | Yes | Yes | Yes | Yes | No | No |
| Scale volume | Yes | Yes | Yes | Yes | Yes | Yes |
| Upgrade | Yes | Yes | Yes | Yes | Yes | Yes |
| Promote replica | Yes | Yes | Yes | Yes | Yes | Yes |
| Configuration management | Yes | Yes | Yes | Yes | No | No |
| Backup to S3 | Yes | Yes | Yes | Yes | Yes | Yes |
| Restore | Yes | Yes | Yes | Yes | Yes | Yes |
| PITR | Yes | Yes | Yes | No | No | No |
| User management† | Yes | Yes | Yes | Yes | Yes | Yes |
| Create databases | Yes | Yes | Yes | Yes | No | No |
| Query monitoring | Yes | Yes | Yes | Yes | No | Yes |
| Database growth (Capacity planning) |
Yes | Yes | Yes | Yes | No | Yes |
† : User management features and scope depends on the underlying datastore. There are datastore specific limitations.
4.3 - FAQ
Does CCX provide a High-availability feature
Yes
Can I change the database configuration?
This is a managed service.
Does CCX support multiple AZs.
CCX supports multiple AZs if the Cloud Provider does.
Can write only instances and read only replicas be created?
Yes, but the write-only instances is read-write. It allows both reads and writes.
Does support use a Proxy or Load Balancer (fora example, if there are 2 or more Read Replica instances, then Read can be load balanced across multiple instances).
DNS is used to facilitate this. However, the user can create his own loadbalancer (such as HAProxy or ProxySQL) and connect to the database service. A load balancer should be placed as close as possible to the user’s application. We recommend that the end-user manages the loadbalancer.
Are backups automatic?
Yes, backups are created automatically. The user can set the frequency.
Is there an auto-upgrade SQL version feature, for minor and major updates?
Only minor upgrades. Major upgrades are not supported in an online operation. See product documentation about upgrades (Life-cycle management)
Can it be backed up externally, for example dumping data?
Yes. See product documentation.
Can external data be restored, if yes, how?
See product documentation.
4.4 - Managed Service
CCX is provided as a managed service for your database engine in the cloud(s) you select. This document aims to outline the responsibilities of CCX and what rests with you, as the user.
CCX does:
- Deploy, secure and configure database engines onto virtual machines (VMs) in your chosen cloud
- Allow you to:
- Configure firewall rules for access
- Create new databases and users
- Configure replication for the chosen topology
- Ensure connectivity between nodes
- View metrics for each VM and the datastore
- View query statistics for your service
- Configure and set a backup schedule for your service
- Configure a maintenance window that allows CCX to perform maintenance and provide security patches
- Scale your service horizontally (up and down)
- Scale your storage vertically (up)
- Manage and monitor the database to ensure connectivity
The primary responsibility of CCX is to ensure that your datastore is running at all times, reacting to scenarios to ensure this is true. CCX does not access your data or control how you use the databases within your datastore.
In order to achieve this, CCX does not:
- Provide SSH or other ways to access the underlying infrastructure
- Allow superuser access to the managed services
- Allow the modification of settings that are not suitable for production use
- Allow the installation of untrusted extensions or code
If you do have specific requirements, such as:
- Temporary modification of configuration
- Feature requests for extensions or different versions of the databases
Please reach out to Support and we will work with you to find a solution.
4.5 - Overview
Elastx DBaaS automatically ensures your databases are reliable, secure, and scalable so that your business continues to run without disruption. It provides full compatibility with the source database engines while reducing operations costs by automating database provisioning and other time-consuming tasks.
Easy high availability and disaster protection by configuring replication, clusters and backups to protect your data. Backups and multi-node datastores are disaster protected as they are running over multiple availability zones which in our case are geographically separated data centers. Automatic failover makes your database highly available. Your data is encrypted at rest, and ISO 27001, 27017, 27018 as well as 14001 compliant.
A Datastore is a database instance with one or more nodes. In the Datastore you can have one or more databases. A datastore can be created with a single node, three nodes in a active/active cluster or a primary node with one or two read only replicas.
You can manage the Datastores with the web-UI. Authentication to the web-UI is done with the Elastx Identity Provider where MFA with TOTP or Yubikey is required. All datastores owned by the organization will be visible for all users with access to that organization.
To access the datastores you need database user credentials which you get and manage for each individual database. You also need to configure the Datastore firewall to allow access from specific IP addresses. The Connection assistant will help you to get the connection string for common programming languages.
In the web-UI you get graphs on key performance metrics on the database and the nodes that will help you to manage capacity and performance. You can scale the Datastore by adding or removing nodes and also to change the size of a node by replacing a node with a different flavor. Contact Elastx support if you need to increase the storage capacity and we will help you. Please note that ephemeral storage can’t be increased unless you change node flavor.
4.6 - Reference
4.6.1 - Datastore Statuses
When you deploy a Datastore, you will see a Status reported in the CCX Dashboard. This article outlines the statuses and what they mean.
| Status | Description | Action Required? |
|---|---|---|
| Deploying | Your Datastore is being configured and deployed into the Cloud you specified |
No |
| Available | Your Datastore is up and running with no reported issues |
No |
| Unreachable | Your Datastore might be running but CCX is not able to communicate directly with one or more Node(s). |
Verify you can access the Datastore and contact Support |
| Maintenance | Your Datastore is applying critical security updates during the specific maintenance window. |
No |
| Deleting | You have requested the deletion of your Datastore and it is currently being processed. |
No, unless this deletion was not requested by you or the Datastore has been in this state for more than 2 hours |
| Deleted | Your Datastore has been deleted. |
No |
| Failed | Your Datastore has failed, this can be a hardware or software fault |
Contact Support |
4.6.2 - Glossary
| Term | Definition | AKA | Area |
|---|---|---|---|
| Datastore | A deployment of a Database on CCX. A Datastore has a unique ID, it is essential to include this when contacting Support with issues or queries. |
Service | Deployment |
| Node | A Virtual Machine (VM) in a Cloud that makes up a Datastore. A Node consists of:- CPU - the number of cores - RAM - the amount (GB) of memory - Storage - the amount (GB/TB) of persistent storage |
Virtual Machine (VM) Node Server Instance |
Compute |
| Storage | The amount of persistent data for your Datastore.Storage comes in multiple different formats and not all are supported by all Clouds. There are cost and performance considerations when choosing the storage. |
Storage | |
| Volumes | The types of Storage available. Typically, this is measured in IOPS and the higher IOPS has increased performance with an increased cost per GB |
||
| Database | The engine deployed and configured for your Datastore. To see these options, check Supported Databases |
Database Management System (DBMS) | General |
| Virtual Private Cloud (VPC) | A private network configured that is unique to your account and ensures that any traffic between your Datastore does not go over the Public Internet |
Private Network | Networking |
| Cloud | An infrastructure provider where Datastores can be deployed |
Deployment | |
| Region | A geographic region with one or more Datacentres owned or operated by a Cloud. A Datastore is deployed into a single Region |
Deployment | |
| Availability Zone (AZ) | A Region can have one or more Availability Zones. More than one Availability Zones allows one Datacentre to go down without bringing down all of the Nodes in your Datastore.CCX will automatically attempt to deploy each Node in a Datastore into a different AZ (if the Region supports it) |
Deployment | |
| Replication | A method of exchanging data between two Nodes that ensures they stay in sync and allows one Node to fail without bringing your Datastore down |
Operations | |
| Primary / Replica | The recommended deployment for a Production Datastore with 2 or more Nodes, one acting as the Primary and the other(s) acting as the Replica |
Highly Available High Availability |
Operations |
| Multi-Primary | Multiple Nodes deployed with the same role, all of them acting as the Primary. This topology is not supported by all Databases |
Clustered | Operations |
| Status | The last known status of your Datastore. For details of the possible statuses, see here |
State | Operations |
| Maintenance | The application of critical security updates to your Datastore. These are applied in your Maintenance Window which can be configured per Datastore. |
Operations | |
| Monitoring | This is the metrics of the hardware and software for your Datastore. These can be accessed in the CCX Dashboard and can be shown per Node. For details of the metrics available, see here. |
Observability |
4.6.3 - Notifications
CCX notifies users by email in case of certain events. Recipients can be configured on the Datastore Settings page or in the Datastore wizard.
| Alert | Description | Action Required? |
|---|---|---|
| Cluster Upgrade | Cluster is being upgraded | No |
| Cluster Storage Resized | Cluster storage has been automatically resized from size to new_size. | No |
| HostAutoScaleDiskSpaceReached | The cluster is running out of storage and will be automatically scaled. | No |
4.6.4 - Observability
4.6.4.1 - Metrics
4.6.4.1.1 - Introduction
CCX uses Prometheus and exporters for monitoring. The monitoring data is exposed though the exports from each node. This is a controlled under the Firewall tab in the CCX UI.
4.6.4.1.2 - MySQL And MariaDB
- MySQL / MariaDB
- Handler Stats
- Statistics for the handler. Shown as:
- Read Rnd
- Count of requests to read a row based on a fixed position
- Read Rnd Next
- Count of requests to read a subsequent row in a data file
- Read Next
- Count of requests to read the next row in key order
- Read Last
- Count of requests to read the last key in an index
- Read Prev
- Count of requests to read the previous row in key order
- Read First
- Count of requests to read a row based on an index key value
- Read Key
- Count of requests to read the last key in an index
- Update
- Count of requests to update a row
- Write
- Count of requests to insert to a table
- Read Rnd
- Statistics for the handler. Shown as:
- Handler Transaction Stats
- Database Connections
- Count of connections to the database. Shown as:
- Thread Connected
- Count of clients connected to the database
- Max Connections
- Count of max connections allowed to the database
- Max Used Connections
- Maximum number of connections in use
- Aborted Clients
- Number of connections aborted due to client not closing
- Aborted Connects
- Number of failed connection attempts
- Connections
- Number of connection attempts
- Thread Connected
- Count of connections to the database. Shown as:
- Queries
- Count of queries executed
- Scan Operations
- Count of operations for the operations: SELECT, UPDATE and DELETE
- Table Locking
- Count of table locks. Shown as:
- Table locks immediate
- Count of table locks that could be granted immediately
- Table locks waited
- Count of locks that had to be waited due to existing locks or another reason
- Table locks immediate
- Count of table locks. Shown as:
- Temporary Tables
- Count of temporary tables created. Shown as:
- Temporary tables
- Count of temporary tables created
- Temporary tables on Disk
- Count of temporary tables created on disk rather than in memory
- Temporary tables
- Count of temporary tables created. Shown as:
- Sorting
- Aborted Connections
- Count of failed or aborted connections to the database. Shown as:
- Aborted Clients
- Number of connections aborted due to client not closing
- Aborted Connects
- Number of failed connection attempts
- Access Denied Errors
- Count of unsuccessful authentication attempts
- Aborted Clients
- Memory Utilisation
- Count of failed or aborted connections to the database. Shown as:
- Handler Stats
4.6.4.1.3 - PostgreSQL
- PostgreSQL
- SELECT (fetched)
- Count of rows fetched by queries to the database
- SELECT (returned)
- Count of rows returned by queries to the database
- INSERT
- Count of rows inserted to the database
- UPDATE
- Count of rows updated in the database
- DELETE
- Count of rows deleted in the database
- Active Sessions
- Count of currently running queries
- Idle Sessions
- Count of connections to the database that are not currently in use
- Idle Sessions in transaction
- Count of connections that have begun a transaction but not yet completed while not actively doing work
- Idle Sessions in transaction (aborted)
- Count of connections that have begun a transaction but did not complete and were forcefully aborted before they could complete
- Lock tables
- Active locks on the database
- Checkpoints requested and timed
- Count of checkpoints requested and scheduled
- Checkpoint sync time
- Time synchronising checkpoint files to disk
- Checkpoint write time
- Time to write checkpoints to disk
- SELECT (fetched)
4.6.4.1.4 - Redis
- Redis
- Blocked Clients
- Clients blocked while waiting on a command to execute
- Memory Used
- Amount of memory used by Redis (in bytes)
- Connected Clients
- Count of clients connected to Redis
- Redis commands per second
- Count of commands processed per second
- Total keys
- The total count of all keys stored by Redis
- Replica Lag
- The lag (in seconds) between the primary and the replica(s)
- Blocked Clients
4.6.4.1.5 - System
- System - Hardware level metrics for your Datastore
- Load Average
- The overall load on your Datastore within the preset period
- CPU Usage
- The breakdown of CPU utilisation for your Datastore, including both
SystemandUserprocesses
- The breakdown of CPU utilisation for your Datastore, including both
- RAM Usage
- The amount of RAM (in Gigabytes) used and available within the preset period
- Network Usage
- The amount of data (in Kilobits or Megabits per second) received and sent within the preset period
- Disk Usage
- The total amount of storage used (in Gigabytes) and what is available within the preset period
- Disk IO
- The input and output utilisation for your disk within the preset period
- Disk IOPS
- The number of read and write operations within the preset period
- Disk Throughput
- The amount of data (in Megabytes per second) that is being read from, or written to, the disk within the preset period
- Load Average
4.6.4.1.6 - Valkey
- Valkey
- Blocked Clients
- Clients blocked while waiting on a command to execute
- Memory Used
- Amount of memory used by Valkey (in bytes)
- Connected Clients
- Count of clients connected to Valkey
- Valkey commands per second
- Count of commands processed per second
- Total keys
- The total count of all keys stored by Valkey
- Replica Lag
- The lag (in seconds) between the primary and the replica(s)
- Blocked Clients
4.6.5 - Products
4.6.5.1 - MariaDb
4.6.5.1.1 - Backup
Mariabackup is used to create backups.
CCX backups the Primary server. In multi-primary setups the node with the highest wsrep_local_index is elected.
Backups are streamed directly to S3 staroge.
Mariabackup blocks DDL operations during the backup using the --lock-ddl flag.
Any attempt to CREATE, ALTER, DROP, TRUNCATE a table during backup creation will be locked with the status Waiting for backup lock (see SHOW FULL PROCESSLIST).
In this case, wait for the backup to finish and, perform the operation later.
Also see the section ‘Schedule’.
Schedule
The backup schedule can be tuned and backups can be paused
4.6.5.1.2 - Configuration
max_connections
- 75 connections / GB of RAM.
- Example: 4GB of RAM yields 300 connections.
- This setting cannot be changed as it affects system stability.
InnoDB settings
- These setting cannot be changed as it affects system stability.
innodb_buffer_pool_size
- 50% of RAM if total RAM is > 4GB
- 25% of RAM if total RAM is <= 4GB
innodb_log_file_size
- 1024 MB if innodb_buffer_pool_size >= 8192MB
- 512 MB if innodb_buffer_pool_size < 8192MB
innodb_buffer_pool_instances
- 8
InnoDB options
| variable_name | variable_value |
|---|---|
| innodb_buffer_pool_size | Depends on instance size |
| innodb_flush_log_at_trx_commit | 2 |
| innodb_file_per_table | 1 |
| innodb_data_file_path | Depends on instance |
| innodb_read_io_threads | 4 |
| innodb_write_io_threads | 4 |
| innodb_doublewrite | 1 |
| innodb_buffer_pool_instances | Depends on instance size |
| innodb_redo_log_capacity | 8G |
| innodb_thread_concurrency | 0 |
| innodb_flush_method | O_DIRECT |
| innodb_autoinc_lock_mode | 2 |
| innodb_stats_on_metadata | 0 |
| default_storage_engine | innodb |
General options
| variable_name | variable_value |
|---|---|
| tmp_table_size | 64M |
| max_heap_table_size | 64M |
| max_allowed_packet | 1G |
| sort_buffer_size | 256K |
| read_buffer_size | 256K |
| read_rnd_buffer_size | 512K |
| memlock | 0 |
| sysdate_is_now | 1 |
| max_connections | Depends on instance size |
| thread_cache_size | 512 |
| table_open_cache | 4000 |
| table_open_cache_instances | 16 |
| lower_case_table_names | 0 |
Storage
Recommended storage size
- We recommend a maximum of 100GB storage per GB of RAM.
- Example: 4GB of RAM yields 400GB of storage.
- The recommendation is not enforced by the CCX platform.
4.6.5.1.3 - Importing Data
This procedure describes how to import data to a MariaDB datastore located in CCX.
- The MariaDB Datastore on CCX is denoted as the ‘replica’
- The source of the data is denoted as the ‘source’
note:
If you do not want to setup replication, then you can chose to only apply the sections:
- Create a database dump file
- Apply the dumpfile on the replica
Limitations of MariaDB
MariaDB does not offer as fine grained control over privileges as MySQL. Nor does it have the same level of replication features.
The following properties must be respected in order to comply with the SLA:
- There must be no user management happening on the source, while the data is imported and the replication link is active. This is avoid corruption of the mysql database and possibly other system databases.
- It is recommended to set
binlog-ignore-dbon the source to ‘mysql, performance_schema, and sys’ during the data import/sync process.
Preparations
Ensure that the source is configured to act as a replication source.
- Binary logging is enabled.
server_idis set to non 0.
Also, prepare the replica with the databases you wish to replicate from the source to the master:
- Using the CCX UI, go to Databases, and issue a Create Database for each database that will be replicated.
Ensure the CCX Firewall is updated:
- Add the replication source as a Trusted Source in the Firewall section of the CCX UI.
Create a replication user on the source
Create a replication user with sufficient privileges on the source:
CREATE USER 'repluser'@'%' IDENTIFIED BY '<SECRET>';
GRANT REPLICATION SLAVE ON *.* TO 'repluser'@'%';
Prepare the replica to replicate from the source
The replica must be instrucuted to replicate from the source.
Make sure to change <SOURCE_IP>, <SOURCE_PORT>, and <SECRET>.
Run the following on the source:
CHANGE MASTER TO MASTER_HOST=<SOURCE_IP>, MASTER_PORT=<SOURCE_PORT>, MASTER_USER='repluser', MASTER_PASSWORD='<SECRET>', MASTER_SSL=1;
Create a database dump file of the source
The database dump contains the data that you wish to import into the replica. Only partial dumps are possible. The dump must not contains any mysql or other system databases.
danger: The dump must not contains any mysql or other system databases.
On the source, issue the following command. Change ADMIN, SECRET and DATABASES:
mysqldump -uADMIN -p<SECRET> --master-data --single-transaction --triggers --routines --events --databases DATABASES > dump.sql`
If your database dump contains SPROCs, triggers or events, then you must replace DEFINER. This may take a while:
sed 's/\sDEFINER=`[^`]*`@`[^`]*`//g' -i dump.sql
Apply the dumpfile on the replica
cat dump.sql | mysql -uccxadmin -p -h<REPLICA_PRIMARY>
Start the replica
On the replica do:
START SLAVE
followed by
SHOW SLAVE STATUS;
And verify that:
             Slave_IO_State: Waiting for source to send event
	     ..
  	     Slave_IO_Running: Yes
             Slave_SQL_Running: Yes
When the migration is ready
STOP SLAVE;
RESET SLAVE ALL;
Troubleshooting
If the replication fails to start then verify:
- All the steps above has been followed.
- Ensure that the replication source is added as a Trusted Source in the Firewall section of the CCX UI.
- Ensure that you have the correct IP/FQDN of the replication source.
- Ensure that users are created correctly and using the correct password.
- Ensure that the dump is fresh.
4.6.5.1.4 - Limitations
Every product has limitations. Here is a list MariaDB limitations:
Permissions
The privilege system is not as flexible as in MySQL.
The ‘ccxadmin’ user has the following privileges:
Global / all databases (.):
- CREATE USER, REPLICATION SLAVE, REPLICATION SLAVE ADMIN, SLAVE MONITOR
On databases created from CCX, the admin user can create new users and grant privileges:
- ALL PRIVILEGES WITH GRANT OPTION
This means that users can only create databases from the CCX UI. Once the database has been created from the CCX UI, then the ccxadmin user can create users and grant user privileges on the database using MariaDB CLI.
4.6.5.1.5 - Overview
CCX supports two types of MariaDB clustering:
- MariaDB Replication (Primary-replica configuration)x
- MariaDB Cluster (Multi-primary configuration)
For general purpose applications we recommend using MariaDB Replication, and we only recommend to use MariaDB Cluster if you are migrating from an existing application that uses MariaDB Cluster.
If you are new to MariaDB Cluster we stronly recommend to read about the MariaDB Cluster 10.x limitations and MariaDB Cluster Overview to understand if your application can benefit from MariaDB Cluster.
MariaDB Replication uses the standard asynchronous replication based on GTIDs.
Scaling
Storage and nodes can be scaled online.
Nodes (horizonal)
- The maximum number of database nodes in a datastore is 5.
- Multi-primary configuration must contain an odd number of nodes (1, 3 and 5).
Nodes (vertical)
A node cannot be scaled vertically currently. To scale to large instance type, then a larger instance must be added and then remove the unwanted smaller instances.
Storage
- Maximum size depends on the service provider and instance size
- Volume type cannot currently be changed
Further Reading
4.6.5.1.6 - Restore
There are two options to restore a backup:
- Restore a backup on the existing datastore
- Restore a backup on a new datastore
Please note that restoring a backup may be a long running process.
This option allows to restore a backup with point in time recovery. The WAL logs are replayed until the desired PITR.
Warning! Running several restores may change the timelines.
This option allows to restore a backup on a new datastore. This option does not currently support PITR.
4.6.5.1.7 - TLS Connection
SSL Modes
CCX currently supports connections to MariaDB in two SSL modes:
REQUIRED: This mode requires an SSL connection. If a client attempts to connect without SSL, the server rejects the connection.VERIFY_CA: This mode requires an SSL connection and the server must verify the client’s certificate against the CA certificates that it has.
CA Certificate
The Certificate Authority (CA) certificate required for VERIFY_CA mode can be downloaded from your datastore on CCX using an API call or through the user interface on page https://{your_ccx_domain}/projects/default/data-stores/{datastore_id}/settings.
This certificate is used for the VERIFY_CA SSL mode.
Example Commands
Here are example commands for connecting to the MySQL server using the two supported SSL modes:
-
REQUIREDmode:mysql --ssl-mode=REQUIRED -u username -p -h hostname -
VERIFY_CAmode:mysql --ssl-mode=VERIFY_CA --ssl-ca=ca.pem -u username -p -h hostname
require_secure_transport
This is a MariaDB setting that governs if connections to the datastore are required to use SSL. You can change this setting in CCX in Settings -> DB Parameters
| Scenario | Server Parameter Settings | Description |
|---|---|---|
| Disable SSL enforcement | require_secure_transport = OFF |
This is the default to support legacy applications. If your legacy application doesn’t support encrypted connections, you can disable enforcement of encrypted connections by setting require_secure_transport=OFF. However, connections are encrypted unless SSL is disabled on the client. See examples |
| Enforce SSL | require_secure_transport = ON |
This is the recommended configuratuion. |
Examples
ssl-mode=DISABLED and require_secure_transport=OFF
mysql -uccxadmin -p -h...  -P3306 ccxdb --ssl-mode=disabled
...
mysql> \s
--------------
...
Connection id:		52
Current database:	ccxdb
Current user:		ccxadmin@...
*SSL:			Not in use*
Current pager:		stdout
...
ssl-mode=PREFERRED and require_secure_transport=OFF
mysql -uccxadmin -p -h...  -P3306 ccxdb --ssl-mode=preferred
...
mysql> \s
--------------
...
Connection id:		52
Current database:	ccxdb
Current user:		ccxadmin@...
SSL:			Cipher in use is TLS_AES_256_GCM_SHA384
Current pager:		stdout
...
ssl-mode=DISABLED and require_secure_transport=ON
mysql -uccxadmin -p -h...  -P3306 ccxdb --ssl-mode=disabled
mysql: [Warning] Using a password on the command line interface can be insecure.
ERROR 3159 (08004): Connections using insecure transport are prohibited while --require_secure_transport=ON.
ssl-mode=PREFERRED|REQUIRED and require_secure_transport=ON
mysql -uccxadmin -p -h...  -P3306 ccxdb --ssl-mode=preferred|required
mysql> \s
--------------
...
Connection id:		52
Current database:	ccxdb
Current user:		ccxadmin@...
SSL:			Cipher in use is TLS_AES_256_GCM_SHA384
Current pager:		stdout
...
tls_version
The tls_version is set to the following by default:
| Variable_name | Value |
|---|---|
| tls_version | TLSv1.2,TLSv1.3 |
4.6.5.2 - MSSQLServer
4.6.5.2.1 - Configurations
Important default values
max_connections
- SQL Server has no direct “max connection per GB of RAM” rule. The actual number of user connections allowed depends on the version of SQL Server that you are using, and also the limits of your application(s), and hardware.
- SQL Server allows a maximum of 32,767 user connections.
- User connections is a dynamic (self-configuring) option, SQL Server adjusts the maximum number of user connections automatically as needed, up to the maximum value allowable.
- In most cases, you do not have to change the value for this option. The default is 0, which means that the maximum (32,767) user connections are allowed.
- To determine the maximum number of user connections that your system allows, you can execute
sp_configureor query thesys.configurationcatalog view. - For more info: https://learn.microsoft.com/en-us/sql/database-engine/configure-windows/configure-the-user-connections-server-configuration-option?view=sql-server-ver16&viewFallbackFrom=sql-server-ver16.
4.6.5.2.2 - Limitations
Every product has limitations. Below is a list of Microsoft SQL Server limitations:
License
- The standard license is applied.
Configurations
- Single node (no High Availability)
- Always On (2 nodes, asynchronous commit mode, High Availability)
Always On-specific limitations
- Refer to the Microsoft standard license for a complete list of limitations.
- Only asynchronous commit mode is currently supported.
- The
ccxdbis currently the only supported Always On enabled database. - Scaling is not supported as the standard license does not permit more than two nodes.
User-created databases (not Always On) are not transferred to the replica
- In the Always On configuration, only the
ccxdbis replicated. - Data loss may occur for other user-created databases, as they are not transferred to the replica during the add node process. Therefore, they may be lost if a failover, automatic repair, or any other life-cycle management event occurs.
4.6.5.2.3 - Overview
CCX supports two Microsoft SQLServer 2022 configurations:
- Single-node (No high-availability)
- Always-on, two nodes, async-commit mode (high-availability) in an primary-replica configuration.
The ‘standard’ license is applied.
Scaling
Scaling is not supported in SQLServer as of the standard license.
Storage
- Maximum size depends on the service provider and instance size
- Volume type cannot currently be changed
Further Reading
4.6.5.2.4 - User Management
CCX supports creating database users from the web interface.
The database user is created as follows:
CREATE LOGIN username WITH PASSWORD = 'SECRET',  DEFAULT_DATABASE=[master], CHECK_EXPIRATION=OFF,  CHECK_POLICY=OFF
ALTER SERVER ROLE [sysadmin] ADD MEMBER [username]
4.6.5.3 - MySQL
4.6.5.3.1 - Backup
Percona Xtrabackup is used to create backups.
CCX backups the Primary server. In multi-primary setups the node with the highest wsrep_local_index is elected.
Backups are streamed directly to S3 staroge.
Percona Xtrabackup blocks DDL operations during the backup using the --lock-ddl flag.
Any attempt to CREATE, ALTER, DROP, TRUNCATE a table during backup creation will be locked with the status Waiting for backup lock (see SHOW FULL PROCESSLIST).
In this case, wait for the backup to finish and, perform the operation later.
Also see the section ‘Schedule’.
Schedule
The backup schedule can be tuned and backups can be paused.
4.6.5.3.2 - Configuration
max_connections
- 75 connections / GB of RAM.
- Example: 4GB of RAM yields 300 connections.
- This setting cannot be changed as it affects system stability.
InnoDB settings
- These setting cannot be changed as it affects system stability.
innodb_buffer_pool_size
- 50% of RAM if total RAM is > 4GB
- 25% of RAM if total RAM is <= 4GB
innodb_log_file_size
- 1024 MB if innodb_buffer_pool_size >= 8192MB
- 512 MB if innodb_buffer_pool_size < 8192MB
innodb_buffer_pool_instances
- 8
InnoDB options
| variable_name | variable_value |
|---|---|
| innodb_buffer_pool_size | Depends on instance size |
| innodb_flush_log_at_trx_commit | 2 |
| innodb_file_per_table | 1 |
| innodb_data_file_path | Depends on instance size |
| innodb_read_io_threads | 4 |
| innodb_write_io_threads | 4 |
| innodb_doublewrite | 1 |
| innodb_buffer_pool_instances | Depends on instance size |
| innodb_redo_log_capacity | 8G |
| innodb_thread_concurrency | 0 |
| innodb_flush_method | O_DIRECT |
| innodb_autoinc_lock_mode | 2 |
| innodb_stats_on_metadata | 0 |
| default_storage_engine | innodb |
General options
| variable_name | variable_value |
|---|---|
| tmp_table_size | 64M |
| max_heap_table_size | 64M |
| max_allowed_packet | 1G |
| sort_buffer_size | 256K |
| read_buffer_size | 256K |
| read_rnd_buffer_size | 512K |
| memlock | 0 |
| sysdate_is_now | 1 |
| max_connections | Depends on instance size |
| thread_cache_size | 512 |
| table_open_cache | 4000 |
| table_open_cache_instances | 16 |
| lower_case_table_names | 0 |
Storage
Recommended storage size
- We recommend a maximum of 100GB storage per GB of RAM.
- Example: 4GB of RAM yields 400GB of storage.
- The recommendation is not enforced by the CCX platform.
4.6.5.3.3 - Importing Data
This procedure describes how to import data to a MySQL datastore located in CCX.
- The MySQL Datastore on CCX is denoted as the ‘replica’
- The source of the data is denoted as the ‘source’
note:
If you dont want to setup replication, then you can chose to only apply the sections:
- Create a database dump file
- Apply the dumpfile on the replica
Preparations
Ensure that the source is configured to act as a replication source:
- Binary logging is enabled.
server_idis set to non 0.
Ensure the CCX Firewall is updated:
- Add the replication source as a Trusted Source in the Firewall section of the CCX UI.
Create a replication user on the source
Create a replication user with sufficient privileges on the source:
CREATE USER 'repluser'@'%' IDENTIFIED BY '<SECRET>';
GRANT REPLICATION SLAVE ON *.* TO  'repluser'@'%';
Prepare the replica to replicate from the source
The replica must be instructed to replicate from the source:
Make sure to change <SOURCE_IP>, <SOURCE_PORT>, and <SECRET>.
CHANGE REPLICATION SOURCE TO SOURCE_HOST=<SOURCE_IP>, SOURCE_PORT=<SOURCE_PORT>, SOURCE_USER='repluser', SOURCE_PASSWORD='<SECRET>', SOURCE_SSL=1;
Create a replication filter on the replica
The replica filter prevents corruption of the datastore.
If the datastore’s system tables are corrupted using replication then the SLA is void and the datastore must be recreated.
CHANGE REPLICATION FILTER REPLICATE_IGNORE_DB=(mysql,sys, performance_schema);
Create a database dump file
The database dump contains the data that you wish to import into the replica. Only partial dumps are possible. The dump must not contains any mysql or other system databases.
On the source, issue the following command. Change USER, SECRET and DATABASES:
mysqldump --set-gtid-purged=OFF -uUSER -pSECRET --master-data --single-transaction --triggers --routines --events --databases DATABASES > dump.sql
Important! If your database dump contains SPROCs, triggers or events, then you must replace DEFINER:
sed 's/\sDEFINER=`[^`]*`@`[^`]*`//g' -i dump.sql
Apply the dumpfile on the replica
cat dump.sql | mysql -uccxadmin -p -h<REPLICA_PRIMARY>
Start the replica
On the replica do:
START REPLICA;
followed by
SHOW REPLICA STATUS;
And verify that:
             Replica_IO_State: Waiting for source to send event
	     ..
  	     Replica_IO_Running: Yes
             Replica_SQL_Running: Yes
When the migration is ready
STOP REPLICA;
RESET REPLICA ALL;
CHANGE REPLICATION FILTER REPLICATE_IGNORE_DB=();
Troubleshooting
If the replication fails to start then verify:
- All the steps above has been followed.
- Ensure that the replication source is added as a Trusted Source in the Firewall section of the CCX UI.
- Ensure that you have the correct IP/FQDN of the replication source.
- Ensure that users are created correctly and using the correct password.
- Ensure that the dump is fresh.
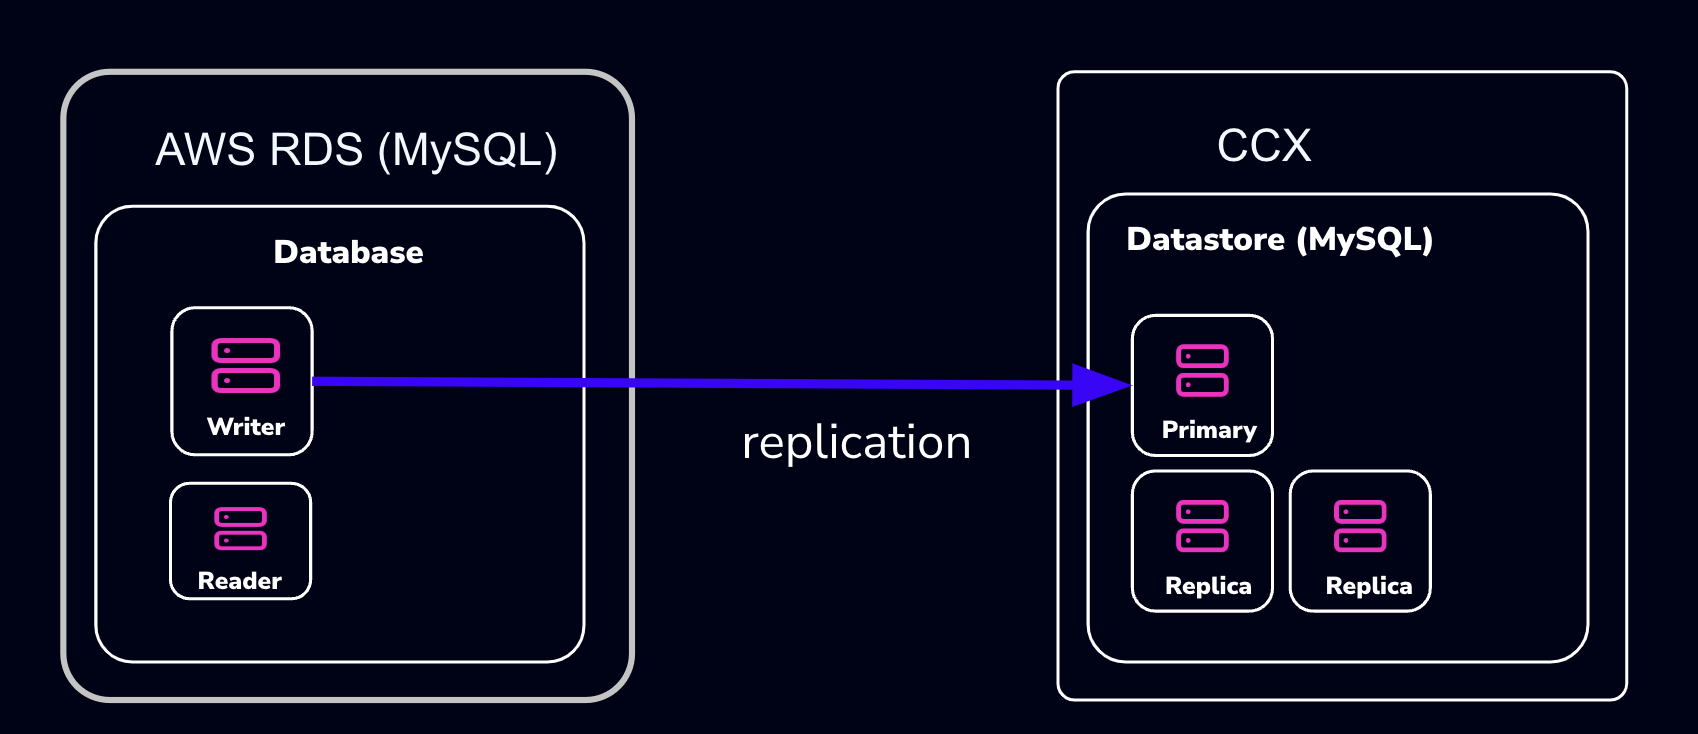
4.6.5.3.4 - Importing Data From AWS RDS
This procedure describes how to import data from Amazon RDS to a MySQL datastore located in CCX.
- The MySQL Datastore on CCX is referred to as the ‘CCX Primary’
- The RDS Source of the data is referred to as the ‘RDS Writer’
Schematically, this is what we will set up:
warning:
AWS RDS makes it intentionally difficult to migrate away from. Many procedures on the internet, as well as AWS’s own procedures, will not work.
The migration we suggest here (and is the only one we know works) requires that the RDS Writer instance be blocked for writes until a mysqldump has been completed. However, AWS RDS blocks operations such as
FLUSH TABLES WITH READ LOCK:mysqldump: Couldn't execute 'FLUSH TABLES WITH READ LOCK': Access denied for user 'admin'@'%' (using password: YES) (1045)Therefore, the actual applications must be blocked from writing.
Also, some procedures on the internet suggest creating a read-replica. This will not work either, as the AWS RDS Read-replica is crippled and lacks GTID support.
note:
If you don’t want to set up replication, you can choose to only apply the following sections:
- Create a database dump file of the RDS Writer
- Apply the dump file on the CCX replica
Also, practice this a few times before you actually do the migration.
Preparations
- Create a datastore on CCX. Note that you can also replicate from MySQL 8.0 to MySQL 8.4.
- Get the endpoint of the CCX Primary (under the Nodes section).
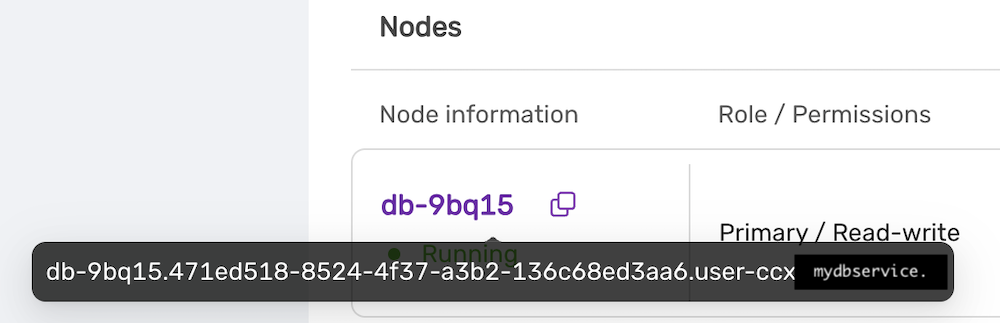 The endpoint in our case is
 db-9bq15.471ed518-8524-4f37-a3b2-136c68ed3aa6.user-ccx.mydbservice.net. - Get the endpoint of the RDS Writer. In this example, the endpoint is
database-1.cluster-cqc4xehkpymd.eu-north-1.rds.amazonaws.com - Update the Security group on AWS RDS to allow the IP address of the CCX Primary to connect. To get the IP address of the CCX Primary, run:
dig db-9bq15.471ed518-8524-4f37-a3b2-136c68ed3aa6.user-ccx.mydbservice.net - Ensure you can connect a MySQL client to both the CCX Primary and the RDS Writer.
Create a Replication User On the RDS Writer Instance
Create a replication user with sufficient privileges on the RDS Writer.
In the steps below, we will use repl and replpassword as the credentials when setting up the replica on CCX.
CREATE USER 'repl'@'%' IDENTIFIED BY 'replpassword';
GRANT REPLICATION SLAVE ON *.* TO  'repluser'@'%'; #mysql 8.0
GRANT REPLICATION REPLICATION_SLAVE_ADMIN ON *.* TO  'repluser'@'%';
Block Writes to the RDS Writer Instance
This is the most challenging part. You must ensure your applications cannot write to the Writer instance.
Unfortunately, AWS RDS blocks operations like FLUSH TABLES WITH READ LOCK.
Create a Consistent Dump
Assuming that writes are now blocked on the RDS Writer Instance, you must get the binary log file and the position of the RDS Writer instance.
Get the Replication Start Position
The start position (binary log file name and position) is used to tell the replica where to start replicating data from.
MySQL 8.0: SHOW MASTER STATUS\G
MySQL 8.4 and later: SHOW BINARY LOG STATUS\G
It will output:
 *************************** 1. row ***************************
             File: mysql-bin-changelog.000901
         Position: 584
     Binlog_Do_DB:
 Binlog_Ignore_DB:
Executed_Gtid_Set: 796aacf3-24ed-11f0-949d-0605a27ab4b9:1-876
1 row in set (0.02 sec)
Record the File: mysql-bin-changelog.000901 and the Position: 584 as they will be used to set up replication.
Create the mysqldump
Be sure to specify the database you wish to replicate. You must omit any system databases. In this example, we will dump the databases prod and crm.
mysqldump -uadmin -p -hdatabase-1.cluster-cqc4xehkpymd.eu-north-1.rds.amazonaws.com --databases prod crm --triggers --routines --events --set-gtid_purged=OFF --single-transaction > dump.sql
Wait for it to complete.
Unblock Writes to the RDS Writer Instance
At this stage, it is safe to enable application writes again.
Load the Dump On the Replica
Create a Replication Filter On the Replica
The replica filter prevents corruption of the datastore, and we are not interested in changes logged by AWS RDS to mysql.rds* tables anyway. Also add other databases that you do not wish to replicate to the filter.
note:
If the CCX datastore’s system tables are corrupted using replication, then the datastore must be recreated.
CHANGE REPLICATION FILTER REPLICATE_IGNORE_DB=(mysql, sys, performance_schema);
Important! If your database dump contains stored procedures, triggers, or events, then you must replace DEFINER:
sed 's/\sDEFINER=`[^`]*`@`[^`]*`//g' -i dump.sql
Apply the Dump File On the CCX Primary:
cat dump.sql | mysql -uccxadmin -p -hCCX_PRIMARY
Connect the CCX Primary to the RDS Writer Instance
The CCX Primary must be instructed to replicate from the RDS Writer. We have the binlog file and position from the earlier step:
- mysql-bin-changelog.000901
- 584
CHANGE REPLICATION SOURCE TO SOURCE_HOST='database-1.cluster-cqc4xehkpymd.eu-north-1.rds.amazonaws.com', SOURCE_PORT=3306, SOURCE_USER='repl', SOURCE_PASSWORD='replpassword', SOURCE_SSL=1, SOURCE_LOG_FILE='mysql-bin-changelog.000901', SOURCE_LOG_POS=584;
Start the Replica
On the replica, run:
START REPLICA;
followed by:
SHOW REPLICA STATUS;
And verify that:
             Replica_IO_State: Waiting for source to send event
	            ...
  	       Replica_IO_Running: Yes
          Replica_SQL_Running: Yes
When the Migration is Ready
At some point, you will need to point your applications to the new datastore. Ensure:
- Prevent writes to the RDS Writer
- Make sure the CCX Primary has applied all data (use
SHOW REPLICA STATUS) - Connect the applications to the new datastore
STOP REPLICA;
RESET REPLICA ALL;
CHANGE REPLICATION FILTER REPLICATE_IGNORE_DB=();
Troubleshooting
If the replication fails to start, verify:
- All the steps above have been followed
- Ensure that the IP address of the CCX Primary is added to the security group used by the RDS Writer instance
- Ensure that you have the correct IP/FQDN of the RDS Writer instance
- Ensure that users are created correctly and using the correct password
- Ensure that the dump is fresh
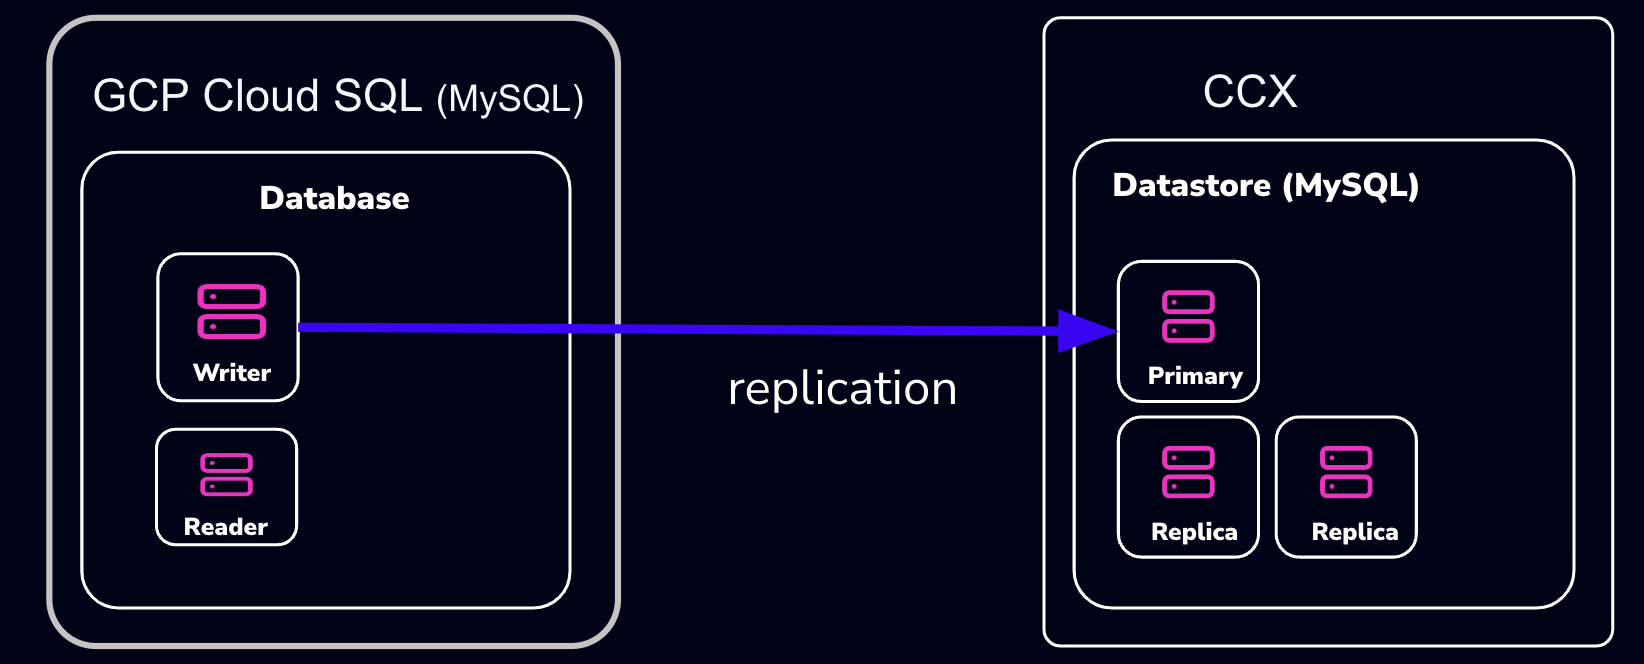
4.6.5.3.5 - Importing Data From GCP
This procedure describes how to import data from Google Cloud SQL to a MySQL datastore located in CCX.
- The MySQL Datastore on CCX is referred to as the ‘CCX Primary’
- The GCP Source of the data is referred to as the ‘GCP Primary’
Schematically, this is what we will set up:
note:
If you don’t want to set up replication, you can choose to only apply the following sections:
- Create a database dump file of the GCP Primary
- Apply the dump file on the CCX replica
Also, practice this a few times before you actually do the migration.
Preparations
- Create a datastore on CCX. Note that you can also replicate from MySQL 8.0 to MySQL 8.4.
- Get the endpoint of the CCX Primary (under the Nodes section). The endpoint in our case is
db-9bq15.471ed518-8524-4f37-a3b2-136c68ed3aa6.user-ccx.mydbservice.net. - The GCP Primary must have a Public IP.
- Get the endpoint of the GCP Primary. In this example, the endpoint is
34.51.xxx.xxx - Update the Security group on GCP to allow the IP address of the CCX Primary to connect. To get the IP address of the CCX Primary, run:
dig db-9bq15.471ed518-8524-4f37-a3b2-136c68ed3aa6.user-ccx.mydbservice.net - Ensure you can connect a MySQL client to both the CCX Primary and the GCP Primary.
Create a Replication User on the GCP Primary Instance
Create a replication user with sufficient privileges on the GCP Primary.
In the steps below, we will use repl and replpassword as the credentials when setting up the replica on CCX.
CREATE USER 'repl'@'%' IDENTIFIED BY 'replpassword';
GRANT REPLICATION SLAVE ON *.* TO  'repluser'@'%'; #mysql 8.0
GRANT REPLICATION REPLICATION_SLAVE_ADMIN ON *.* TO  'repluser'@'%';
Create the mysqldump
Be sure to specify the database you wish to replicate. You must omit any system databases. In this example, we will dump the databases prod and crm.
mysqldump -uroot -p -h34.51.xxx.xxx --databases prod crm --triggers --routines --events --set-gtid_purged=OFF --source-data --single-transaction > dump.sql
Wait for it to complete.
Load the Dump on the Replica
Create a Replication Filter on the Replica
The replica filter prevents corruption of the datastore, and we are not interested in changes logged by GCP to mysql.rds* tables anyway. Also add other databases that you do not wish to replicate to the filter.
note:
If the CCX datastore’s system tables are corrupted using replication, then the datastore must be recreated.
CHANGE REPLICATION FILTER REPLICATE_IGNORE_DB=(mysql, sys, performance_schema);
Important! If your database dump contains stored procedures, triggers, or events, then you must replace DEFINER:
sed 's/\sDEFINER=`[^`]*`@`[^`]*`//g' -i dump.sql
Apply the Dump File on the CCX Primary:
cat dump.sql | mysql -uccxadmin -p -hCCX_PRIMARY
Connect the CCX Primary to the GCP Primary
Issue the following commands on the CCX Primary:
CHANGE REPLICATION SOURCE TO SOURCE_HOST='34.51.xxx.xxx', SOURCE_PORT=3306, SOURCE_USER='repl', SOURCE_PASSWORD='replpassword', SOURCE_SSL=1;
Start the Replica
On the CCX Primary, run:
START REPLICA;
followed by:
SHOW REPLICA STATUS\G
And verify that:
             Replica_IO_State: Waiting for source to send event
	     ..
  	     Replica_IO_Running: Yes
             Replica_SQL_Running: Yes
When the Migration is Ready
At some point, you will need to point your applications to the new datastore. Ensure:
- There are no application writes to the GCP Primary
- The CCX Primary has applied all data (use
SHOW REPLICA STATUS \G, check theSeconds_Behind_Master) - Connect the applications to the new datastore
Then you can clean up the replication link on the CCX Primary:
STOP REPLICA;
RESET REPLICA ALL;
CHANGE REPLICATION FILTER REPLICATE_IGNORE_DB=();
Troubleshooting
If the replication fails to start, verify:
- All the steps above have been followed
- Ensure that the IP address of the CCX Primary is added to the security group used by the GCP Primary instance
- Ensure that you have the correct IP/FQDN of the GCP Primary instance
- Ensure that users are created correctly and using the correct password
- Ensure that the dump is fresh
4.6.5.3.6 - Limitations
Every product has limitations. Here is a list MySQL limitations:
Permissions
The privilege system in MySQL is offers more capabilties than MariaDB. Hence, the ‘ccxadmin’ user has more privileges in MySQL than in MariaDB.
The ‘ccxadmin’ user has the following privileges:
- Global / all databases (
*.*):- SELECT, INSERT, UPDATE, DELETE, CREATE, DROP, RELOAD, PROCESS, REFERENCES, INDEX, ALTER, SHOW DATABASES, CREATE TEMPORARY TABLES, LOCK TABLES, EXECUTE, REPLICATION SLAVE, REPLICATION CLIENT, CREATE VIEW, REPLICATION_SLAVE_ADMIN, SHOW VIEW, CREATE ROUTINE, ALTER ROUTINE, CREATE USER, EVENT, TRIGGER, GRANT
This means that the ‘ccxadmin’ may assign privileges to users on all databases.
Restrictions:
‘ccxadmin’ is not allowed to modify the following databases
mysql.*sys.*
For those database, the following privileges have been revoked from ‘ccxadmin’:
- INSERT, UPDATE, DELETE, CREATE, DROP, REFERENCES, INDEX, ALTER, CREATE TEMPORARY TABLES, LOCK TABLES, EXECUTE, CREATE VIEW, SHOW VIEW, CREATE ROUTINE, ALTER ROUTINE, EVENT, TRIGGER
4.6.5.3.7 - Overview
CCX supports two types of MySQL clustering:
- MySQL Replication (Primary-replica configuration)
- Percona XtraDb Cluster (Multi-primary configuration)
For general purpose applications we recommend using MySQL Replication, and we only recommend to use Percona XtraDb Cluster if you are migrating from an existing application that uses Percona XtraDb Cluster.
If you are new to Percona XtraDb Cluster we stronly recommend to read about the Percona XtraDb Cluster limitations and Percona XtraDb Cluster Overview to understand if your application can benefit from Percona XtraDb Cluster.
MySQL Replication uses the standard asynchronous replication based on GTIDs.
Scaling
Storage and nodes can be scaled online.
Nodes (horizonal)
- The maximum number of database nodes in a datastore is 5.
- Multi-primary configuration must contain an odd number of nodes (1, 3 and 5).
Nodes (vertical)
A node cannot be scaled vertically currently. To scale to large instance type, then a larger instance must be added and then remove the unwanted smaller instances.
Storage
- Maximum size depends on the service provider and instance size
- Volume type cannot currently be changed
Further Reading
4.6.5.3.8 - Restore
There are two options to restore a backup:
- Restore a backup on the existing datastore
- Restore a backup on a new datastore
Please note that restoring a backup may be a long running process.
This option allows to restore a backup with point in time recovery. The WAL logs are replayed until the desired PITR. Warning! Running several restores may change the timelines.
This option allows to restore a backup on a new datastore. This option does not currently support PITR.
4.6.5.3.9 - TLS Connection
SSL Modes
CCX currently supports connections to MySQL in two SSL modes:
-
REQUIRED: This mode requires an SSL connection. If a client attempts to connect without SSL, the server rejects the connection. -
VERIFY_CA: This mode requires an SSL connection and the server must verify the client’s certificate against the CA certificates that it has.
CA Certificate
The Certificate Authority (CA) certificate required for VERIFY_CA mode can be downloaded from your datastore on CCX using an API call or through the user interface on page https://{your_ccx_domain}/projects/default/data-stores/{datastore_id}/settings.
This certificate is used for the VERIFY_CA SSL mode.
Example Commands
Here are example commands for connecting to the MySQL server using the two supported SSL modes:
-
REQUIREDmode:mysql --ssl-mode=REQUIRED -u username -p -h hostname -
VERIFY_CAmode:mysql --ssl-mode=VERIFY_CA --ssl-ca=ca.pem -u username -p -h hostname
require_secure_transport
This is a MySQL setting that governs if connections to the datastore are required to use SSL. You can change this setting in CCX in Settings -> DB Parameters:
| Scenario | Server Parameter Settings | Description |
|---|---|---|
| Disable SSL enforcement | require_secure_transport = OFF |
This is the default to support legacy applications. If your legacy application doesn’t support encrypted connections, you can disable enforcement of encrypted connections by setting require_secure_transport=OFF. However, connections are encrypted unless SSL is disabled on the client. See examples |
| Enforce SSL | require_secure_transport = ON |
This is the recommended configuration. |
Examples
ssl-mode=DISABLED and require_secure_transport=OFF
mysql -uccxadmin -p -h...  -P3306 ccxdb --ssl-mode=disabled
...
mysql> \s
--------------
...
Connection id:		52
Current database:	ccxdb
Current user:		ccxadmin@...
*SSL:			Not in use*
Current pager:		stdout
...
ssl-mode=PREFERRED and require_secure_transport=OFF
mysql -uccxadmin -p -h...  -P3306 ccxdb --ssl-mode=preferred
...
mysql> \s
--------------
...
Connection id:		52
Current database:	ccxdb
Current user:		ccxadmin@...
SSL:			Cipher in use is TLS_AES_256_GCM_SHA384
Current pager:		stdout
...
ssl-mode=DISABLED and require_secure_transport=ON
mysql -uccxadmin -p -h...  -P3306 ccxdb --ssl-mode=disabled
mysql: [Warning] Using a password on the command line interface can be insecure.
ERROR 3159 (08004): Connections using insecure transport are prohibited while --require_secure_transport=ON.
ssl-mode=PREFERRED|REQUIRED and require_secure_transport=ON
mysql -uccxadmin -p -h...  -P3306 ccxdb --ssl-mode=preferred|required
mysql> \s
--------------
...
Connection id:		52
Current database:	ccxdb
Current user:		ccxadmin@...
SSL:			Cipher in use is TLS_AES_256_GCM_SHA384
Current pager:		stdout
...
tls_version
The tls_version is set to the following by default:
| Variable_name | Value |
|---|---|
| tls_version | TLSv1.2,TLSv1.3 |
4.6.5.3.10 - User Management
CCX supports creating database users from the web interface. The database user has the following privileges:
- Global / all databases (
*.*):- SELECT, INSERT, UPDATE, DELETE, CREATE, DROP, RELOAD, PROCESS, REFERENCES, INDEX, ALTER, SHOW DATABASES, CREATE TEMPORARY TABLES, LOCK TABLES, EXECUTE, REPLICATION SLAVE, REPLICATION CLIENT, CREATE VIEW, REPLICATION_SLAVE_ADMIN, SHOW VIEW, CREATE ROUTINE, ALTER ROUTINE, CREATE USER, EVENT, TRIGGER, GRANT
This means that the database user may assign privileges to users on all databases.
Restrictions:
The database user is not allowed to modify the following databases
mysql.*sys.*
For those database, the following privileges have been revoked from ‘ccxadmin’:
- INSERT, UPDATE, DELETE, CREATE, DROP, REFERENCES, INDEX, ALTER, CREATE TEMPORARY TABLES, LOCK TABLES, EXECUTE, CREATE VIEW, SHOW VIEW, CREATE ROUTINE, ALTER ROUTINE, EVENT, TRIGGER
4.6.5.4 - PostgreSQL
4.6.5.4.1 - Backup
Pg_basebackup is used to create backup. Also see the section ‘Schedule’.
CCX backups the Secondary server.
Backups are streamed directly to S3 staroge.
Schedule
The backup schedule can be tuned and backups can be paused
4.6.5.4.2 - Configuration
These settings cannot be changed as it affects system stability
Important default values
| Parameter | Default value |
|---|---|
| wal_keep_size | 1024 (v.1.50+) / 512 |
| max_wal_senders | min 16, max 4 x Db Node count |
| wal_level | replica |
| hot_standby | ON |
| max_connections | see below |
| shared_buffers | instance_memory x 0.25 |
| effective_cache_size | instance_memory x 0.75 |
| work_mem | instance_memory / max_connections |
| maintenance_work_mem | instance_memory/16 |
Max connections
The maximum number of connections depends on the instance size. The number of connections can be scaled by adding a new database secondary allowing of a larger instance size. The new replica can then be promoted to the new primary. See Promoting a replica for more information.
| Instance size (GiB RAM) | Max connections |
|---|---|
| < 4 | 100 |
| 8 | 200 |
| 16 | 400 |
| 32 | 800 |
| 64+ | 1000 |
Archive mode
All nodes are configured with archive_mode=always.
Auto-vacuum
Auto-vacuum settings are set to default. Please read more about automatic vaccuming here
4.6.5.4.3 - Extensions
Supported extentions
| Extension | Postgres version |
|---|---|
| vector (pgvector) | 15 and later |
| postgis | 15 and later |
Creating an extension
Connect to PostgreSQL using an admin account (e.g ccxadmin).
CREATE EXTENSION vector;
CREATE EXTENSION
See Postgres documentation for more information.
4.6.5.4.4 - Importing Data
This procedure describes how to import data to a PostgreSQL datastore located in CCX.
- The PostgreSQL Datastore on CCX is denoted as the ‘replica’
- The source of the data is denoted as the ‘source’
Create a database dump file
Dump the database schema from the <DATABASE> you wish to replicate:
pg_dump --no-owner -d<DATABASE> > /tmp/DATABASE.sql
Apply the dumpfile on the replica
postgres=# CREATE DATABASE <DATABASE>;
Copy the DSN from Nodes, Connection Information in the CCX UI.
Change ‘ccxdb’ to <DATABASE>:
psql postgres://ccxadmin:.../<DATABASE> < /tmp/DATABASE.sql
4.6.5.4.5 - Limitations
Every product has limitations. Here is a list PostgreSQL limitations:
Permissions
PostgreSQL users are created with the following permissions:
- NOSUPERUSER, CREATEROLE, LOGIN, CREATEDB
4.6.5.4.6 - Restore
Postgres configures archive_command and archive_mode=always.
Morever, during the restore the restore_command is set.
There are two options to restore a backup:
- Restore a backup on the existing datastore
- Restore a backup on a new datastore
Please note that restoring a backup may be a long running process.
This option allows to restore a backup with point in time recovery. The WAL logs are replayed until the desired PITR. Warning! Running several restores may change the timelines.
This option allows to restore a backup on a new datastore. This option does not currently support PITR.
4.6.5.5 - Redis
4.6.5.5.1 - Backup
A backup of Redis consists of both RDB and AOF.
Schedule
The backup schedule can be tuned and backups can be paused
4.6.5.5.2 - Configuration
Volume size
Since Redis is an in-memory database, the storage size is fixed and twice the amount of the RAM. Thus, it is not possible to:
- specify the storage size in the deployment wizard.
- scale the storage.
Persistance
Redis is configured to use both AOF and RDB for persistance. The following configuration parameters are set:
- appendonly yes
- default values for AOF
- default values for RDB
4.6.5.5.3 - User Management
CCX simplifies Redis user management by providing a clear and intuitive user interface for managing privileges and accounts. Below are detailed instructions and explanations for managing Redis users within the CCX environment.
Viewing Existing Users
To view existing Redis users:
- Navigate to the Users section in your CCX Redis cluster.
- Here you’ll see a list of existing user accounts along with their associated privileges.
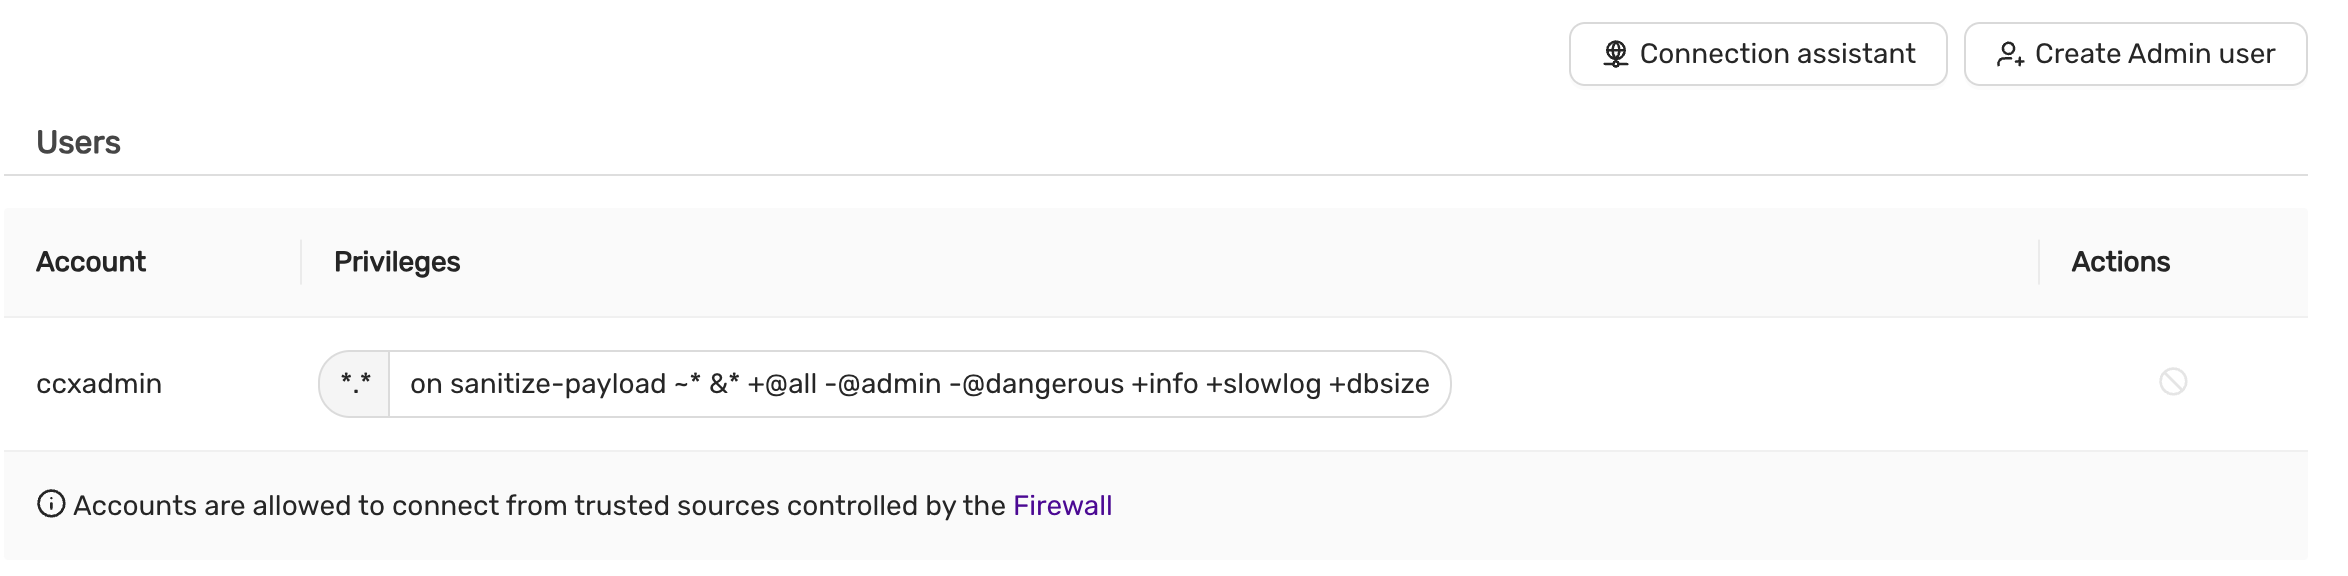
User Information Displayed:
- Account: Username of the Redis user.
- Privileges: Specific privileges granted or filtered out.
- Actions: Options to manage (modify/delete) the user.
Note: By default, the
-@adminand-@dangerousprivileges are filtered out for security purposes.
Creating a New Redis Admin User
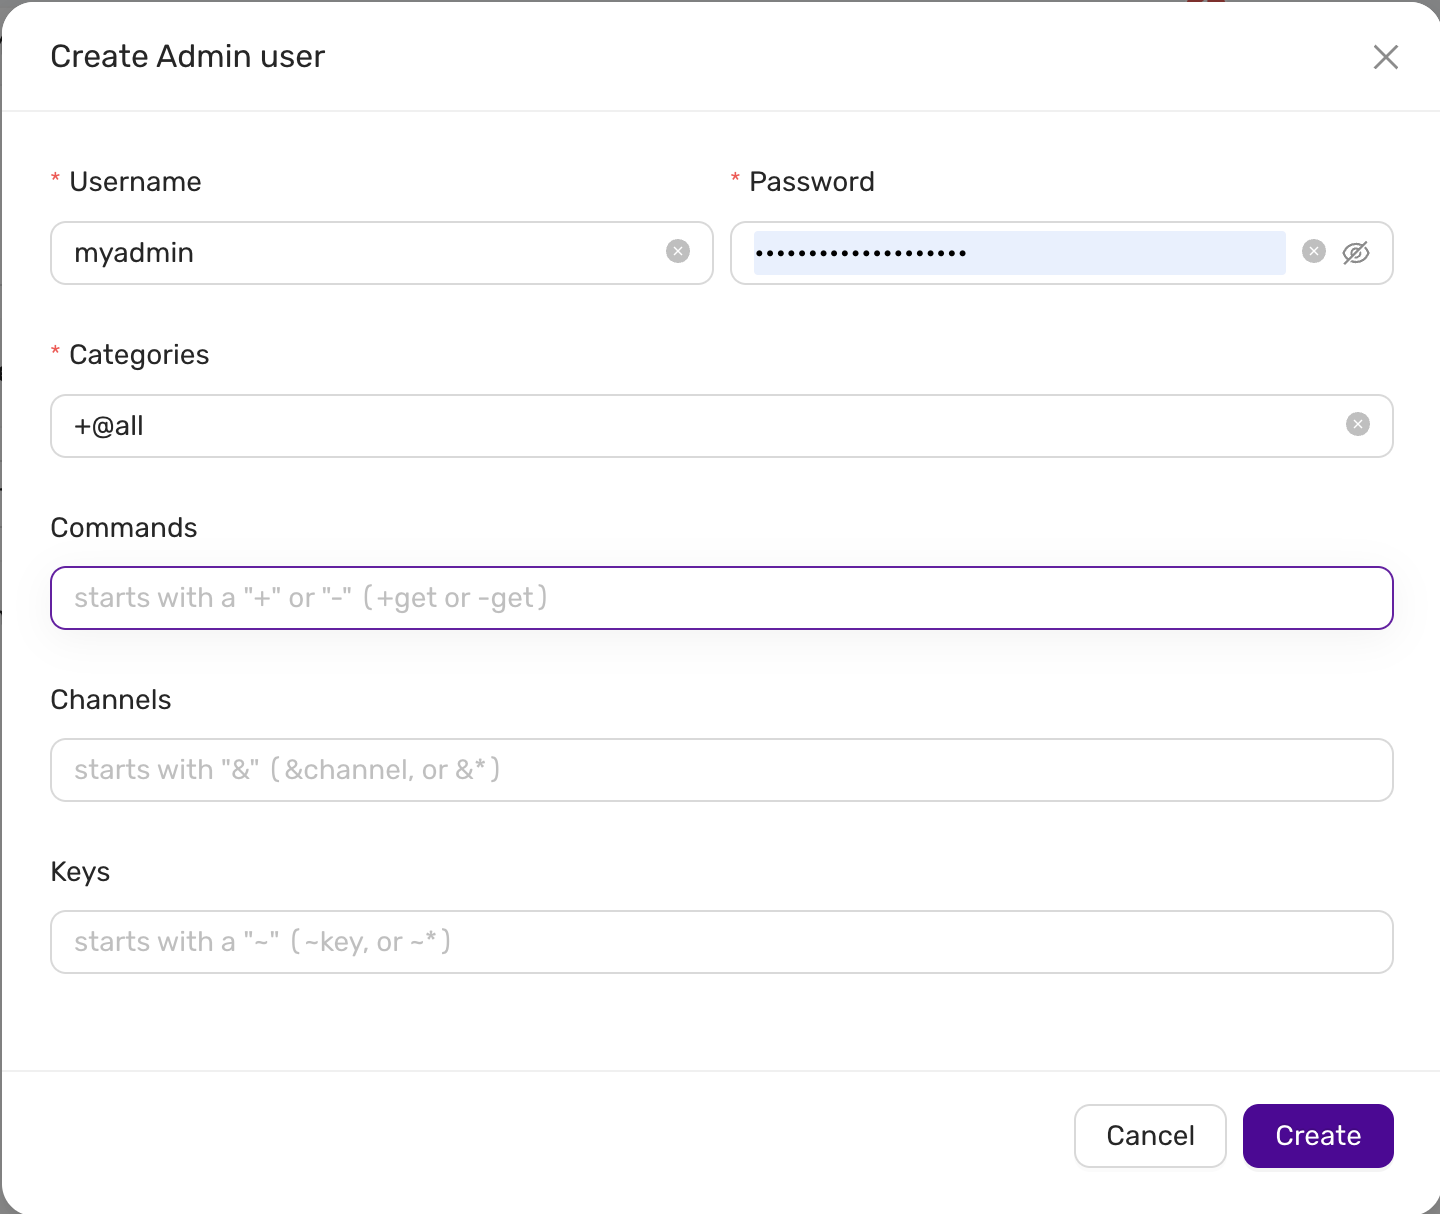
To create a new Redis admin user:
-
Click on the Create Admin user button.
-
Fill in the required fields:
- Username: Enter the desired username.
- Password: Enter a secure password for the user.
- Categories: Enter the privilege categories. By default, using
+@allwill grant all privileges except those explicitly filtered (like-@adminand-@dangerous).
-
Optionally, you can define more granular restrictions:
-
Commands: Enter commands to explicitly allow (
+) or disallow (-). For example:- Allow command:
+get - Disallow command:
-get
- Allow command:
-
Channels: Specify Redis Pub/Sub channels. You can allow (
&channel) or disallow (-&channel). -
Keys: Specify key access patterns. Use the syntax
~keyto allow or~-keyto disallow access to specific keys or patterns.
-
-
After completing the form, click on the Create button to save the new user.
Default Privilege Filtering
CCX ensures the security of your Redis instance by automatically filtering potentially harmful privileges:
-@admin: Restricts administrative commands.-@dangerous: Restricts commands that could compromise the cluster’s stability.
These privileges cannot be granted through CCX’s standard user interface for security reasons.
Firewall and Access Control
User accounts in CCX Redis clusters are protected by built-in firewall rules:
- Accounts are only allowed to connect from trusted sources defined in the firewall settings.
Ensure your firewall rules are properly configured to maintain secure access control to your Redis users.
4.6.5.6 - Valkey
4.6.5.6.1 - Backup
A backup of Valkey consists of both RDB and AOF.
Schedule
The backup schedule can be tuned and backups can be paused
4.6.5.6.2 - Configuration
Volume size
Since Valkey is an in-memory database, the storage size is fixed and twice the amount of the RAM. Thus, it is not possible to:
- specify the storage size in the deployment wizard.
- scale the storage.
Persistance
Redis is configured to use both AOF and RDB for persistance. The following configuration parameters are set:
- appendonly yes
- default values for AOF
- default values for RDB
4.6.5.6.3 - User Management
CCX simplifies Valkey user management by providing a clear and intuitive user interface for managing privileges and accounts. Below are detailed instructions and explanations for managing Valkey users within the CCX environment.
Viewing Existing Users
To view existing Valkey users:
- Navigate to the Users section in your CCX Valkey cluster.
- Here you’ll see a list of existing user accounts along with their associated privileges.
User Information Displayed:
- Account: Username of the Valkey user.
- Privileges: Specific privileges granted or filtered out.
- Actions: Options to manage (modify/delete) the user.
Note: By default, the
-@adminand-@dangerousprivileges are filtered out for security purposes.
Creating a New Valkey Admin User
To create a new Valkey admin user:
-
Click on the Create Admin user button.
-
Fill in the required fields:
- Username: Enter the desired username.
- Password: Enter a secure password for the user.
- Categories: Enter the privilege categories. By default, using
+@allwill grant all privileges except those explicitly filtered (like-@adminand-@dangerous).
-
Optionally, you can define more granular restrictions:
-
Commands: Enter commands to explicitly allow (
+) or disallow (-). For example:- Allow command:
+get - Disallow command:
-get
- Allow command:
-
Channels: Specify Valkey Pub/Sub channels. You can allow (
&channel) or disallow (-&channel). -
Keys: Specify key access patterns. Use the syntax
~keyto allow or~-keyto disallow access to specific keys or patterns.
-
-
After completing the form, click on the Create button to save the new user.
Default Privilege Filtering
CCX ensures the security of your Valkey instance by automatically filtering potentially harmful privileges:
-@admin: Restricts administrative commands.-@dangerous: Restricts commands that could compromise the cluster’s stability.
These privileges cannot be granted through CCX’s standard user interface for security reasons.
Firewall and Access Control
User accounts in CCX Valkey clusters are protected by built-in firewall rules:
- Accounts are only allowed to connect from trusted sources defined in the firewall settings.
Ensure your firewall rules are properly configured to maintain secure access control to your Valkey users.
4.6.6 - Supported Databases
| Database | Topology | CCX Supported | EOL | Notes |
|---|---|---|---|---|
| MariaDB | Primary/Replica Multi-Primary |
10.11 | 16 Feb 2028 | |
| Primary/Replica Multi-Primary |
11.4 | 29 May 2029 | ||
| MySQL | Primary/Replica Multi-Primary |
8.0 | April, 2026 | |
| Primary/Replica Multi-Primary |
8.4 | 30 Apr 2029 | ||
| PostgreSQL | Primary/Replica | 14 | 12 Nov 2026 | |
| Primary/Replica | 15 | 11 Nov 2027 | ||
| Primary/Replica | 16 | 8 Nov 2028 | ||
| Redis | Sentinel | 7.2 | deprecated | |
| Valkey | Sentinel | 8 | tbd | |
| Microsoft SQL Server for Linux | Single Instance | 2022 | 2027? | |
| Primary/Replica (always on) | 2022 | 2027? |
4.7 - Changelog
V 1.55
Overview
Changes has been introduced in user onboarding flow. Important security fixes has been deployed.
Changes
- Change in user onboarding flow.
Important fixes
- Fixed CMON config invalid save.
- Single server MSSQL datastore creation fails unless 1 node is manually chosen.
- UI fix for create datastore from backup when changing node configuration.
- Backend using 8.0.6 Valkey resolving security issues (CVE-2025-49844).
V 1.54
Overview
Support for new PostgreSQL and MariaDB versions. Added more Valkey modules.
Changes
- PostgreSQL 17.
- MariaDB 11.8 including MariaDB Vector.
- Improved instance selection.
- Added valkey-search and valkey-json.
Important fixes
- Fixed missing add/extend storage option for MSSQL.
- Fixed issue with PostgreSQL 17 unable to set DB parameters.
- Corrected disk utilization charts (sum vs. max).
V 1.53
Overview
Valkey is now replacing Redis as option for creating new datastores. The monitoring charts have been improved and refreshed.
Changes
- Improved backup handling.
- Customer log UI improvements.
- Terraform functionality extensions.
Important fixes
- Fixed problem with DB parameter acceptance and group synchronisation.
- Corrected a problem with incorrect volume type for expanded volumes.
- Improved datastore status transitions during upgrades.
V 1.51
Overview
A new way to group custom database parameters is introduced. This allows to apply the group to multiple datastores in a more structured way. Autoscaling of volumes has been improved where the actual scaling is less intrusive than it was in 1.50. Added a SUPERUSER checkbox when creating a new PostgreSQL user, with caution prompts.
Changes
- Parameter Groups for Database Management.
- Database Logs in Events Viewer.
- Create Datastore from incremental backup from different storage types.
- Reboot database node.
- Make Postgres SUPERUSER configurable.
Important fixes
- Deployments stuck in deploying status forever
- Corrected state transitions so a failed deployment eventually marks as “failed” instead of hanging.
- Reduced unnecessary Service updates, lowering API calls to Kubernetes.
- Set correct interval to 15/30/60 minutes for incremental backups.
- Disabled volume-editing for ephemeral storage as it was never intended.
V 1.50
Overview
This release offers upward volume autoscaling, new customer database parameters, improved monitoring in terms of mail notifications and more metrics. It is now possible to create (m)TLS-based sessions where the client can prefetch server certificates. The backup management has been improved disalloving concurrent backup race conditions.
Changes
- Auto-scale volumes, enabled by default.
- Send email notifications to end user.
- (m)TLS for Mysql/MariaDB, Postgres and Redis.
- Do all DNS queries through ExternalDNS.
- The Terraform provider has been substantially improved.
Important fixes
- Fixed a problem where multiple concurrent backups were executed.
- There was a problem in removing datastores stuck in creation or modifying state.
- Redis and MSSQL backup restore was not working properly.
- Optimized failover time for Always on.
V 1.48
Overview
In this release we introduce MSSQL, the new Openstack V2 instance flavors and volume types giving even better performance and price efficiency.
Changes
- MSSQL in Standalone and Always On versions.
- Lifecycle management, database upgrades.
- Improved automatic datastore failover handling.
- Change existing datastore volume type and size.
- Account password management.
- Choose new V2 node flavors with improved performance.
- Mobile UI.
- Datastore UI overview page paging and filtering.
- Terraform provider upgrade allowing automated datastore and firewall management.
- Improved documentation with more practical examples for, among other, external backup/restore and Terraform provider usage, and much more.
Important fixes
- Fixed a problem where DNS name for datatore nodes occasionally disappeared.
- Fixed Postgres creation and restore who occasionally could fail.
- Corrected a problem where datastore creation from backup failed.
V 1.47
Overview
The release focus on datastore failure handling, e.g. when nodes are lost and how the failover is managed. It introduces improved general database life cycle management and initial backend support for MSSQL Server 2022.
Changes
- Automatatic datastore failure handling.
- Datastore creation from backups.
- Improved datastore upgrade process.
- Expose monitoring ports for customer prometheus clients.
- Repair and node scaling for MSSQL.
- UI view filtering and list presentation.
- Improved UI guidance tool tips.
- Terraform API for grouped firewall rules.
Important fixes
- Corrected a problem where promotion of new MSSQL primary led to endless loops.
- Fixed problem where DNS records for datastore nodes could sometime disappear after upgrades.
- Corrected a problem with inconsistent logging and presentation of changed cluster and node status.
V 1.46
Overview
This release introduces configuration management and simplified service access. Initial support for life cycle management is introduced.
Changes
- Access to services/failover. This provides the user with a single entrypoint to the datastore.
- Configuration Management. Ability to let the end-user tune certain configuration values.
- Lifecycle Management. Ability to upgrade datastores (OS and database software) using a roll-forward upgrade method.
- Improved customer error interaction for handling nodes.
Important fixes
- Corrected a bug that caused the control plane process to restart occasionally.
4.8 - DBaaS Guides
4.8.1 - Backup and Restore via CLI
Overview
This guide will help you getting started with creating and restoring your own backups using various database CLI tools.
For the built-in backup functionality, please see here.
PostgreSQL
Backup
The client we are using in this guide is pg_dump which is included in the PostgreSQL client package. It is recommended to use the same client version as your server version.
The basic syntax and an example to dump a PostgreSQL database with the official tool pg_dump is shown below.
To connect and authenticate with a remote host you can either specify this information either with options, environment variables or a password file.
Usage & example
pg_dump [OPTION]... [DBNAME]
  -h, --host=HOSTNAME      database server host or socket directory (default: "local socket")
  -p, --port=PORT          database server port (default: "5432")
  -U, --username=USERNAME  database user name (default: "$USER")
  -f, --file=FILENAME      output file or directory name
  -d, --dbname=DBNAME      database to dump
pg_dump -h mydatabaseserver -U mydatabaseuser -f dump.sql -d mydatabase
Environment variables
As mentioned, we can also specify the options, connection and authentication information via environment variables, by default the client checks if the below environment variables are set.
For a full list, check out the documentation under PostgreSQL Documentation.
PGDATABASE
PGHOST
PGOPTIONS
PGPORT
PGUSER
It is not recommended to specify the password via the above methods, and thus not listed here. For the password it is better to use a so called password file. By default the client checks the user’s home directory for a file named
.pgpass. Read more about the password file by going to the official documentation linked under PostgreSQL Documentation.
Restore
To restore a database we will use the client psql which is also included in the PostgreSQL client package. It is recommended to use the same client version as your server version.
Usage & example
psql [OPTION]... [DBNAME [USERNAME]]
  -h, --host=HOSTNAME      database server host or socket directory (default: "local socket")
  -p, --port=PORT          database server port (default: "5432")
  -U, --username=USERNAME  database user name (default: "$USER")
  -f, --file=FILENAME      execute commands from file, then exit
  -d, --dbname=DBNAME      database name to connect to
psql -h mydatabaseserver -U mydatabaseuser -f dump.sql -d mydatabase
PostgreSQL Documentation
- PostgreSQL 11/14 - pgdump
- PostgreSQL 11/14 - The Password file
- PostgreSQL 11/14 - Environment variables
- PostgreSQL 11/14 - SQL Dump
MariaDB
Backup
The client we are using in this guide is mariadb-dump which is included in the MariaDB client package.
The basic syntax and an example to dump a MariaDB database with the official tool mariadb-dump is shown below together with some of the options we will use.
Usage & example
mariadb-dump [OPTIONS] database [tables]
OR     mariadb-dump [OPTIONS] --databases DB1 [DB2 DB3...]
-h, --host=name       Connect to host.
-B, --databases       Dump several databases...
-q, --quick           Don't buffer query, dump directly to stdout.
--single-transaction  Creates a consistent snapshot by dumping all tables
                      in a single transaction...
--skip-lock-tables    Disable the default setting to lock tables
For a full list of options, check out the documentation under MariaDB Documentation.
Depending on your specific needs and the scope of the backup you might need to use the pre-created database user. This is because any subsequent users created in the portal are set up with permissions to a specific database while the pre-existing admin user have more global permissions that are needed for some of the dump options.
mariadb-dump -h mydatabaseserver -B mydatabase --quick --single-transaction --skip-lock-tables > dump.sql
It is not recommended to specify the password via the command line. Consider using an option file instead, by default the client checks the user’s home directory for a file named
.my.cnf. You can read more about option files in the official documentation linked under MariaDB Documentation.
Restore
To restore the database from the dump file we will use the tool mariadb that is also included in the MariaDB client package.
Usage & example
mariadb [OPTIONS] [database]
-h, --host=name     Connect to host
mariadb -h mydatabaseserver mydatabase < dump.sql
MariaDB Documentation
- MariaDB mariadb-dump tool
- MariaDB Option Files
- MariaDB Backup and Restore Overview
MySQL
Backup
The client we are using in this guide is mysqldump which is included in the MySQL client package.
The basic syntax and an example to dump a MySQL database with the official tool mysqldump is shown below together with some of the options we will use.
Usage & example
mysqldump [OPTIONS] database [tables]
OR     mysqldump [OPTIONS] --databases DB1 [DB2 DB3...]
-h, --host=name       Connect to host.
-B, --databases       Dump several databases...
-q, --quick           Don't buffer query, dump directly to stdout.
--single-transaction  Creates a consistent snapshot by dumping all tables
                      in a single transaction...
--skip-lock-tables    Disable the default setting to lock tables
--no-tablespaces      Do not write any CREATE LOGFILE GROUP or
                      CREATE TABLESPACE statements in output
For a full list of options, check out the documentation under MySQL Documentation.
Depending on your specific needs and the scope of the backup you might need to use the pre-created database user. This is because any subsequent users created in the portal are set up with permissions to a specific database while the pre-existing admin user have more global permissions that are needed for some of the dump options.
mysqldump -h mydatabaseserver -B mydatabase --quick --single-transaction --skip-lock-tables --no-tablespaces > dump.sql`
It is not recommended to specify the password via the command line. Consider using an option file instead, by default the client checks the user’s home directory for a file named
.my.cnf. You can read more about option files in the official documentation linked under MySQL Documentation.
Restore
To restore the database from the dump file we will use the tool mysql that is also included in the MySQL client package.
Usage & example
mysql [OPTIONS] [database]
-h, --host=name     Connect to host
mysql -h mydatabaseserver mydatabase < dump.sql
MySQL Documentation
- MySQL mysqldump tool
- MySQL Option Files
- MySQL Backup and Recovery
4.8.2 - Backup and Restore via DBaaS UI
Overview
All our supported database types comes with built-in backup functionality and is enabled by default. Backups are stored in our object storage, which is encrypted at rest and also utilizes all of our availability zones for highest availability. You can easily set the amount of backups per day, the prefered time of day and the retention period in our DBaaS UI. For MySQL, MariaDB and PostgreSQL we also support creating new datastores from backup, making it easy to create a new database cluster using another cluster as a base.
For backup pricing, you can use our DBaaS price calculator found here: ECP-DBaaS
Good to know
Beaware: Please note that if you delete a datastore, all backups for that datastore will also be deleted. This action cannot be reverted.
- Backups are taken for the whole datastore.
- Maximum backup retention period is 90 days. Default value is 7 days.
- There’s no storage quota for backups.
- Incremental backups are supported and enabled by default on MySQL and MariaDB.
- Backups cannot be downloaded locally. To create an offsite backup, you can use one of the CLI-tools. See here for some examples.
- Creating new datastores from previously taken backups is supported for MySQL, MariaDB and PostgreSQL.
Manage backups
Begin by logging into your Elastx DBaaS account, choose your datastore and go to Backups.
Under this tab you will see all the previously taken backups for the chosen datastore, if you just created this datastore, it might be empty.
Retention Period
To change retention period click on Backup settings at the top right corner, set your prefered retention period and click Save.
Backup schedules
For datastores running MySQL and MariaDB you have the ability to set schedules for both full and incremental backups.
To change how often and when your backups should run, click on Backup Schedules in the left corner.
Select the backup type you want to change and choose edit:
- Incremental backups can be set to run every 15, 30 and 60 minutes.
- Full backups can be set to run hourly or daily. Set your prefered time in UTC.
Restore backup on your running datastore
Beaware: Please note that this process will completely overwrite your current data and all changes since your last backup will be lost.
Go to the Backups tab for the datastore you want to restore. Select the prefered backup and click on the three dots under Actions and choose restore.
Create a new datastore from backup
For MySQL, MariaDB and PostgreSQL you have the ability to use a backup as a base for a new datastore.
Go to backups and click on the three dots under actions for the backup you want to use as a base and select Create Datastore.
A new datastore will be created with the same specification and name (with extension _Copy) as the base datastore.
When it’s finished, you can rename your new datastore by going to Settings > Datastore name.
Disable backups
Beaware: Not recommended. Please note that if you disable full backups, no backups will be taken after this point until you manually enable it again.
Go to the backups tab for the datastore you want to pause backups. Select Backup Schedules, click on the three dots for type of backup you want to disable and choose pause. To re-enable backups again, take the same steps and choose enable.
4.8.3 - Config Management
note: Deprecated in v1.51 in favor of parameter groups Please see to Parameter Groups
In CCX, you have the ability to fine-tune your database performance by adjusting various DB Parameters. These parameters control the behavior of the database server and can impact performance, resource usage, and compatibility.
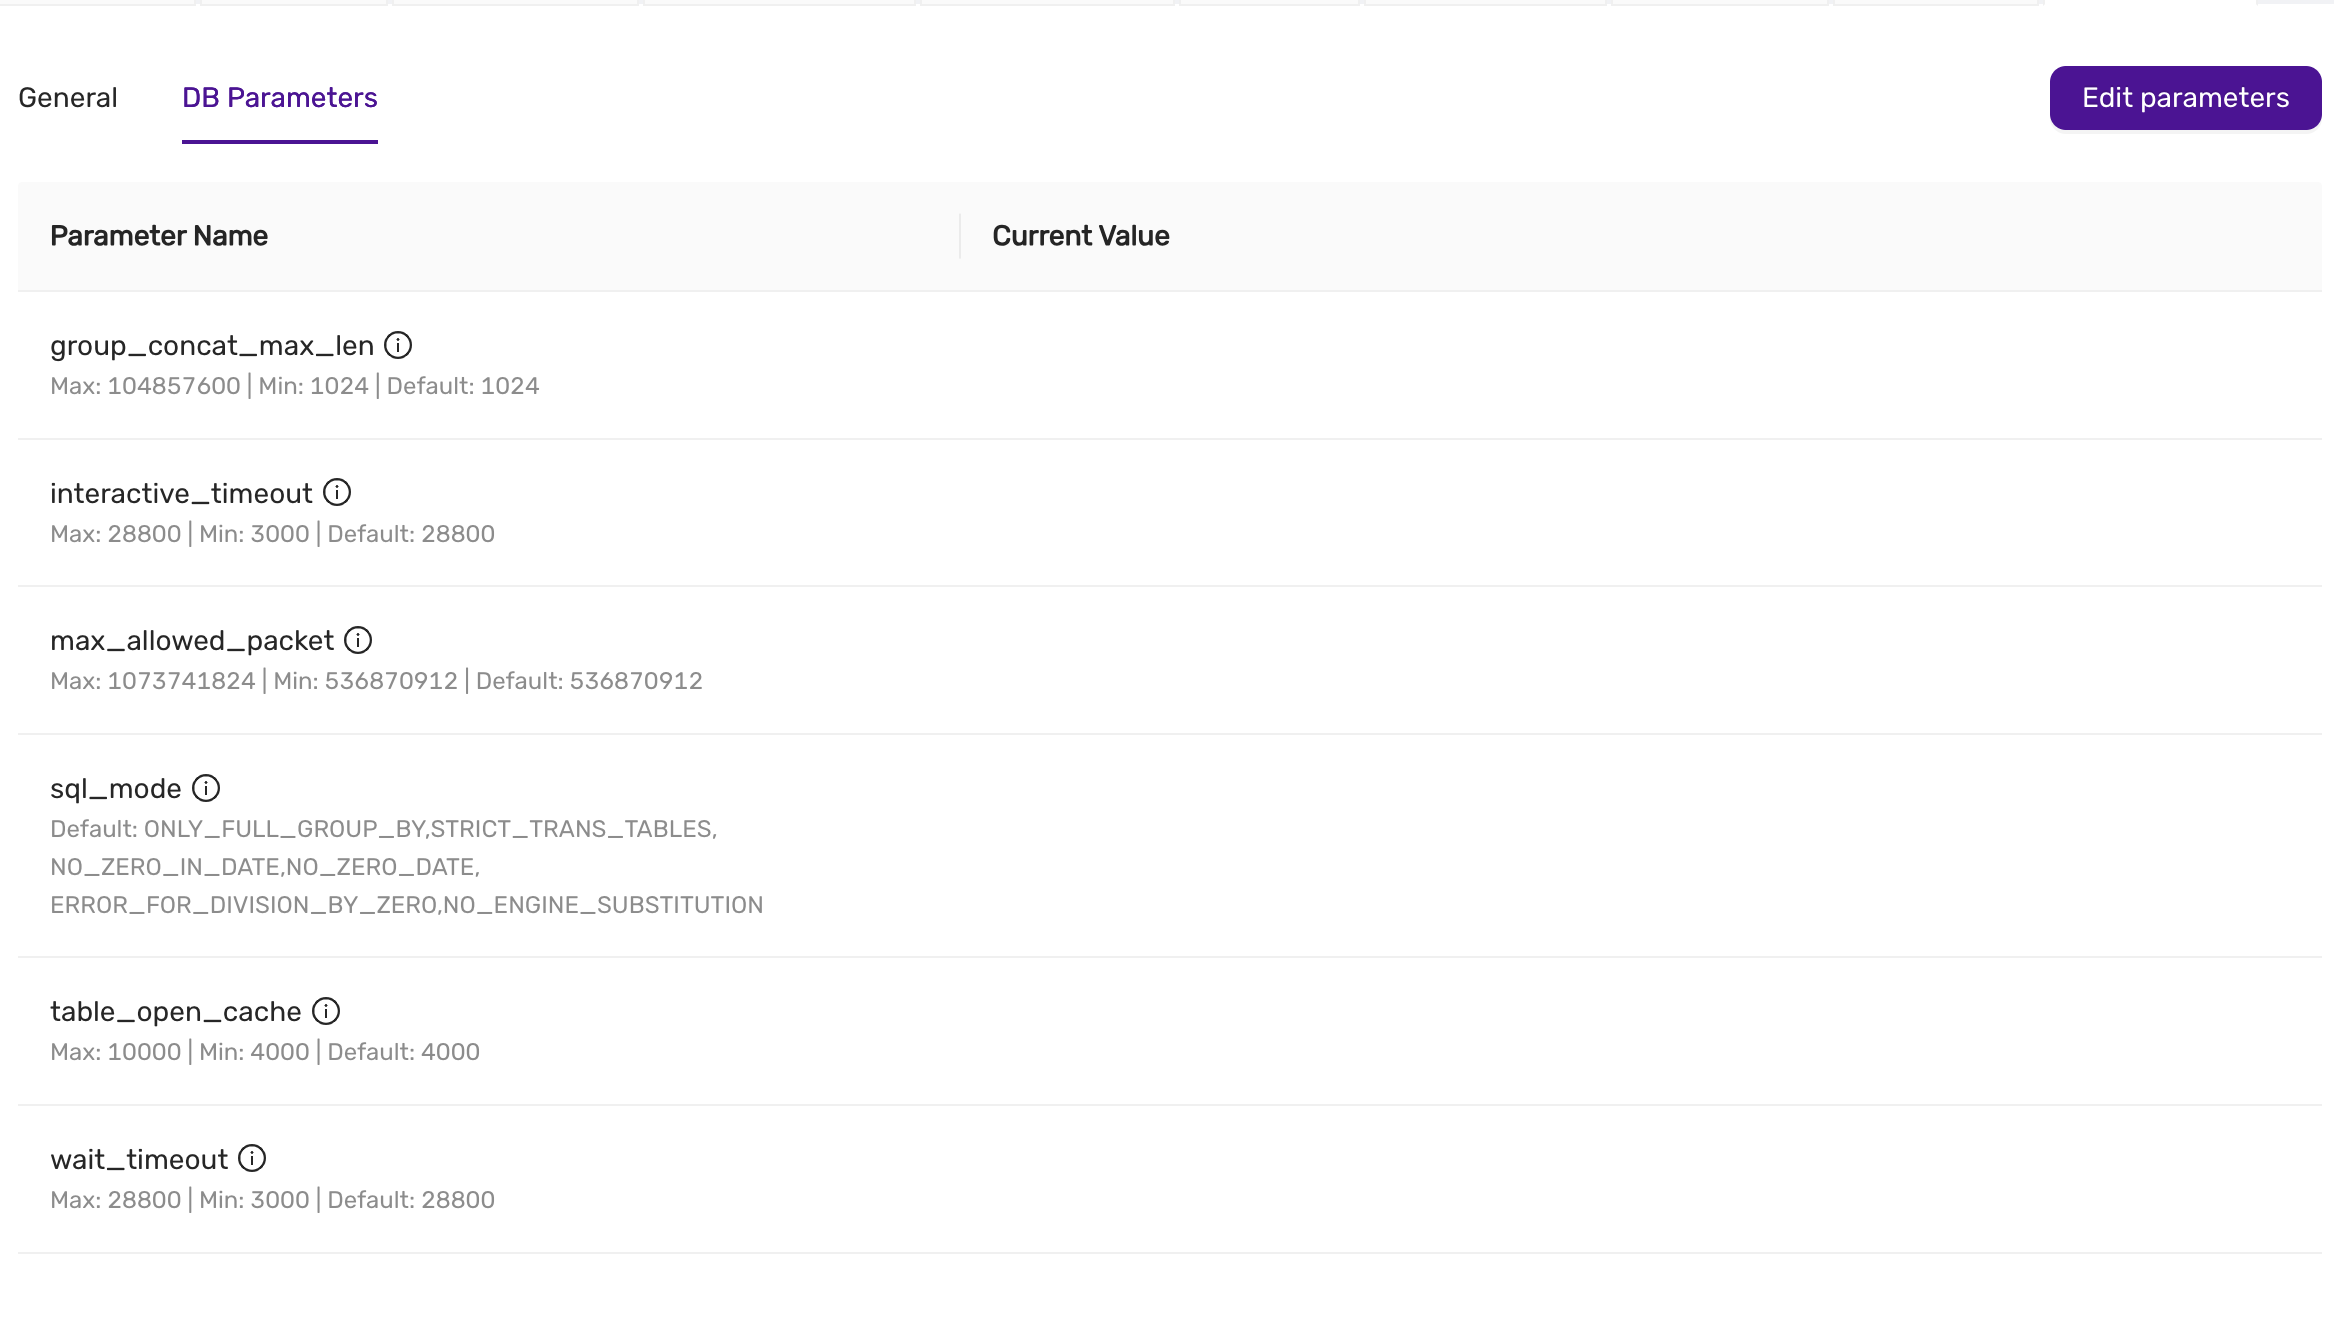
Available DB Parameters
This is an example, and is subject to change and depends on the configuration of CCX.
-
group_concat_max_len
- Description: Specifies the maximum allowed result length of the
GROUP_CONCAT()function. - Max: 104857600 | Min: 1024 | Default: 1024
- Description: Specifies the maximum allowed result length of the
-
interactive_timeout
- Description: Sets the number of seconds the server waits for activity on an interactive connection before closing it.
- Max: 28800 | Min: 3000 | Default: 28800
-
max_allowed_packet
- Description: Specifies the maximum size of a packet or a generated/intermediate string.
- Max: 1073741824 | Min: 536870912 | Default: 536870912
-
sql_mode
- Description: Defines the SQL mode for MySQL, which affects behaviors such as handling of invalid dates and zero values.
- Default:
ONLY_FULL_GROUP_BY, STRICT_TRANS_TABLES, NO_ZERO_IN_DATE, NO_ZERO_DATE, ERROR_FOR_DIVISION_BY_ZERO, NO_ENGINE_SUBSTITUTION
-
table_open_cache
- Description: Sets the number of open tables for all threads.
- Max: 10000 | Min: 4000 | Default: 4000
-
wait_timeout
- Description: Defines the number of seconds the server waits for activity on a non-interactive connection before closing it.
- Max: 28800 | Min: 3000 | Default: 28800
How to Change Parameters
- Navigate to the DB Parameters tab within the Settings section.
- Review the list of available parameters and their current values.
- Click on the Edit Parameters button in the upper-right corner.
- Adjust the values as necessary within the defined minimum and maximum limits.
- Once you’ve made the required changes, save the new configuration.
note: The latest saved settings are applied when adding a node (either as part of Scaling, during Lifecycle management, or during automatic repair).
Best Practices
- Understand the impact: Changing certain parameters can significantly impact the performance and stability of your database. Make sure to test changes in a staging environment if possible.
- Stay within limits: Ensure that your values respect the maximum and minimum bounds defined for each parameter.
- Monitor after changes: After adjusting any parameter, monitor your database performance to ensure the changes have the desired effect.
By properly configuring these parameters, you can optimize your database for your specific workload and operational requirements.
4.8.4 - Create Datastore From Backup
In CCX, it is possible to create a new datastore from a backup Supported databases: MySQL, MariaDb, Postgres.
Select the backup you wish to restore in the Backup tab and select “Create datastore” from the action menu next to the backup. This process may take some time depending on the size of the backup. The new datastore will have the name datastore as the parent but will be suffixed with _Copy.
This allows you to:
- create a datastore from a backup for development and testing purposes.
- Investigate and analyse data without interfering with the production environment.
Limitations
PITR is not supported yet.
4.8.5 - Database Db Management
This guide explains how to create, list, and manage databases within the CCX platform for both PostgreSQL and MySQL systems. Databases is not a concept in Redis, and in Microsoft SQLServer creating databases is not supported.
Listing Existing Databases
Once databases are created, you can view the list of databases in the Databases tab.
- The Database Name column shows the names of the databases.
- The Size column displays the size of the database.
- The Tables column indicates the number of tables within each database.

- For MySQL, the database list will appear similar, with columns for database name, size, and tables.
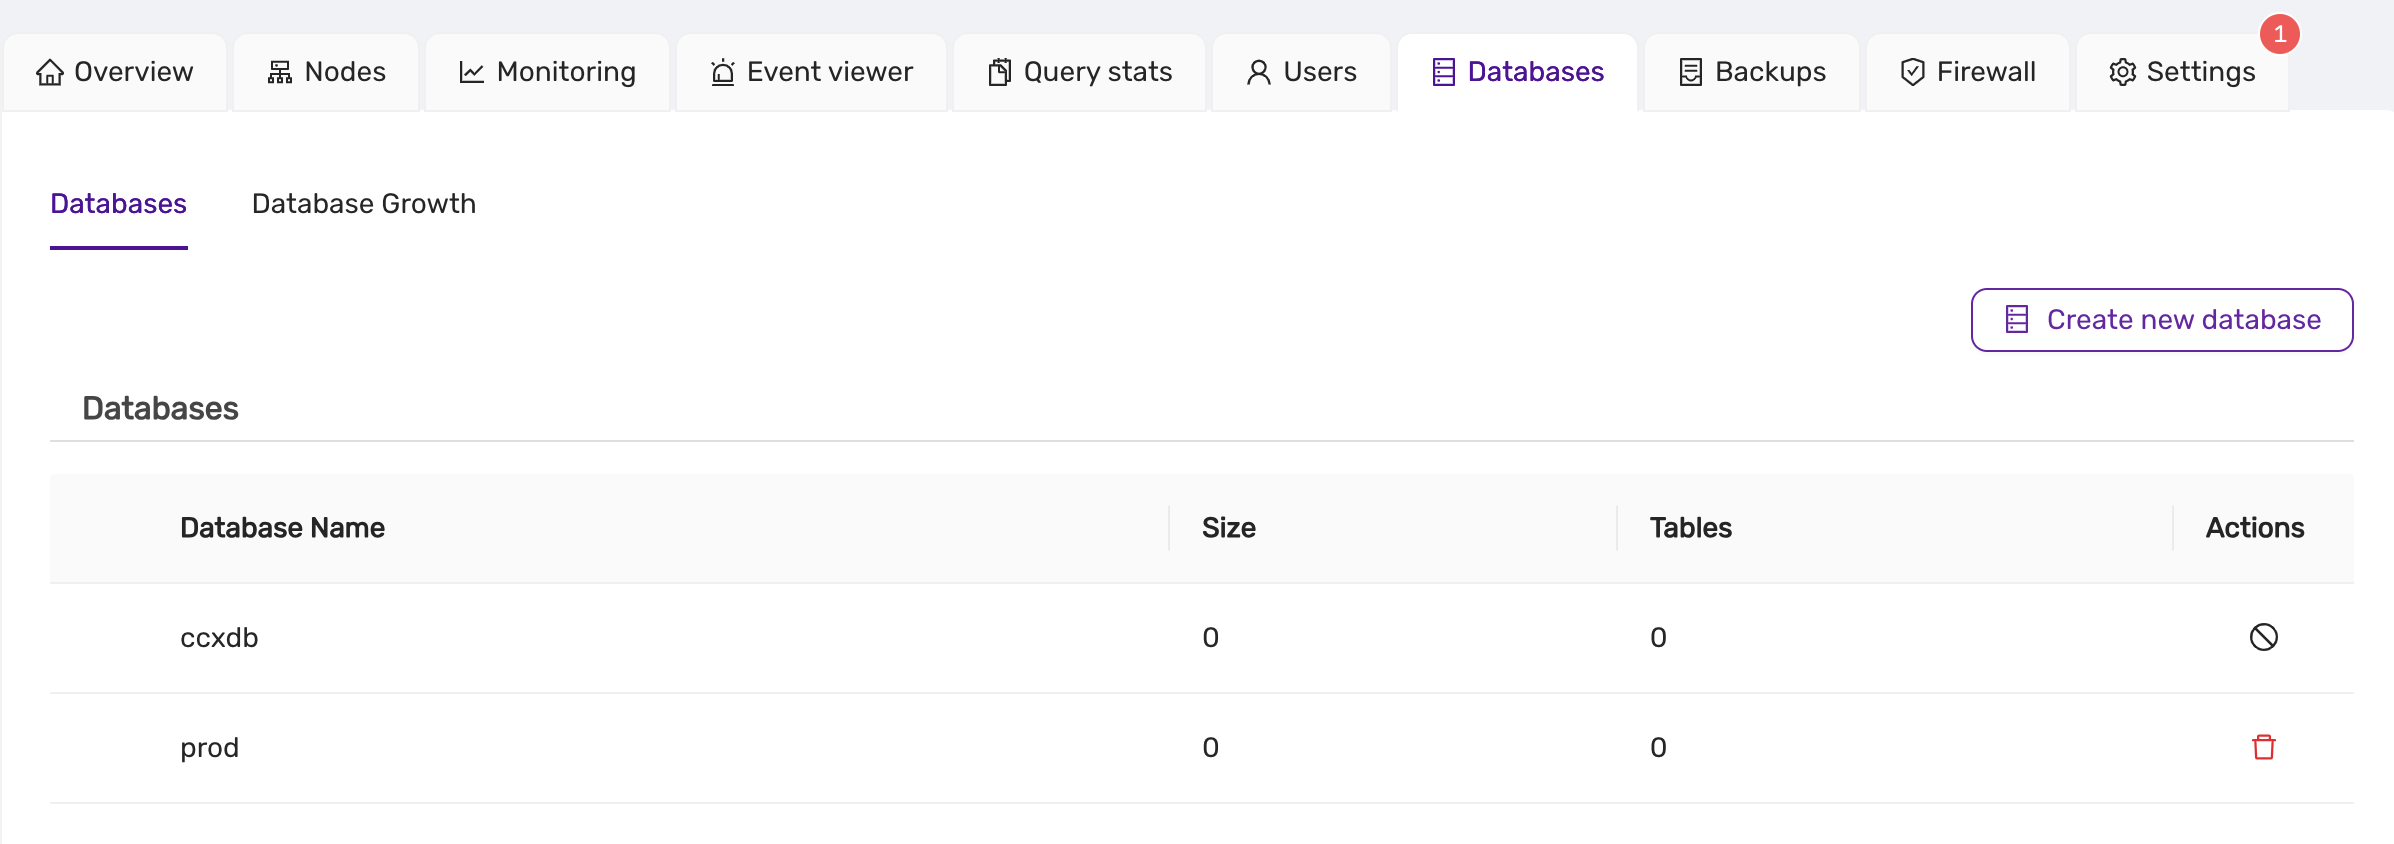
Creating a New Database
To create a new database in the CCX platform:
note:
- PostgreSQL Database Owner: When creating a database in PostgreSQL, ensure that a valid user is selected as the owner of the database.:**
- MySQL Database Management: MySQL database creation does not require specifying an owner, but all other functions (listing, deleting) remain similar.:**
-
Navigate to the Databases Tab:
- Click on the Databases section from the main dashboard.
-
Click on Create New Database:
- A form will appear asking for the following details:
- Database Name: The name of the new database.
- DB Owner: The user who will own the database (applicable to PostgreSQL).
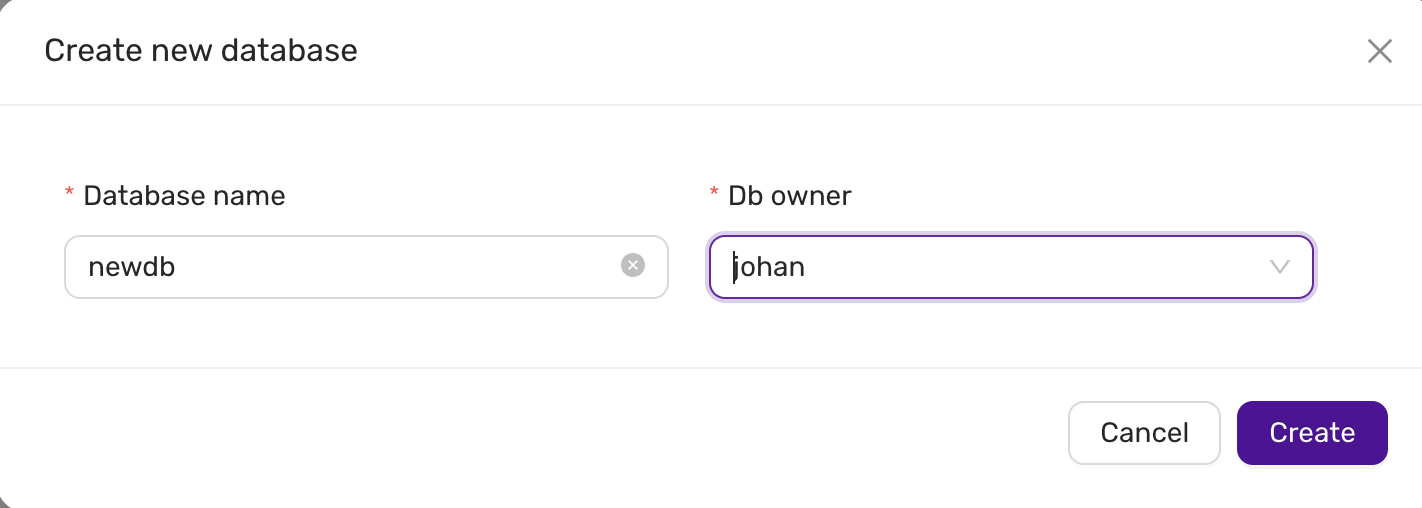
- A form will appear asking for the following details:
-
Submit the Form:
- After filling in the necessary information, click Create to create the new database.
-
MySQL Database Creation:
- For MySQL, the owner field is not required. You only need to specify the database name.
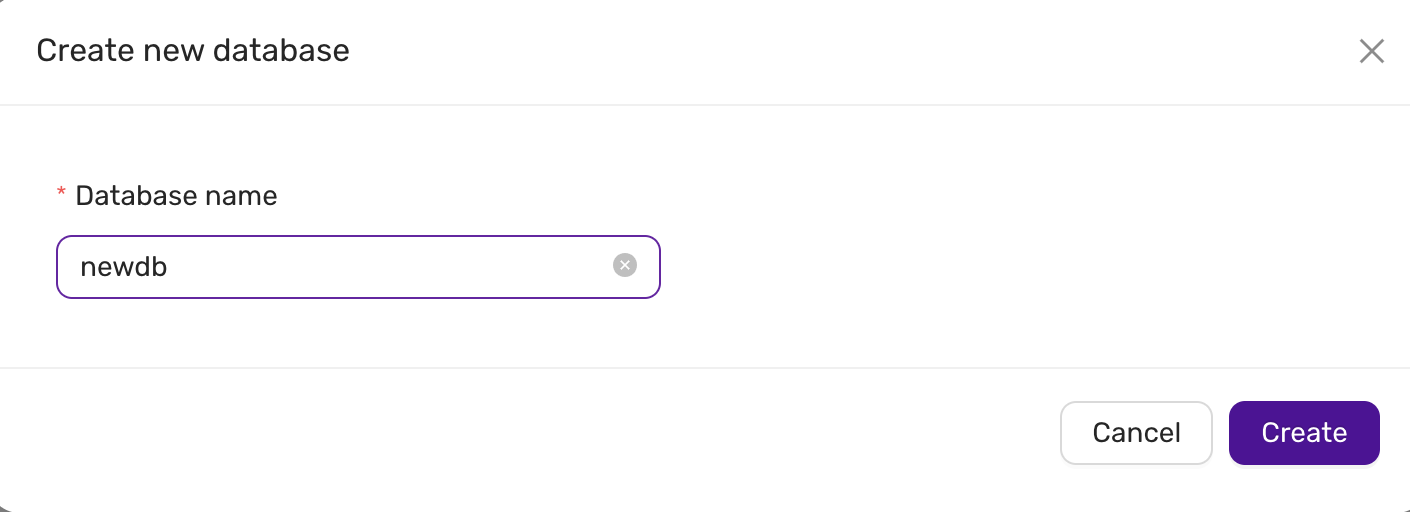
Dropping a Database
note:
- MySQL/MariaDb Database locks / metadata locks: The DROP DATABASE will hang if there is a metadata lock on the database or a table/resource in the database. Use
SHOW PROCESSLISTin the mysql client to identify the lock. Either release the lock, KILL the connection, or wait for the lock to be released.:**
To delete or drop a database:
-
Locate the Database:
- In the Databases tab, find the database you want to delete.
-
Click the Delete Icon:
- Click on the red delete icon next to the database entry.
- A confirmation dialog will appear asking if you are sure about dropping the database.
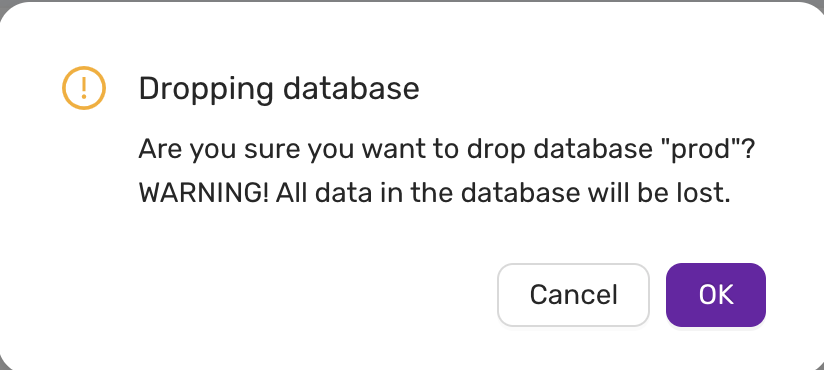
-
Confirm Deletion:
- Click OK to proceed. WARNING: All data in the database will be lost.
Troubleshooting
Drop database hangs, the icon is spinning in the frontend.
Check if there are locks preventing the database from being deleted.
- In MySQL, the DROP DATABASE will hang if there is a metadata lock on the database or a table/resource in the database. Use SHOW PROCESSLIST in the mysql/mariadb client to identify the lock. Either release the lock, KILL the connection, or wait for the lock to be released.
4.8.6 - Database User Management
CCX allows you to create admin users. These users can in turn be used to create database uses with lesser privileges. Privileges and implementation is specific to the type of database. Admin users can be created for the following databases:
- PostgreSQL
- MySQL
- MariaDb
- Valkey
- Cache 22
- Microsoft SQL Server
List database users
To list database users do Navigate to the Users Tab::
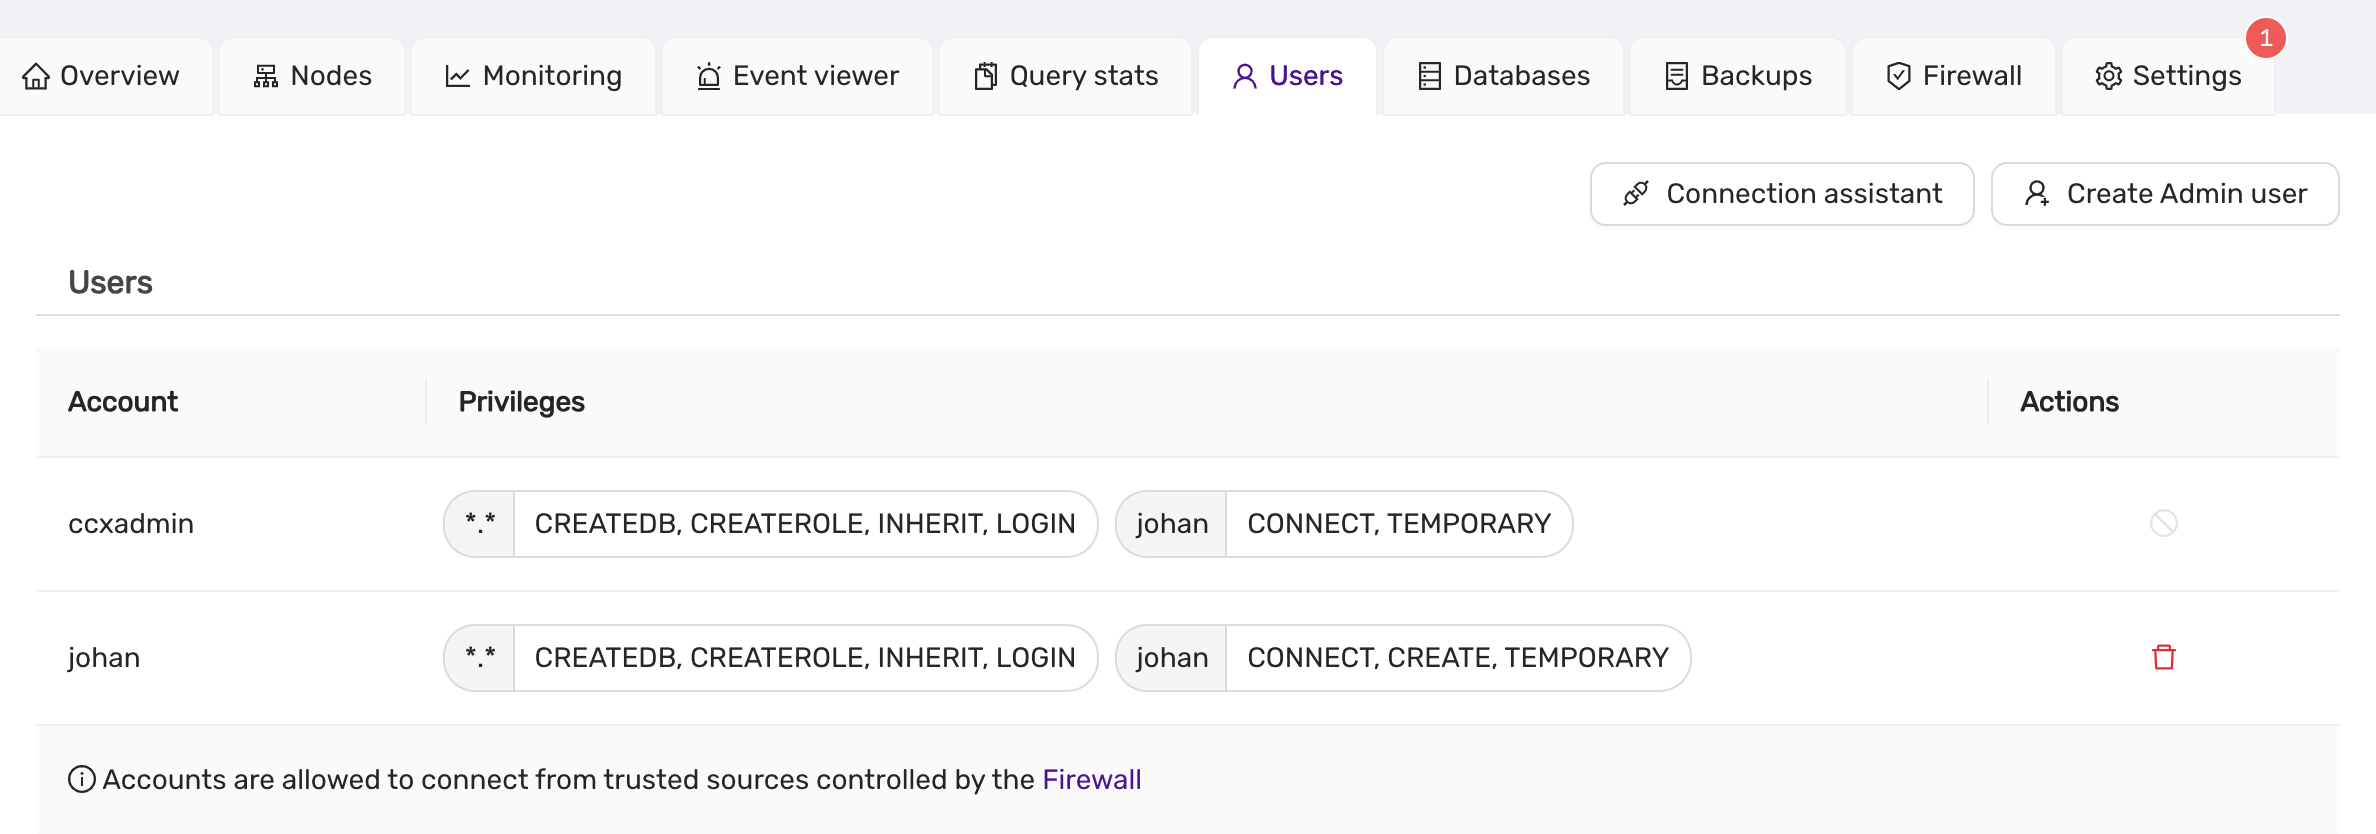
Creating an Admin User
To create a new admin user, follow these steps:
-
Navigate to Users Tab:
- Go to the Users section from the main dashboard.
-
Click on Create Admin User:
Below is the MySQL interface described, but the interface is similar for the other database types
- A form will appear prompting you to enter the following details:
- Username: Specify the username for the new admin.
- Password: Enter a strong password for the admin user.
- Database Name: Select or specify the database this user will be associated with.
- Authentication Plugin: Choose the authentication method for the user. Available options:
caching_sha2_password(default)mysql_native_password(for MySQL compatibility)
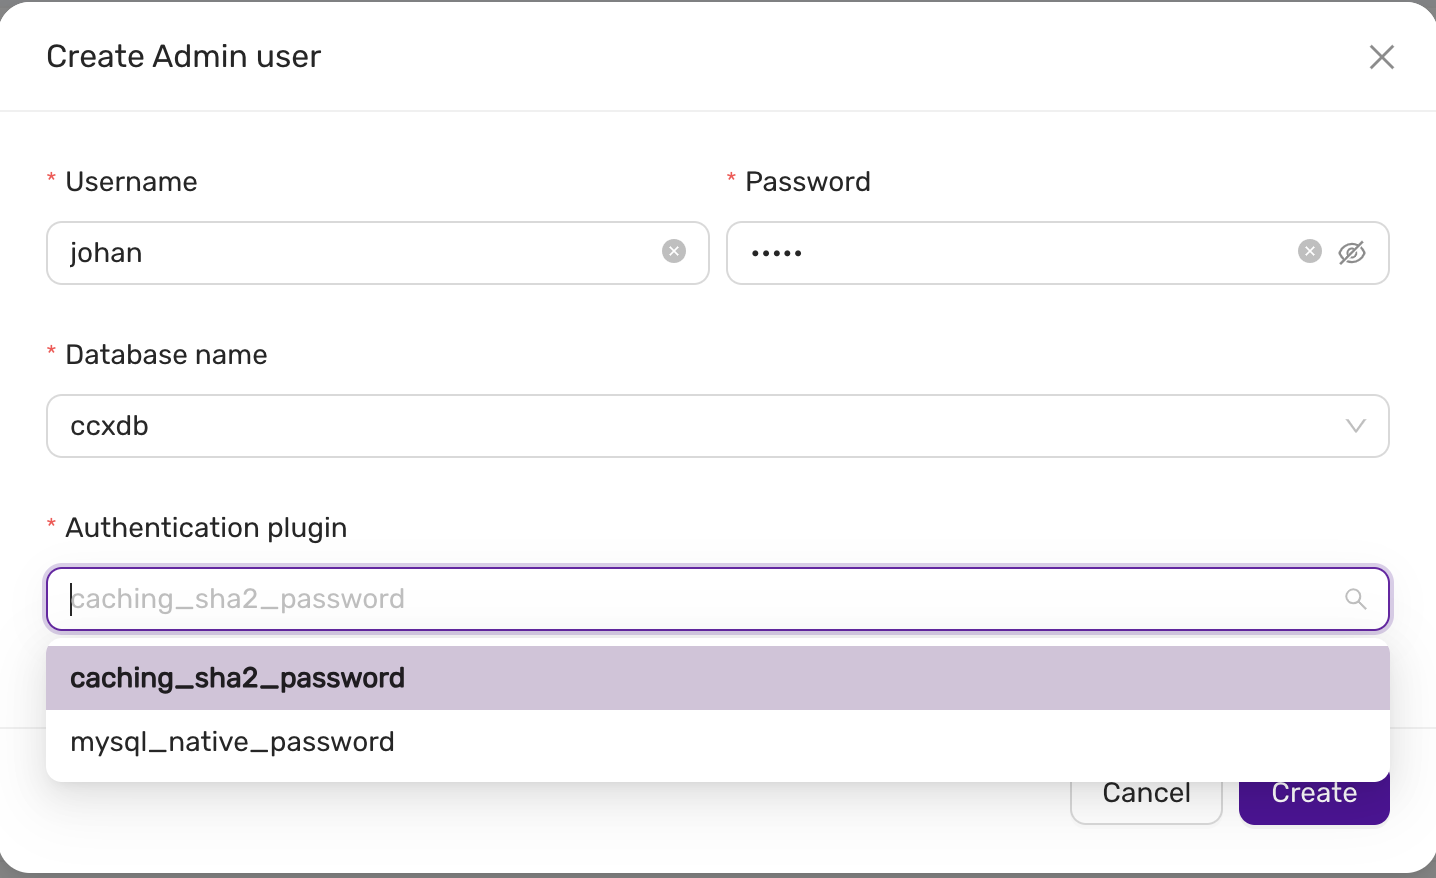
Deleting a database user
Delete User: To delete a user, click on the red delete icon beside the user entry. A confirmation dialog will appear before the user is removed.
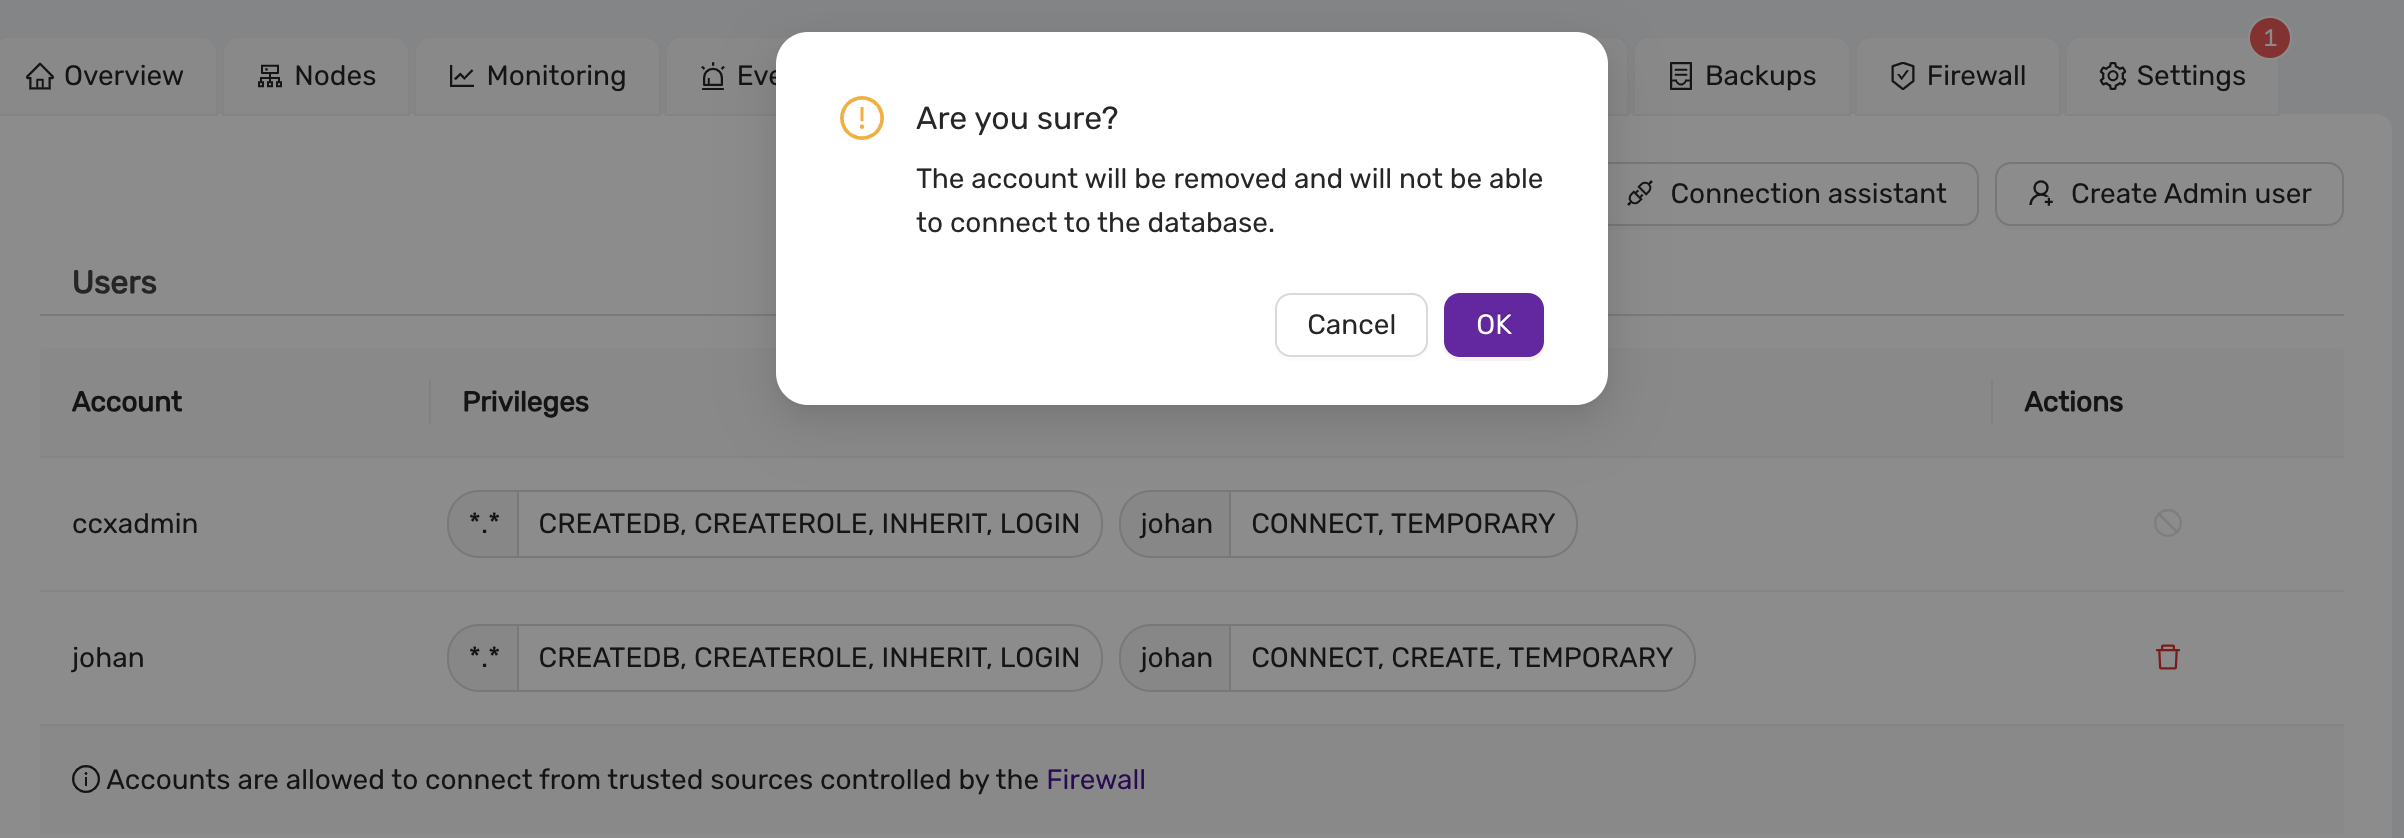
Connection assistant
CCX provides a Connection Assistant to help configure connection strings for your database clients.
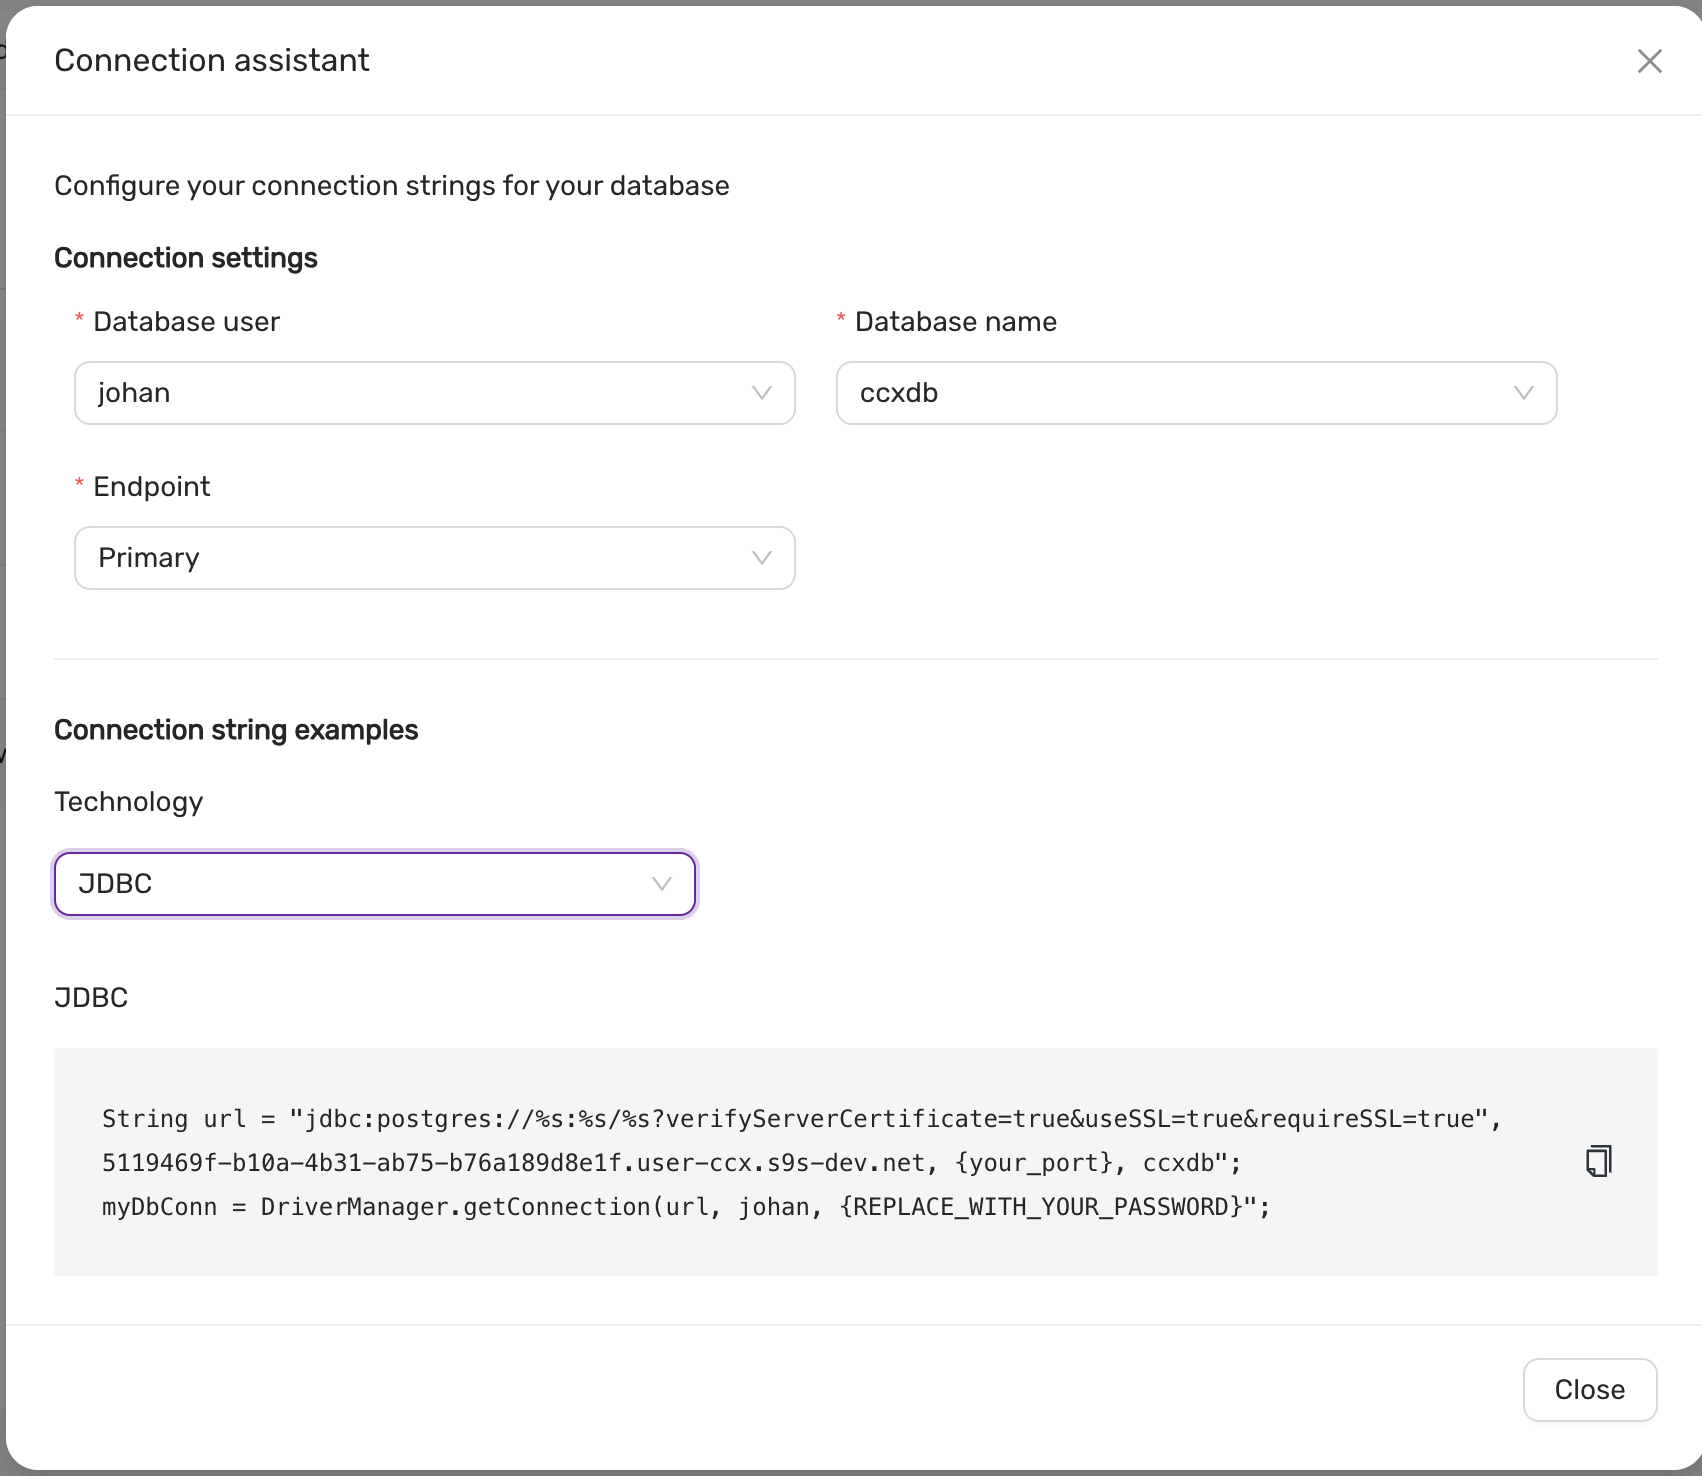
-
Configure Database User and Database Name:
- Select the database user and the database name.
- Choose the Endpoint type (Primary or Replica).
-
Connection String Generation:
- Based on the selected options, a connection string is generated for various technologies, including:
- JDBC
- ODBC
- Python (psycopg2)
- Node.js (pg)
- Based on the selected options, a connection string is generated for various technologies, including:
-
Example:
String url = "jdbc:postgresql://<host>:<port>/<dbname>?verifyServerCertificate=true&useSSL=true&requireSSL=true";
myDbConn = DriverManager.getConnection(url, "<username>", "<password>");
4.8.7 - Datastore Settings
In the Settings section of CCX, there are two primary configuration options: General and DB Parameters.
The General settings section allows you to configure high-level settings for your datastore. This may include basic configurations such as system name, storage options, and general system behavior.
The DB Parameters section is used for fine-tuning your database. Here, you can adjust specific database settings such as memory allocation, query behavior, or performance-related parameters. These settings allow for a deeper level of control and optimization of the datastore for your specific workload.
Database Parameters
Please see Configuration management.
Changing the Datastore Name in CCX
The Datastore Name in CCX is an identifier for your datastore instance, and it is important for proper organization and management of multiple datastores. The name can be set when creating a datastore or changed later to better reflect its purpose or environment.

Notifications in CCX
Introduced in v.1.50.
The Notifications feature in CCX allows you to configure email alerts for important system events. These notifications help ensure that you are aware of critical events happening within your environment, such as when the disk space usage exceeds a certain threshold or when important jobs are started on the datastore.

To configure recipients of notification emails, simply enter the email addresses in the provided field. Multiple recipients can be added by separating each email with a semicolon (;).
If no email addresses are added, notifications will be disabled.
Key Notifications:
- Disk Space Alerts: When disk usage exceeds 85%, a notification is sent to the configured recipients.
- Job Alerts: Notifications are sent when significant jobs (such as data processing or backups) are initiated on the datastore.
This feature ensures that system administrators and key stakeholders are always up-to-date with the health and operations of the system, reducing the risk of unexpected issues.
Auto Scaling Storage Size in CCX
Introduced in v.1.50.
CCX provides a convenient Auto Scaling Storage Size feature that ensures your system never runs out of storage capacity unexpectedly. By enabling this feature, users can automatically scale storage based on usage, optimizing space management.

When Auto Scale is turned ON, the system will automatically increase the storage size by 20% when the used space exceeds 85% of the allocated storage. This proactive scaling ensures that your system maintains sufficient space for operations, preventing service interruptions due to storage constraints.
Key Benefits:
- Automatic scaling by 20% when usage exceeds 85%.
- Ensures consistent performance and reliability.
- Eliminates the need for manual storage interventions.
This feature is especially useful for dynamic environments where storage usage can rapidly change, allowing for seamless growth as your data expands.
Authentication in CCX
Introduced in v.1.49.
The Authentication section in CCX allows users to download credentials and CA certificates, which are essential for securing communication between the system and external services or applications.
Credentials
The Credentials download provides the necessary authentication details, such as API keys, tokens, or certificates, that are used to authenticate your system when connecting to external services or accessing certain system resources. These credentials should be securely stored and used only by authorized personnel.

To download the credentials, simply click the Download button.
CA Certificate
The CA Certificate ensures secure communication by verifying the identity of external systems or services through a trusted Certificate Authority (CA). This certificate is critical when establishing secure connections like HTTPS or mutual TLS (mTLS).
To download the CA Certificate, click the Download button next to the CA Certificate section.
Security Considerations:
- Keep credentials secure: After downloading, ensure the credentials and certificates are stored in a secure location and only accessible by authorized personnel.
- Use encryption: Where possible, encrypt your credentials and certificates both at rest and in transit.
- Regularly rotate credentials: To maintain security, periodically rotate your credentials and update any related system configurations.
This Authentication section is vital for maintaining a secure and trustworthy communication environment in your CCX setup.
4.8.8 - DBaaS with Terraform
Overview
This guide will help you getting started with managing datastores in Elastx DBaaS using Terraform.
For this we will be using OAuth2 for authentication and the CCX Terraform provider. You can find more information about the latest CCX provider here.
Good To Know
- Create/Destroy datastores supported.
- Setting firewall rules supported.
- Setting database parameter values supported.
- Scale out/in nodes supported.
- Create users and databases currently not supported.
DBaaS OAuth2 credentials
Before we get started with terraform, we need to create a new set of OAuth2 credentials.
In the DBaaS UI, go to your Account settings, select Authorization and choose Create credentials.
In the Create Credentials window, you can add a description and set an expiration date for your new OAuth2 credential.
Expiration date is based on the number of hours starting from when the credential were created. If left empty, the credential will not have an expiration date. You can however revoke and-/or remove your credentials at any time.
When you’re done select Create.
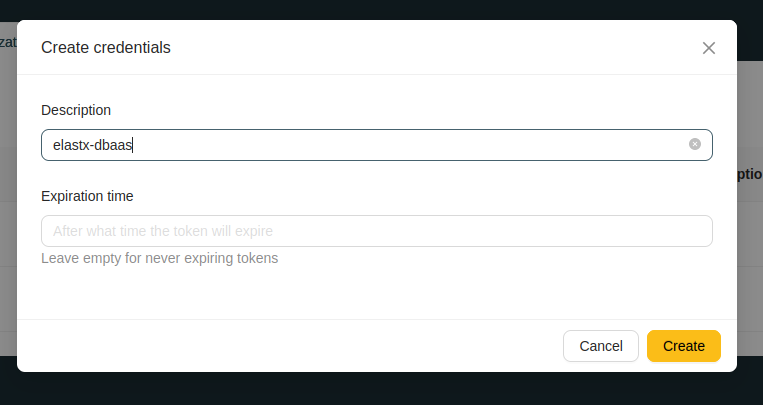
Copy Client ID and Client Secret. We will be using them to authenticate to DBaaS with Terraform.
Make sure you’ve copied and saved the client secret before closing the popup window. The client secret cannot be obtained later and you will have to create a new one.
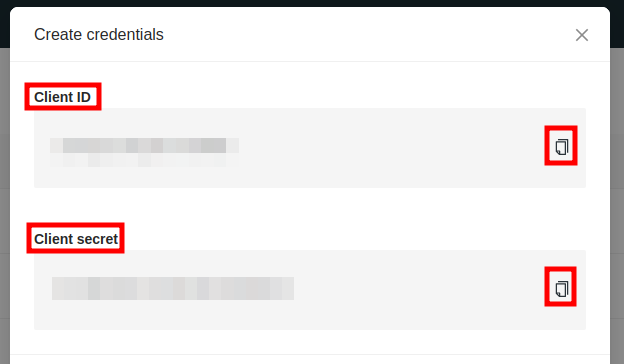
Terraform configuration
We’ll start by creating a new, empty file, and adding the Client ID and Secret as variables, which will be exported and used for authenticaton later when we apply our terraform configuration.
Add your Client ID and Client Secret.
#!/usr/bin/env bash

export CCX_BASE_URL="https://dbaas.elastx.cloud"
export CCX_CLIENT_ID="<client-id>"
export CCX_CLIENT_SECRET="<client-secret>"
Source your newly created credentials file.
source /path/to/myfile.sh
Terraform provider
Create a new terraform configuration file. In this example we create provider.tf and add the CCX provider.
terraform {
  required_providers {
    ccx = {
      source = "severalnines/ccx"
      version = "0.3.1"
    }
  }
}
Create your first datastore with Terraform
Create an additional terraform configuration file and add your prefered datastore settings. In this example we create a configuration file named main.tf and specify that his is a single node datastore with MariaDB.
resource "ccx_datastore" "elastx-dbaas" {
  name           = "my-terraform-datastore"
  db_vendor      = "mariadb"
  size           = "1"
  instance_size  = "v2-c2-m8-d80"
  volume_type    = "v2-1k"
  volume_size    = "80"
  cloud_provider = "elastx"
  cloud_region   = "se-sto"
  tags           = ["terraform", "elastx", "mariadb"]
}
Create primary/replica datastores with added firewall rules and database parameter values
This example is built upon the previous MariaDB example. Here we added a second node to create a primary/replica datastore. We’re also adding firewall rules and setting database parameter values. To see all available database parameters for your specific database type, log into the DBaaS UI, go to your specific datastore > Settings > DB Parameters.
resource "ccx_datastore" "elastx-dbaas" {
  name           = "my-terraform-datastore"
  db_vendor      = "mariadb"
  size           = "2"
  instance_size  = "v2-c2-m8-d80"
  volume_type    = "v2-1k"
  volume_size    = "80"
  cloud_provider = "elastx"
  cloud_region   = "se-sto"
  tags           = ["terraform", "elastx", "mariadb"]

# You can add multiple firewall rules here
  firewall {
    source       = "x.x.x.x/32"
    description  = "My Application"
  }

  firewall {
    source      = "x.x.x.x/32"
    description = "My database client"
  }

# Set your specific database parameter values here. Values should be comma-separated without spaces.
  db_params = {
    sql_mode = "STRICT_TRANS_TABLES,NO_AUTO_CREATE_USER"
  }

}
Available options
Below you will find a table with available options you can choose from.
| Resource | Description |
|---|---|
name |
Required - Sets the name for your new datastore. |
db_vendor |
Required - Selects which database vendor you want to use. Available options: mysql, mariadb, redis and postgres. For specific Postgres version see the db_version option. |
instance_size |
Required - Here you select which flavor you want to use. |
cloud_provider |
Required - Should be set to elastx. |
cloud_region |
Required - Should be set to se-sto. |
volume_type |
Recommended - This will create a volume as the default storage instead of the ephemeral disk that is included with the flavor. Select the volume type name for the type of volume you want to use. You can find the full list of available volume types here: ECP/OpenStack Block Storage. |
volume_size |
Recommended - Required if volume_type is used. Minimum volume size requirement is 80GB. |
db_version |
Optional - Only applicable to PostgreSQL. Selects the version of PostgreSQL you want to use. You can choose between 14 and 15. Defaults to 15 if not set. |
firewall |
Optional - Inline block for adding firewall rules. Can be set multiple times. |
db_params |
Optional - Inline block for setting specific database parameter values using: parameter=“values”. Values should be comma-separated. |
tags |
Optional - Add additional tags. |
4.8.9 - Deploy A Datastore

MySQL or MariaDB
MySQL 8.4 is recommended if you are migrating from an existing MySQL system. MariaDB 11.4 is recommended if you are migrating from an existing MariaDB system. MySQL 8.4 offers a more sophisticated privilege system which makes database administration easier, wheres
High-availability
MySQL and MariaDB offers two configurations for High-availability.
- Primary/replica (asynchronous replication)
- Multi-primary (Galera replication)
Primary/replica is recommended for general purpose.
Scaling
MySQL and MariaDb can be created with one node (no high-availability) and can later be scaled with read-replicas or Primarys (in case of Multi-primary configuration).
PostgreSQL
PostgreSQL 15 and later supports the following extensions by default:
- PostGis
- PgVector
High-availability
High-availability is facilitated with PostgreSQL streaming replication
Scaling
PostgreSQL can be created with one node (no high-availability) but can later be scaled with read-replicas.
Cache22 (aka Redis)
deprecated
Cache22 is an in-memory data structure store.
High-availability
High-availability is facilitated with Redis replication and Redis Sentinels.
Scaling
Redis can be created with one node (no high-availability) but can later be scaled with read-replicas.
Valkey
Valkey is an in-memory data structure store.
High-availability
High-availability is facilitated with Valkey replication and Valkey Sentinels.
Scaling
Valkey can be created with one node (no high-availability) but can later be scaled with read-replicas.
MSSQL Server
Microsoft SQLServer 2022. Special license restrictions apply and this option may not be available in all CCX implementations.
4.8.10 - Event Viewer
The Event Viewer provides a detailed history of actions performed on the datastore. It tracks when changes were made, their status, who initiated the action, and a brief description of the action itself.
- When: Timestamp indicating when the event occurred.
- Status: The current status of the event (e.g.,
Finishedfor successfully completed tasks). - Initiated by: The user or process that initiated the action.
- Description: A summary of the action performed.
Example Events:
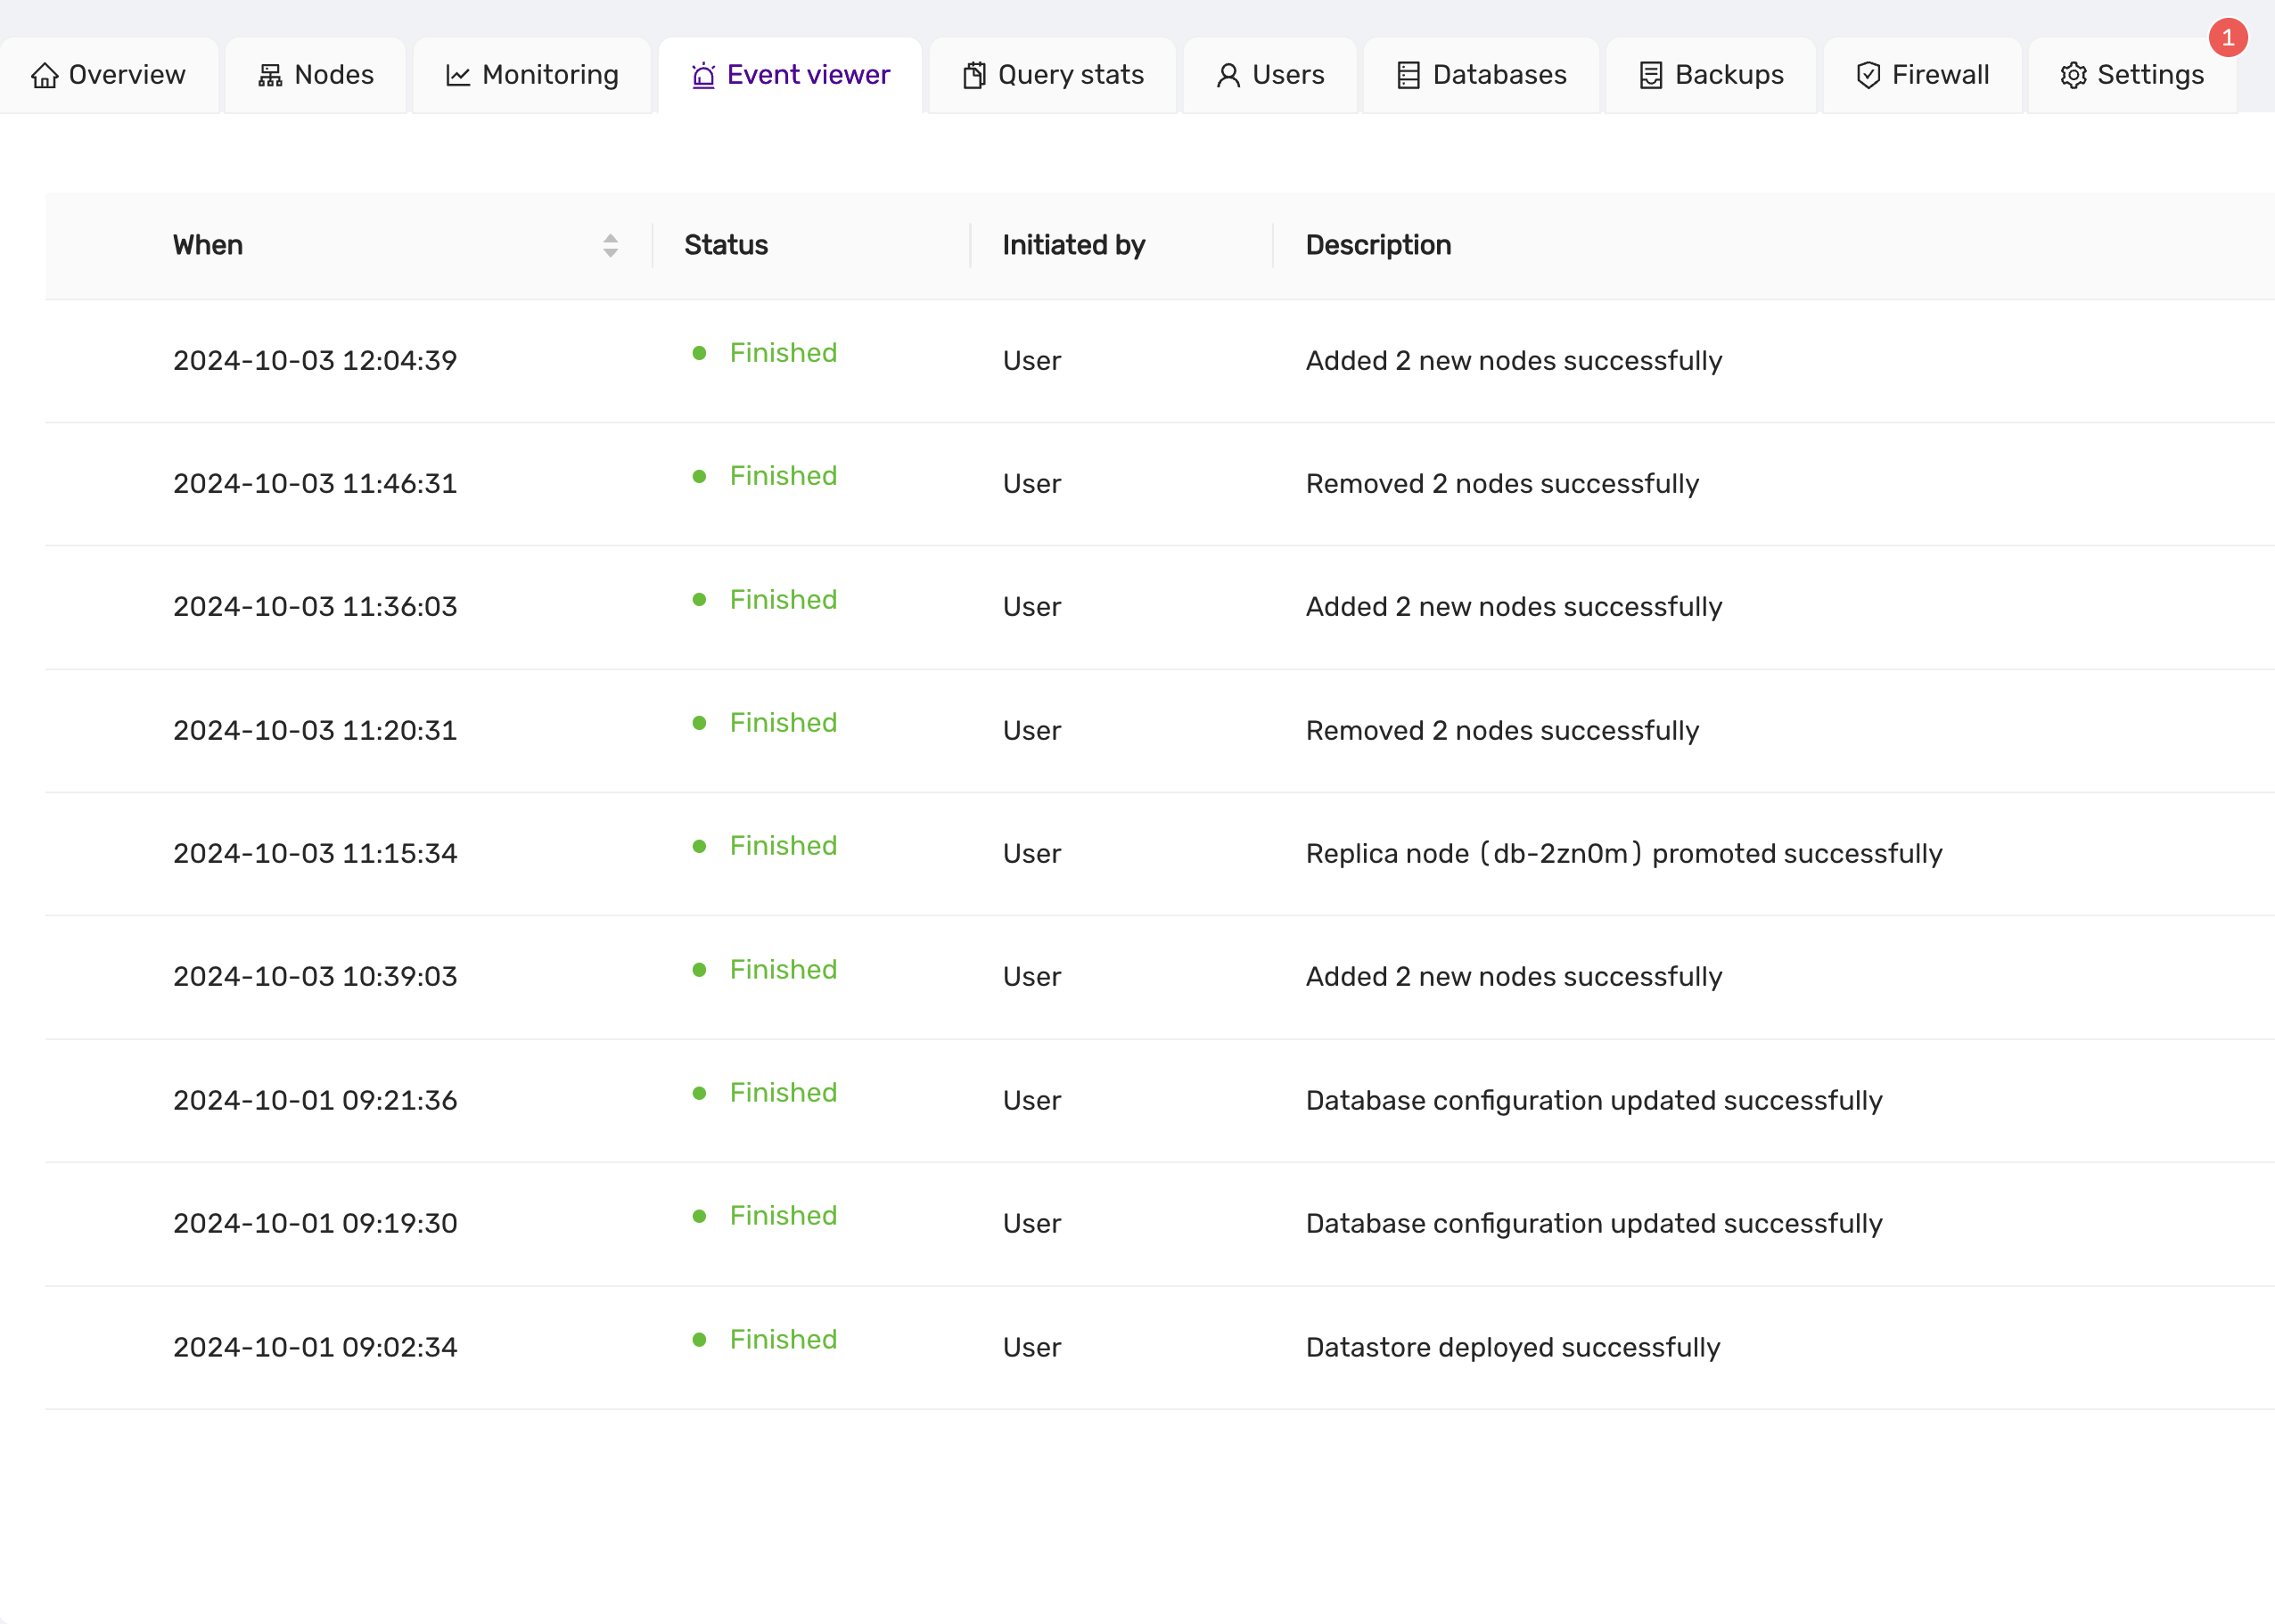
The Event Viewer is essential for tracking the progress of tasks such as node scaling, promotions, and configuration updates. Each event is clearly labeled, providing users with transparency and insight into the state of their datastore operations.
4.8.11 - Firewall
This guide explains how to manage trusted sources and open ports within the firewall settings of the CCX platform. Only trusted sources are allowed to connect to the datastore.
A number of ports are open for each trusted source. One port is opened for the database service, but other ports are open for metrics. This makes it possible to connect and scrape the database nodes for metrics from a trusted source. The metrics are served using Prometheus exporters.
List Trusted Sources
Trusted sources can be managed from the Firewall tab. Only trusted sources are allowed to connect to the datastore. Here you can see:
- Source: View the allowed IP addresses or ranges.
- Description: Review the description of the source for identification.
- Actions: Delete the source by clicking on the red trash icon.
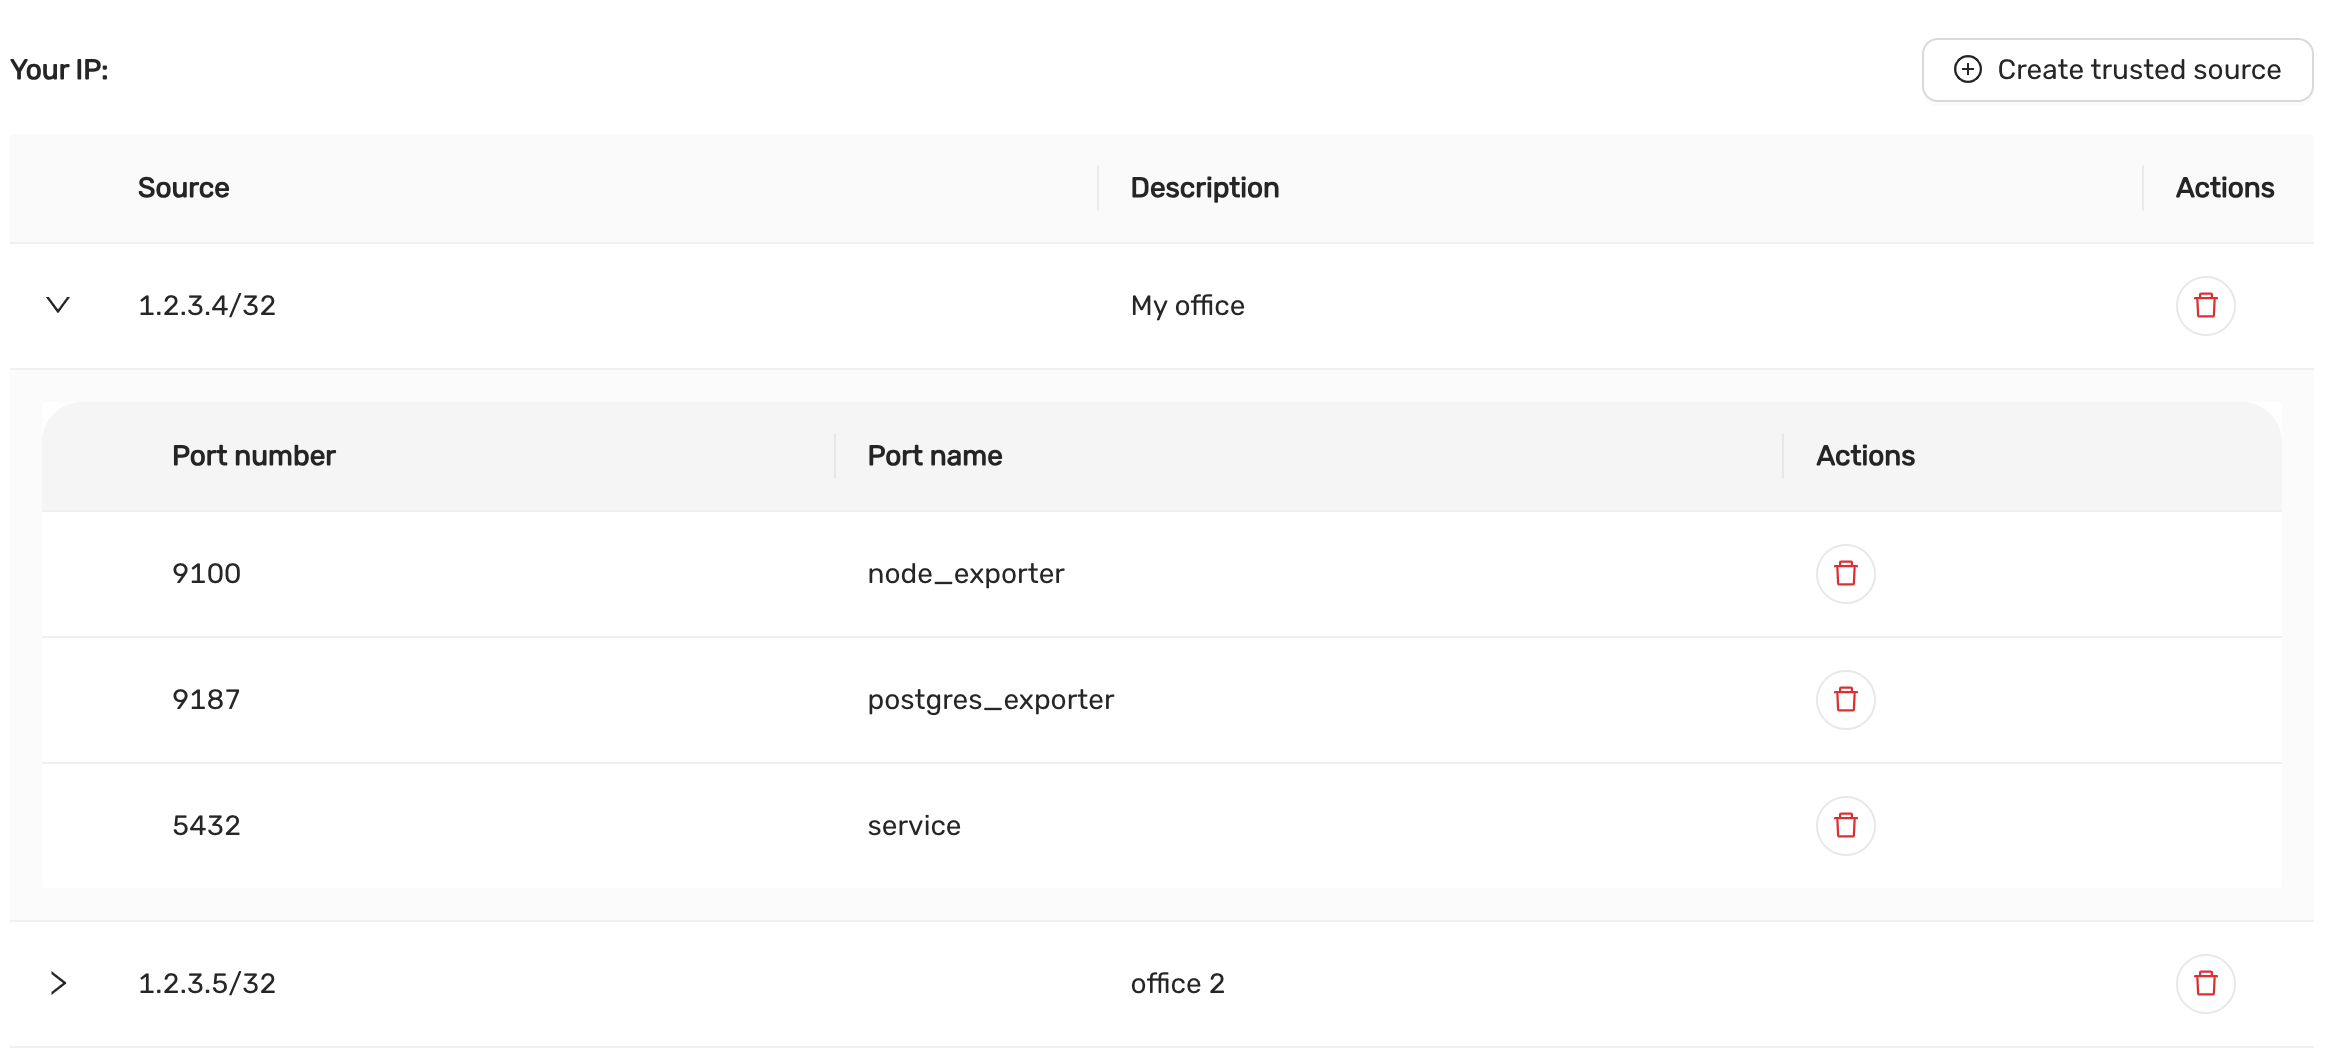
Adding a Trusted Source
To allow connections from a specific IP address or range, you need to create a trusted source.
Click on Create Trusted Source:
- A form will appear prompting you to enter the following details:
- Source IP: Specify the IP address or CIDR range to allow. It is possible to specify a semicolon-separated list of CIDRs. If no CIDR is specified, then /32 is automatically added to the IP address.
- Description: Add a description to identify the source (e.g., “My office”, “Data Center”).
After filling out the details, click Create to add the trusted source.
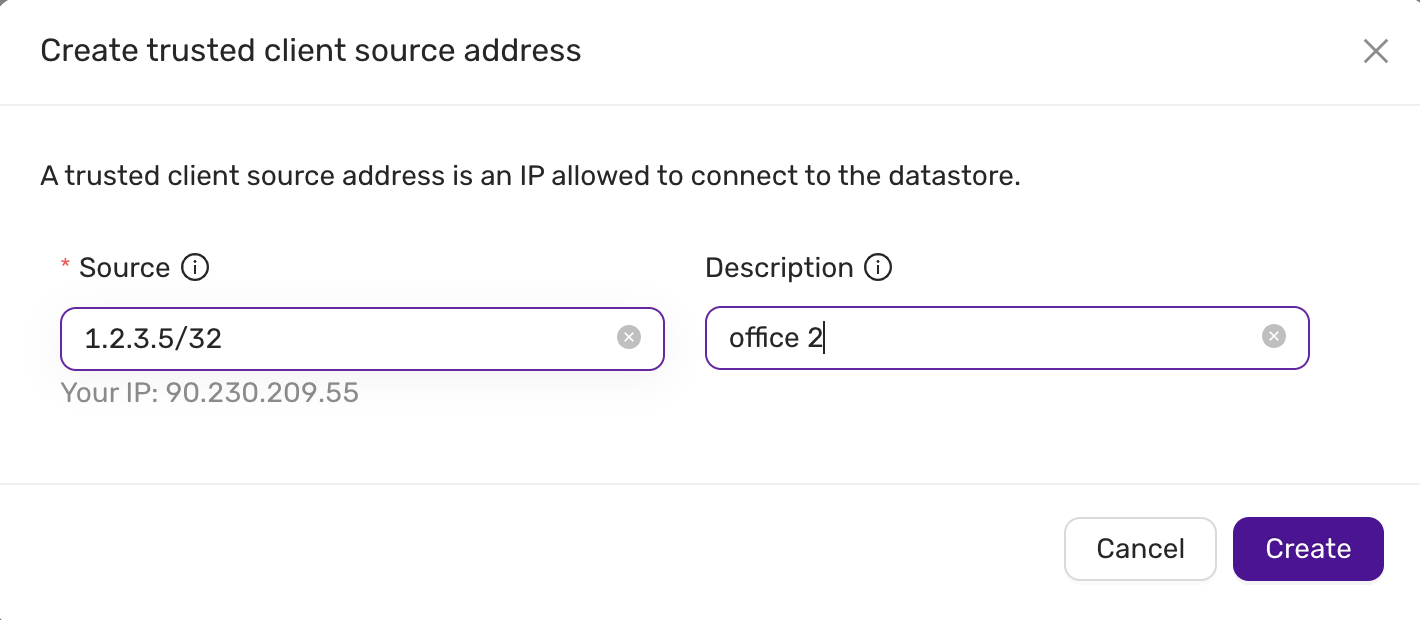
Viewing and Managing Trusted Sources
Managing Open Ports for Each Trusted Source.
TLS access to exporter metrics are described in this section.
Each trusted source can have specific ports opened for services. To manage the ports:
-
Expand a Trusted Source:
- Click the down arrow beside the source IP to view the open ports.
-
Port Configuration:
- Port Number: The number of the open port (e.g.,
9100,5432). - Port Name: The name of the service associated with the port (e.g.,
node_exporter,postgres_exporter,service).
The
serviceindicates the listening port of the database server. The ports for thenode_exporteranddb_exporterallows you to tap in to observability metrics for the database nodes. - Port Number: The number of the open port (e.g.,
-
Actions:
- Delete a Port: Remove a port by clicking the red trash icon next to the port number.
Example Ports:
-
Port 9100:
node_exporter -
Port 9187:
postgres_exporter -
Port 5432:
service
Deleting Trusted Sources and Ports
Deleting a Trusted Source:
To remove a trusted source entirely, click on the red trash icon next to the source IP. This will remove the source and all associated ports.
Deleting an Individual Port:
To delete a specific port for a trusted source, click on the red trash icon next to the port number. This action will only remove the specific port.
This documentation covers the basic operations for managing firewall trusted sources and ports within the CCX platform. For further details, refer to the CCX platform’s official user manual or support.
4.8.12 - Logs Viewer
The Logs Viewer provides a comprehensive view of Database logs. The generated logs can be accessed for troubleshooting. It provides real-time access to essential logs, such as error logs, slow query logs though UI.
- Name: The file path or identifier of the log file.
- When: The timestamp indicating the most recent update or entry in the log file.
- Actions: Options to view, download the log file for further analysis.
Example Logs
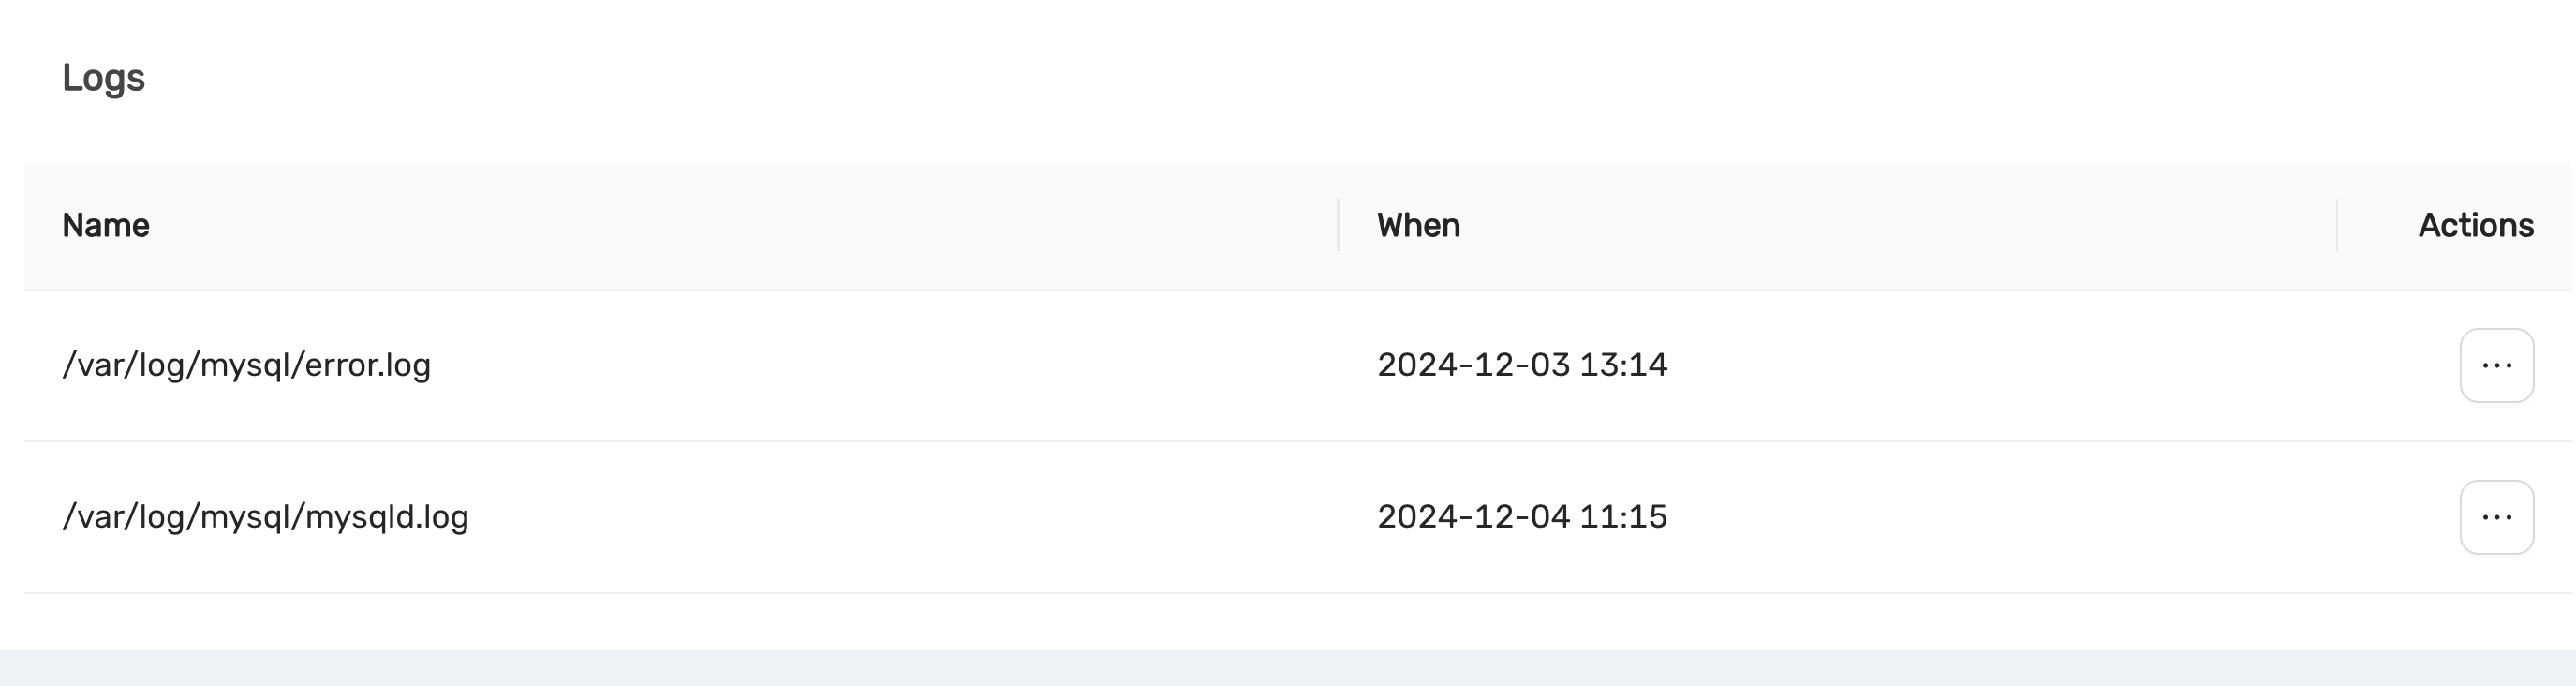
The Logs Viewer is a critical tool for system administrators, enabling real-time monitoring and investigation of log files. With clear timestamps and actionable options, it ensures efficient identification and resolution of issues to maintain the stability of datastore operations.
4.8.13 - Observability
Overview
DBaaS offers metrics monitoring via the UI and remote.
Via UI there are various metrics for both databases and the nodes are presented under the datastore Monitor tab.
Remotely it is possible to monitor by using Prometheus and different exporters. The monitoring data is exposed though the exports from each node in the datastore. This is controlled under the Firewall tab in the DBaaS UI.
The ports available for the specific datastore configuration can be seen in UI under Firewall tab and the specific IP-address entry (fold the arrow to the left of the IP-address).
Exporter ports
Each exporter has its own port used by prometheus to scrape metrics.
| Exporter | TCP port |
|---|---|
| Node | 9100 |
| Mysql | 9104 |
| Postgres | 9187 |
| Redis | 9121 |
| MSSQL | 9399 |
Sample visible metrics
The following tables are excerpts of metrics for the different exporters to quickly get started.
System - Hardware level metrics
| Statistic | Description |
|---|---|
| Load Average | The overall load on your Datastore within the preset period |
| CPU Usage | The breakdown of CPU utilisation for your Datastore, including both System and User processes |
| RAM Usage | The amount of RAM (in Gigabytes) used and available within the preset period |
| Network Usage | The amount of data (in Kilobits or Megabits per second) received and sent within the preset period |
| Disk Usage | The total amount of storage used (in Gigabytes) and what is available within the preset period |
| Disk IO | The input and output utilisation for your disk within the preset period |
| Disk IOPS | The number of read and write operations within the preset period |
| Disk Throughput | The amount of data (in Megabytes per second) that is being read from, or written to, the disk within the preset period |
MySQL / MariaDB
- Handler Stats
Statistic Description Read Rnd Count of requests to read a row based on a fixed position Read Rnd Next Count of requests to read a subsequent row in a data file Read Next Count of requests to read the next row in key order Read Last Count of requests to read the last key in an index Read Prev Count of requests to read the previous row in key order Read First Count of requests to read a row based on an index key value Read Key Count of requests to read the last key in an index Update Count of requests to update a row Write Count of requests to insert to a table - Database Connections
Metric Description Thread Connected Count of clients connected to the database Max Connections Count of max connections allowed to the database Max Used Connections Maximum number of connections in use Aborted Clients Number of connections aborted due to client not closing Aborted Connects Number of failed connection attempts Connections Number of connection attempts - Queries
- Count of queries executed
- Scan Operations
- Count of operations for the operations: SELECT, UPDATE and DELETE
- Table Locking
Metric Description Table locks immediate Count of table locks that could be granted immediately Table locks waited Count of locks that had to be waited due to existing locks or another reason - Temporary Tables
Metric Description Temporary tables Count of temporary tables created Temporary tables on Disk Count of temporary tables created on disk rather than in memory - Aborted Connections
Metric Description Aborted Clients Number of connections aborted due to client not closing Aborted Connects Number of failed connection attempts Access Denied Errors Count of unsuccessful authentication attempts - Memory Utilisation
Metric Description SELECT (fetched) Count of rows fetched by queries to the database SELECT (returned) Count of rows returned by queries to the database INSERT Count of rows inserted to the database UPDATE Count of rows updated in the database DELETE Count of rows deleted in the database Active Sessions Count of currently running queries Idle Sessions Count of connections to the database that are not currently in use Idle Sessions in transaction Count of connections that have begun a transaction but not yet completed while not actively doing work Idle Sessions in transaction (aborted) Count of connections that have begun a transaction but did not complete and were forcefully aborted before they could complete Lock tables Active locks on the database Checkpoints requested and timed Count of checkpoints requested and scheduled Checkpoint sync time Time synchronising checkpoint files to disk Checkpoint write time Time to write checkpoints to disk
Redis
| Metric | Description |
|---|---|
| Blocked Clients | Clients blocked while waiting on a command to execute |
| Memory Used | Amount of memory used by Redis (in bytes) |
| Connected Clients | Count of clients connected to Redis |
| Redis commands per second | Count of commands processed per second |
| Total keys | The total count of all keys stored by Redis |
| Replica Lag | The lag (in seconds) between the primary and the replica(s) |
4.8.14 - Parameter Group
Introduced in v.1.51
Parameter Groups is a powerful new feature introduced in version 1.51 of CCX. It enables users to manage and fine-tune database parameters within a group, simplifying configuration and ensuring consistency across datastores.
Overview
With Parameter Groups, users can:
- Create new parameter groups with customized settings.
- Assign parameter groups to specific datastores.
- Edit and update parameters within a group.
- Delete unused parameter groups.
- Automatically synchronize parameter changes with associated datastores.
note:
A datastore can only be associated with one parameter group at a time. Changes to parameters are automatically propagated to all associated datastores.
Features
1. Creating a Parameter Group
Users can create a new parameter group to define custom configurations for their databases.
Steps to Create a New Parameter Group:
- Navigate to the DB Parameters section.
- Click on the + Create new group button.
- Fill in the required details:
- Group Name: A unique name for the parameter group.
- Description: A brief description of the group.
- Vendor: Select the database type (e.g., MySQL, PostgreSQL, Redis).
- Version: Specify the database version.
- Configuration: Choose the type of configuration (e.g., Primary/Replica).
- Customize the parameter values as needed.
- Click Create to save the new group.
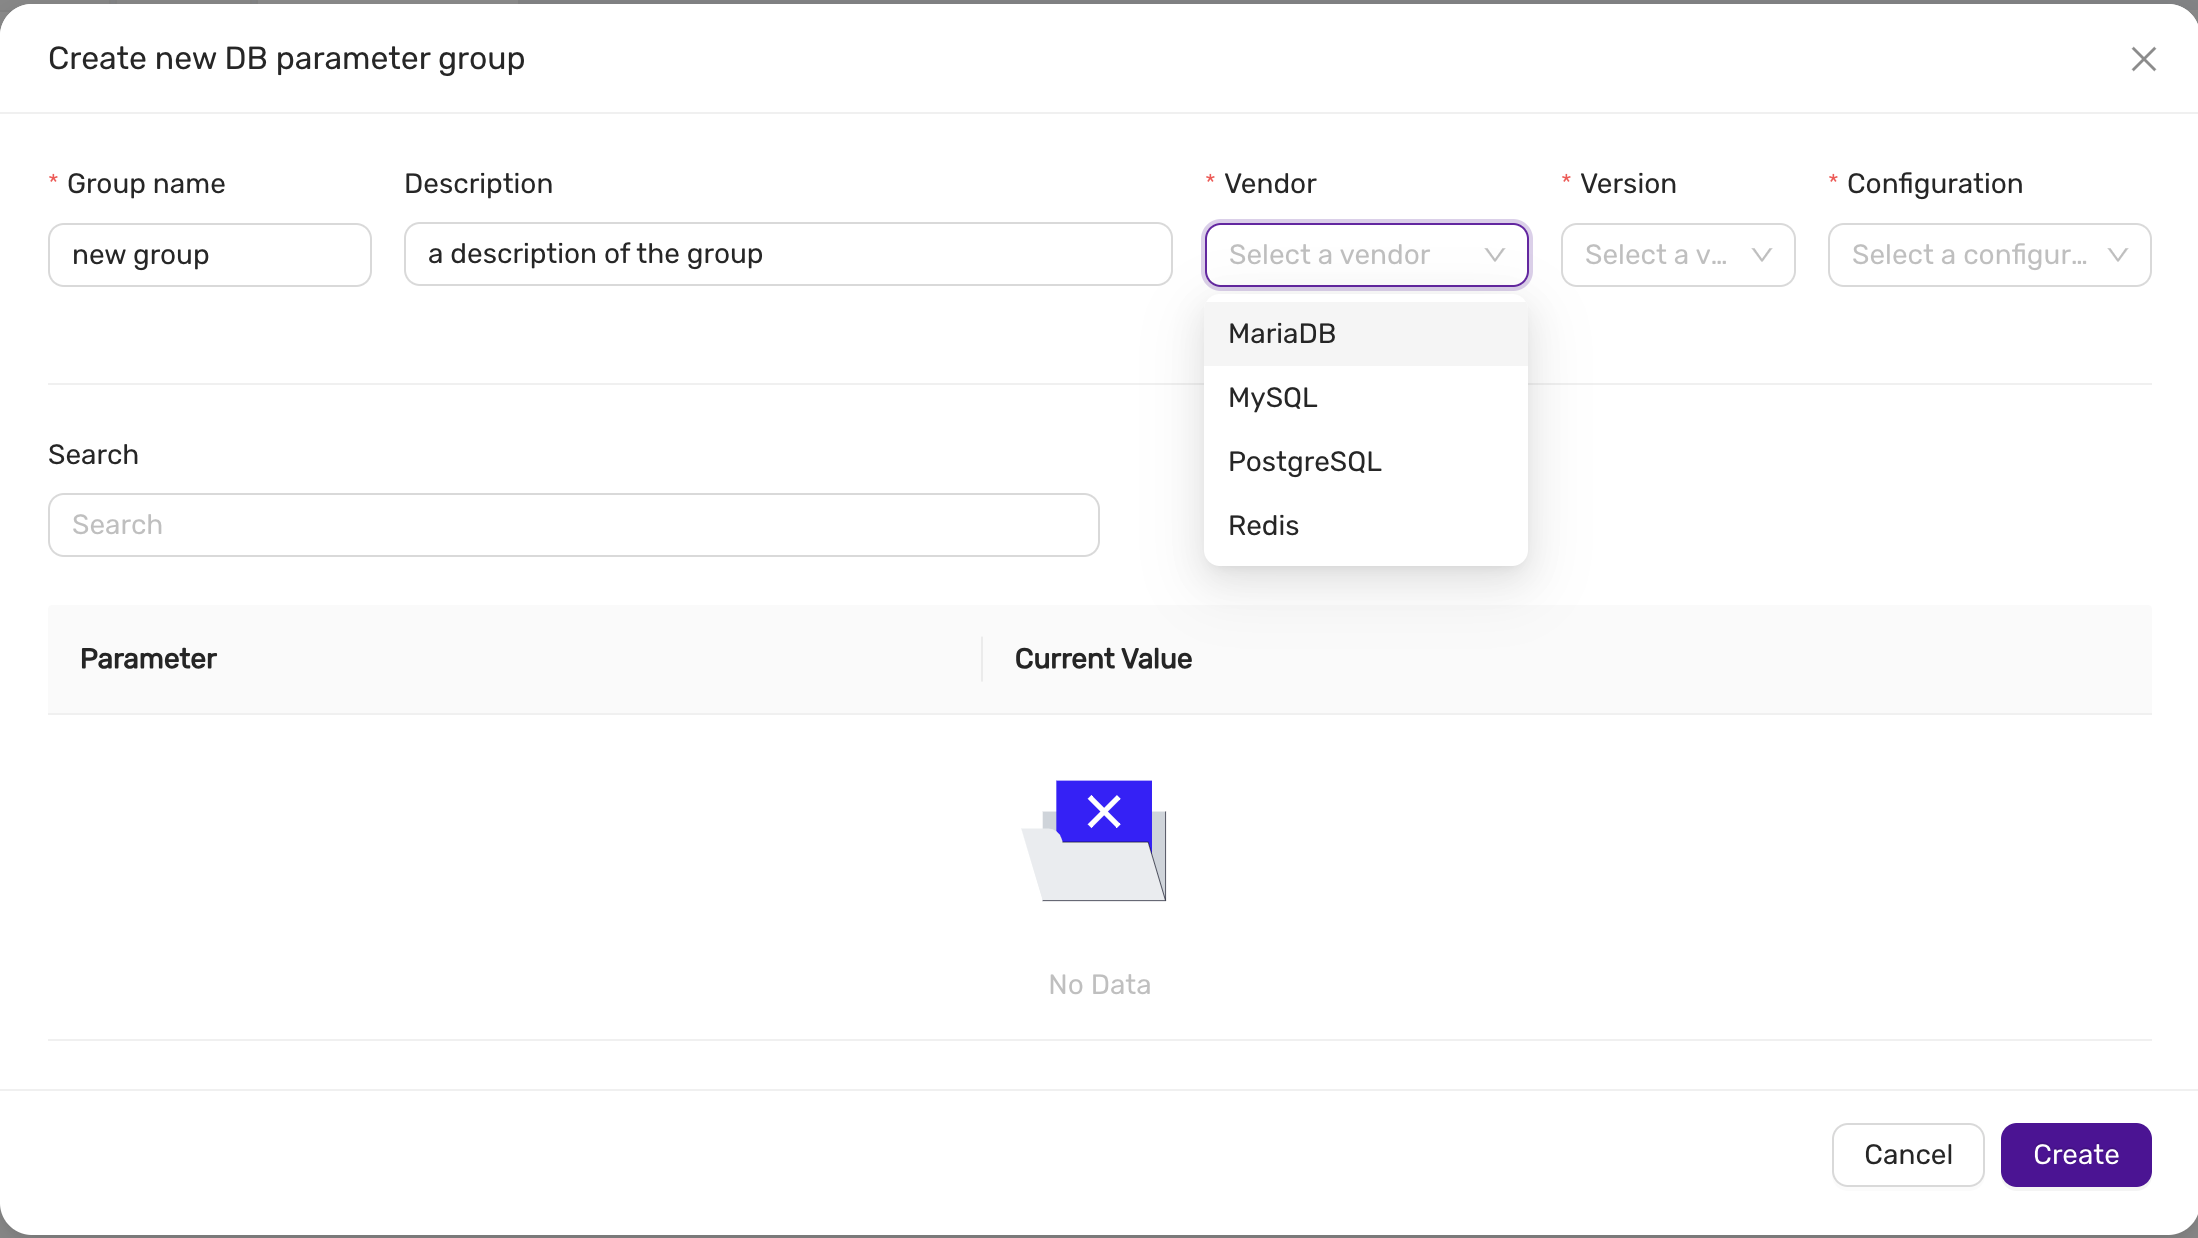
2. Assigning a Parameter Group to a Datastore
Once created, parameter groups can be assigned to datastores to apply the defined settings. The parameter can be assigned to an existing datastore or when a datastore is created.
Steps to Assign a Parameter Group in the Deployment wizard:
- Open the Create datastore wizard
- In the Configuration step, press Advanced, and select the parameter group under DB Settings.
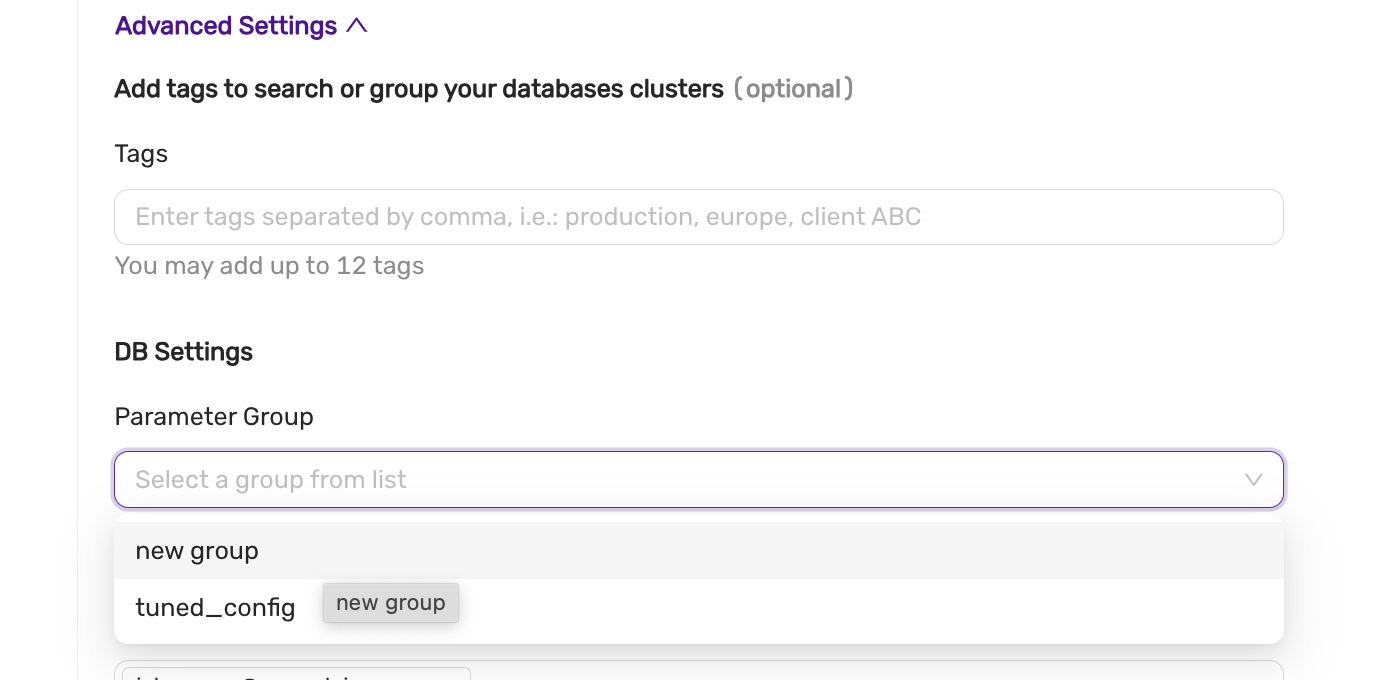
note Please note that atleast one parameter group must exist matching the vendor, version and configuration.
Steps to Assign a Parameter Group to an existing datastore:
- Navigate to the datastore you want to configure.
- Go to the DB Parameters tab.
- Click Change group or Assign group.
- Select the desired parameter group from the dropdown.
- Click Save to apply the group to the datastore.
The system will display the synchronization status (e.g., Pending or Synced) after assigning the group.
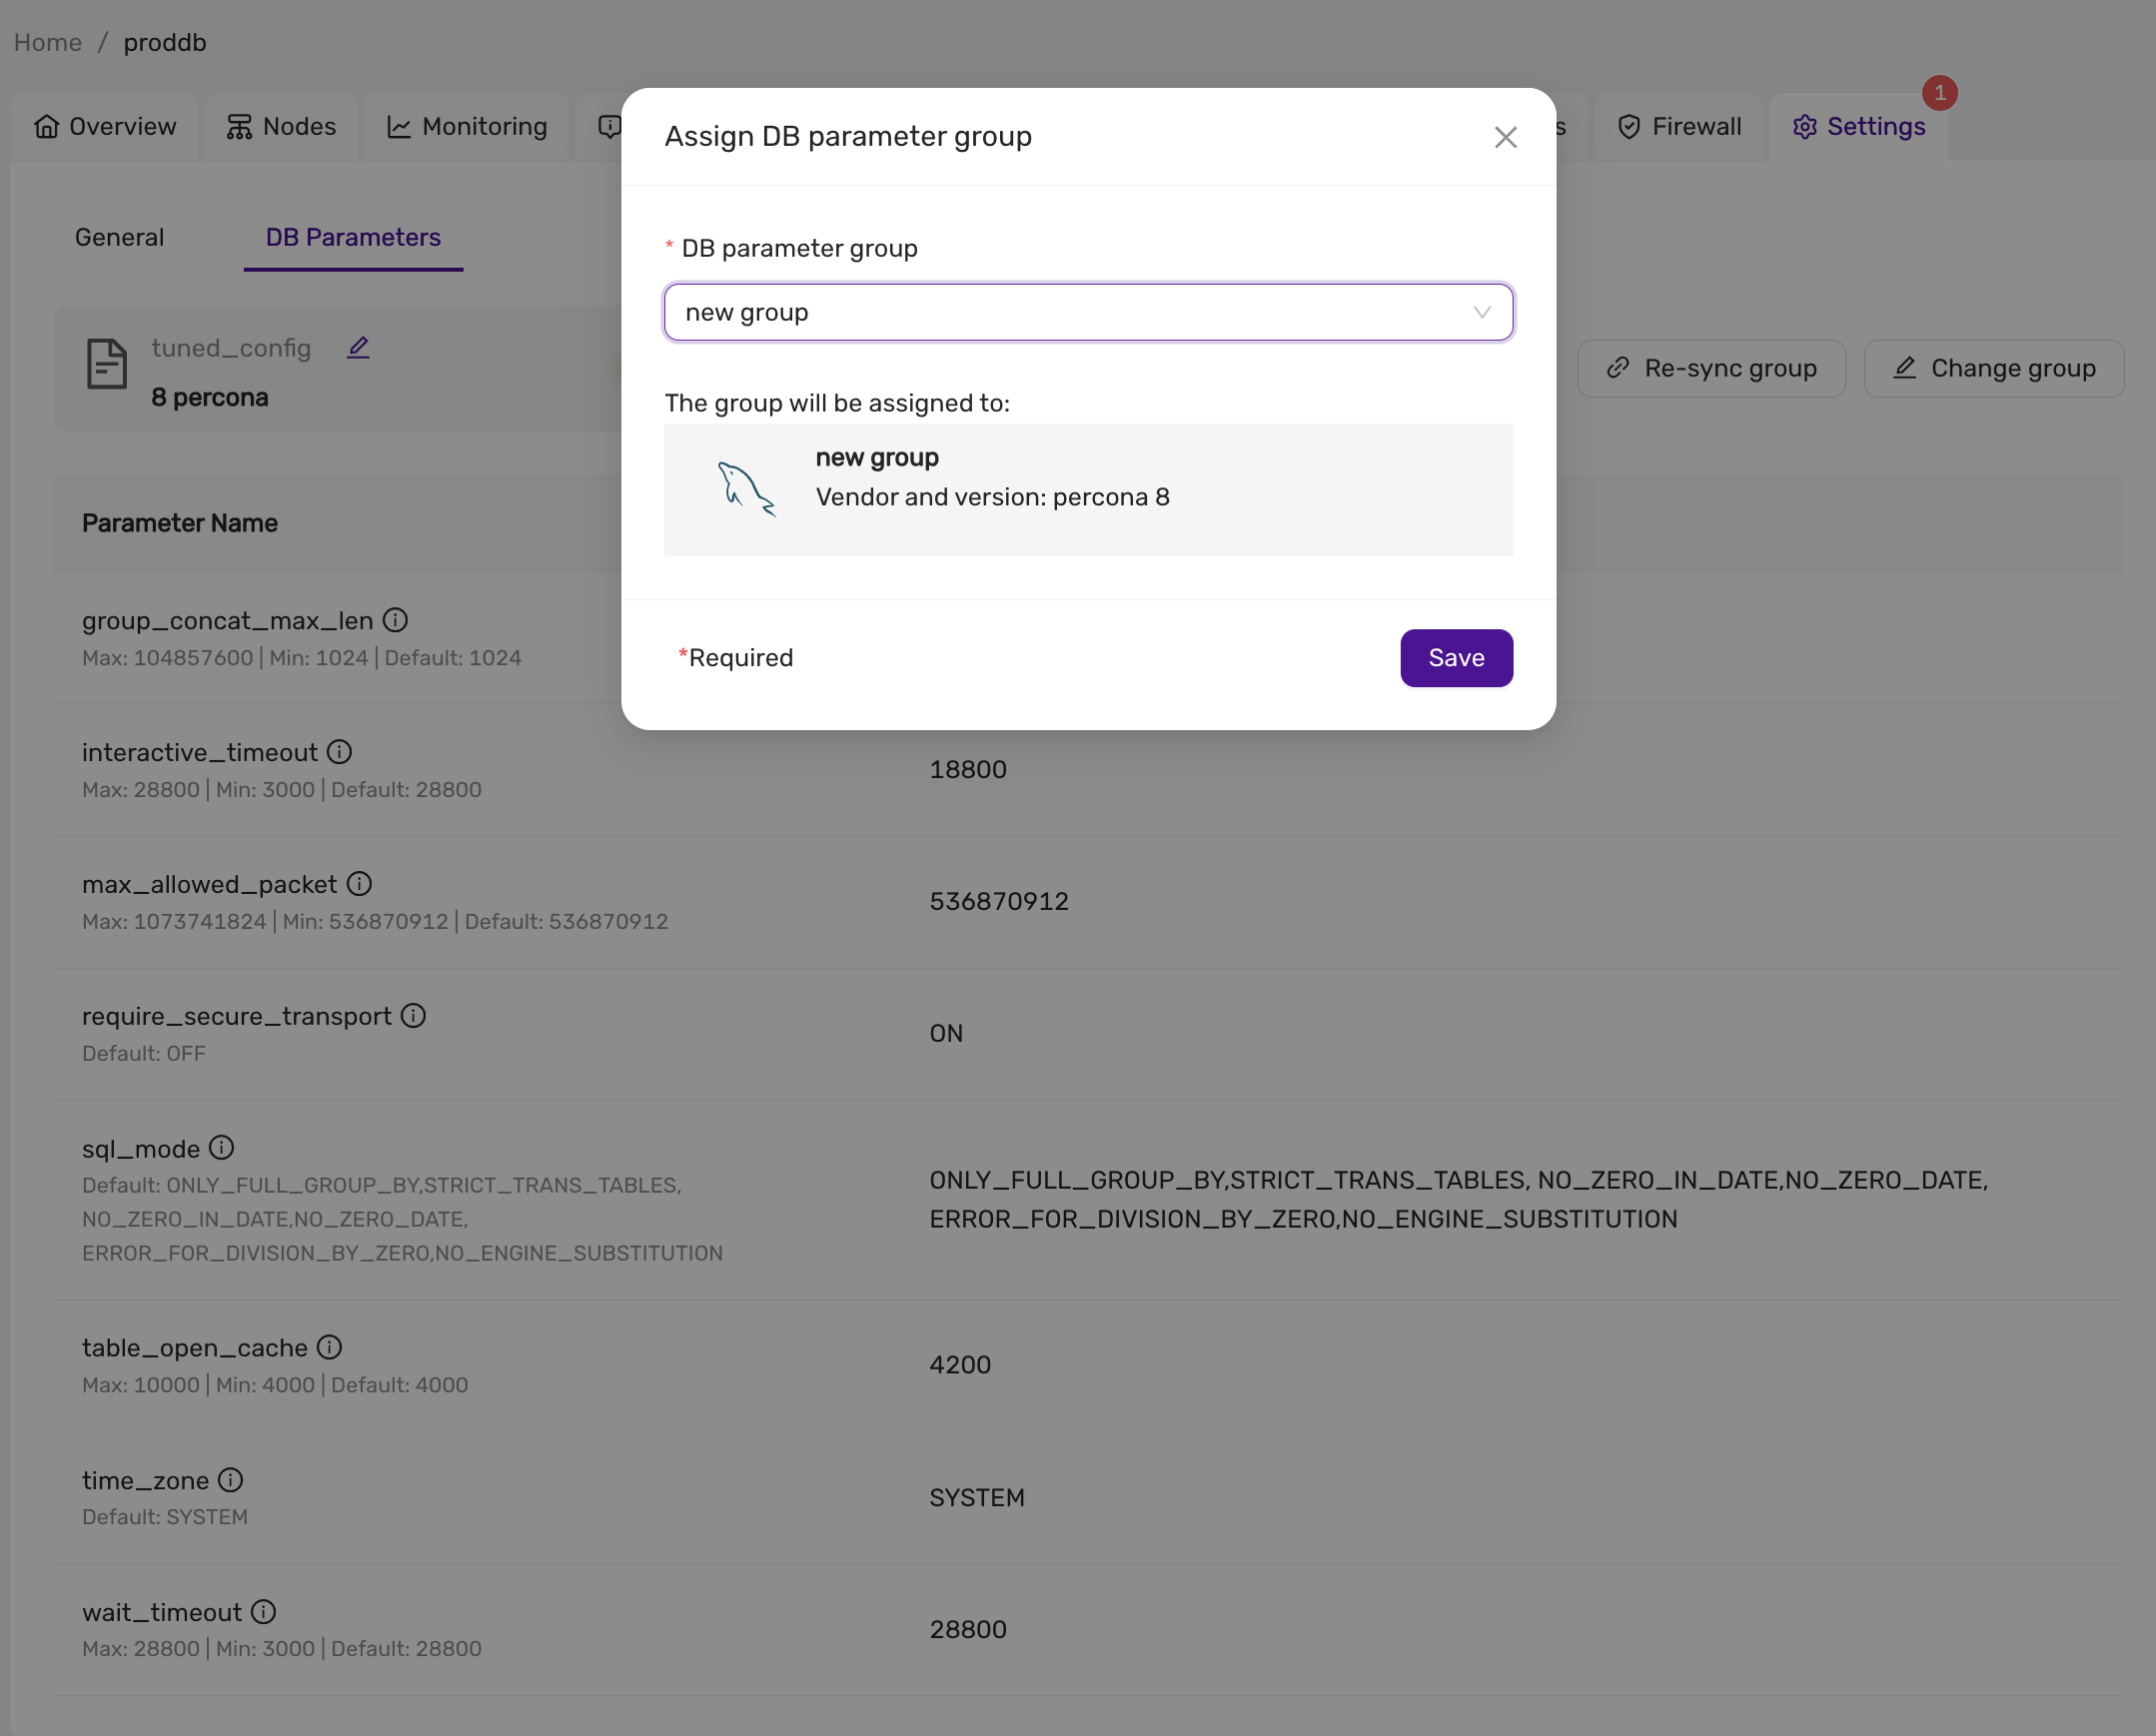
3. Viewing and Managing Parameter Groups
Users can view all parameter groups in the DB Parameters section. For each group, the following details are displayed:
- Group Name
- Vendor and Version
- Datastores: Associated datastores.
- Descriptions
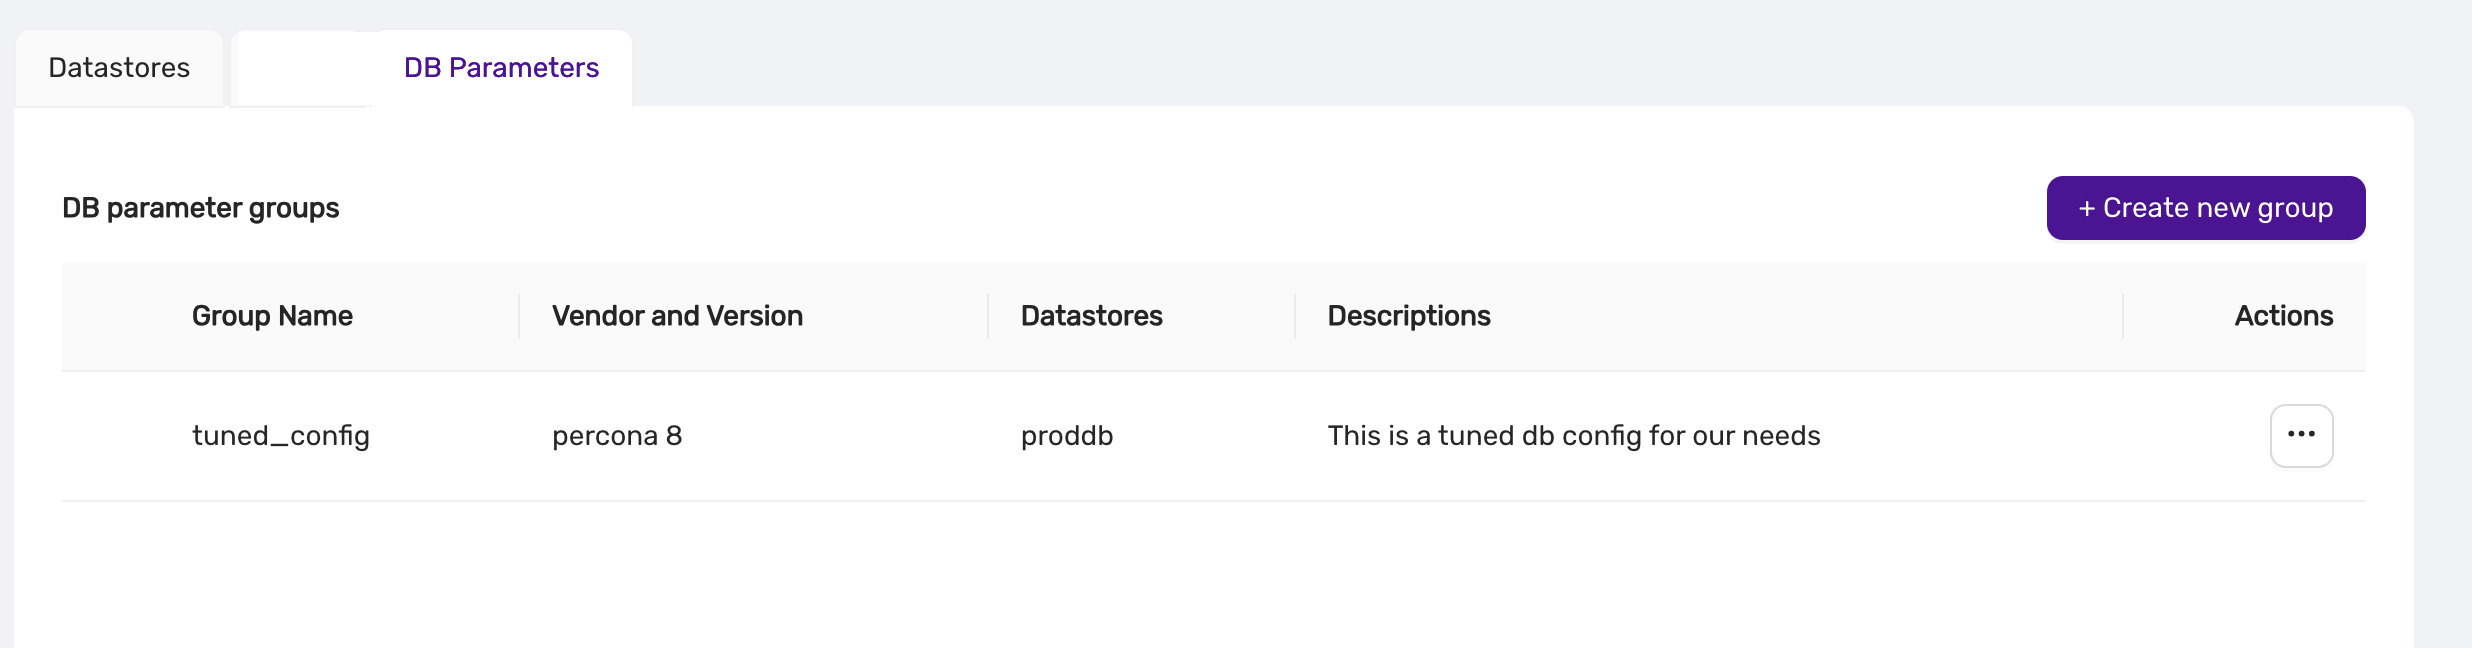
From this view, users can:
- Edit: Modify the group’s parameters.
- Duplicate: Create a copy of the group.
- Delete: Remove the group.
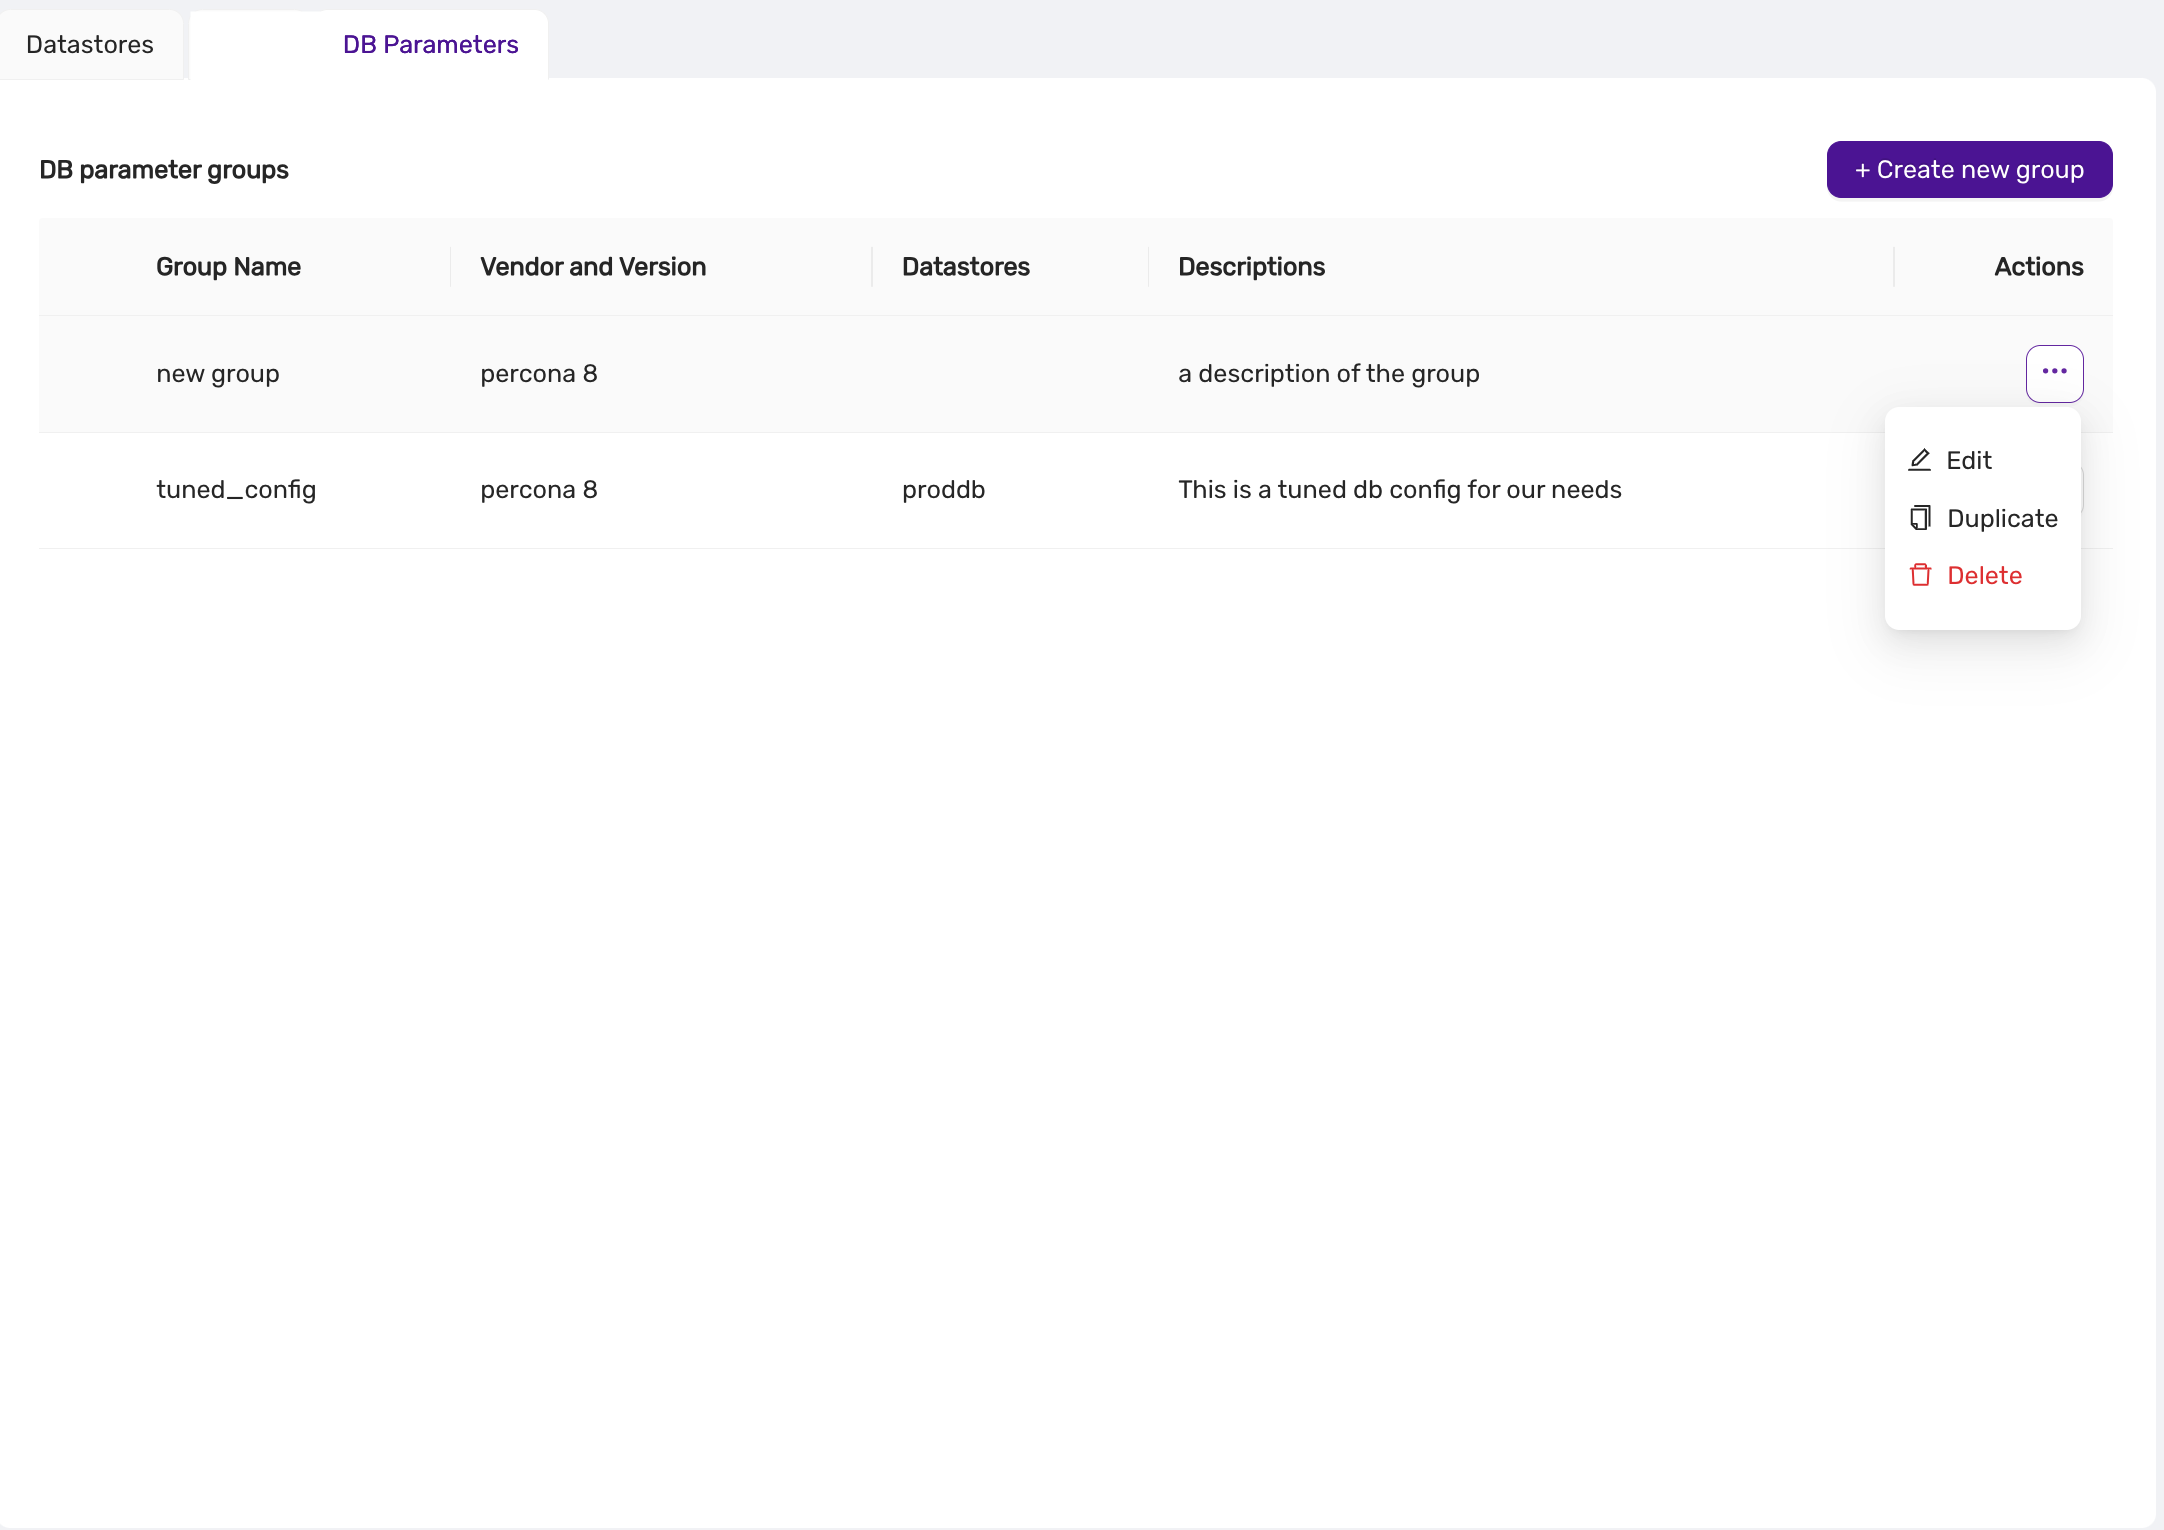
4. Editing a Parameter Group
Parameter groups can be updated to reflect new configurations. Any changes are automatically synchronized with associated datastores.
Steps to Edit a Parameter Group:
- Navigate to the DB Parameters section.
- Click on the three-dot menu next to the group you want to edit.
- Select Edit.
- Update the parameter values as needed.
- Click Save.
5. Deleting a Parameter Group
Unused parameter groups can be deleted to maintain a clean configuration environment.
Steps to Delete a Parameter Group:
- Navigate to the DB Parameters section.
- Click on the three-dot menu next to the group you want to delete.
- Select Delete.
- Confirm the deletion.
note A parameter group cannot be deleted if it is assigned to a datastore.
6. Synchronization
Once a parameter group is assigned to a datastore, the parameters are automatically synchronized. The status of synchronization (e.g., Pending or Synced) is visible in the DB Parameters tab of the datastore, and also in the Event Viewer.

Best Practices
- Use Descriptive Names: Give parameter groups clear, descriptive names to make them easily identifiable.
- Regular Updates: Regularly review and update parameter groups to optimize database performance.
- Monitor Sync Status: Always verify that parameter changes are properly synced to the datastores.
Conclusion
Parameter Groups in CCX provide a centralized and efficient way to manage database configurations. By grouping parameters and syncing them to datastores, users can ensure consistency, reduce manual errors, and improve overall system performance.
4.8.15 - Promote A Replica
You may want to promote a replica to become the new primary. For instance, if you’ve scaled up with a larger instance, you might prefer to designate it as the primary. Alternatively, if you’re scaling down, you may want to switch to a smaller configuration for the primary node.
In the Nodes view, select the Promote Replica action from the action menu next to the replica you wish to promote:

In this example, the replica with an instance size of ‘medium’ will be promoted to the new primary.
A final confirmation screen will appear, detailing the steps that will be performed:
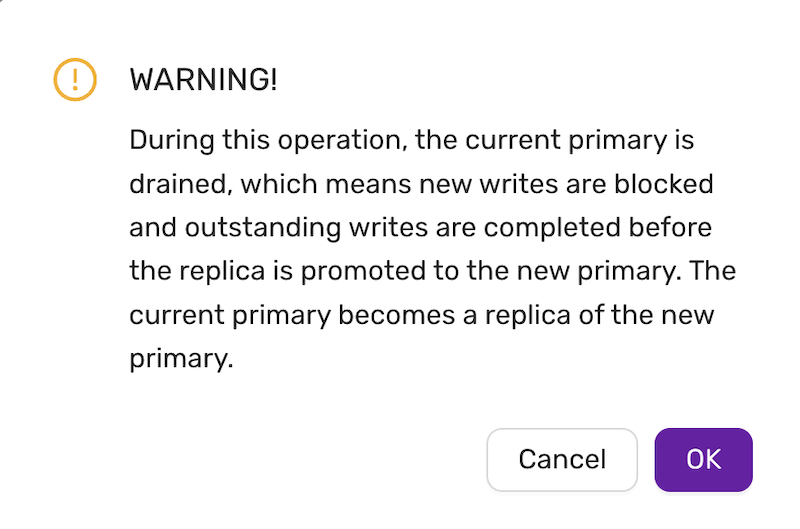
4.8.16 - Reboot A Node
Introduced in v.1.51
The reboot command is found under the action menu of a databse node, on the Nodes page.
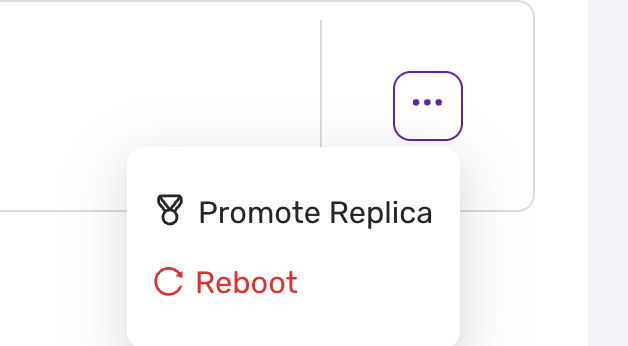
Selecting “Reboot” triggers a restart of the chosen replica. Use this option when:
- the replica needs to be refreshed due to performance issues
- for maintenance purposes.
- For some parameters, any change to the parameter value in a parameter group only takes effect after a reboot.
danger:
- Ensure all tasks linked with the node are concluded before initiating a reboot to prevent data loss.
- Only authorized personnel should perform actions within the administration panel to maintain system integrity.
note:
- Please note that rebooting may cause temporary unavailability.
- In Valkey, the primary may failover to a secondary if the reboot takes more than 30 seconds.
4.8.17 - Restore Backup
The Backup and Restore feature provides users with the ability to create, view, and restore backups for their databases. This ensures data safety and allows recovery to previous states if necessary.
Backup List View
In the Backup tab, users can view all the backups that have been created. The table provides essential information about each backup, such as:
- Method: The tool or service used to perform the backup (e.g.,
mariabackup). - Type: The type of backup (e.g., full backup).
- Status: The current state of the backup (e.g.,
Completed). - Started: The start time of the backup process.
- Duration: How long the backup process took.
- Size: The total size of the backup file.
- Actions: Options to manage or restore backups.
Example Backup Table
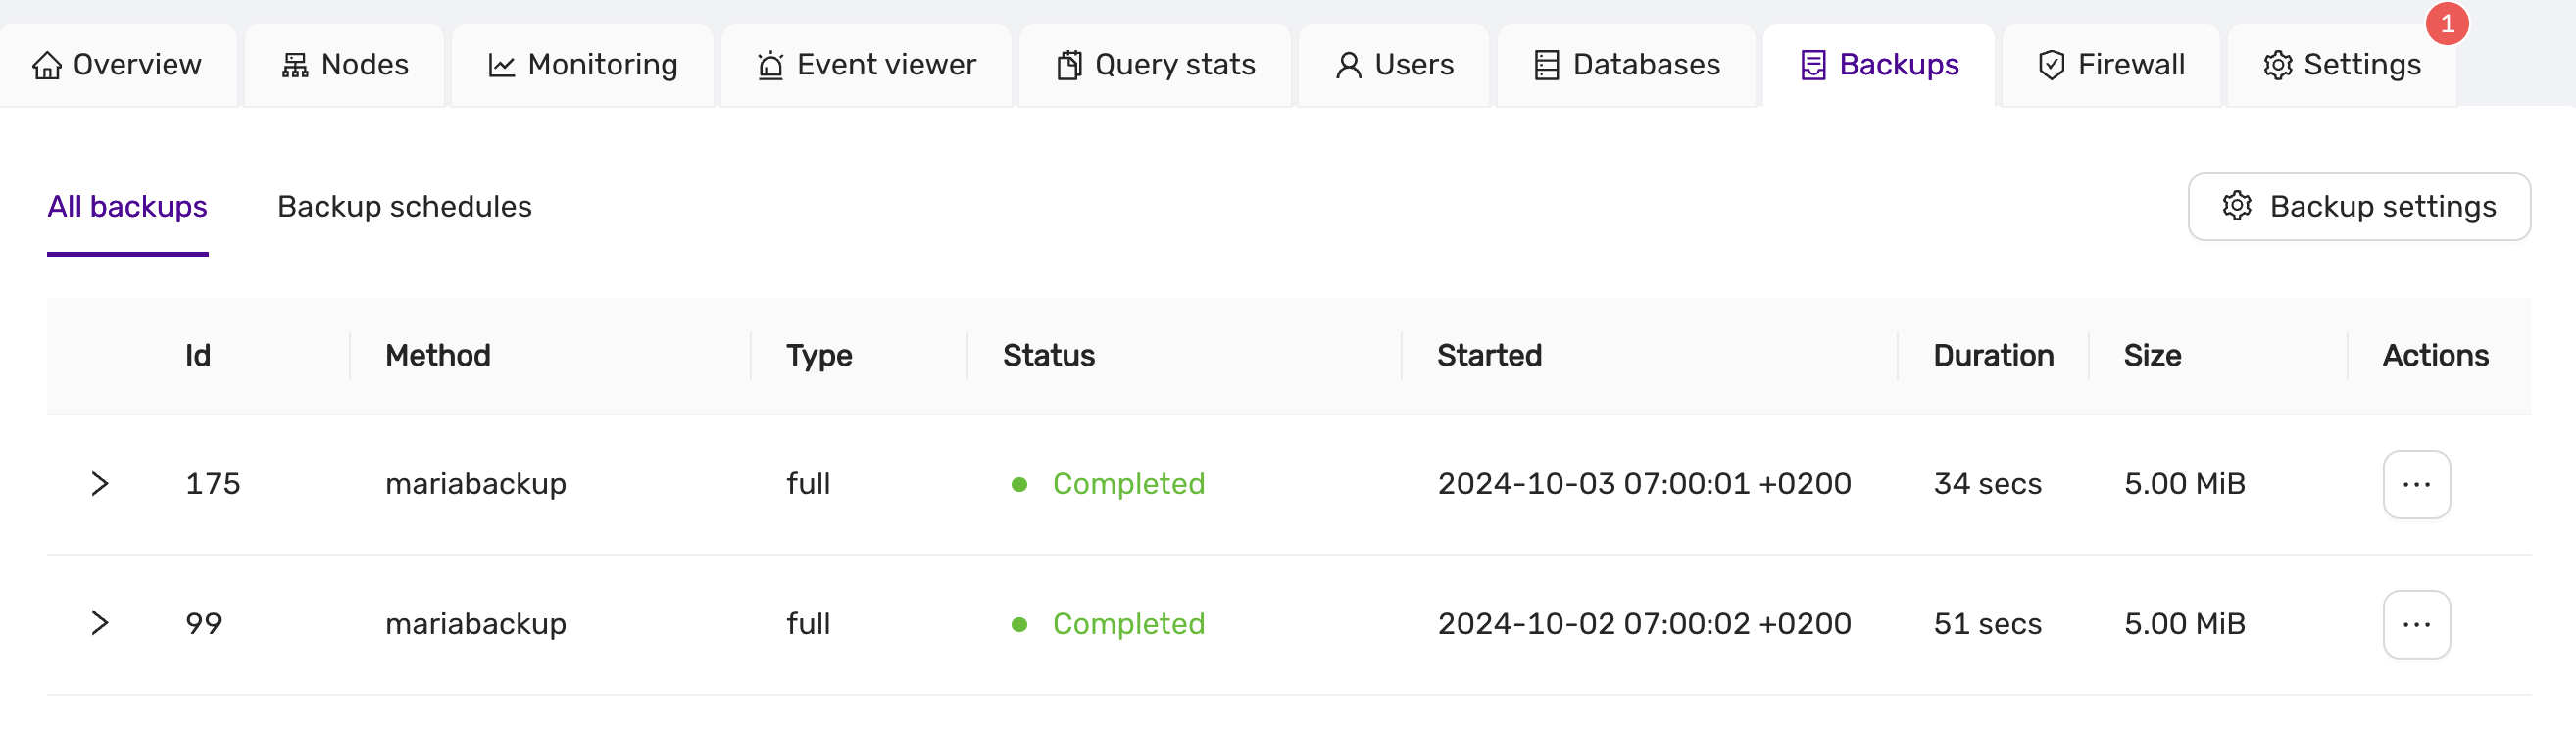
Users can manage their backups using the “Actions” menu, where options such as restoring a backup are available.
Backup Schedules View
The Backup Schedules allows users to manage scheduled backups for their datastore. Users can configure automatic backup schedules to ensure data is periodically saved without manual intervention.
Backup Schedule Table
The schedule table shows the details of each scheduled backup, including:
- Method: The tool or service used to perform the backup (e.g.,
mariabackup). - Type: The type of backup, such as
incrementalorfull. - Status: The current state of the scheduled backup (e.g.,
Active). - Created: The date and time when the backup schedule was created.
- Recurrence: The schedule’s frequency, showing the cron expression used for the schedule (e.g.,
TZ=UTC 5 * * *). - Action: Options to manage the schedule, such as Pause or Edit.
Example Backup Schedule Table:
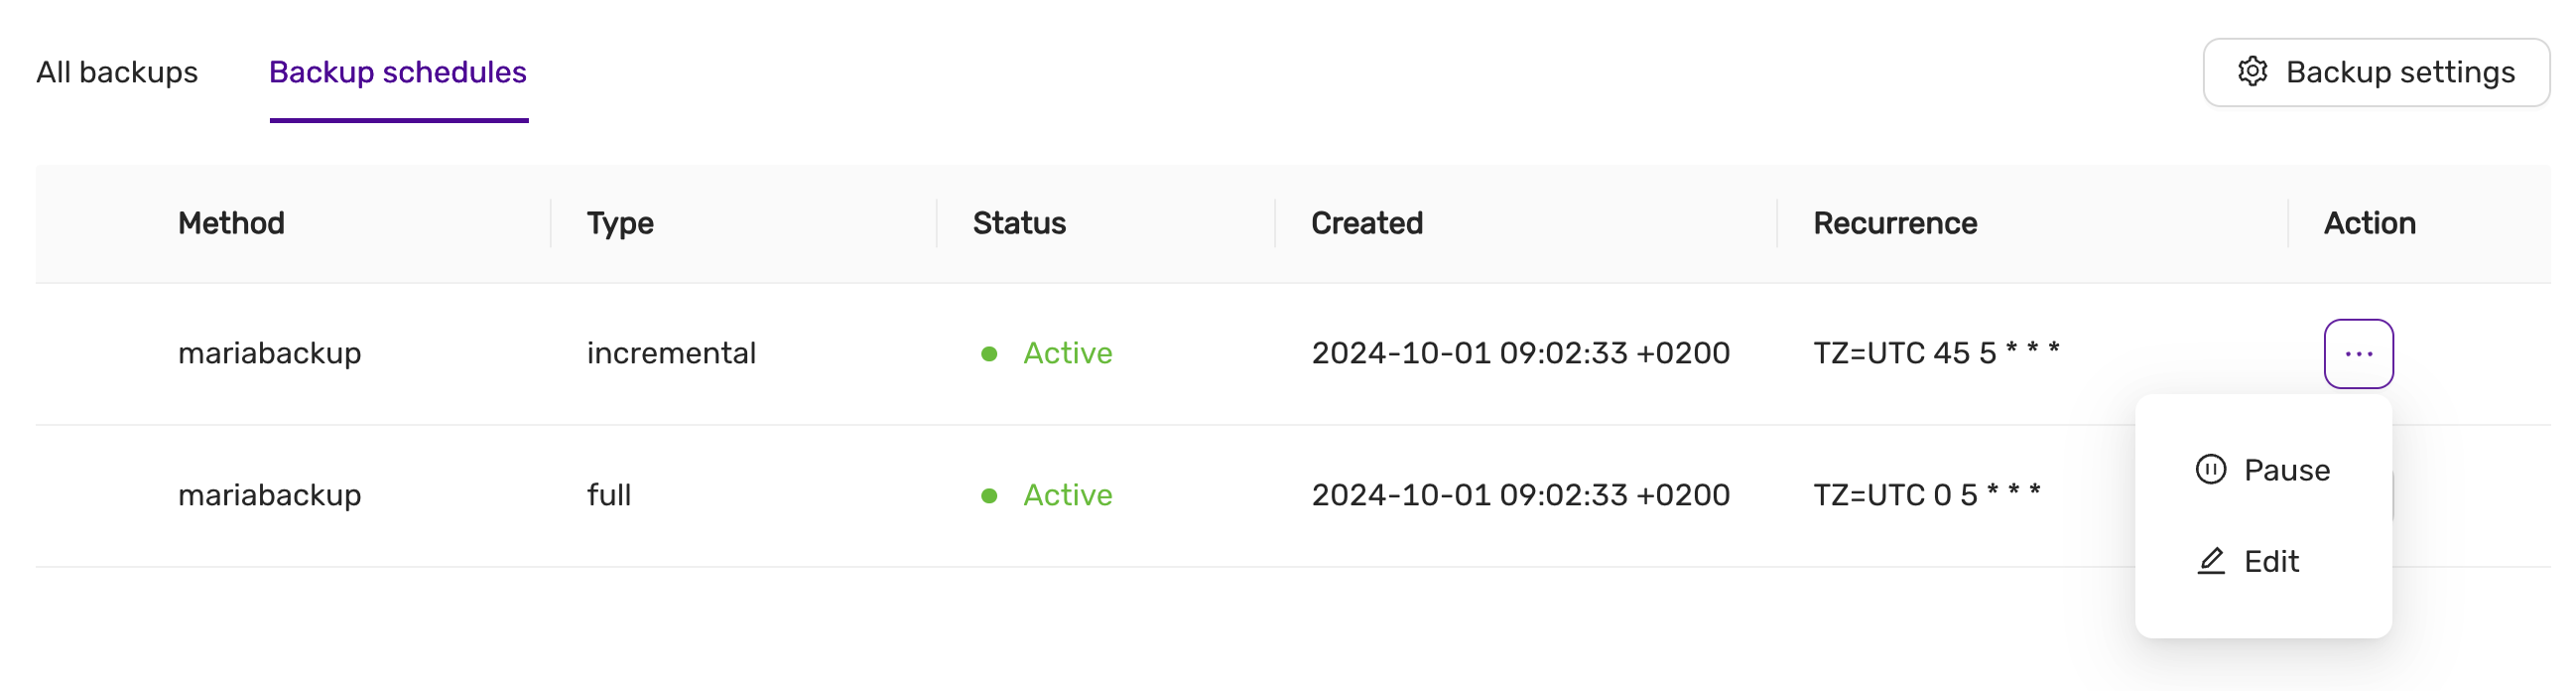
Managing Backup Schedules
The Action menu next to each schedule allows users to:
- Pause: Temporarily stop the backup schedule.
- Edit: Adjust the backup schedule settings, such as its frequency or time.
Editing a Backup Schedule
When editing a backup schedule, users can specify:
- Frequency: Choose between
HourlyorDailybackups. - Time: Set the exact time when the backup will start (e.g., 05:00 UTC).
For example, in the Edit Full Backup Schedule dialog, you can configure a full backup to run every day at a specified time. Adjust the settings as needed and click Save to apply the changes.
Example Backup Schedule Edit Dialog:
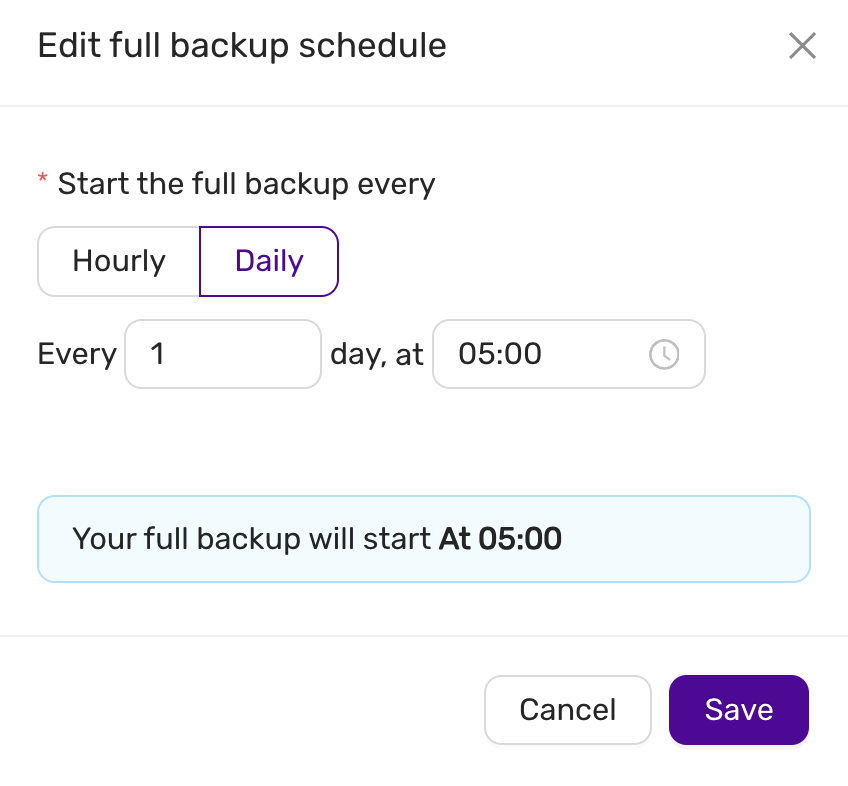
This dialog allows you to easily adjust backup intervals, ensuring that backups align with your operational needs.
note:
Editing or pausing a schedule will not affect the current backups already created. The changes will only apply to future backups.
Restore Backup
To restore a backup, navigate to the Backup tab, find the desired backup, and select the Restore action from the Actions menu. This opens the restore dialog, where the following information is displayed:
- Backup ID: The unique identifier of the backup.
- Type: The type of backup (e.g., full backup).
- Size: The total size of the backup file.
Restore Settings
- Use Point in Time Recovery: Option to enable point-in-time recovery for finer control over the restore process. PITR is only supported by Postgres, MySQL/MariaDb, and MS SQLServer.
By default, this option is turned off, allowing a full restoration from the selected backup.
Confirmation
Before initiating the restore, users are presented with a confirmation dialog:
You are going to restore a backup
You are about to restore a backup created on03/10/2024 05:00 UTC.
This process will completely overwrite your current data, and all changes since your last backup will be lost.
Users can then choose to either Cancel or proceed with the Restore.
Example Restore Dialog:
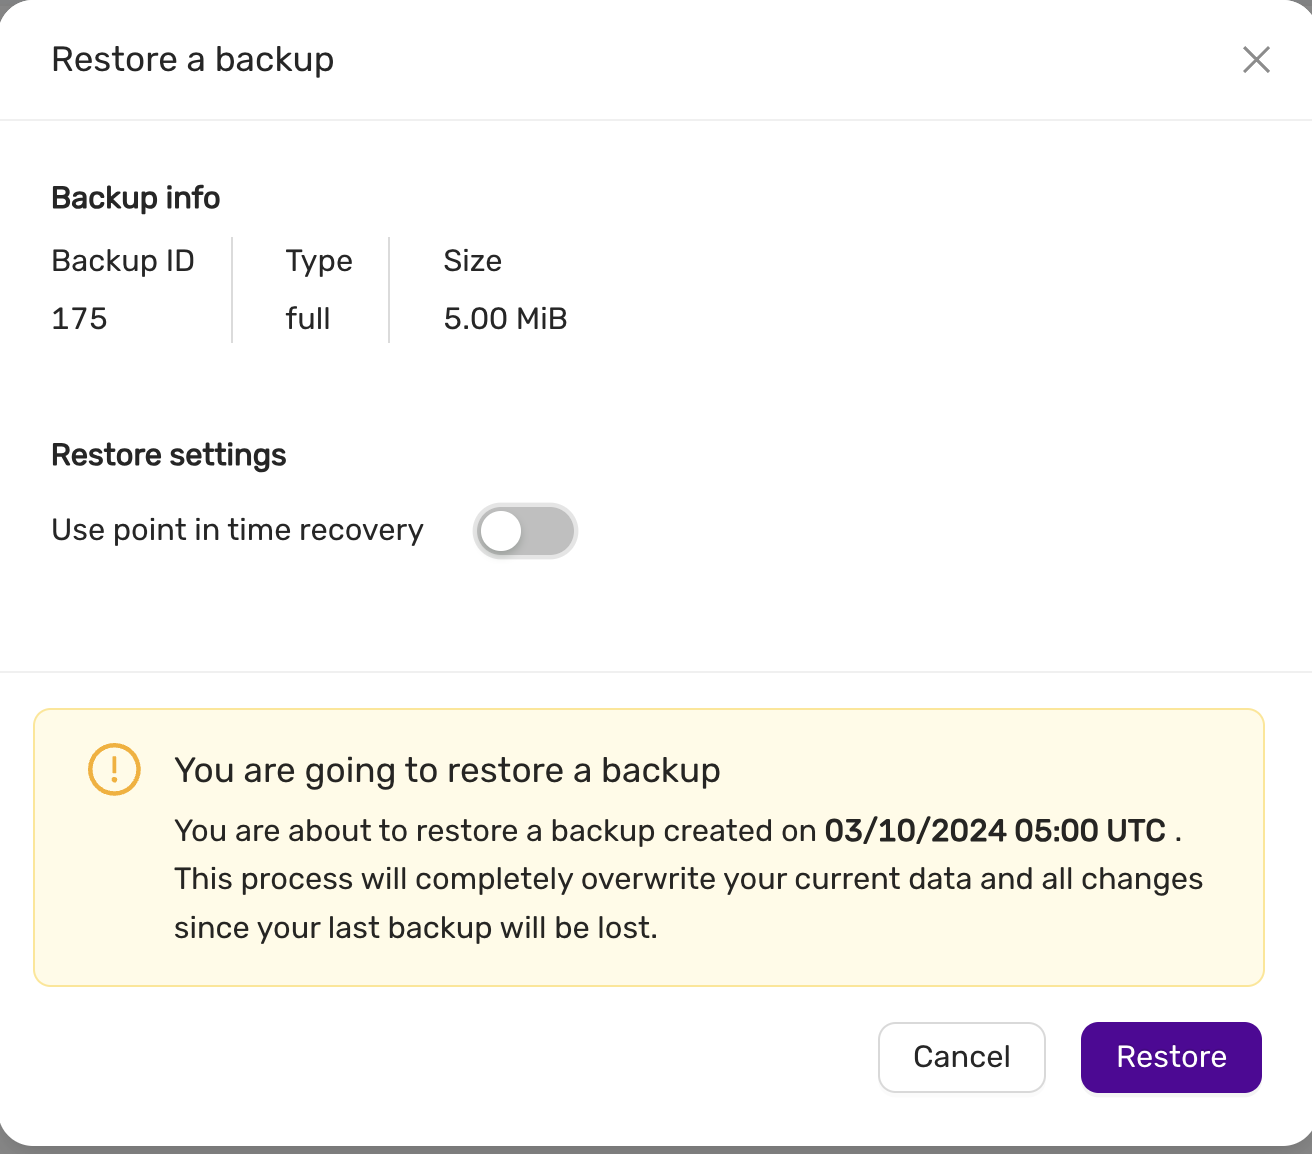
This ensures that users are fully aware of the potential data loss before proceeding with the restore operation.
4.8.18 - Scale A Datastore
This section explains how to scale a datastore, including:
- Scaling volumes
- Scaling nodes (out, in, up and down)
A datastore can be scaled out to meet growing demands. Scaling out involves adding:
- One or more replica nodes (for primary/replica configurations). This is useful when you need to scale up and want the primary node to have more resources, such as additional CPU cores and RAM.
- One or more primary nodes (for multi-primary configurations). In multi-primary setups, scaling up or down must maintain an odd number of nodes to preserve quorum and the consensus protocol required by the database.
The instance type of the new nodes may differ from the current ones.
To scale a datastore, navigate to the Nodes page and select Nodes Configuration.
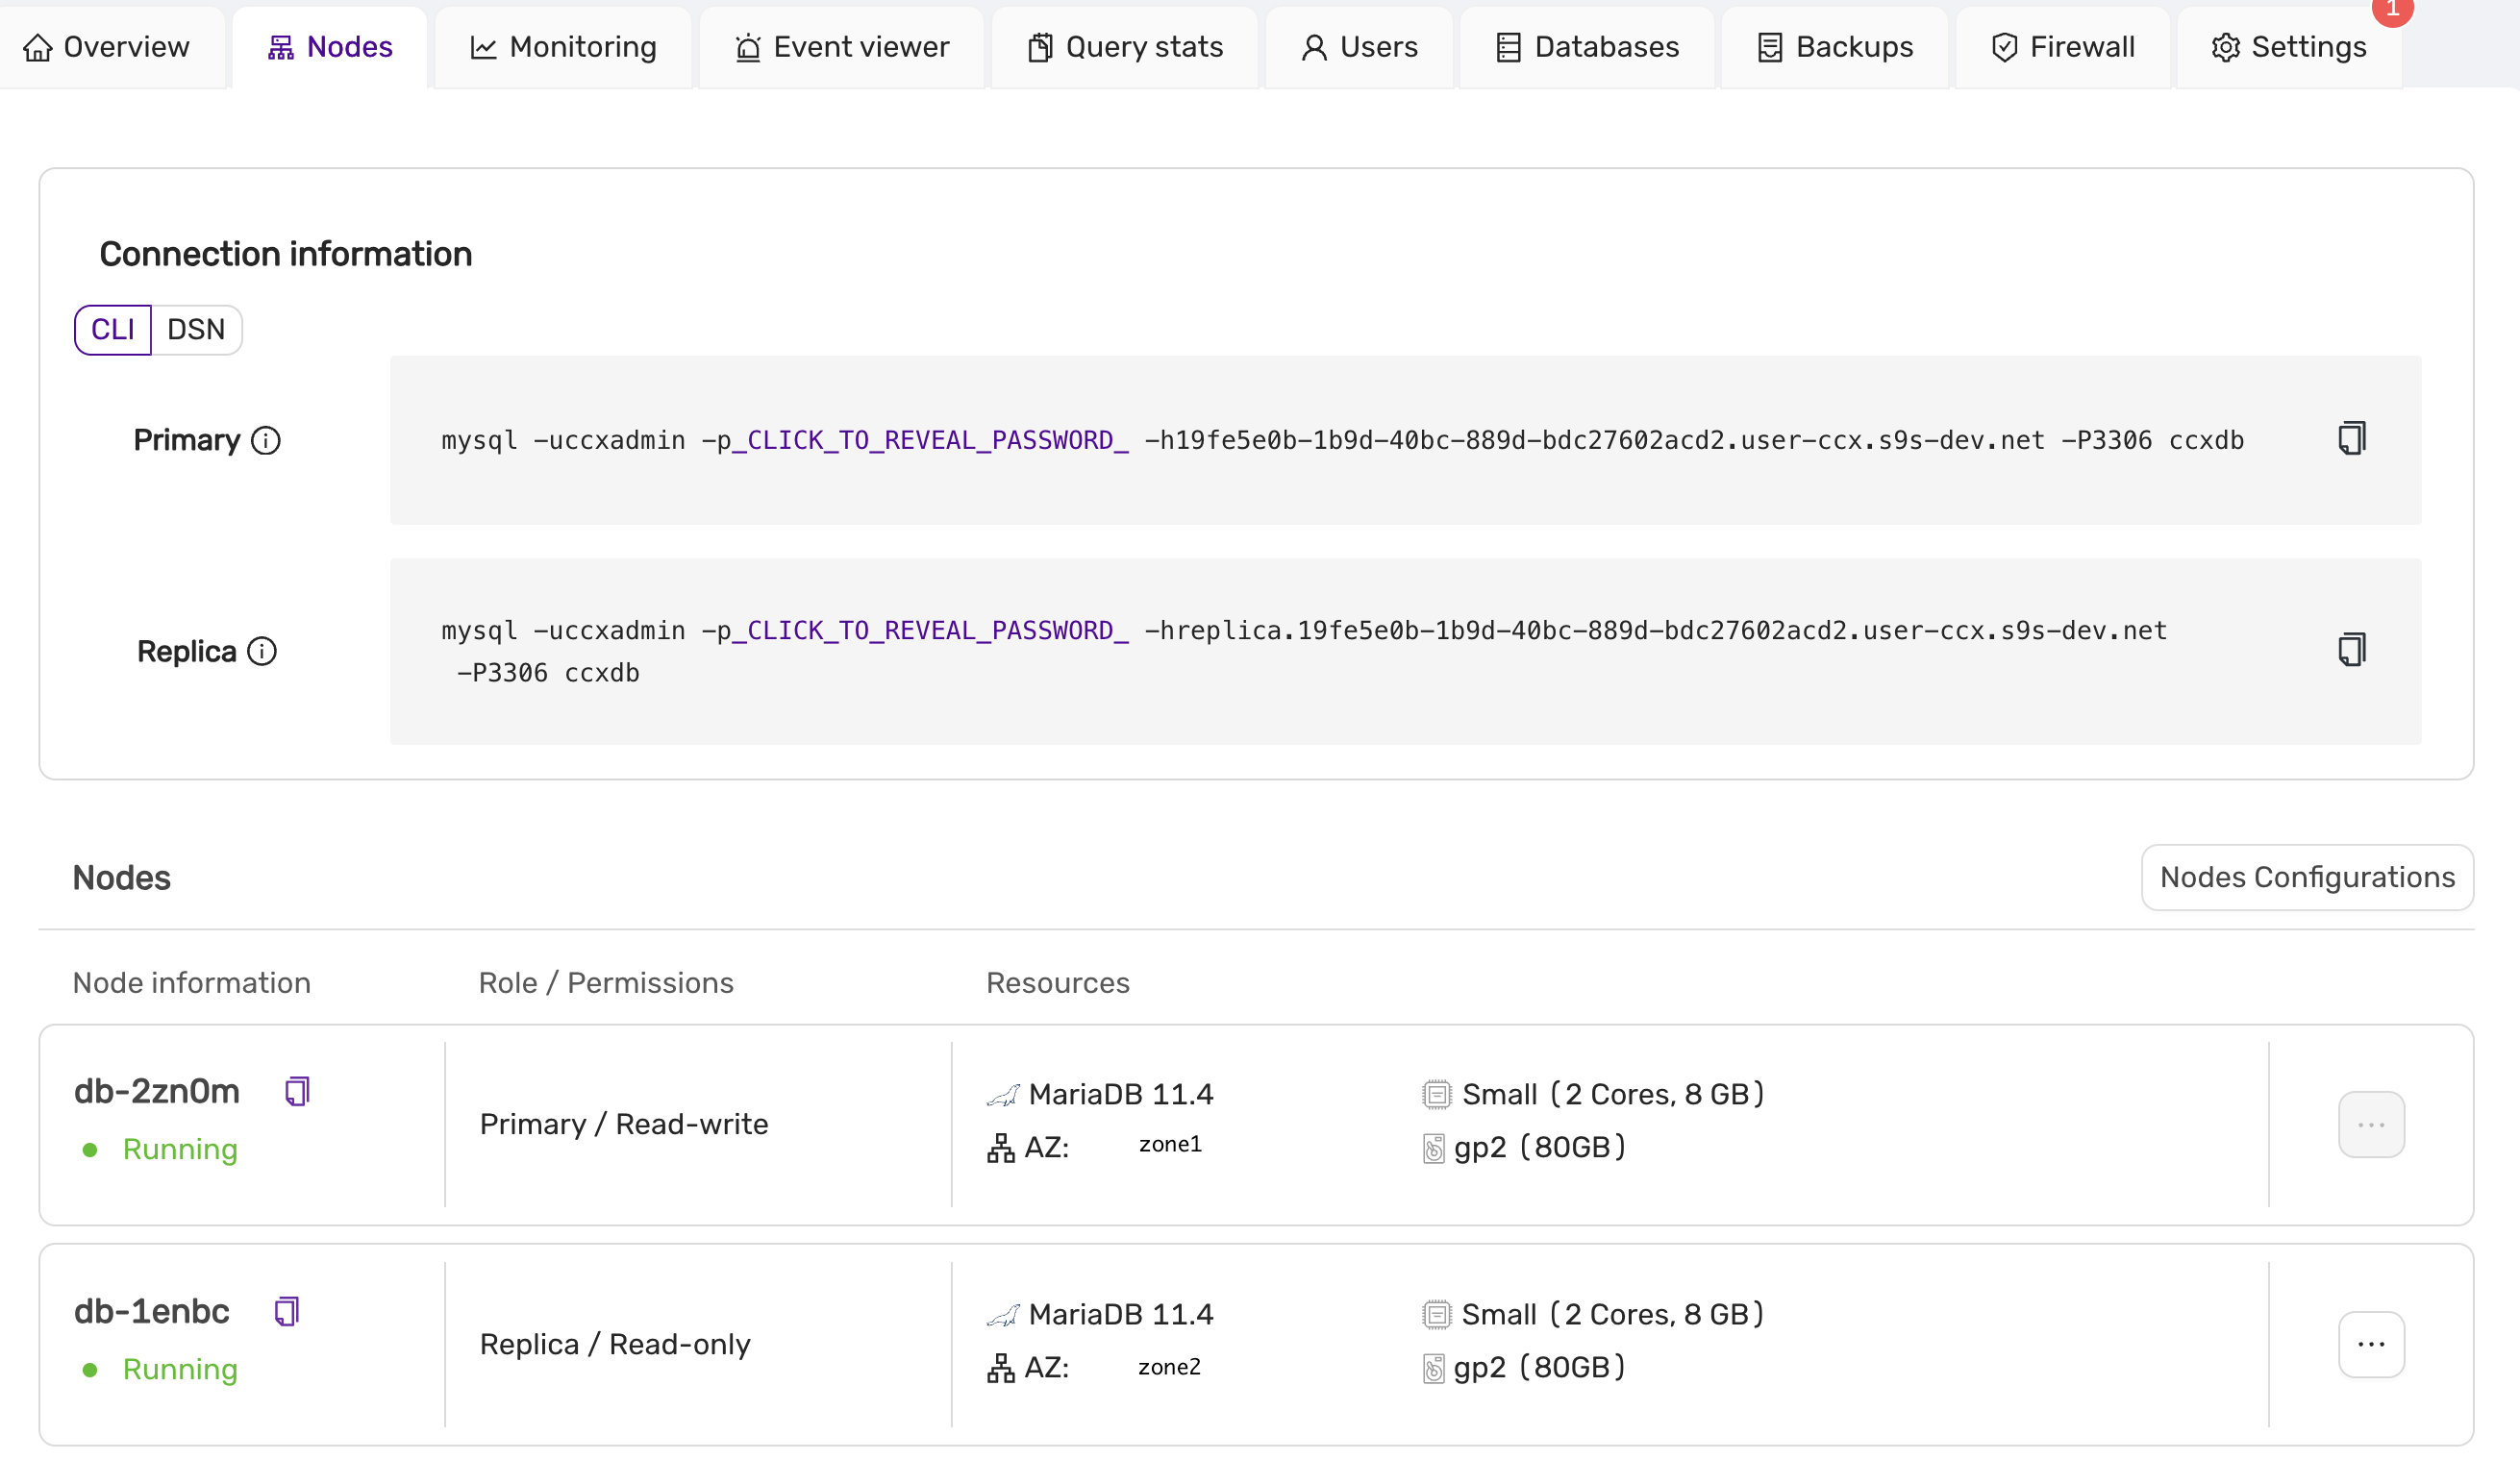
Scaling Up or Down, In or Out
Use the slider to adjust the datastore’s new size. In this example, we have two nodes (one primary and one replica), and we want to scale up to four nodes. You can also specify the availability zones and instance sizes for the new nodes. Later, you might choose to promote one of the replicas to be the new primary. To proceed with scaling, click Save and wait for the scaling job to complete.
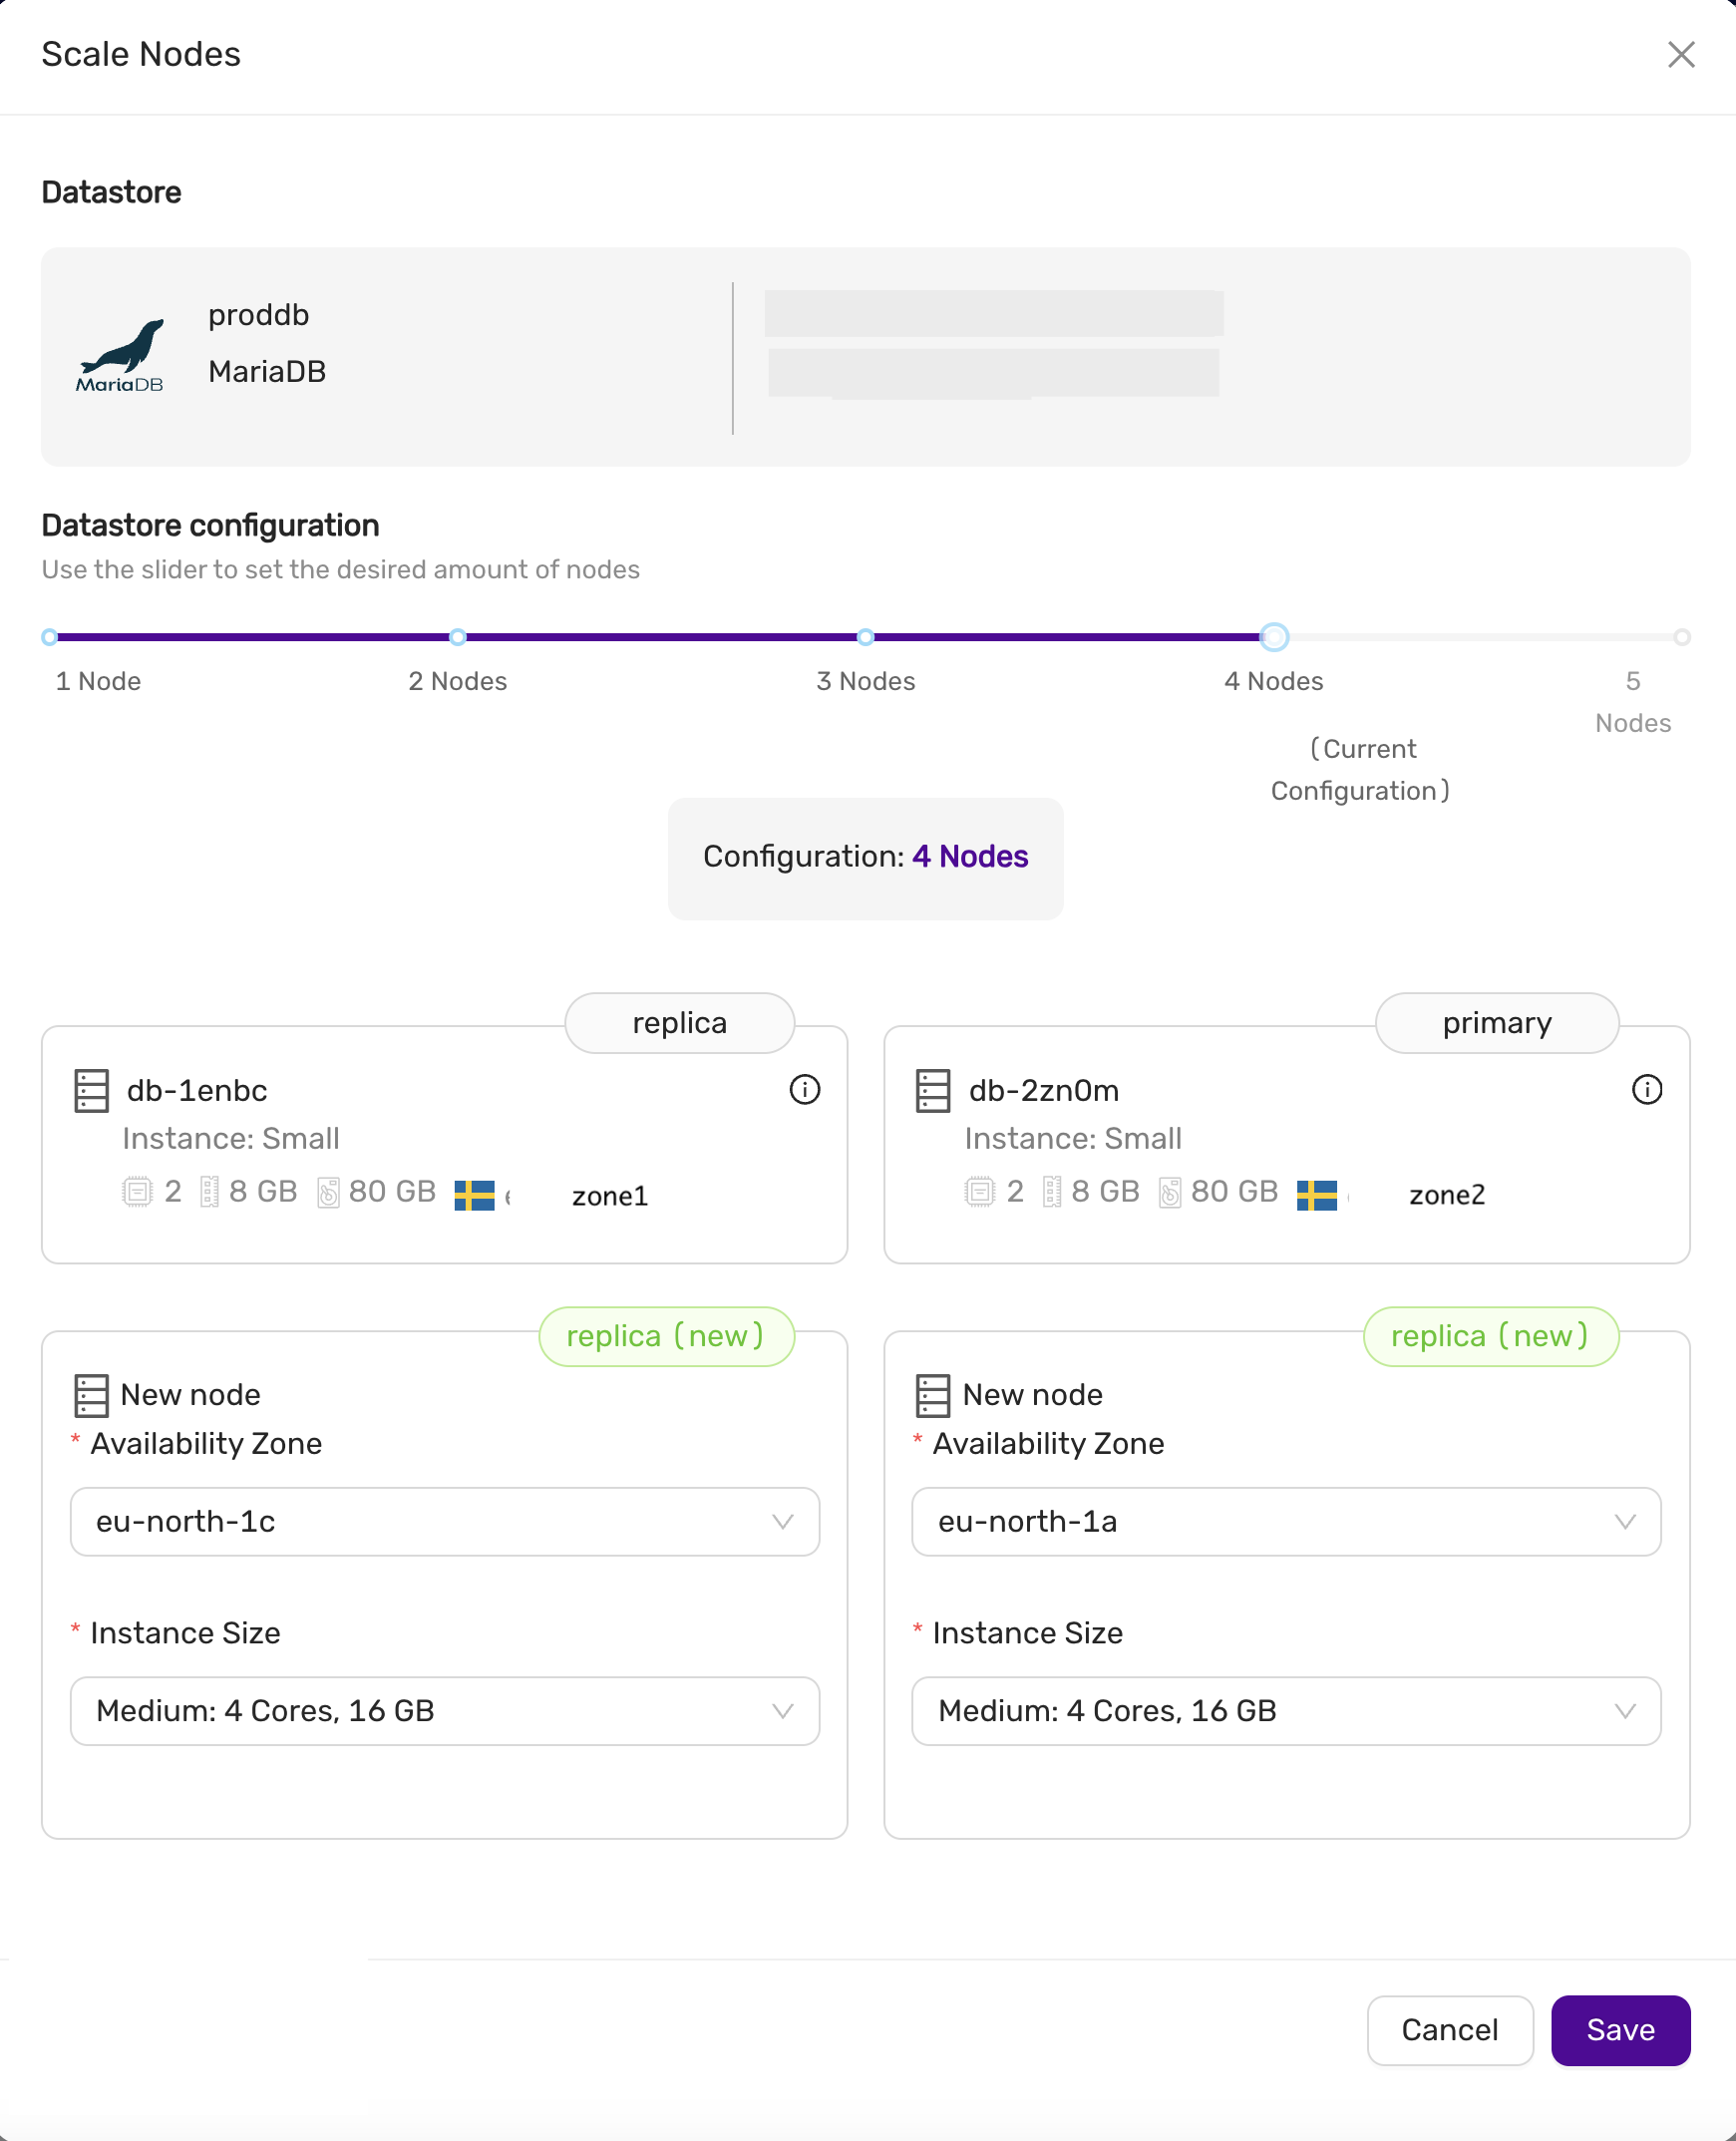
Scaling Down
You can also scale down by removing replicas or primary nodes (in a multi-primary configuration). In the Nodes Configuration view, select the nodes you wish to remove, then click Save to begin the scaling process. This allows you to reduce the size of the datastore or remove nodes with unwanted instance sizes.
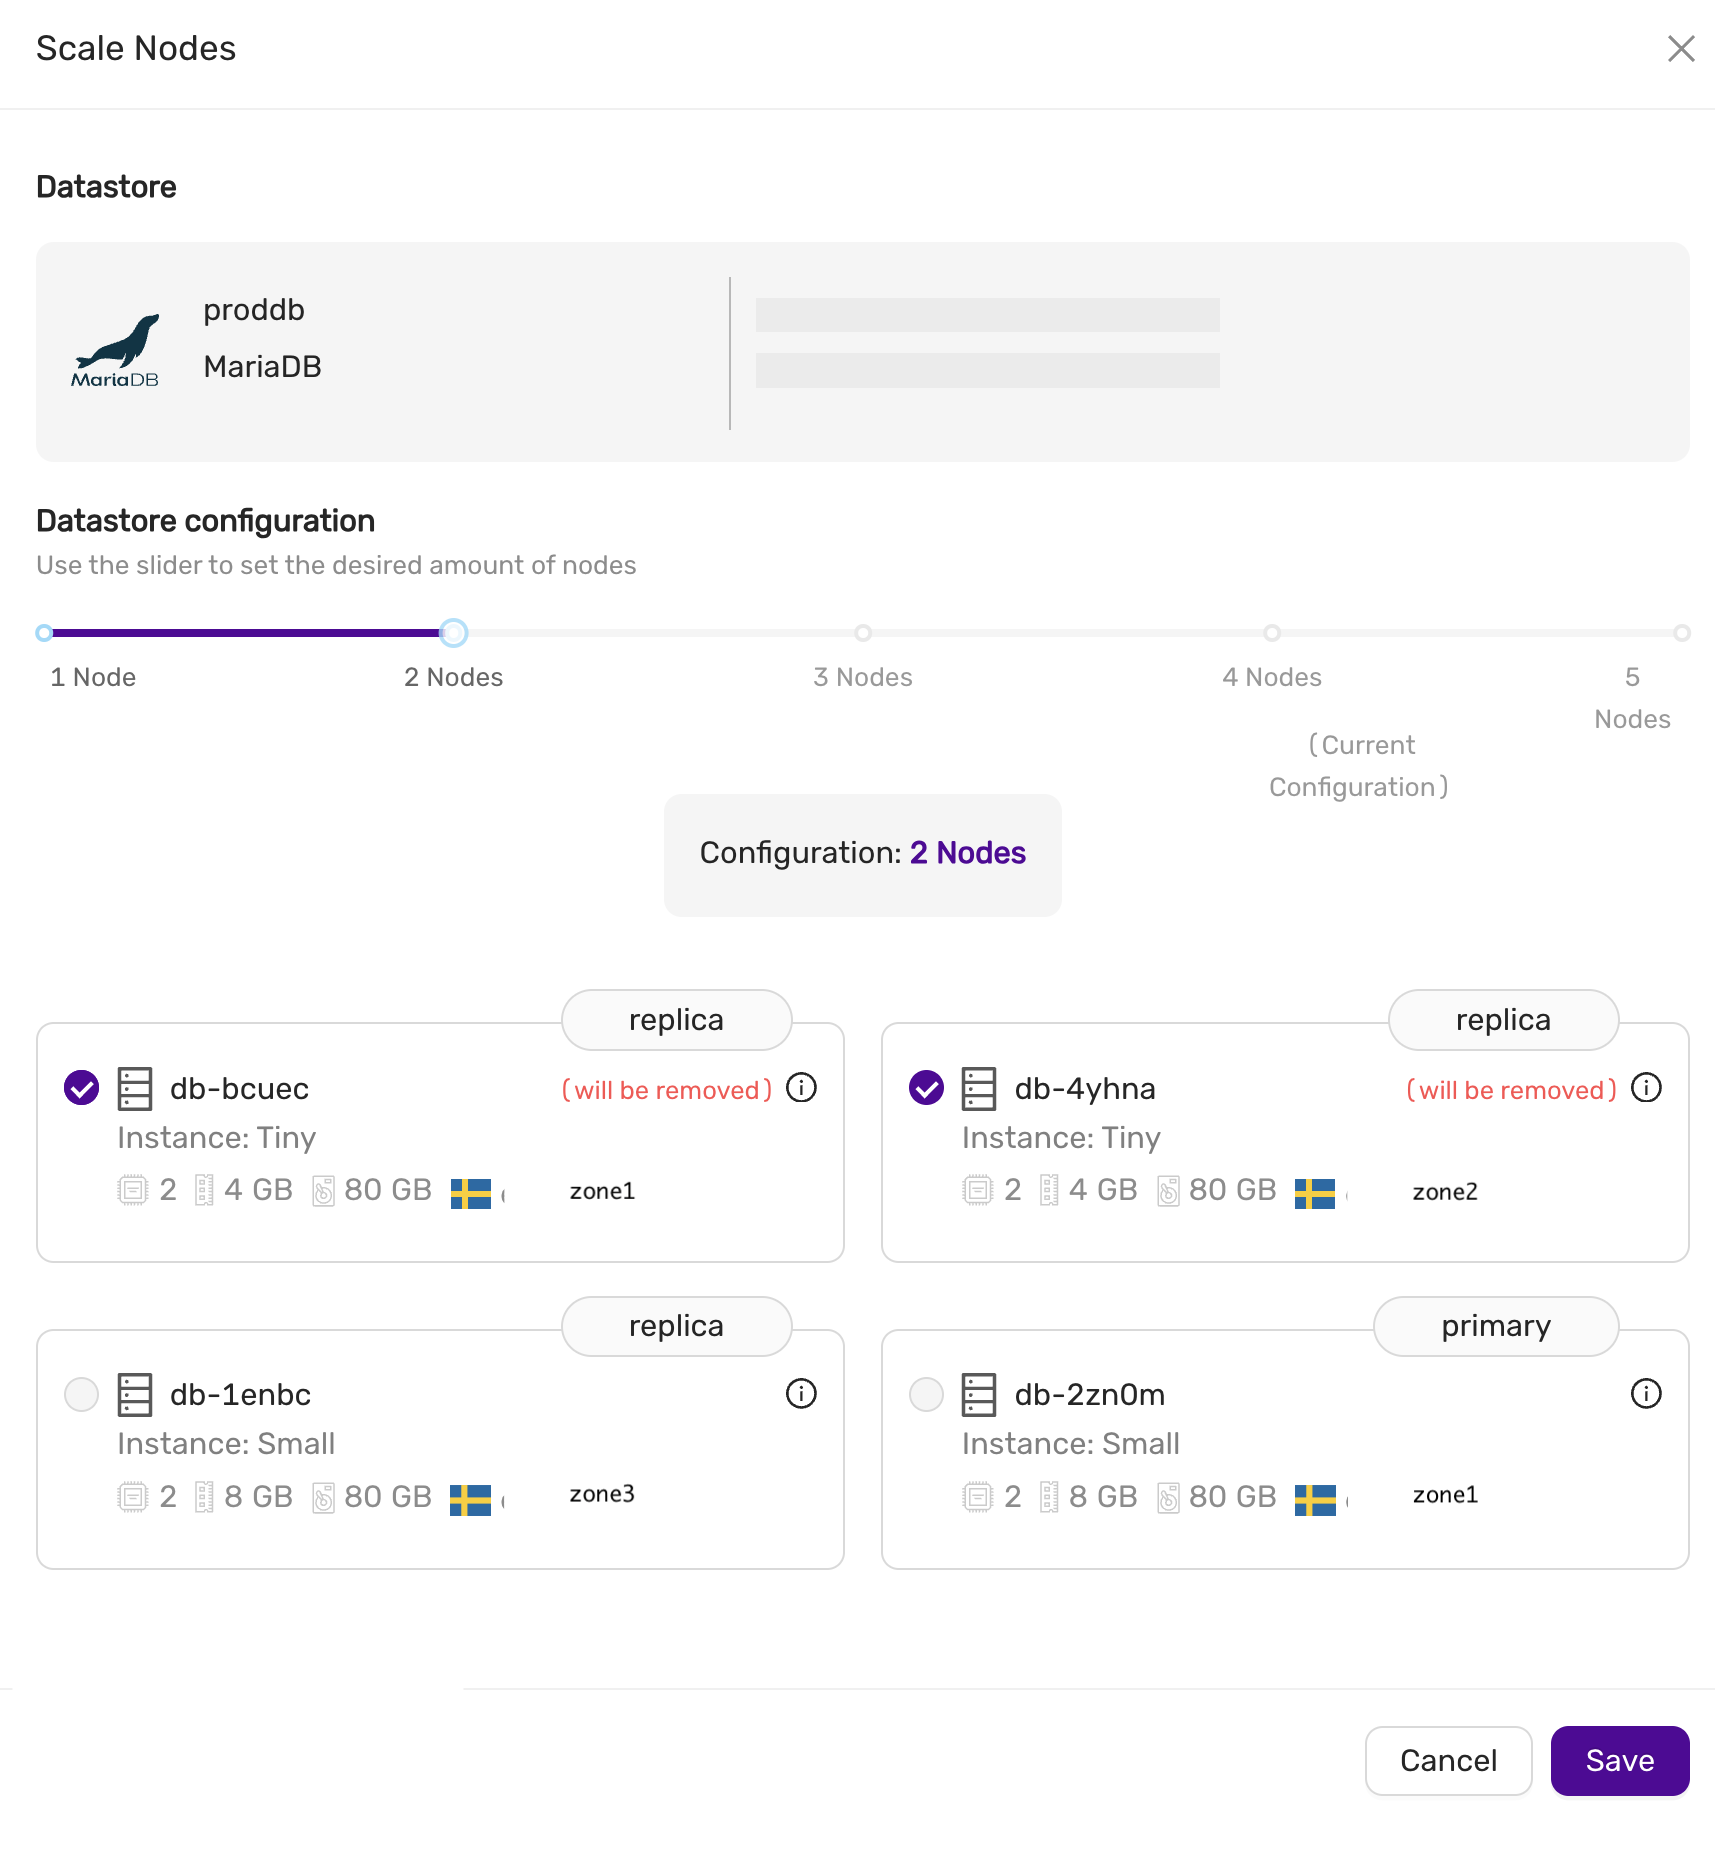
Scaling Volumes
To scale storage, go to the Nodes tab and select Scale Storage. You can extend the storage size, but it cannot be reduced. All nodes in the datastore will have their storage scaled to the new size.
4.8.19 - Terraform Provider
The CCX Terraform provider allows to create datastores on all supported clouds. The CCX Terraform provider project is hosted on github.
Oauth2 credentials
Oauth2 credentials are used to authenticate the CCX Terraform provider with CCX.
You can generate these credentials on the Account page Authorization tab.
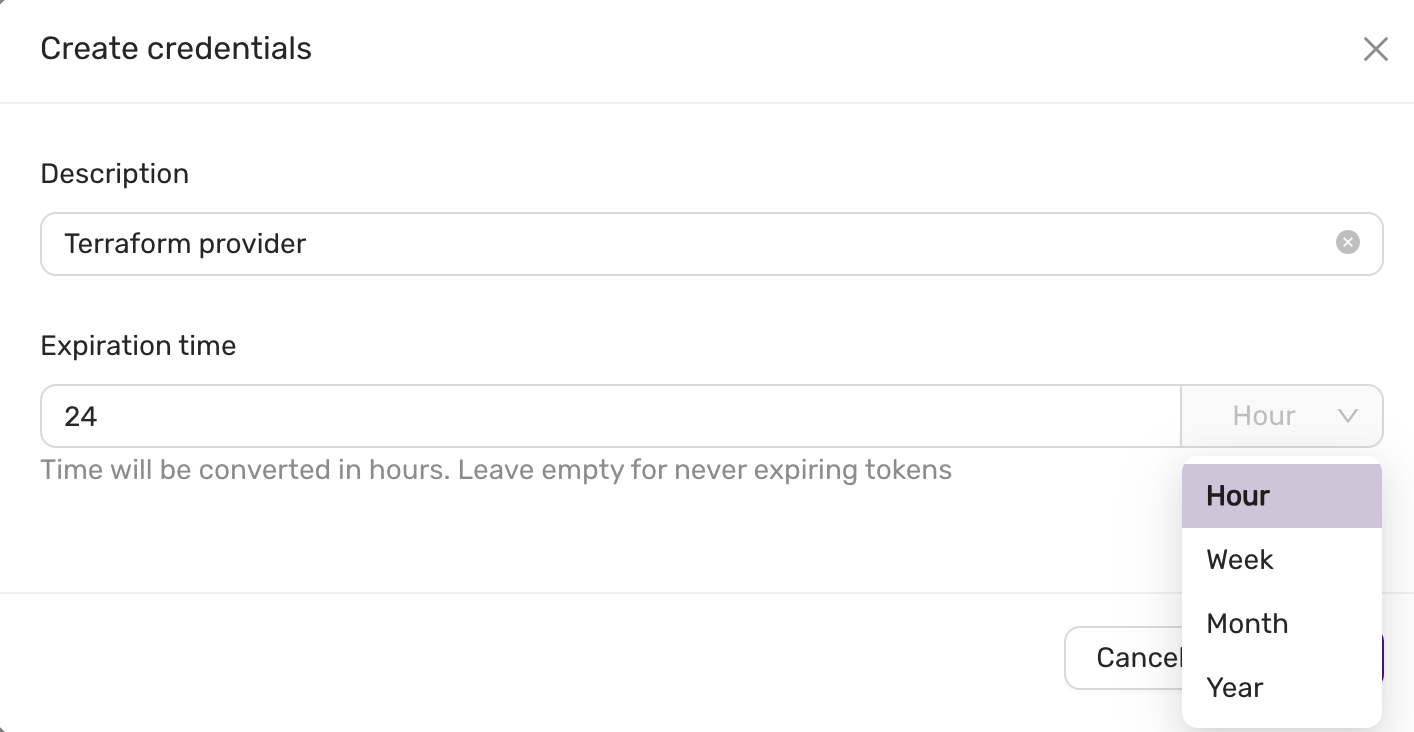 And then you will see:
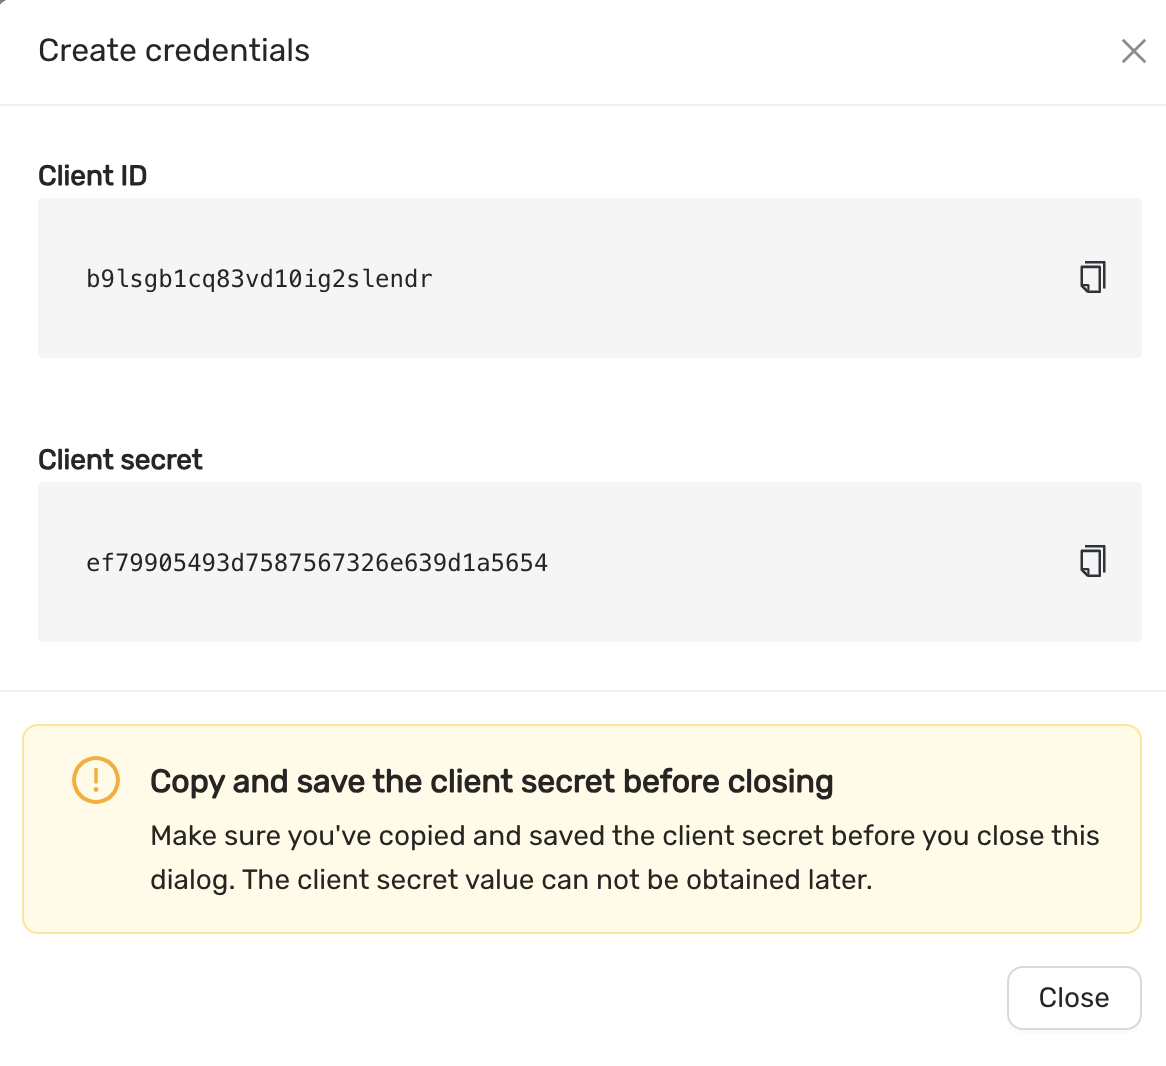
Requirement
- Terraform 0.13.x or later
Quick Start
- Create Oauth2 credentials.
- Create a
terraform.tf - Set
client_id,client_secret, below is a terraform.tf file:
terraform {
  required_providers {
    ccx = {
      source  = "severalnines/ccx"
      version = "~> 0.4.7"
    }
  }
}

provider "ccx" {
    client_id = `client_id`
    client_secret = `client_secret`
}
```

Now, you can create a datastore using the following terraform code.
Here is an example of a parameter group:

```terraform
resource "ccx_parameter_group" "asteroid" {
    name = "asteroid"
    database_vendor = "mariadb"
    database_version = "10.11"
    database_type = "galera"

    parameters = {
      table_open_cache = 8000
      sql_mode = "STRICT_TRANS_TABLES,ERROR_FOR_DIVISION_BY_ZERO,NO_AUTO_CREATE_USER,NO_ENGINE_SUBSTITUTION"
    }
}
```

This group can then be associated with a datastore as follows:

```terraform
resource "ccx_datastore" "luna_mysql" {
	name           = "luna_mysql"
	size           = 3
	type           = "replication"
	db_vendor      = "mysql"
	tags           = ["new", "test"]
	cloud_provider = "CCX_CLOUD"
	cloud_region   = "CCX-REGION-1"
	instance_size  = "MEGALARGE"
	volume_size    = 80
	volume_type    = "MEGAFAST"
	parameter_group = ccx_parameter_group.asteroid.id
}
```

Replace CCX_CLOUD, CCX-REGION-1, MEGALARGE and, MEGAFAST, with actual values depending on the cloud infrastructure available.

For more information and examples, visit the [terraform-provider-ccx](https://github.com/severalnines/terraform-provider-ccx) github page.

## More on parameter groups
Only one parameter group can be used at any give time by a datastore.
Also, you cannot change an existing parameter group from terraform.
If you want to change an existing parameter group, then you need to create a new parameter group:
```terraform
resource "ccx_parameter_group" "asteroid2" {
    name = "asteroid2"
    database_vendor = "mariadb"
    database_version = "10.11"
    database_type = "galera"

    parameters = {
      table_open_cache = 7000
      sql_mode = "NO_ENGINE_SUBSTITUTION"
    }
}
```
And then reference it in:
```terraform
resource "ccx_datastore" "luna_mysql" {
	name           = "luna_mysql"
  ... <same as before>
	parameter_group = ccx_parameter_group.asteroid2.id
}
```
Now you can apply this to terraform. Always test config changes first on a test system to be sure the config change works as expected.

## Features
The following settings can be updated:

- Add and remove nodes
- Volume type
- Volume size
- Notifications
- Maintenance time
- Modify firewall (add/remove) entries. Multiple entries can be specified with a comma-separated list.

### Limitations

- Change the existing parameter group is not possible after initial creation, however you can create a new parameter group and reference that.
- It is not possible to change instance type.
- Changing availability zone is not possible.
4.8.20 - TLS For Metrics
Overview
To enhance security, using TLS for accessing metrics is recommended. This document outlines how the metrics served securely using TLS for each exporter. Each node typically has a Node Exporter and a corresponding database-specific exporter to provide detailed metrics. Access to these metrics is limited to the sources specified in Firewall Management.
Service discovery
There is a service discovery endpoint created for each datastore. Available from CCX v1.53 onwards.
It’s available at https://<ccxFQDN>/metrics/<storeID>/targets and
implements Prometheus HTTP SD Endpoint.
note:
<ccxFQDN>is the domain you see in your address bar with CCX UI open, not a datastore URL or a connection string. We’ll useccx.example.comhereafter.
Here is an example of a scrape config for Prometheus:
scrape_configs:
  - job_name: 'my datastore'
    http_sd_configs:
      - url: 'https://ccx.example.com/metrics/50e4db2a-85cd-4190-b312-e9e263045b5b/targets'
Individual Metrics Endpoints Format
Metrics for each exporter is served on:
https://ccx.example.com/metrics/<storeID>/<nodeName>/<exporterType>
Where nodeName is short name, not full fqdn.
Exporter Type Examples:
-
MSSQL:
- URL:
https://ccx.example.com/metrics/<storeID>/<nodeName>/mssql_exporter
- URL:
-
Redis:
- URL:
https://ccx.example.com/metrics/<storeID>/<nodeName>/redis_exporter
- URL:
-
PostgreSQL:
- URL:
https://ccx.example.com/metrics/<storeID>/<nodeName>/postgres_exporter
- URL:
-
MySQL:
- URL:
https://ccx.example.com/metrics/<storeID>/<nodeName>/mysqld_exporter
- URL:
-
MariaDB:
- URL:
https://ccx.example.com/metrics/<storeID>/<nodeName>/mysqld_exporter
- URL:
-
NodeExporter:
- URL:
https://ccx.example.com/metrics/<storeID>/<nodeName>/node_exporter
- URL:
By serving metrics over HTTPS with TLS, we ensure secure monitoring access for customers.
4.8.21 - Upgrade Lifecycle Mgmt
CCX will keep your system updated with the latest security patches for both the operating system and the database software.
You will be informed when there is a pending update and you have two options:
- Apply the update now
- Schedule a time for the update
The update will be performed using a roll-forward upgrade algorithm:
- The oldest replica (or primary if no replica exist) will be selected first
- A new node will be added with the same specification as the oldest node and join the datastore
- The oldest node will be removed
- 1-3 continues until all replicas (or primaries in case of a multi-primary setup) are updated.
- If it is a primary-replica configuration then the primary will be updated last. A new node will be added, the new node will be promoted to become the new primary, and the old primary will be removed.
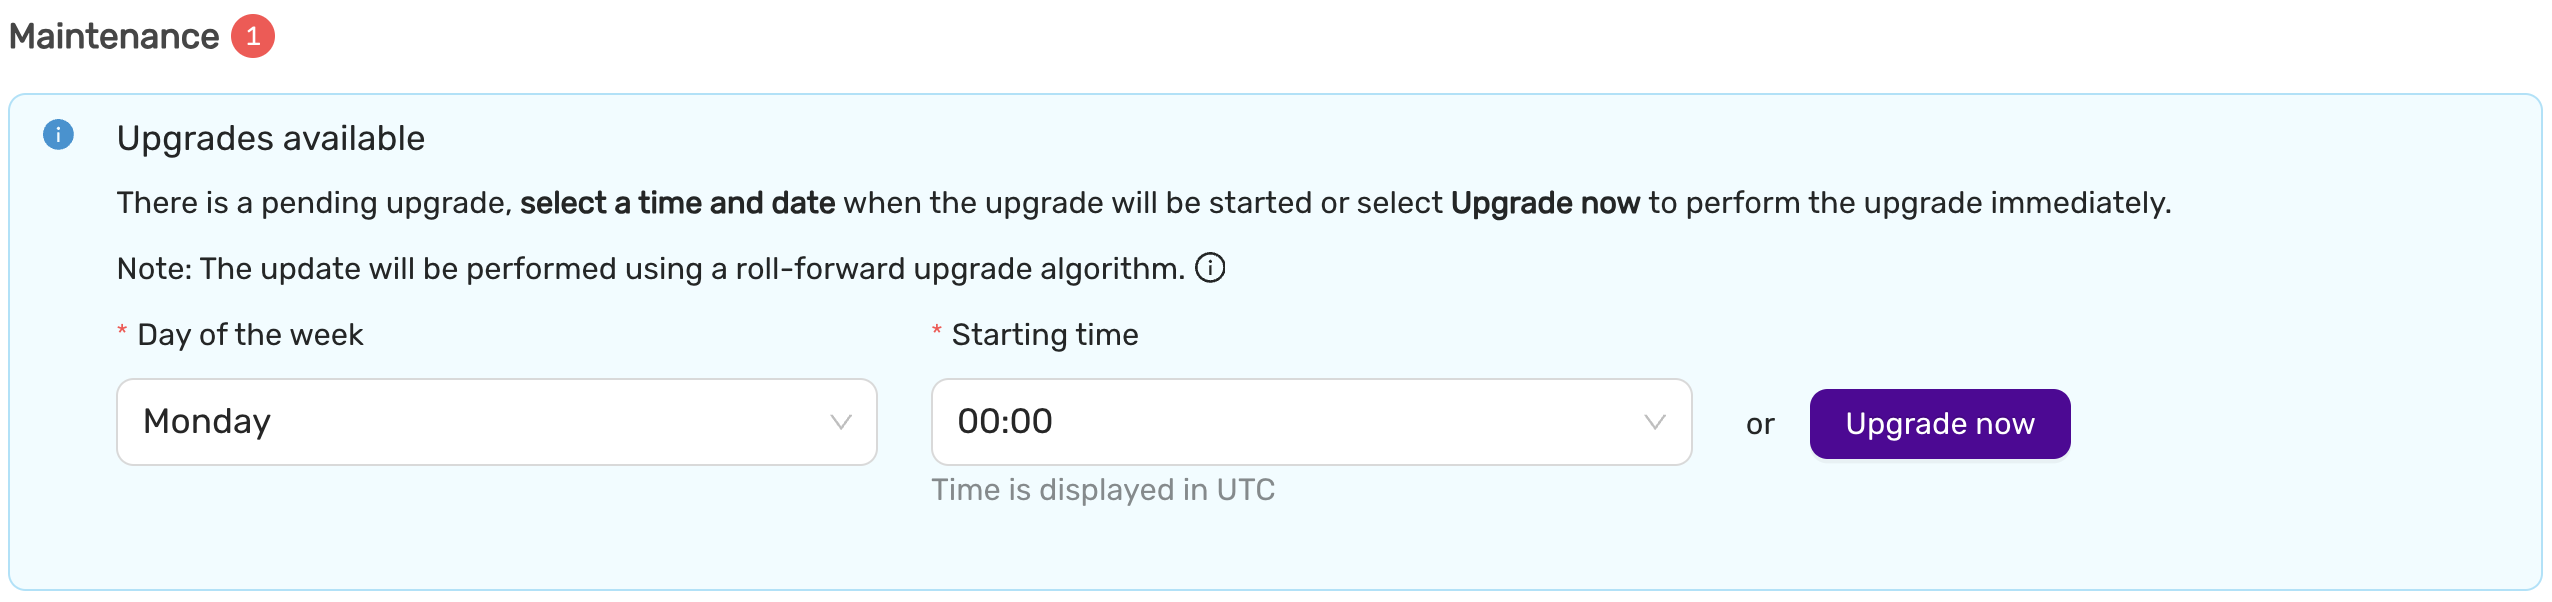
Upgrade now
This option will start the upgrade now.
Scheduled upgrade
The upgrade will start at a time (in UTC) and on a weekday which suits the application. Please note, that for primary-replica configurations, the update will cause the current primary to be changed.
Upgrade database major version
To upgrade the database major version from e.g MariaDB 10.6 to 10.11, you need to create a new datastore from backup, alternatively take mysqldump or pgdump and apply it to your new datastore.
4.8.22 - Connect Kubernetes with DBaaS
Overview
To connect your Kubernetes cluster with DBaaS, you need to allow the external IP addresses of your worker nodes, including reserved IP adresses, in DBaaS UIs firewall. You can find the reserved IPs in your clusters Openstack project or ask the support for help.
Get your worker nodes external IP with the CLI tool kubectl: kubectl get nodes -o wide
NAME                                            STATUS   ROLES           AGE    VERSION   INTERNAL-IP    EXTERNAL-IP   OS-IMAGE             KERNEL-VERSION      CONTAINER-RUNTIME
company-stage1-control-plane-1701435699-7s27c   Ready    control-plane   153d   v1.28.4   10.128.0.40    <none>        Ubuntu 22.04.3 LTS   5.15.0-88-generic   containerd://1.7.6
company-stage1-control-plane-1701435699-9spjg   Ready    control-plane   153d   v1.28.4   10.128.1.160   <none>        Ubuntu 22.04.3 LTS   5.15.0-88-generic   containerd://1.7.6
company-stage1-control-plane-1701435699-wm8pd   Ready    control-plane   153d   v1.28.4   10.128.3.13    <none>        Ubuntu 22.04.3 LTS   5.15.0-88-generic   containerd://1.7.6
company-stage1-worker-sto1-1701436487-dwr5f     Ready    <none>          153d   v1.28.4   10.128.3.227   1.2.3.5       Ubuntu 22.04.3 LTS   5.15.0-88-generic   containerd://1.7.6
company-stage1-worker-sto2-1701436613-d2wgw     Ready    <none>          153d   v1.28.4   10.128.2.180   1.2.3.6       Ubuntu 22.04.3 LTS   5.15.0-88-generic   containerd://1.7.6
company-stage1-worker-sto3-1701437761-4d9bl     Ready    <none>          153d   v1.28.4   10.128.0.134   1.2.3.7       Ubuntu 22.04.3 LTS   5.15.0-88-generic   containerd://1.7.6
Copy the external IP for each worker node, in this case the three nodes with the ROLE <none>.
In the DBaaS UI, go to Datastores -> Firewall -> Create trusted source,
Add the external IP with CIDR notation /32 for each IP address (E.g. 1.2.3.5/32).
5 - Elastx Cloud Platform API (beta)
5.1 - ⚡ Quick Start Guide
1. Introduction
The ECPAPI provides programmatic access to Elastx Cloud services, including resource management and automation capabilities. This guide will walk you through how to generate your API key, explore the API using Swagger UI, and make authenticated requests.
ECPAPI is currently in beta.
2. Authentication
Before accessing the API, you need to generate a Service Account Token from the Elastx Cloud Console (ECC).
This token will inherit the same permissions as your account within the selected organization. Use it in the Authorization header as follows:
Authorization: ServiceAccount <token>
Creating a Service Account Token
- Log in to https://console.elastx.cloud/account.
- Navigate to Service Accounts.
- Select your organization.
- Optionally set the token expiry (in seconds). Leave blank to use the default (1 year).
- Click Save.
- Copy and securely store the generated token. It will be used as a Bearer token in your API requests.
📌 Important: The token will only be shown once after creation. Store it securely.
Curl example using Service Account Token
curl -X 'GET' \
  'https://console.elastx.cloud/ecp-api/apis/v1/organizations' \
  -H 'accept: application/json' \
  -H 'Authorization: ServiceAccount <token>'
3. Explore the API (Swagger UI)
You can explore and test the API interactively using the Swagger UI.
- API Base URL: https://console.elastx.cloud/ecp-api/
- Swagger UI: https://console.elastx.cloud/ecp-api/openapi/
4. Example API Calls Using curl
List your organizations
Since the service account token is organization scoped, when using a Service Account Token, this will only return one organization.
curl -X 'GET' \
  'https://console.elastx.cloud/ecp-api/apis/v1/organizations' \
  -H 'accept: application/json' \
  -H 'Authorization: ServiceAccount <token>'
List Dbaas Projects in organization
curl -X 'GET' \
  'https://console.elastx.cloud/ecp-api/apis/v1/organizations/<org-id>/dbaasprojects' \
  -H 'accept: application/json' \
  -H 'Authorization: ServiceAccount <token>'
List users in organization
curl -X 'GET' \
  'https://console.elastx.cloud/ecp-api/apis/v1/organizations/<org-id>/users' \
  -H 'accept: application/json' \
  -H 'Authorization: ServiceAccount <token>'
Add user to organization
These users will not automatically get any access to neither ECC nor DBaaS projects, but you will need to add them to your organization in order to give them access to a DBaaS project. If the user does not have a prior account with a verified email you will need to trigger an invite to let the user verify their email address.
curl -X 'POST' \
  'https://console.elastx.cloud/ecp-api/apis/v1/organizations/<org-id>/users' \
  -H 'accept: application/json' \
  -H 'Content-Type: application/json' \
  -H 'Authorization: ServiceAccount <token>'
  -d '{
  "email": "user@example.com",
  "firstName": "Firstname",
  "lastName": "LastName"
}'
response:
{
  "name": "useratexample-com",
  "email": "user@example.com",
  "firstName": "Firstname",
  "lastName": "LastName"
  "emailVerified": false
}
Send invite email
curl -X 'POST' \
  'https://console.elastx.cloud/ecp-api/apis/v1/organizations/<org-id>/users/<user-name>/invites' \
  -H 'accept: application/json' \
  -H 'Content-Type: application/json' \
  -H 'Authorization: ServiceAccount <token>'
Create a new DbaasProject
curl -X 'POST' \
  'https://console.elastx.cloud/ecp-api/apis/v1/organizations/<org-id>/dbaasprojects' \
  -H 'accept: application/json' \
  -H 'Content-Type: application/json' \
  -H 'Authorization: ServiceAccount <token>'
  -d '{
"projectName": "test project"
}'
response:
{
  "name": "test-project",
  "organization": "e0db3c07-b6aa-4ec6-8d21-f5c5fa670fbb",
  "projectName": "test project",
  "ccxProjectName": ""
}
Give user access to DbaasProject
Role can be member or admin both grant access to the DbaasProject in the DBaaS console, but only admin will give the user access to manage the DBaaS project in ECC and add additional users to the project.
curl -X 'POST' \
  'http://localhost:9000/apis/v1/organizations/<org-id>/dbaasprojects/<project-name>/members' \
  -H 'accept: application/json' \
  -H 'Content-Type: application/json' \
  -H 'Authorization: ServiceAccount <token>'
  -d '{
  "role": "member",
  "userRef": "test-ecp-apiatelastx-se"
}'
Remove users access from DbaasProject
curl -X 'DELETE' \
  'http://localhost:9000/apis/v1/organizations/<org-id>/dbaasprojects/<project-name>/members/<user-ref>' \
  -H 'accept: application/json' \
  -H 'Authorization: ServiceAccount <token>'
5. Additional API: DBaaS (Database as a Service)
Elastx also provides a separate API for managing DBaaS environments.
- Base URL:
https://dbaas.elastx.cloud/api - Swagger UI: API Docs
6. Support
Need help with authentication or API usage?
📧 Contact us at support@elastx.se
6 - Elastx Identity Provider
6.1 - Overview
The purpose of Elastx Identity Provider (IDP) is to provide a Single Sign-on experience for access to the different Elastx service offerings. The service provides integration with OpenStack IaaS to enable usage/enforcement of multi-factor authentication.
Enrollment
Once enrolled, all or selected users will receive an email to verify their account and setup multi-factor authentication.
Please review known issues and limitations for further reference.
Update account settings
Users in organizations which have enrolled can use the “My Account” web page to change their password, configure multi-factor authentication and similar account related settings.
Supported MFA methods
In addition to username and password for authentication, the ability to configure multi-factor authentication using either TOTP, supported by mobile applications such as “Google Authenticator” and “FreeOTP”), or the Webauthn standard which enables usage of hardware tokens such as the Yubikey.
TOTP is default method for all accounts (except if explicitly defined otherwise for the organization), but can be changed by the user after initial setup.
OpenStack authentication flow
Once enrolled users can login to the OpenStack web dashboard (Horizon) by selecting “elastx-id” in the “Authenticate using” drop-down menu and pressing “Connect”:
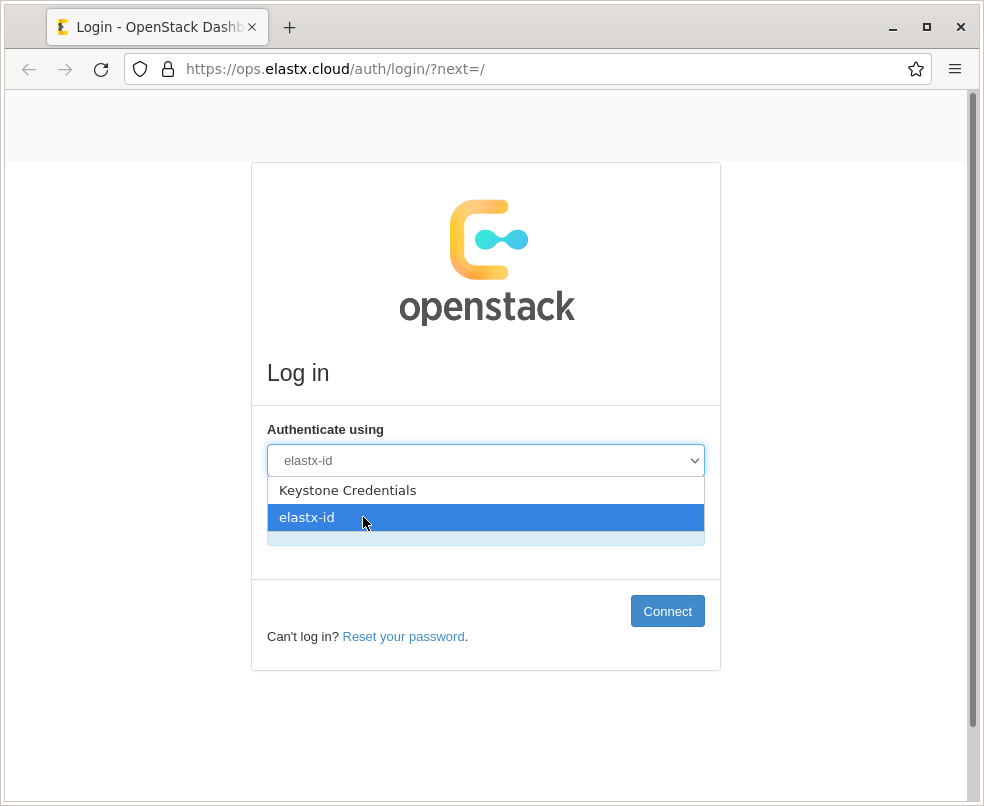
The users are redirected redirected to the login portal, which validates their password/second-factor and redirects them back to the OpenStack dashboard.
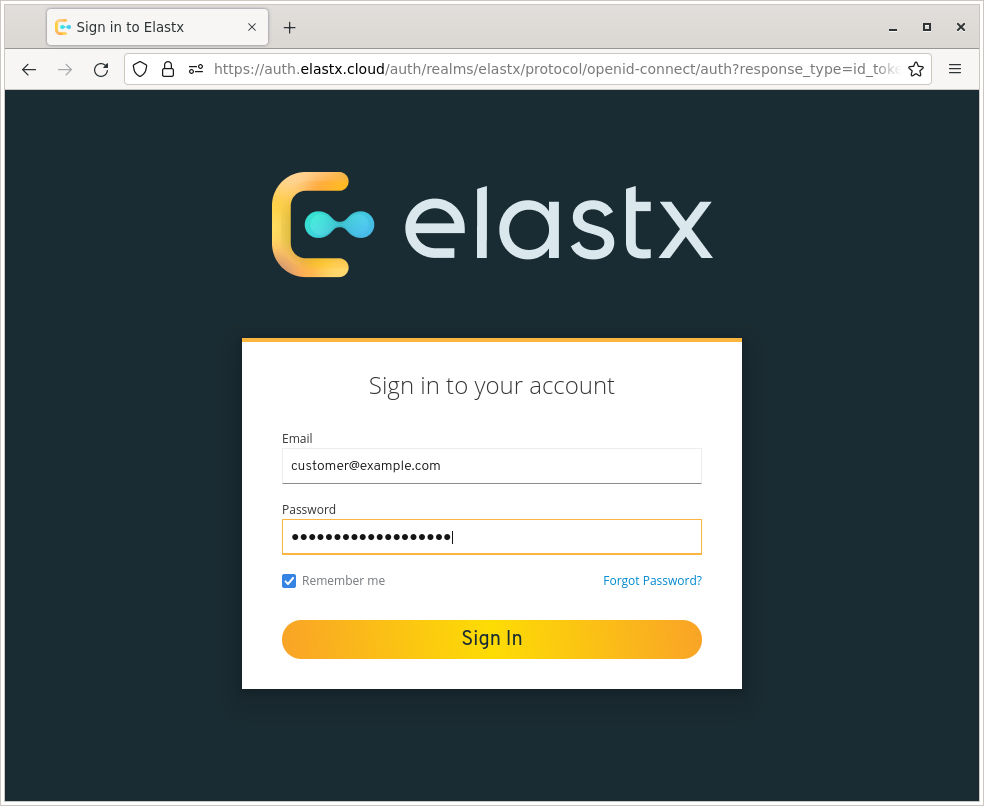
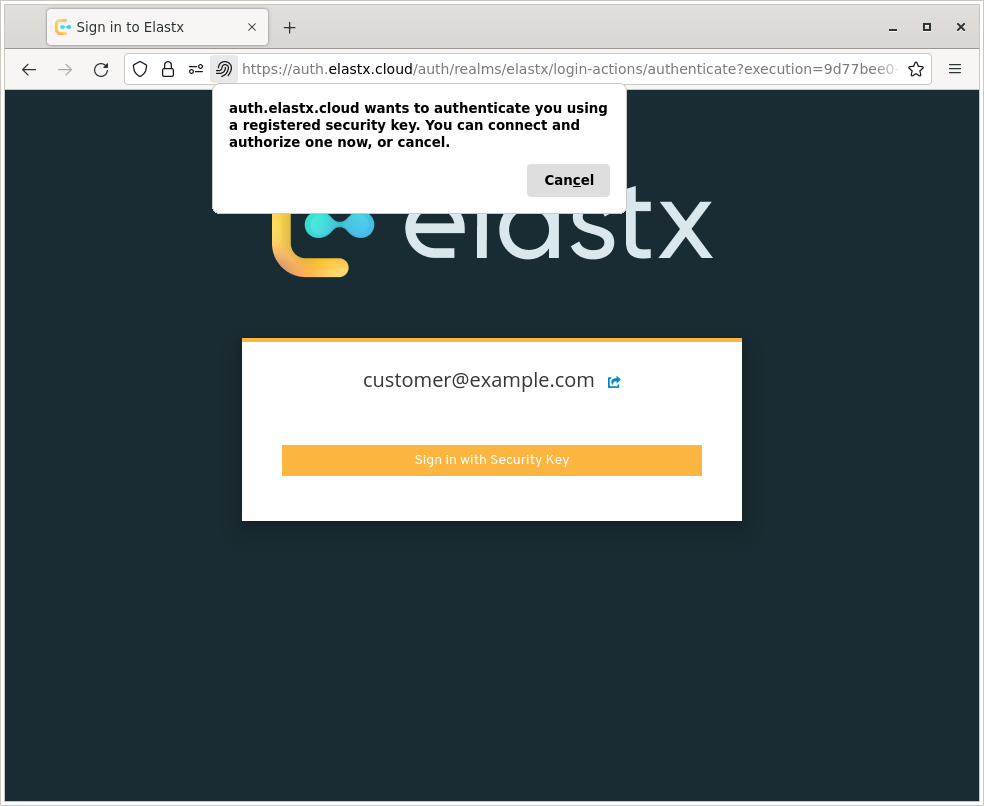
Known issues/limitations
The OpenStack platform is configured to support authentication and account management using both platform-specific features (Keystone/Adjutant) and those provided by IDP.
The following sections describe known issues, limitations and relevant workarounds.
Mandatory usage of MFA
All users enrolled are required to configure both a password and a second factor for authentication. Enforcement of MFA for all non-services users is planned.
CLI and Terraform usage
Applications that use the OpenStack APIs directly, such as the official CLI utilities, Terraform and similar automation tools, do not support authentication using the identity provider. For these use-cases, a dedicated service account or usage of application credentials is highly recommended.
Logout functionality in Horizon
Once a user who has authenticated through the IDP logs out of the OpenStack web dashboard (Horizon), their browser session token remains valid for a short period of time. This issue has been mitigated in later versions of OpenStack and the only currently available work-around is to manually clear all browser cookies for the “ops.elastx.cloud” origin.
User settings and project management
Users enrolled can not utilize functionality exposed through the OpenStack web dashboard for account management, such as change/reset password features. These actions may instead be performed through the “My Account” web page.
While the ability for project moderators to invite other users to their projects still exist, it should be noted that new users won’t be automatically enrolled.
Full credential reset
Users can initiate a password reset by clicking on the “Forgot Password?” link below the login form. The password reset flow requires that user authenticate using their second-factor before proceeding.
If the user has lost access to their second-factor (multiple can be configured as a backup), Elastx Support must be contacted for additional identity validation before both credentials are reset. This process is by design for security reasons, but may be reconsidered before the service is generally available.
7 - Kubernetes CaaS
7.1 - Announcements
2024-06-28 New default Kubernetes StorageClass
We are changing the default StorageClass from v1-dynamic-40 to v2-1k ahead of schedule.
Background
The change was already implemented by accident to clusters created on versions after v1.26, which meant we diverged from advertised changes in our changelog.
By committing to doing this change actively for all clusters, we’re catching up to reality and uniforming our clusters.
Impact
Customers who are not specifying a storage class, will not have any impact on creating new volumes. In this scenario, a volume will be created with the v2-1k as the new default. Customers that actively specify the old v1-dynamic-40 will face no impact as this StorageClass is still supported.
General note
To simplify the future necessary migration to v2 storage classes, please consider to stop creating new volumes using StorageClass that are not prefixed with “v2-”.
A list of available StorageClasses and their respective pricing can be found here: https://elastx.se/en/openstack/pricing
A guide on how to migrate volumes between StorageClasses can be found here: https://docs.elastx.cloud/docs/kubernetes/guides/change_storageclass/
2024-03-08 Kubernetes v1.26 upgrade notice
To ECP customers that have not yet upgraded to v1.26, this announcement is valid for you.
We have received, and acted upon, customer feedback regarding the v1.26 upgrade. Considering valuable feedback received from our customers, we are introducing two new options to ensure a suitable upgrade path for your cluster.
Ingress and Certmanager
- We will not require customers to take ownership of the Ingress and Certmanager as advertised previously. We will continue to provide a managed Ingress/Certmanager.
A new cluster free of charge
- You have the option to request a new cluster, in which you can setup your services at your own pace. You can choose the kubernetes version, we support 1.26 or 1.29 (soon 1.30). The cluster is free of charge for 30 days and after that, part of your standard environment.
- We expect you to migrate your workloads from the old cluster to the new one, and then cancel the old cluster via a ZD ticket.
What’s next?
Our team will initiate contact via a Zendesk ticket to discuss your preferences and gather the necessary configuration options. We will initially propose a date and time for the upgrade.
Meanwhile, please have a look at our updated version of the migration guide to v1.26:
https://docs.elastx.cloud/docs/kubernetes/knowledge-base/migration-to-caasv2/.
In case you have any technical inquiries please submit a support ticket at:
https://support.elastx.se.
We are happy to help and guide you through the upgrade process.
2023-12-08 Kubernetes CaaS updates including autoscaling
We are happy to announce our new Kubernetes CaaS lifecycle management with support for both worker node auto scaling and auto healing. We have reworked a great deal of the backend for the service which will speed up changes, allow you to run clusters in a more efficient way as well as being able to handle increased load without manual intervention.
All new clusters will automatically be deployed using our new backend. Existing clusters will need to be running Kubernetes 1.25 in order to be upgraded. We plan to contact all customers during Q1 2024 in order to plan this together with the Kubernetes 1.26 upgrade.
When upgrading, there are a few changes that need immediate action. Most notably the ingress will be migrated to a load balancer setup. We have information on all changes in more detail here: https://docs.elastx.cloud/docs/kubernetes/knowledge-base/migration-to-caasv2/
You can find information, specifications and pricing here, https://elastx.se/en/kubernetes/.
Service documentation is available here, https://docs.elastx.cloud/docs/kubernetes/.
If you have any general questions or would like to sign-up please contact us at hello@elastx.se.
For any technical questions please register a support ticket at https://support.elastx.se.
7.2 - Overview
Elastx Kubernetes CaaS consists of a fully redundant Kubernetes cluster spread over three separate physical locations (availability zones) in Stockholm, Sweden. We offer managed addons and monitoring 24x7, including support.
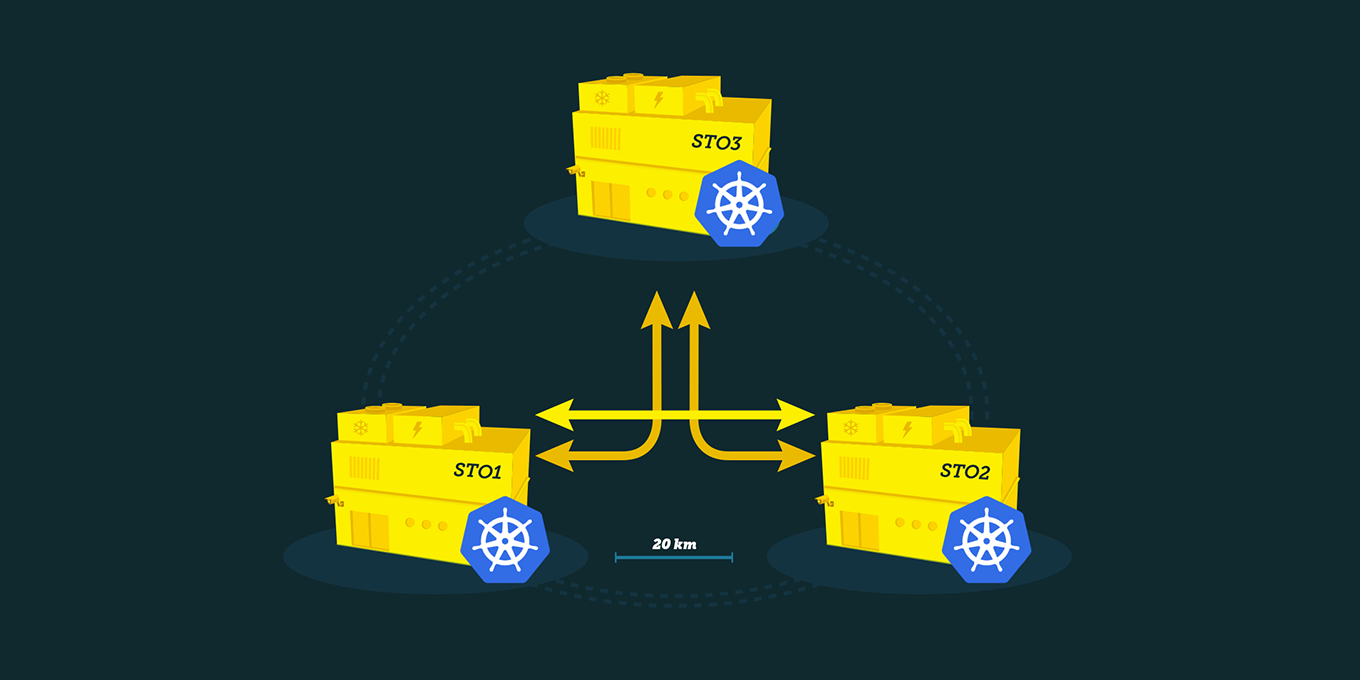
Features
Elastx Kubernetes CaaS runs on top of our high perfomant OpenStack IaaS platform and we integrate with the features it provides.
-
High availability: Cluster nodes are spread over our three availability zones, combined with our great connectivity this creates a great platform for you to build highly available services on.
-
Load Balancer: Services that use the type “LoadBalancer” in Kubernetes integrate with OpenStack Octavia. Each service exposed this way gets its own public IP (Floating IP in OpenStack lingo).
-
Persistent Storage: When creating a Persistent Volume Claim Kubernetes creates a volume using OpenStack Cinder and then connects the volume on the node where your pod(s) gets scheduled.
-
Auto scaling: Starting in CaaS 2.0 we offer node autoscaling. Autoscaling works by checking the resources your workload is requesting. Autoscaling can help you scale your clusters in case you need to run jobs or when yur application scales out due to more traffic or users than normal.
-
Standards conformant: Our clusters are certified by the CNCF Conformance Program ensuring interoperability with Cloud Native technologies and minimizing vendor lock-in.
Good to know
Design your Cloud
We expect customers to design their setup to not require access to Openstack Horizon. This is to future proof the product. This means, do not place other instances in the same Openstack project, nor utilize Swift (objectstore) in the same project. We are happy to provide a separate Swiftproject, and a secondary Openstack project for all needs.
Persistent volumes
Cross availability zone mounting of volumes is not supported. Therefore, volumes can only be mounted by nodes in the same availability zone.
Ordering and scaling
Ordering and scaling of clusters is currently a manual process involving contact with either our sales department or our support. This is a known limitation, but we are quick to respond and a cluster is typically delivered within a business day.
Since Elastx Private Kubernetes 2.0 we offer auto scaling of workload nodes. This is based on resource requests, which means it relies on the administator to set realistic requests on the workload. Configuring auto-scaling options is currently a manual process involving contact with either our sales department or our support.
Cluster add-ons
We offer a managed cert-manager and a managed NGINX Ingress Controller.
If you are interested in removing any limitations, we’ve assembled guides with everything you need to install the same IngressController and cert-manager as we provide. This will give you full control. The various resources gives configuration examples, and instructions for lifecycle management. These can be found in the sections Getting Started and Guides.
7.3 - Getting started
7.3.1 - Accessing your cluster
In order to access your cluster there are a couple of things you need to do. First you need to make sure you have the correct tools installed, the default client for interacting with Kubernetes clusters is called kubectl. Instructions for installing it on your system can be found by following the link.
You may of course use any Kubernetes client you wish to access your cluster however setting up other clients is beyond the scope of this documentation.
Credentials (kubeconfig)
Once you have a client you can use to access the cluster you will need to fetch
the credentials for you cluster. You can find the credentials for your cluster
by logging in to Elastx OpenStack IaaS.
When logged in you can find the kubeconfig file for your cluster by clicking
on the “Object Storage” menu option in the left-hand side menu. And then click
on “Containers”, you should now see a container with the same name as your cluster
(clusters are named “customer-cluster_name”). Clicking on the container should
reveal a file called admin.conf in the right-hand pane. Click on the
`Download" button to the right of the file name to download it to your computer.
NOTE These credentials will be rotated when your cluster is upgraded so you should periodically fetch new credentials to make sure you have a fresh set.
NOTE The kubeconfig you just downloaded has full administrator privileges.
Configuring kubectl to use your credentials
In order for kubectl to be able to use the credentials you just downloaded you need to either place the credentials in the default location or otherwise configure kubectl to utilize them. The official documentation covers this process in detail.
Verify access
To verify you’ve got access to the cluster you can run something like this:
$ kubectl get nodes
NAME                           STATUS   ROLES           AGE   VERSION
hux-lab1-control-plane-c9bmm   Ready    control-plane   14h   v1.27.3
hux-lab1-control-plane-j5p42   Ready    control-plane   14h   v1.27.3
hux-lab1-control-plane-wlwr8   Ready    control-plane   14h   v1.27.3
hux-lab1-worker-447sn          Ready    <none>          13h   v1.27.3
hux-lab1-worker-9ltbp          Ready    <none>          14h   v1.27.3
hux-lab1-worker-vszmc          Ready    <none>          14h   v1.27.3
If your output looks similar then you should be good to go! If it looks very different or contains error messages, don’t hesitate to contact our support if you can’t figure out how to solve it on your own.
Restrict access
Access to the API server is controlled in the loadbalancer in front of the API. Currently, managing the IP-range allowlist requires a support ticket here. All Elastx IP ranges are always included.
Instructions for older versions
Everything under this section is only for clusters running older versions of our private Kubernetes service.
Security groups
Note: This part only applies to clusters not already running Private Kubernetes 2.0 or later.
If your cluster was created prior to Kubernetes 1.26 or when we specifically informed you that this part applies.
If you are not sure if this part applies, you can validate it by checking if there is a security group called cluster-name-master-customer in your openstack project.
To do so, log in to Elastx Openstack IaaS. When logged in click on the “Network” menu option in the left-hand side menu. Then click on “Security Groups”, finally click on the “Manage Rules” button to the right of the security group named cluster-name-master-customer. To add a rule click on the “Add Rule” button.
For example, to allow access from the ip address 1.2.3.4 configure the rule as follows:
Rule: Custom TCP Rule
Direction: Ingress
Open Port: Port
Port: 6443
Remote: CIDR
CIDR: 1.2.3.4/32
Once you’ve set up rules that allow you to access your cluster you are ready to verify access.
7.3.2 - Auto Healing
In our Kubernetes Services, we have implemented a robust auto-healing mechanism to ensure the high availability and reliability of our infrastructure. This system is designed to automatically manage and replace unhealthy nodes, thereby minimizing downtime and maintaining the stability of our services.
Auto-Healing Mechanism
Triggers
-
Unready Node Detection:
- The auto-healing process is triggered when a node remains in an “not ready” or “unknown” state for 15 minutes.
- This delay allows for transient issues to resolve themselves without unnecessary node replacements.
-
Node Creation Failure:
- To ensure new nodes are given adequate time to initialize and join the cluster, we have configured startup timers:
- Control Plane Nodes:
- A new control plane node has a maximum startup time of 30 minutes. This extended period accounts for the critical nature and complexity of control plane operations.
- Worker Nodes:
- A new worker node has a maximum startup time of 10 minutes, reflecting the relatively simpler setup process compared to control plane nodes.
- Control Plane Nodes:
- To ensure new nodes are given adequate time to initialize and join the cluster, we have configured startup timers:
Actions
- Unresponsive Node:
- Once a node is identified as unready for the specified duration, the auto-healing system deletes the old node.
- Simultaneously, it initiates the creation of a new node to take its place, ensuring the cluster remains properly sized and functional.
Built-in Failsafe
To prevent cascading failures and to handle scenarios where multiple nodes become unresponsive, we have a built-in failsafe mechanism:
- Threshold for Unresponsive Nodes:
- If more than 35% of the nodes in the cluster become unresponsive simultaneously, the failsafe activates.
- This failsafe blocks any further changes, as such a widespread issue likely indicates a broader underlying problem, such as network or platform-related issues, rather than isolated node failures.
By integrating these features, our Kubernetes Services can automatically handle node failures and maintain high availability, while also providing safeguards against systemic issues. This auto-healing capability ensures that our infrastructure remains resilient, responsive, and capable of supporting continuous service delivery.
7.3.3 - Auto Scaling
We now offer autoscaling of nodes.
What is a nodegroup?
In order to simplify node management we now have nodegroup.
A nodegroup is a set of nodes, They span over all 3 of our availability zones. All nodes in a nodegroup are using the same flavour. This means if you want to mix flavours in your cluster there will be at least one nodegroup per flavor. We can also create custom nodegroups upon requests meaning you can have 2 nodegroups with the same flavour.
By default clusters are created with one nodegroup called “worker”.
When listing nodes by running kubectl get nodes you can see the node group by looking at the node name. All node names begin with clustername - nodegroup.
In the example below we have the cluster hux-lab1 and can see the default workers are located in the nodegroup worker and additionally, the added nodegroup nodegroup2 with a few extra nodes.
❯ kubectl get nodes
NAME                           STATUS   ROLES           AGE     VERSION
hux-lab1-control-plane-c9bmm   Ready    control-plane   2d18h   v1.27.3
hux-lab1-control-plane-j5p42   Ready    control-plane   2d18h   v1.27.3
hux-lab1-control-plane-wlwr8   Ready    control-plane   2d18h   v1.27.3
hux-lab1-worker-447sn          Ready    <none>          2d18h   v1.27.3
hux-lab1-worker-9ltbp          Ready    <none>          2d18h   v1.27.3
hux-lab1-worker-htfbp          Ready    <none>          15h     v1.27.3
hux-lab1-worker-k56hn          Ready    <none>          16h     v1.27.3
hux-lab1-nodegroup2-33hbp      Ready    <none>          15h     v1.27.3
hux-lab1-nodegroup2-54j5k      Ready    <none>          16h     v1.27.3
How to activate autoscaling?
Autoscaling currently needs to be configured by Elastx support.
In order to activate auto scaling we need to know clustername and nodegroup with two values for minimum/maximum number of desired nodes. Currently we have a minimum set to 1 node per AZ.
Nodegroups are by default split into availability zones, if you want 3 nodes you get one in each availability zone. We have the option to lock a node group to a single AZ.
Examples: Default nodegroup in 3 AZ: Minimum of 3 nodes and maximum of 7. This would translate to minimum one node per availability zone and maximum nodes AZ-1: 3, AZ-2: 2, AZ-3: 2. Any number of max nodes is supported.
Opt for foot print nodegroup: 1 Az. Min 1 node. Any number of max nodes is supported. Opt for 2 AZ redundancy: nodegroup with 2 nodes, 2 AZ, can accomodate for min 2 nodes and any number of max nodes.
If you are unsure contact out support and we will help you get the configuration you wish for.
How does autoscaling know when to add additional nodes?
Nodes are added when they are needed. There are two scenarios:
- You have a pod that fails to be scheduled on existing nodes
- Scheduled pods requests more then 100% of any resource, this method is smart and senses the amount of resources per node and can therfor add more than one node at a time if required.
When does the autoscaler scale down nodes?
The autoscaler removes nodes when it senses there is enough free resources to accomodate all current workload (based on requests) on fewer nodes. To avoid all nodes having 100% resource requests (and thereby usage), there is also a built-in mechanism to ensure there is always at least 50% of a node available resources to accept additional requests.
Meaning if you have a nodegroup with 3 nodes and all of them have 4 CPU cores you need to have a total of 2 CPU cores that is not requested per any workload.
To refrain from triggering the auto-scaling feature excessively, there is a built in delay of 10 minutes for scale down actions to occur. Scale up events are triggered immediately.
Can I disable auto scaling after activating it?
Yes, just contact Elastx support and we will help you with this.
When disabling auto scaling node count will be locked. Contact support if the number if nodes you wish to keep deviates from current amount od nodes, and we will scale it for you.
7.3.4 - Cluster configuration
There are a lot of options possible for your cluster. Most options have a sane default however could be overridden on request.
A default cluster comes with 3 control plane and 3 worker nodes. To connect all nodes we create a network, default (10.128.0.0/22). We also deploy monitoring to ensure functionality of all cluster components. However most things are just a default and could be overridden.
Common options
Nodes
The standard configuration consists of the following:
- Three control plane nodes, one in each of our availability zones. Flavor: v2-c2-m8-d80
- Three worker nodes, one in each of our availability zones, in a single nodegroup. Flavor: v2-c2-m8-d80
Minimal configuration
-
Three control plane nodes, one in each of our availability zones. Flavor: v2-c2-m8-d80
-
One worker node, Flavor: v2-c2-m8-d80
This is the minimal configuration offered. Scaling to larger flavors and adding nodes are supported. Autoscaling is not supported with a single worker node.
Note: SLA is different for minimal configuration type of cluster. SLA’s can be found here.
Nodegroups and multiple flavors
A nodegroup contains of one or multiple nodes with the same flavor and a list of availability zones to deploy nodes in. Clusters are default delivered with a single nodegroup containing 3 nodes, one in each AZ. Each nodegroup is limited to one flavor.
You could have multiple nodegroups, if you for example want to target workload on separate nodes or in case you wish to consume multiple flavors.
A few examples of nodegroups:
| Name | Flavour | AZ list | Min node count | Max node count (autoscaling) |
|---|---|---|---|---|
| worker | v2-c2-m8-d80 | STO1, STO2, STO3 | 3 | 0 |
| database | d2-c8-m120-d1.6k | STO1, STO2, STO3 | 3 | 0 |
| frontend | v2-c4-m16-d160 | STO1, STO2, STO3 | 3 | 12 |
| jobs | v2-c4-m16-d160 | STO1 | 1 | 3 |
In the examples we could see worker our default nodegroup and an example of having separate nodes for databases and frontend where the database is running on dedicated nodes and the frontend is running on smaller nodes but can autoscale between 3 and 12 nodes based on current cluster request. We also have a jobs nodegroup where we have one node in sto1 but can scale up to 3 nodes where all are placed inside STO1. You can read more about autoscaling here.
Nodegroups can be changed at any time. Please also note that we have auto-healing meaning in case any of your nodes for any reason stops working we will replace them. More about autohealing could be found here.
Worker nodes Floating IPs
By default, our clusters come with nodes that do not have any Floating IPs attached to them. If, for any reason, you require Floating IPs on your workload nodes, please inform us, and we can configure your cluster accordingly. It’s worth noting that the most common use case for Floating IPs is to ensure predictable source IPs. However, please note that enabling or disabling Floating IPs will necessitate the recreation of all your nodes.
Since during upgrades we create a new node prior to removing an old node you would need to have an additional IP adress on standby. Thus, for a 3 worker nodes, with with autoscaling up to 5 nodes, we will allocate 6 IPs.
Network
By default we create a node network (10.128.0.0/22). However we could use another subnet per customer request. The most common scenario is when customer request another subnet is when exposing multiple Kubernetes clusters over a VPN.
Please make sure to inform us if you wish to use a custom subnet during the ordering process since we cannot replace the network after creation, meaning we would then need to recreate your entire cluster.
We currently only support cidr in the 10.0.0.0/8 subnet range and at least a /24. Both nodes and loadbalancers are using IPs for this range meaning you need to have a sizable network from the beginning.
Cluster domain
We default all clusters to “cluster.local”. If you wish to have another cluster domain please let us know during the ordering procedure since it cannot be replaced after cluster creation.
OIDC
If you wish to integrate with your existing OIDC compatible IDP, example Microsoft AD And Google Workspace that is supported directy in the kubernetes api service.
By default we ship clusters with this option disabled however if you wish to make use of OIDC just let us know when order the cluster or afterwards. OIDC can be enabled, disabled or changed at any time.
Kubelet configurations and resource reservations
We make a few adaptations to Kubernetes vanilla settings.
-
NodeDrainVolumeandNodeDrainTimeout: 5 -> 15min- Increased duration to 15 minutes to allow more time for graceful shutdown and controlled startup of workload on new nodes, while respecting
PodDisruptionBudgets.
- Increased duration to 15 minutes to allow more time for graceful shutdown and controlled startup of workload on new nodes, while respecting
-
podPidsLimit: 0 → 4096- Added safety net of a maximum of Per-pod PIDs (process IDs), that is limited and enforced by the kubelet. We used to not have any limitation. Setting this to
4096limits how many PIDs a single pod may create, which helps mitigate runaway processes or fork-bombs.
- Added safety net of a maximum of Per-pod PIDs (process IDs), that is limited and enforced by the kubelet. We used to not have any limitation. Setting this to
-
serializeImagePulls: true → false- Allows the kubelet to pull multiple images in parallel, speeding up startup times.
-
maxParallelImagePulls: 0 → 10- Controls the maximum number of image pulls the kubelet will perform in parallel.
Resource reservations on worker nodes
To improve stability and predictability of the core Kubernetes functionality during heavy load, we introduce node reservations for CPU, memory, and ephemeral storage.
The reservation model follows proven hyperscaler formulas but is tuned conservatively, ensuring more allocatable resources.
Hyperscalers tend to not make a distinction of systemReserved and kubeReserved, and bundle all reservations into and kubeReserved.
We make use of both, but skewed towards kube reservations to align closer with Hyperscalers, but still maintain the reservations of the system.
We calculate the reservations settings based on cpu cores, memory and storage of each flavor dynamically.
Here we’ve provided a sample of what to expect:
CPU Reservations Table
| Cores (int) | System reserved (millicores) | Kube reserved (millicores) | Allocatable of node (%) |
|---|---|---|---|
| 2 | 35 | 120 | 92% |
| 4 | 41 | 180 | 94% |
| 8 | 81 | 240 | 96% |
| 16 | 83 | 320 | 97% |
| 32 | 88 | 480 | 98% |
| 64 | 98 | 800 | 99% |
Memory Reservations
| Memory (Gi) | System reserved (Gi) | Kube reserved (Gi) | Reserved total (Gi) | Eviction Soft (Gi) | Eviction Hard (Gi) | Allocatable of node (%) |
|---|---|---|---|---|---|---|
| 8 | 0.4 | 1.0 | 1.4 | 0.00 | 0.25 | 79% |
| 16 | 0.4 | 1.8 | 2.2 | 0.00 | 0.25 | 85% |
| 32 | 0.4 | 3.4 | 3.8 | 0.00 | 0.25 | 87% |
| 64 | 0.4 | 3.7 | 4.1 | 0.00 | 0.25 | 93% |
| 120 | 0.4 | 4.3 | 4.7 | 0.00 | 0.25 | 96% |
| 240 | 0.4 | 4.5 | 4.9 | 0.00 | 0.25 | 98% |
| 384 | 0.4 | 6.9 | 7.3 | 0.00 | 0.25 | 98% |
| 512 | 0.4 | 8.2 | 8.6 | 0.00 | 0.25 | 98% |
Ephemeral Disk Reservations
NOTE: We use the default of
nodefs.availableat 10%.
| Storage (Gi) | System reserved (Gi) | Kube reserved (Gi) | Reserved total (Gi) | Eviction Soft (Gi) | Eviction Hard (Gi) | Allocatable of node (%) |
|---|---|---|---|---|---|---|
| 60 | 12.0 | 1.0 | 13.0 | 0.0 | 6.0 | 68% |
| 80 | 12.0 | 1.0 | 13.0 | 0.0 | 8.0 | 74% |
| 120 | 12.0 | 1.0 | 13.0 | 0.0 | 12.0 | 79% |
| 240 | 12.0 | 1.0 | 13.0 | 0.0 | 24.0 | 85% |
| 1600 | 12.0 | 1.0 | 13.0 | 0.0 | 160.0 | 89% |
Cluster add-ons
We currently offer managed cert-manager, NGINX Ingress and elx-nodegroup-controller.
Cert-manager
Cert-manager (link to cert-manager.io) helps you to manage TLS certificates. A common use case is to use lets-encrypt to “automatically” generate certificates for web apps. However the functionality goes much deeper. We also have usage instructions and have a guide if you wish to deploy cert-manager yourself.
Ingress
An ingress controller in a Kubernetes cluster manages how external traffic reaches your services. It routes requests based on rules, handles load balancing, and can integrate with cert-manager to manage TLS certificates. This simplifies traffic handling and improves scalability and security compared to exposing each service individually. We have a usage guide with examples that can be found here.
We have chosen to use ingress-nginx and to support ingress, we limit what custom configurations can be made per cluster. We offer two “modes”. One that we call direct mode, which is the default behavior. This mode is used when end-clients connect directly to your ingress. We also have a proxy mode for when a proxy (e.g., WAF) is used in front of your ingress. When running in proxy mode, we also have the ability to limit traffic from specific IP addresses, which we recommend doing for security reasons. If you are unsure which mode to use or how to handle IP whitelisting, just let us know and we will help you choose the best options for your use case.
If you are interested in removing any limitations, we’ve assembled guides with everything you need to install the same IngressController as we provide. This will give you full control. The various resources give configuration examples and instructions for lifecycle management. These can be found here.
elx-nodegroup-controller
The nodegroup controller is useful when customers want to use custom taints or labels on their nodes. It supports matching nodes based on nodegroup or by name. The controller can be found on Github if you wish to inspect the code or deploy it yourself.
7.3.5 - Cluster upgrades
Introduction
Kubernetes versions are released approximately three times a year, introducing enhancements, security updates, and bug fixes. The planning and initiation of a cluster upgrade is a manual task that requires coordination with our customers.
To schedule the upgrade of your cluster(s), we require a designated point of contact for coordination.
For customers with multiple clusters, please provide your preferred sequence and timeline for upgrades. If you haven’t shared this information yet, kindly submit a support ticket with these details.
Upgrade Planning
Upgrades are scheduled in consultation with the customer and can be done on at the initiative of either Elastx or the customer. If the customer does not initiate the planning of an upgrade, we will reach out to the designated contact in a support ticket at least twice a year with suggested upgrade dates.
NOTE: Upgrades are not performed during our changestop periods:
- In general the full month of July and through the first week of August
- December 23rd to January 2nd
Before scheduling and confirming a time slot, please review the relevant changelog and the Kubernetes Deprecated API Migration guide:
- Elastx PcaaS Changelog: https://docs.elastx.cloud/docs/kubernetes/changelog/
- Kubernetes Deprecated API Migration Guide: https://kubernetes.io/docs/reference/using-api/deprecation-guide/
Upgrade Process
NOTE Please refrain from making any changes while the upgrade is in progress.
The duration of the upgrade typically ranges from 1 to 3 hours, depending on the size of the cluster.
The upgrade starts with the control plane nodes followed by the worker nodes, one nodegroup at a time.
Steps Involved
- A new node with the newer version is added to the cluster to replace the old node.
- Once the new node is ready, the old node is drained.
- Once all transferable loads have been migrated, the old node is removed from the cluster.
- This process is repeated until all nodes in the cluster have been upgraded.
NOTE When using public IPs on worker nodes to ensure predictable egress IP, a previously unused IP will be assigned to the new worker node. This IP should have been provided to you in a list of all allocated IPs during your request for adding public IPs on the worker nodes.
Support and Communication During Upgrades
The engineer responsible for executing the upgrade will notify you through the support ticket when the upgrade begins and once it is completed. The support ticket serves as the primary channel for communication during the upgrade process. If you have any concerns or questions about the upgrade, please use the support ticket to reach out.
Additional Information
- Upon request, upgrades can be scheduled outside office hours if needed. Upgrades outside of office hours depend on personnel availability and comes at an additional fee, see current price for professional services.
- Our Kubernetes service includes up to four version upgrades per year; additional upgrades can be performed at an extra cost.
- To address critical security vulnerabilities, additional upgrades can be performed and will not count against the four upgrades included per year.
- In a previous Tech-fika, we discussed how to build redundancy and implement autoscaling with our Kubernetes service. You can access the presentation here to help you prepare for a smoother upgrade experience.
7.3.6 - Kubernetes API whitelist
In our Kubernetes Services, we rely on Openstack loadbalancers in front of the control planes to ensure traffic will be sent to a functional node. Whitelisting of access to the API server is now controlled in the loadbalancer in front of the API. Currently, managing the IP-range whitelist requires a support ticket here.
Please submit a ticket with CIDR/ranges for the ip’s you wish to whitelist. We are happy to help you ASAP.
Note: All Elastx IP ranges are always included.
In the future, we expect to have this functionality available self-service style.
7.3.7 - Order a new cluster
How to order or remove a cluster
Ordering and scaling of clusters is currently a manual process involving contact with either our sales department or our support. This is a known limitation, but may change in the future.
7.3.8 - Recommendations
This page describes a list of things that could help you get the best experience out of your cluster.
Note: You do not need to follow this documentation in order to use your cluster
Ingress and cert-manager
To make it easier to expose applications an ingress controller is commonly deployed.
An ingress controller makes sure when you go to a specific webpage you are routed towards the correct application.
There are a lot of different ingress controllers available. We on Elastx are using ingress-nginx and have a guide ready on how to get started. However you can deploy any ingress controller you wish inside your clusters.
To get a single IP-address you can point your DNS towards we recommend to deploy an ingress-controller with a service of type LoadBalancer. More information regarding Load Balancers can be found here.
In order to automatically generate and update TLS certificates cert-manager is commonly deployed side by side with an ingress controller.
We have created a guide on how to get started with ingress-nginx and Cert-manager that can be found here.
Requests and limits
Below we describe requests and limits briefly. For a more detailed description or help setting requests and limits we recommend to check out Kubernetes documentation here.
Requests
Requests and limits are critical to enable Kubernetes to make informed decisions on when and where to schedule and limit your workload.
Requests are important for the scheduler. Requests can be seen as “Amount of resources the pod would utilize during normal operation”. This means that the scheduler will allocate the required amount of resources and make sure they are always available to your pod.
Requests also enables the auto-scaler to make decisions on when to scale a cluster up and down.
Limits
Limits define the maximum allowed resource usage for a pod. This is important to avoid slowdowns in other pods running on the same node.
CPU limit. Your application will be throttled or simply run slower when trying to exceed the limit. Run slower equals to fewer cpu cycles per given time. That is, introducing latency.
Memory limit is another beast. If any pod trying to use memory above the the limit, the pod will be Out of memory killed.
Autoscaling
Autoscaling can operate on both node-level and pod-level. To get the absolute best experience we recommend a combination of both.
Scaling nodes
We have built-in support for scaling nodes. To get started with autoscaling we recommend to check the guide here.
Scaling pods
Kubernetes official documentation has a guide on how to accomplish this can be found here.
In short, node autoscaling is only taken into consideration if you have any pods that cannot be scheduled or if you have set requests on your pods. In order to automatically scale an application pod scaling can make sure you get more pods before reaching your pod limit and if more nodes are needed in order to run the new pods nodes will automatically be added and then later removed when no longer needed.
Network policies
Network policies can in short be seen as Kubernetes built in firewalls.
Network policy can be used to limit both incoming and outgoing traffic. This is useful to specify a set of pods that are allowed to communicate with the database.
Kubernetes documentation have an excellent guide on how to get started with network policies here.
Pod Security Standards / Pod Security Admission
Pod Security Admission can be used to limit what your pods can do. For example you can make sure pods are not allowed to run as root.
In order to get to know this more in detail and getting started we recommend to follow the Kubernetes documentation here.
Load Balancers
Load Balancers allow your application to be accessed from the internet. Load Balancers can automatically split traffic to all your nodes to even out load. Load Balancers can also detect if a node is having problems and remove it to avoid displaying errors to end users.
We have a guide on how to get started with Boad Balancers here.
7.4 - Guides
7.4.1 - Cert-manager and Cloudflare demo
In this guide we will use a Cloudflare managed domain and a our own cert-manager to provide LetsEncrypt certificates for a test deployment.
The guide is suitable if you have a domain connected to a single cluster, and would like a to issue/manage certificates from within kubernetes. The setup below becomes Clusterwider, meaning it will deploy certificates to any namespace specifed.
Prerequisites
- DNS managed on Cloudflare
- Cloudflare API token
- Installed cert-manager. See our guide here.
- Installed IngressController. See our guide here.
Setup ClusterIssuer
Create a file to hold the secret of your api token for your Cloudflare DNS. Then create the ClusterIssuer configuration file adapted for Cloudflare.
apiVersion: v1
kind: Secret
metadata:
  name: cloudflare-api-token
  namespace: cert-manager
type: Opaque
stringData:
  api-token: "<your api token>"
---
apiVersion: cert-manager.io/v1
kind: ClusterIssuer
metadata:
  name: cloudflare-issuer
spec:
  acme:
    server: https://acme-v02.api.letsencrypt.org/directory
    email: <your email>
    privateKeySecretRef:
      name: cloudflare-issuer-key
    solvers:
    - dns01:
        cloudflare:
          email: <your email>
          apiTokenSecretRef:
            name: cloudflare-api-token
            key: api-token
kubectl apply -f cloudflare-issuer.yml
The clusterIssuer is soon ready. Example output:
kubectl get clusterissuers.cert-manager.io
NAME                READY   AGE
cloudflare-issuer   True    6d18h
Expose a workload and secure with Let’s encrypt certificate
In this section we will setup a deployment, with it’s accompanying service and ingress object. The ingress object will request a certificate for test2.domain.ltd, and once fully up and running, should provide https://test2.domain.ltd with a valid letsencrypt certificate.
We’ll use the created ClusterIssuer and let cert-manager request new certificates for any added ingress object. This setup requires the “*” record setup in the DNS provider.
This is how the DNS is setup in this particular example:
A A record (“domain.ltd”) points to the loadbalancer IP of the cluster.
A CNAME record refers to ("*") and points to the A record above.
This example also specifies the namespace “echo2”.
apiVersion: apps/v1
kind: Deployment
metadata:
  name: echo2-dep
  namespace: echo2
spec:
  selector:
    matchLabels:
      app: echo2
  replicas: 1
  template:
    metadata:
      labels:
        app: echo2
    spec:
      containers:
      - name: echo2
        image: hashicorp/http-echo
        args:
        - "-text=echo2"
        ports:
        - containerPort: 5678
      securityContext:
        runAsUser: 1001
        fsGroup: 1001
---
apiVersion: v1
kind: Service
metadata:
  labels:
    app: echo2
  name: echo2-service
  namespace: echo2
spec:
  ports:
    - protocol: TCP
      port: 5678
      targetPort: 5678
  selector:
    app: echo2
  type: ClusterIP
---
apiVersion: networking.k8s.io/v1
kind: Ingress
metadata:
  name: echo2-ingress
  namespace: echo2
  annotations:
    cert-manager.io/cluster-issuer: cloudflare-issuer
    kubernetes.io/ingress.class: "nginx"
spec:
  ingressClassName: nginx
  tls:
  - hosts:
    - test2.domain.ltd
    secretName: test2-domain-tls
  rules:
  - host: test2.domain.ltd
    http:
      paths:
      - path: /
        pathType: Prefix
        backend:
          service:
            name: echo5-service
            port:
              number: 5678
The DNS challenge and certificate issue process takes a couple of minutes. You can follow the progress by watching:
kubectl events -n cert-manager
Once completed, it shall all be accessible at http://test2.domain.ltd
7.4.2 - Change PV StorageClass
This guide details all steps to change storage class of a volume. The instruction can be used to migrate from one storage class to another, while retaining data. For example from 8kto v2-4k.
Prerequisites
- Access to the kubernetes cluster
- Access to Openstack kubernetes Project
Preparation steps
-
Populate variables
Complete with relevant names for your setup. Then copy/paste them into the terminal to set them as environment variables that will be used throughout the guide. PVC is the
PVC=test1 NAMESPACE=default NEWSTORAGECLASS=v2-1k -
Fetch and populate the PV name by running:
PV=$(kubectl get pvc -n $NAMESPACE $PVC -o go-template='{{.spec.volumeName}}') -
Create backup of PVC and PV configurations
Fetch the PVC and PV configurations and store in /tmp/ for later use:
kubectl get pvc -n $NAMESPACE $PVC -o yaml | tee /tmp/pvc.yaml kubectl get pv $PV -o yaml | tee /tmp/pv.yaml -
Change VolumeReclaimPolicy
To avoid deletion of the PV when deleting the PVC, the volume needs to have VolumeReclaimPolicy set to Retain.
Patch:
kubectl patch pv $PV -p '{"spec":{"persistentVolumeReclaimPolicy":"Retain"}}' -
Stop pods from accessing the mounted volume (ie kill pods/scale statefulset/etc..).
-
Delete the PVC.
kubectl delete pvc -n "$NAMESPACE" "$PVC"
Login to Openstack
-
Navigate to: Volumes -> Volumes
-
Make a backup of the volume From the drop-down to the right, select backup. The backup is good practice, not used in the following steps.
-
Change the storage type to desired type. The volume should now or shortly have status Available. Dropdown to the right, Edit volume -> Change volume type:
- Select your desired storage type
- Select Migration policy=Ondemand
The window will close, and the volume will be updated and migrated (to the v2 storage platform) if necessary, by the backend. The status becomes “Volume retyping”. Wait until completed.
We have a complementary guide here.
Back to kubernetes
-
Release the tie between PVC and PV
The PV is still referencing its old PVC, in the
claimRef, found under spec.claimRef.uid. This UID needs to be nullified to release the PV, allowing it to be adopted by a PVC with correct storageClass.Patch claimRef to null:
kubectl patch pv "$PV" -p '{"spec":{"claimRef":{"namespace":"'$NAMESPACE'","name":"'$PVC'","uid":null}}}' -
The PV StorageClass in kubernetes does not match to its counterpart in Openstack.
We need to patch the storageClassName reference in the PV:
kubectl patch pv "$PV" -p '{"spec":{"storageClassName":"'$NEWSTORAGECLASS'"}}' -
Prepare a new PVC with the updated storageClass
We need to modify the saved /tmp/pvc.yaml.
-
Remove “last-applied-configuration”:
sed -i '/kubectl.kubernetes.io\/last-applied-configuration: |/ { N; d; }' /tmp/pvc.yaml -
Update existing storageClassName to the new one:
sed -i 's/storageClassName: .*/storageClassName: '$NEWSTORAGECLASS'/g' /tmp/pvc.yaml
-
-
Apply the updated /tmp/pvc.yaml
kubectl apply -f /tmp/pvc.yaml -
Update the PV to bind with the new PVC
We must allow the new PVC to bind correctly to the old PV. We need to first fetch the new PVC UID, then patch the PV with the PVC UID so kubernetes understands what PVC the PV belongs to.
-
Retrieve the new PVC UID:
PVCUID=$(kubectl get -n "$NAMESPACE" pvc "$PVC" -o custom-columns=UID:.metadata.uid --no-headers) -
Patch the PV with the new UID of the PVC:
kubectl patch pv "$PV" -p '{"spec":{"claimRef":{"uid":"'$PVCUID'"}}}'
-
-
Reset the Reclaim Policy of the volume to Delete:
kubectl patch pv $PV -p '{"spec":{"persistentVolumeReclaimPolicy":"Delete"}}' -
Completed.
- Verify the volume works healthily.
- Update your manifests to reflect the new storageClassName.
7.4.3 - Ingress and cert-manager
Follow along demo
In this piece, we show all steps to expose a web service using an Ingress resource. Additionally, we demonstrate how to enable TLS, by using cert-manager to request a Let’s Encrypt certificate.
Prerequisites
- A DNS record pointing at the public IP address of your worker nodes. In the examples all references to the domain example.ltd must be replaced by the domain you wish to issue certificates for. Configuring DNS is out of scope for this documentation.
- For clusters created on or after Kubernetes 1.26 you need to ensure there is a Ingress controller and cert-manager installed.
Create resources
Create a file called ingress.yaml with the following content:
---
apiVersion: apps/v1
kind: Deployment
metadata:
  labels:
    app: my-web-service
  name: my-web-service
spec:
  replicas: 3
  selector:
    matchLabels:
      app: my-web-service
  template:
    metadata:
      labels:
        app: my-web-service
    spec:
      securityContext:
        runAsUser: 1001
        fsGroup: 1001
      containers:
      - image: k8s.gcr.io/serve_hostname
        name: servehostname
        ports:
        - containerPort: 9376
---
apiVersion: v1
kind: Service
metadata:
  labels:
    app: my-web-service
  name: my-web-service
spec:
  ports:
  - port: 9376
    protocol: TCP
    targetPort: 9376
  selector:
    app: my-web-service
  type: ClusterIP
---
apiVersion: networking.k8s.io/v1
kind: Ingress
metadata:
  name: my-web-service-ingress
  annotations:
    cert-manager.io/issuer: letsencrypt-prod
spec:
  ingressClassName: nginx
  tls:
  - hosts:
    - example.tld
    secretName: example-tld
  rules:
  - host: example.tld
    http:
      paths:
      - path: /
        pathType: Prefix
        backend:
          service:
            name: my-web-service
            port:
              number: 9376
Then create the resources in the cluster by running:
kubectl apply -f ingress.yaml
Run kubectl get ingress and you should see output similar to this:
NAME                     CLASS   HOSTS         ADDRESS         PORTS     AGE
my-web-service-ingress   nginx   example.tld   91.197.41.241   80, 443   39s
If not, wait a while and try again. Once you see output similar to the above you should be able to reach your service at http://example.tld.
Exposing TCP services
If you wish to expose TCP services note that the tcp-services is located in the default namespace in our clusters.
Enabling TLS
A simple way to enable TLS for your service is by requesting a certificate using the Let’s Encrypt CA. This only requires a few simple steps.
Begin by creating a file called issuer.yaml with the following content:
apiVersion: cert-manager.io/v1
kind: Issuer
metadata:
  name: letsencrypt-prod
spec:
  acme:
    # Let's Encrypt ACME server for production certificates
    server: https://acme-v02.api.letsencrypt.org/directory
    # This email address will get notifications if failure to renew certificates happens
    email: valid-email@example.tld
    privateKeySecretRef:
      name: letsencrypt-prod
    solvers:
    - http01:
        ingress:
          class: nginx
Replace the email address with your own. Then create the Issuer in the cluster
by running:
kubectl apply -f issuer.yaml
Next edit the file called ingress.yaml from the previous example and make sure
the Ingress resource matches the example below:
apiVersion: networking.k8s.io/v1
kind: Ingress
metadata:
  name: my-web-service-ingress
  annotations:
    cert-manager.io/issuer: letsencrypt-prod
spec:
  ingressClassName: nginx
  tls:
  - hosts:
    - example.tld
    secretName: example-tld
  rules:
  - host: example.tld
    http:
      paths:
      - path: /
        pathType: Prefix
        backend:
          service:
            name: my-web-service
            port:
              number: 9376
Make sure to replace all references to example.tld by your own domain. Then
update the resources by running:
kubectl apply -f ingress.yaml
Wait a couple of minutes and your service should be reachable at https://example.tld with a valid certificate.
Network policies
If you are using network policies you will need to add a networkpolicy that allows traffic from the ingress controller to the temporary pod that performs the HTTP challenge. With the default NGINX Ingress Controller provided by us this policy should do the trick.
kind: NetworkPolicy
apiVersion: networking.k8s.io/v1
metadata:
  name: letsencrypt-http-challenge
spec:
  policyTypes:
  - Ingress
  podSelector:
    matchLabels:
      acme.cert-manager.io/http01-solver: "true"
  ingress:
  - ports:
    - port: http
    from:
    - namespaceSelector:
        matchLabels:
          app.kubernetes.io/name: ingress-nginx
Advanced usage
For more advanced use cases please refer to the documentation provided by each project or contact our support:
7.4.4 - Install and upgrade cert-manager
Starting at Kubernetes version v1.26, our default configured clusters are delivered without cert-manager.
This guide will assist you get a working up to date cert-manager and provide instructions for how to upgrade and delete it. Running your own is useful if you want to have full control.
The guide is based on cert-manager Helm chart, found here. We draw advantage of the option to install CRDs with kubectl, as recommended for a production setup.
Prerequisites
Helm needs to be provided with the correct repository:
-
Setup helm repo
helm repo add jetstack https://charts.jetstack.io --force-update -
Verify you do not have a namespace named
elx-cert-manageras you first need to remove some resources.kubectl -n elx-cert-manager delete svc cert-manager cert-manager-webhook kubectl -n elx-cert-manager delete deployments.apps cert-manager cert-manager-cainjector cert-manager-webhook kubectl delete namespace elx-cert-manager
Install
-
Prepare and install CRDs run:
kubectl apply -f https://github.com/cert-manager/cert-manager/releases/download/v1.14.4/cert-manager.crds.yaml -
Run Helm install:
helm install \
  cert-manager jetstack/cert-manager \
  --namespace cert-manager \
  --create-namespace \
  --version v1.14.4 \
A full list of available Helm values is on cert-manager’s ArtifactHub page.
-
Verify the installation: Done with cmctl (cert-manager CLI https://cert-manager.io/docs/reference/cmctl/#installation).
cmctl check apiIf everything is working you should get this message
The cert-manager API is ready.
Upgrade
The setup used above is referenced in the topic “CRDs managed separately”.
In these examples <version> is “v1.14.4”.
-
Update CRDS:
kubectl apply -f https://github.com/cert-manager/cert-manager/releases/download/<version>/cert-manager.crds.yaml -
Update the Helm chart:
helm upgrade cert-manager jetstack/cert-manager --namespace cert-manager --version v1.14.4
Uninstall
To uninstall, use the guide here.
7.4.5 - Install and upgrade ingress-nginx
This guide will assist you get a working up to date ingress controller and provide instructions for how to upgrade and delete it. Running your own is useful if you want to have full control.
The guide is based on on ingress-nginx Helm chart, found here.
Prerequisites
Helm needs to be provided with the correct repository:
-
Setup helm repo
helm repo add ingress-nginx https://kubernetes.github.io/ingress-nginx -
Make sure to update repo cache
helm repo update
Generate values.yaml
We provide settings for two main scenarios of how clients connect to the cluster. The configuration file, values.yaml, must reflect the correct scenario.
-
Customer connects directly to the Ingress:
controller: kind: DaemonSet metrics: enabled: true service: enabled: true annotations: loadbalancer.openstack.org/proxy-protocol: "true" ingressClassResource: default: true publishService: enabled: false allowSnippetAnnotations: true config: use-proxy-protocol: "true" defaultBackend: enabled: true -
Customer connects via Proxy:
controller: kind: DaemonSet metrics: enabled: true service: enabled: true #loadBalancerSourceRanges: # - <Proxy(s)-CIDR> ingressClassResource: default: true publishService: enabled: false allowSnippetAnnotations: true config: use-forwarded-headers: "true" defaultBackend: enabled: true -
Other useful settings:
For a complete set of options see the upstream documentation here.
  [...]
  service:
    loadBalancerSourceRanges:        # Whitelist source IPs.
      - 133.124.../32
      - 122.123.../24
    annotations:
      loadbalancer.openstack.org/keep-floatingip: "true"  # retain floating IP in floating IP pool.
      loadbalancer.openstack.org/flavor-id: "v1-lb-2"     # specify flavor.
  [...]
Install ingress-nginx
Use the values.yaml generated in the previous step.
helm install ingress-nginx ingress-nginx/ingress-nginx --values values.yaml --namespace ingress-nginx --create-namespace
Example output:
NAME: ingress-nginx
LAST DEPLOYED: Tue Jul 18 11:26:17 2023
NAMESPACE: default
STATUS: deployed
REVISION: 1
TEST SUITE: None
NOTES:
The ingress-nginx controller has been installed.
It may take a few minutes for the Load Balancer IP to become available.
You can watch the status by running 'kubectl --namespace default get services -o wide -w ingress-nginx-controller'
[..]
Upgrade ingress-nginx
Use the values.yaml generated in the previous step.
helm upgrade --install ingress-nginx ingress-nginx/ingress-nginx --values values.yaml --namespace ingress-nginx
Example output:
Release "ingress-nginx" has been upgraded. Happy Helming!
NAME: ingress-nginx
LAST DEPLOYED: Tue Jul 18 11:29:41 2023
NAMESPACE: default
STATUS: deployed
REVISION: 2
TEST SUITE: None
NOTES:
The ingress-nginx controller has been installed.
It may take a few minutes for the Load Balancer IP to be available.
You can watch the status by running 'kubectl --namespace default get services -o wide -w ingress-nginx-controller'
[..]
Remove ingress-nginx
The best practice is to use the helm template method to remove the ingress. This allows for proper removal of lingering resources, then remove the namespace. Use the values.yaml generated in the previous step.
Note: Avoid running multiple ingress controllers using the same
IngressClass.
See more information here.
-
Run the delete command
helm template ingress-nginx ingress-nginx/ingress-nginx --values values.yaml --namespace ingress-nginx | kubectl delete -f - -
Remove the namespace if necessary
kubectl delete namespace ingress-nginx
7.4.6 - Load balancers
Load balancers in our Elastx Kubernetes CaaS service are provided by OpenStack Octavia in collaboration with the Kubernetes Cloud Provider OpenStack. This article will introduce some of the basics of how to use services of service type LoadBalancer to expose service using OpenStack Octavia load balancers. For more advanced use cases you are encouraged to read the official documentation of each project or contacting our support for assistance.
A quick example
Exposing services using a service with type LoadBalancer will give you an unique public IP backed by an OpenStack Octavia load balancer. This example will take you through the steps for creating such a service.
Create the resources
Create a file called lb.yaml with the following content:
---
apiVersion: apps/v1
kind: Deployment
metadata:
  labels:
    app.kubernetes.io/name: echoserver
  name: echoserver
spec:
  replicas: 3
  selector:
    matchLabels:
      app.kubernetes.io/name: echoserver
  template:
    metadata:
      labels:
        app.kubernetes.io/name: echoserver
    spec:
      containers:
      - image: gcr.io/google-containers/echoserver:1.10
        name: echoserver
---
apiVersion: v1
kind: Service
metadata:
  labels:
    app.kubernetes.io/name: echoserver
  name: echoserver
  annotations:
    loadbalancer.openstack.org/x-forwarded-for: "true"
    loadbalancer.openstack.org/flavor-id: 552c16df-dcc1-473d-8683-65e37e094443
spec:
  ports:
  - port: 80
    protocol: TCP
    targetPort: 8080
    name: http
  selector:
    app.kubernetes.io/name: echoserver
  type: LoadBalancer
Then create the resources in the cluster by running:
kubectl apply -f lb.yaml
You can watch the load balancer being created by running:
kubectl get svc
This should output something like:
NAME         TYPE           CLUSTER-IP     EXTERNAL-IP   PORT(S)        AGE
echoserver   LoadBalancer   10.233.32.83   <pending>     80:30838/TCP   6s
kubernetes   ClusterIP      10.233.0.1     <none>        443/TCP        10h
The
We can investigate further by running:
kubectl describe svc echoserver
Output should look something like this:
Name:                     echoserver
Namespace:                default
Labels:                   app.kubernetes.io/name=echoserver
Annotations:              loadbalancer.openstack.org/x-forwarded-for: true
Selector:                 app.kubernetes.io/name=echoserver
Type:                     LoadBalancer
IP Family Policy:         SingleStack
IP Families:              IPv4
IP:                       10.233.32.83
IPs:                      10.233.32.83
Port:                     <unset>  80/TCP
TargetPort:               8080/TCP
NodePort:                 <unset>  30838/TCP
Endpoints:
Session Affinity:         None
External Traffic Policy:  Cluster
Events:
  Type    Reason                Age   From                Message
  ----    ------                ----  ----                -------
  Normal  EnsuringLoadBalancer  115s  service-controller  Ensuring load balancer
Looking at the Events section near the bottom we can see that the Cloud Controller has picked up the order and is provisioning a load balancer.
Running the same command again (kubectl describe svc echoserver) after waiting
some time should produce output like:
Name:                     echoserver
Namespace:                default
Labels:                   app.kubernetes.io/name=echoserver
Annotations:              loadbalancer.openstack.org/x-forwarded-for: true
Selector:                 app.kubernetes.io/name=echoserver
Type:                     LoadBalancer
IP Family Policy:         SingleStack
IP Families:              IPv4
IP:                       10.233.32.83
IPs:                      10.233.32.83
LoadBalancer Ingress:     91.197.41.223
Port:                     <unset>  80/TCP
TargetPort:               8080/TCP
NodePort:                 <unset>  30838/TCP
Endpoints:
Session Affinity:         None
External Traffic Policy:  Cluster
Events:
  Type    Reason                Age    From                Message
  ----    ------                ----   ----                -------
  Normal  EnsuringLoadBalancer  8m52s  service-controller  Ensuring load balancer
  Normal  EnsuredLoadBalancer   6m43s  service-controller  Ensured load balancer
Again looking at the Events section we can tell that the Cloud Provider has provisioned the load balancer for us (the EnsuredLoadBalancer event). Furthermore we can see the public IP address associated with the service by checking the LoadBalancer Ingress.
Finally to verify that the load balancer and service are operational run:
curl http://<IP address from LoadBalancer Ingress>
Your output should look something like:
Hostname: echoserver-84655f4656-sc4k6

Pod Information:
        -no pod information available-

Server values:
        server_version=nginx: 1.13.3 - lua: 10008

Request Information:
        client_address=10.128.0.3
        method=GET
        real path=/
        query=
        request_version=1.1
        request_scheme=http
        request_uri=http://91.197.41.223:8080/

Request Headers:
        accept=*/*
        host=91.197.41.223
        user-agent=curl/7.68.0
        x-forwarded-for=213.179.7.4

Request Body:
        -no body in request-
Things to note:
- You do not need to modify security groups when exposing services using load balancers.
- The client_address is the address of the load balancer and not the client making the request, you can find the real client address in the x-forwarded-for header.
- The x-forwarded-for header is provided by setting the
loadbalancer.openstack.org/x-forwarded-for: "true"on the service. Read more about available annotations in the Advanced usage section.
Advanced usage
For more advanced use cases please refer to the documentation provided by each project or contact our support:
Good to know
Load balancers are billable resources
Adding services of type LoadBalancer will create load balancers in OpenStack, which is a billable resource and you will be charged for them.
Loadbalancer statuses
Load balancers within OpenStack have two distinct statuses, which may cause confusion regarding their meanings:
- Provisioning Status: This status reflects the overall condition of the load balancer itself. If any issues arise with the load balancer, this status will indicate them. Should you encounter any problems with this status, please don’t hesitate to contact Elastx support for assistance.
- Operating Status: This status indicates the health of the configured backends, typically referring to the nodes within your cluster, especially when health checks are enabled (which is the default setting). It’s important to note that an operational status doesn’t necessarily imply a problem, as it depends on your specific configuration. If a service is only exposed on a single node, for instance, this is to be expected since load balancers by default distribute traffic across all cluster nodes.
Provisioning status codes
| Code | Description |
|---|---|
| ACTIVE | The entity was provisioned successfully |
| DELETED | The entity has been successfully deleted |
| ERROR | Provisioning failed |
| PENDING_CREATE | The entity is being created |
| PENDING_UPDATE | The entity is being updated |
| PENDING_DELETE | The entity is being deleted |
Operating status codes
| Code | Description |
|---|---|
| ONLINE | - Entity is operating normally - All pool members are healthy |
| DRAINING | The member is not accepting new connections |
| OFFLINE | Entity is administratively disabled |
| DEGRADED | One or more of the entity’s components are in ERROR |
| ERROR | -The entity has failed - The member is failing it’s health monitoring checks - All of the pool members are in ERROR |
| NO_MONITOR | No health monitor is configured for this entity and it’s status is unknown |
High availability properties
OpenStack Octavia load balancers are placed in two of our three availability zones. This is a limitation imposed by the OpenStack Octavia project.
Reconfiguring using annotations
Reconfiguring the load balancers using annotations is not as dynamic and smooth as one would hope. For now, to change the configuration of a load balancer the service needs to be deleted and a new one created.
Loadbalancer protocols
Loadbalancers have support for multiple protocols. In general we would recommend everyone to try avoiding http and https simply because they do not perform as well as other protocols.
Instead use tcp or haproxys proxy protocol and run an ingress controller thats responsible for proxying within clusters and TLS.
Load Balancer Flavors
Load balancers come in multiple flavors. The biggest difference is how much traffic they can handle. If no flavor is deployed, we default to v1-lb-1. However, this flavor can only push around 200 Mbit/s. For customers wanting to push potentially more, we have a couple of flavors to choose from:
| ID | Name | Specs | Approx Traffic |
|---|---|---|---|
| 16cce6f9-9120-4199-8f0a-8a76c21a8536 | v1-lb-1 | 1G, 1 CPU | 200 Mbit/s |
| 48ba211c-20f1-4098-9216-d28f3716a305 | v1-lb-2 | 1G, 2 CPU | 400 Mbit/s |
| b4a85cd7-abe0-41aa-9928-d15b69770fd4 | v1-lb-4 | 2G, 4 CPU | 800 Mbit/s |
| 1161b39a-a947-4af4-9bda-73b341e1ef47 | v1-lb-8 | 4G, 8 CPU | 1600 Mbit/s |
To select a flavor for your Load Balancer, add the following to the Kubernetes Service .metadata.annotations:
loadbalancer.openstack.org/flavor-id: <id-of-your-flavor>
Note that this is a destructive operation when modifying an existing Service; it will remove the current Load Balancer and create a new one (with a new public IP).
Full example configuration for a basic LoadBalancer service:
apiVersion: v1
kind: Service
metadata:
  annotations:
    loadbalancer.openstack.org/flavor-id: b4a85cd7-abe0-41aa-9928-d15b69770fd4
  name: my-loadbalancer
spec:
  ports:
  - name: http-80
    port: 80
    protocol: TCP
    targetPort: http
  selector:
    app: my-application
  type: LoadBalancer
7.4.7 - Migration to Kubernetes CaaS v2
** Please note this document was updated 20240305.
This document will guide through all new changes introduced when migrating to our new kubernetes deployment backend. All customers with a Kubernetes cluster created on Kubernetes 1.25 and earlier are affected.
We have received, and acted upon, customer feedback since our main announcement 2023Q4. We provide two additional paths to reach v1.26:
- We’ve reverted to continue providing Ingress/Certmanager.
- To assist with your transition we can offer you an additional cluster (v1.26 or latest version) up to 30 days at no extra charge.
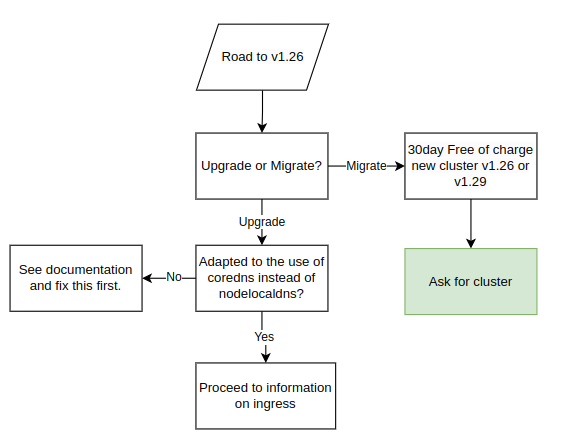
All customers will receive this information when we upgrade clusters to v1.26, which also includes the migration procedure. Make sure to carefully read through and understand the procedure and changes in order to avoid potential downtime during the upgrade.
Pre-Upgrade Information:
-
The following overall steps are crucial for a seamless upgrade process:
- Date for the upgrade is agreed upon.
- For users of Elastx managed ingress opting to continue with our management services:
- Elastx integrates a load balancer into the ingress service. The load balancer is assigned an external IP-address that will be used for all DNS records post-transition (do not point DNS to this IP at this point).
- Date of the traffic transition to the load balancer is agreed upon.
-
Important Note Before the Upgrade:
- Customers are required to carefully read and comprehend all changes outlined in the migration documentation to avoid potential downtime or disruptions.
- In case of any uncertainties or challenges completing the steps, please contact Elastx support. We are here to assist and can reschedule the upgrade to a more suitable date if needed.
To facilitate a seamless traffic transition, we recommend the following best practices:
- Utilize CNAMEs when configuring domain pointers for the ingress. This approach ensures that only one record needs updating, enhancing efficiency.
- Prior to implementing the change, verify that the CNAME record has a low Time-To-Live (TTL), with a duration of typically 1 minute, to promote rapid propagation.
During the traffic transition:
- All DNS records or proxies need to be updated to point towards the new loadbalancer
- In order to make this change as seamless as possible. We recommend the customer to make use of CNAMEs when pointing domains towards the ingress. This would ensure only one record needs to be updated. Prior to the change make sure the CNAME record has a low TTL, usually 1 minute is good to ensure rapid propagation
During the traffic transition:
- Elastx will meticulously update the ingress service configuration to align with your specific setup.
- The customer is responsible for updating all DNS records or proxies to effectively direct traffic towards the newly implemented load balancer.
During the Upgrade:
- Elastx assumes all necessary pre-upgrade changes have been implemented unless notified otherwise.
- On the scheduled upgrade day, Elastx initiates the upgrade process at the agreed-upon time.
- Note: The Kubernetes API will be temporarily unavailable during the upgrade due to migration to a load balancer.
- Upgrade Procedure:
- The upgrade involves replacing all nodes in your cluster twice.
- Migration to the new cluster management backend system will occur during Kubernetes 1.25, followed by the cluster upgrade to Kubernetes 1.26.
After Successful Upgrade:
- Users are advised to download a new kubeconfig from the object store for continued access and management.
Possibility to get a new cluster instead of migrating
To address the growing demand for new clusters rather than upgrades, customers currently running Kubernetes 1.25 (or earlier) can opt for a new Kubernetes cluster instead of migrating their existing one. The new cluster can be of version 1.26 or the latest available (1.29 at the moment). This new cluster is provided free of charge for an initial 30-day period, allowing you the flexibility to migrate your services at your own pace. However, if the migration extends beyond 30 days, please note that you will be billed for both clusters during the extended period. We understand the importance of a smooth transition, and our support team is available to assist you throughout the process.
Ingress
We are updating the way clusters accept incoming traffic by transitioning from accepting traffic on each worker node to utilizing a load balancer. This upgrade, effective from Kubernetes 1.26 onwards, offers automatic addition and removal of worker nodes, providing enhanced fault management and a single IP address for DNS and/or WAF configuration.
Before upgrading to Kubernetes 1.26, a migration to the new Load Balancer is necessary. See below a flowchart of the various configurations. In order to setup the components correctly we need to understand your configuration specifics. Please review your scenario:
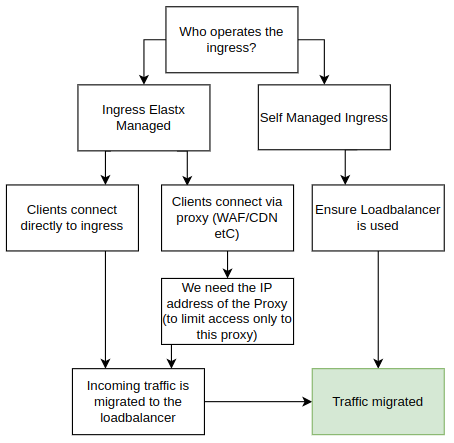
Using Your Own Ingress
If you manage your own add-ons, you can continue doing so. Starting from Kubernetes 1.26, clusters will no longer have public IP addresses on all nodes by default. We strongly recommend implementing a load balancer in front of your ingress for improved fault tolerance, especially in handling issues better than web browsers.
Elastx managed ingress
If you are using the Elastx managed ingress, additional details about your setup are required.
Proxy Deployed in Front of the Ingress (CDN, WAF, etc.)
If a proxy is deployed, provide information on the IP addresses used by your proxy. We rely on this information to trust the x-forwarded- headers. By default, connections that do not come from your proxy are blocked directly on the load balancer, enforcing clients to connect through your proxy.
Clients Connect Directly to Your Ingress
If clients connect directly to the ingress, we will redirect them to the new ingress. To maintain client source IPs, we utilize HAProxy proxy protocol in the load balancer. However, during the change, traffic will only be allowed to the load balancer for approximately 1-2 minutes. Please plan accordingly, as some connections may experience downtime during this transition.
Floating IPs
Floating IPs (FIPs) are now available for customers who choose to opt in. As part of the upgrade to Kubernetes 1.26, floating IPs will be removed from nodes by default. Instead, Load Balancers will be employed to efficiently direct traffic to services within the cluster.
Please note that current floating IPs will be lost if customers do not opt in for this feature during the upgrade process.
Should you wish to continue utilizing Floating IPs or enable them in the future, simply inform us, and we’ll ensure to assist you promptly.
A primary use case where Floating IPs prove invaluable is in retaining control over egress IP from the cluster. Without leveraging FIPs, egress traffic will be SNAT’ed via the hypervisor.
Kubernetes API
We are removing floating IPs for all control-plane nodes. Instead, we use a Load Balancer in front of control-planes to ensure the traffic will be sent to an working control-plane node.
Whitelisting of access to the API server is now controlled in the loadbalancer in front of the API. Currently, managing the IP-range whitelist requires a support ticket here. All Elastx IP ranges are always included.
Node local DNS
During the Kubernetes 1.26 upgrade we stop using the nodelocaldns. However to ensure we does not break any existing clusters the service will remain installed.
All nodes being added to the cluster running Kubernetes 1.26 or later will not make use of nodelocaldns and pods being created on upgraded nodes will instead make use of the CoreDNS service located in kube-system.
This may affect customers that make use of network policies. If the policy only allows traffic to nodelocaldns, it is required to update the policy to also allow traffic from the CoreDNS service.
Network policy to allow CoreDNS and NodeLocalDNS Cache
This example allows DNS traffic towards both NodeLocalDNS and CoreDNS. This policy is recommended for customers currently only allowing DNS traffic towards NodeLocalDNS and can be used in a “transition phase” prior to upgrading to Kubernetes 1.26.
apiVersion: networking.k8s.io/v1
kind: NetworkPolicy
metadata:
  name: allow-dns-access
spec:
  podSelector: {}
  egress:
    - ports:
        - protocol: UDP
          port: 53
        - protocol: TCP
          port: 53
      to:
        - ipBlock:
            cidr: 169.254.25.10/32
        - podSelector:
            matchLabels:
              k8s-app: kube-dns
  policyTypes:
    - Egress
Network policy to allow CoreDNS
This example shows an example network policy that allows DNS traffic to CoreDNS. This can be used after the upgrade to Kubernetes 1.26
apiVersion: networking.k8s.io/v1
kind: NetworkPolicy
metadata:
  name: allow-dns-access
spec:
  podSelector: {}
  egress:
    - ports:
        - protocol: UDP
          port: 53
        - protocol: TCP
          port: 53
      to:
        - podSelector:
            matchLabels:
              k8s-app: kube-dns
  policyTypes:
    - Egress
7.4.8 - Persistent volumes
Persistent volumes in our Elastx Kubernetes CaaS service are provided by OpenStack Cinder. Volumes are dynamically provisioned by Kubernetes Cloud Provider OpenStack.
Storage classes
8k refers to 8000 IOPS.
See our pricing page under the table Storage to calculate your costs.
Below is the list of storage classes provided in newly created clusters. In case you see other storageclasses in your cluster, consider these legacy and please migrate data away from them. We provide a guide to Change PV StorageClass.
$ kubectl get storageclasses
NAME              PROVISIONER                RECLAIMPOLICY   VOLUMEBINDINGMODE      ALLOWVOLUMEEXPANSION   AGE
v2-128k           cinder.csi.openstack.org   Delete          WaitForFirstConsumer   true                   27d
v2-16k            cinder.csi.openstack.org   Delete          WaitForFirstConsumer   true                   27d
v2-1k (default)   cinder.csi.openstack.org   Delete          WaitForFirstConsumer   true                   27d
v2-32k            cinder.csi.openstack.org   Delete          WaitForFirstConsumer   true                   27d
v2-4k             cinder.csi.openstack.org   Delete          WaitForFirstConsumer   true                   27d
v2-64k            cinder.csi.openstack.org   Delete          WaitForFirstConsumer   true                   27d
v2-8k             cinder.csi.openstack.org   Delete          WaitForFirstConsumer   true                   27d
Example of PersistentVolumeClaim
A quick example of how to create an unused 1Gi persistent volume claim named example:
kind: PersistentVolumeClaim
apiVersion: v1
metadata:
  name: example
spec:
  accessModes:
    - ReadWriteOnce
  volumeMode: Filesystem
  resources:
    requests:
      storage: 1Gi
  storageClassName: v2-16k
$ kubectl get persistentvolumeclaim
NAME      STATUS   VOLUME                                     CAPACITY   ACCESS MODES   STORAGECLASS   AGE
example   Bound    pvc-f8b1dc7f-db84-11e8-bda5-fa163e3803b4   1Gi        RWO            v2-16k            18s
Good to know
Cross mounting of volumes between nodes
Cross mounting of volumes is not supported! That is a volume can only be mounted by a node residing in the same availability zone as the volume. Plan accordingly for ensured high availability!
Limit of volumes and pods per node
In case higher number of volumes or pods are required, consider adding additional worker nodes.
| Kubernetes version | Max pods/node | Max volumes/node |
|---|---|---|
| v1.25 and lower | 110 | 25 |
| v1.26 and higher | 110 | 125 |
Encryption
All volumes are encrypted at rest in hardware.
Volume type hostPath
A volume of type hostPath is in reality just a local directory on the specific node being mounted in a pod, this means data is stored locally and will be unavailable if the pod is ever rescheduled on another node. This is expected during cluster upgrades or maintenance, however it may also occur because of other reasons, for example if a pod crashes or a node is malfunctioning. Malfunctioning nodes are automatically healed, meaning they are automatically replaced.
You can read more about hostpath here.
If you are looking for a way to store persistent data we recommend to use PVCs. PVCs can move between nodes within one data-center meaning any data stored will be present even if the pod or node is recreated.
Known issues
Resizing encrypted volumes
Legacy: encrypted volumes do not resize properly, please contact our support if you wish to resize such a volume.
7.4.9 - Your first deployment
This page will help you getting a deployment up and running and exposed as a load balancer.
Note: This guide is optional and only here to help new Kubernetes users with an example deployment.
You can verify access by running kubectl get nodes and if the output is similar to the example below you are set to go.
❯ kubectl get nodes
NAME                           STATUS   ROLES           AGE     VERSION
hux-lab1-control-plane-c9bmm   Ready    control-plane   2d18h   v1.27.3
hux-lab1-control-plane-j5p42   Ready    control-plane   2d18h   v1.27.3
hux-lab1-control-plane-wlwr8   Ready    control-plane   2d18h   v1.27.3
hux-lab1-worker-447sn          Ready    <none>          2d18h   v1.27.3
hux-lab1-worker-9ltbp          Ready    <none>          2d18h   v1.27.3
hux-lab1-worker-htfbp          Ready    <none>          15h     v1.27.3
hux-lab1-worker-k56hn          Ready    <none>          16h     v1.27.3
Creating an example deployment
To get started we need a deployment to deploy.
Below we have a deployment called echoserver we can use for this example.
-
Start off by creating a file called
deployment.yamlwith the content of the deployment below:--- apiVersion: apps/v1 kind: Deployment metadata: labels: app.kubernetes.io/name: echoserver name: echoserver spec: replicas: 3 selector: matchLabels: app.kubernetes.io/name: echoserver template: metadata: labels: app.kubernetes.io/name: echoserver spec: containers: - image: gcr.io/google-containers/echoserver:1.10 name: echoserver -
After you have created your file we can apply the deployment by running the following command:
❯ kubectl apply -f deployment.yaml deployment.apps/echoserver created -
After running the apply command we can verify that 3 pods have been created. This can take a few seconds.
❯ kubectl get pod
NAME                          READY   STATUS    RESTARTS   AGE
echoserver-545465d8dc-4bqqn   1/1     Running   0          51s
echoserver-545465d8dc-g5xxr   1/1     Running   0          51s
echoserver-545465d8dc-ghrj6   1/1     Running   0          51s
Exposing our deployment
After your pods are created we need to make sure to expose our deployment. In this example we are creating a service of type loadbalancer. If you run this application in production you would likely install an ingress controller
-
First of we create a file called
service.yamlwith the content of the service below--- apiVersion: v1 kind: Service metadata: labels: app.kubernetes.io/name: echoserver name: echoserver annotations: loadbalancer.openstack.org/x-forwarded-for: "true" spec: ports: - port: 80 protocol: TCP targetPort: 8080 name: http selector: app.kubernetes.io/name: echoserver type: LoadBalancer -
After creating the service.yaml file we apply it using kubectl
❯ kubectl apply -f service.yaml service/echoserver created -
We should now be able to use our service by running
kubectl get service❯ kubectl get service NAME TYPE CLUSTER-IP EXTERNAL-IP PORT(S) AGE echoserver LoadBalancer 10.98.121.166 <pending> 80:31701/TCP 54s kubernetes ClusterIP 10.96.0.1 <none> 443/TCP 2d20hFor the echo service we can see that
EXTERNAL-IPsays<pending>this means that a load balancer is being created but is not yet ready. As soon as the load balancer is up and running we will instead use an IP address here we can use to access our application.Loadbalancers usually take around a minute to be created however can sometimes take a little longer.
-
Once the load balancer is up and running the
kubectl get serviceshould return something like this:❯ kubectl get service NAME TYPE CLUSTER-IP EXTERNAL-IP PORT(S) AGE echoserver LoadBalancer 10.98.121.166 185.24.134.39 80:31701/TCP 2m24s kubernetes ClusterIP 10.96.0.1 <none> 443/TCP 2d20h
Access the example deployment
Now if we open our web browser and visits the IP address we should get a response looking something like this:
Hostname: echoserver-545465d8dc-ghrj6

Pod Information:
  -no pod information available-

Server values:
  server_version=nginx: 1.13.3 - lua: 10008

Request Information:
  client_address=192.168.252.64
  method=GET
  real path=/
  query=
  request_version=1.1
  request_scheme=http
  request_uri=http://185.24.134.39:8080/

Request Headers:
  accept=text/html,application/xhtml+xml,application/xml;q=0.9,image/avif,image/webp,image/apng,*/*;q=0.8,application/signed-exchange;v=b3;q=0.7
  accept-encoding=gzip, deflate
  accept-language=en-US,en;q=0.9,sv;q=0.8
  host=185.24.134.39
  upgrade-insecure-requests=1
  user-agent=Mozilla/5.0 (X11; Linux x86_64) AppleWebKit/537.36 (KHTML, like Gecko) Chrome/114.0.0.0 Safari/537.36
  x-forwarded-for=90.230.66.18

Request Body:
  -no body in request-
The Hostname shows which pod we reached and if we refresh the page we should be able to see this value change.
Cleanup
To clean up everything we created you an run the following set of commands
-
We can start off by removing the deployment. To remove a deployment we can use kubectl delete and point it towards the file containing our deployment:
❯ kubectl delete -f deployment.yaml deployment.apps "echoserver" deleted -
After our deployment are removed we can go ahead and remove our service and load balancer. Please note that this takes a few seconds since we are waiting for the load balancer to be removed.
❯ kubectl delete -f service.yaml
service "echoserver" deleted
7.5 - Changelog
7.5.1 - Changelog for Kubernetes 1.34
Versions
The deployed Kubernetes patch version varies based on when your cluster is deployed or upgraded. We strive to use the latest versions available.
Current release leverages Kubernetes 1.34. Official release blogpost found here with corresponding official changelog.
Optional addons
Major changes
- The 4k, 8k, 16k, and v1-dynamic-40 storage classes are removed in this version. Existing volumes will not be affected. The ability to create legacy volumes will be removed. Please migrate manifests that specify storage classes to the storageclasses prefixed with
v2-, which have been available since Kubernetes 1.26 and have been the default since 2024-06-28 made public in the announcement.
Noteworthy changes in upcoming versions
Announcement of changes in future versions.
Scheduled for upcoming releases:
- We’ll remove the legacy
nodelocaldnswhere still deployed. Relevant only if the cluster was created before v1.26. - Ingress-nginx controller will be fully deprecated from our management, following the news.
- We will not handle migrations of ingresses, but aim to provide an API Gateway controller as addon.
Is downtime expected
The cluster is expected to be up and running during the upgrade however pods will restart when being migrated to a new node.
Known issues
Custom node taints and labels lost during upgrade.
Custom taints and labels on worker and control-plane nodes may be lost during the upgrade. We recommend auditing and reapplying any critical custom taints/labels via automation (e.g., cluster bootstrap, configuration management, or a post-upgrade job).
There is a label that is persistent across upgrades that can be used to direct workload to particular nodegroups. Example on how to use it:
spec:
  template:
    spec:
      affinity:
        nodeAffinity:
          requiredDuringSchedulingIgnoredDuringExecution:
            nodeSelectorTerms:
            - matchExpressions:
              - key: nodegroup.node.cluster.x-k8s.io
                operator: In
                values:
                - worker1
Snapshots are not working.
There is currently a limitation in the snapshot controller: it is not topology-aware. As a result, snapshot behavior may be unreliable for topology-sensitive volumes. Avoid depending on snapshots for cross-zone/region recovery until a topology-aware snapshot controller is available or confirm your storage driver’s snapshot semantics.
7.5.2 - Changelog for Kubernetes 1.33
Versions
The deployed Kubernetes patch version varies based on when your cluster is deployed or upgraded. We strive to use the latest versions available.
Current release leverages Kubernetes 1.33. Official release blogpost found here with corresponding official changelog.
Optional addons
Major changes
- Base Ubuntu image upgraded from 22.04 to 24.04.
Kubelet configurations provided by Elastx, not configurable by client
-
NodeDrainVolumeandNodeDrainTimeout: 5 -> 15min- Increased duration to 15 minutes to allow more time for graceful shutdown and controlled startup of workload on new nodes, while respecting
PodDisruptionBudgets.
- Increased duration to 15 minutes to allow more time for graceful shutdown and controlled startup of workload on new nodes, while respecting
-
podPidsLimit: 0 → 4096- Added safety net of a maximum of Per-pod PIDs (process IDs), that is limited and enforced by the kubelet. We used to not have any limitation. Setting this to
4096limits how many PIDs a single pod may create, which helps mitigate runaway processes or fork-bombs.
- Added safety net of a maximum of Per-pod PIDs (process IDs), that is limited and enforced by the kubelet. We used to not have any limitation. Setting this to
-
serializeImagePulls: true → false- Allows the kubelet to pull multiple images in parallel, speeding up startup times.
-
maxParallelImagePulls: 0 → 10- Controls the maximum number of image pulls the kubelet will perform in parallel.
Introducing resource reservations on worker nodes
To improve stability and predictability of the core Kubernetes functionality during heavy load, we introduce node reservations for CPU, memory, and ephemeral storage.
The reservation model follows proven hyperscaler formulas but is tuned conservatively, ensuring more allocatable resources.
Hyperscalers tend to not make a distinction of systemReserved and kubeReserved, and bundle all reservations into and kubeReserved.
We make use of both, but skewed towards kube reservations to align closer with Hyperscalers, but still maintain the reservations of the system.
We calculate the reservations settings based on Cpu cores, Memory and Storage of each flavor dynamically.
Here we’ve provided a sample of what to expect:
CPU Reservations Table
| Cores (int) | System reserved (millicores) | Kube reserved (millicores) | Allocatable of node (%) |
|---|---|---|---|
| 2 | 35 | 120 | 92% |
| 4 | 41 | 180 | 94% |
| 8 | 81 | 240 | 96% |
| 16 | 83 | 320 | 97% |
| 32 | 88 | 480 | 98% |
| 64 | 98 | 800 | 99% |
Memory Reservations
| Memory (Gi) | System reserved (Gi) | Kube reserved (Gi) | Reserved total (Gi) | Eviction Soft (Gi) | Eviction Hard (Gi) | Allocatable of node (%) |
|---|---|---|---|---|---|---|
| 8 | 0.4 | 1.0 | 1.4 | 0.00 | 0.25 | 79% |
| 16 | 0.4 | 1.8 | 2.2 | 0.00 | 0.25 | 85% |
| 32 | 0.4 | 3.4 | 3.8 | 0.00 | 0.25 | 87% |
| 64 | 0.4 | 3.7 | 4.1 | 0.00 | 0.25 | 93% |
| 120 | 0.4 | 4.3 | 4.7 | 0.00 | 0.25 | 96% |
| 240 | 0.4 | 4.5 | 4.9 | 0.00 | 0.25 | 98% |
| 384 | 0.4 | 6.9 | 7.3 | 0.00 | 0.25 | 98% |
| 512 | 0.4 | 8.2 | 8.6 | 0.00 | 0.25 | 98% |
Ephemeral Disk Reservations
NOTE: We use the default of
nodefs.availableat 10%.
| Storage (Gi) | System reserved (Gi) | Kube reserved (Gi) | Reserved total (Gi) | Eviction Soft (Gi) | Eviction Hard (Gi) | Allocatable of node (%) |
|---|---|---|---|---|---|---|
| 60 | 12.0 | 1.0 | 13.0 | 0.0 | 6.0 | 68% |
| 80 | 12.0 | 1.0 | 13.0 | 0.0 | 8.0 | 74% |
| 120 | 12.0 | 1.0 | 13.0 | 0.0 | 12.0 | 79% |
| 240 | 12.0 | 1.0 | 13.0 | 0.0 | 24.0 | 85% |
| 1600 | 12.0 | 1.0 | 13.0 | 0.0 | 160.0 | 89% |
Noteworthy changes in upcoming versions.
Announcement of changes in future versions.
Kubernetes v1.34
The 4k, 8k, 16k, and v1-dynamic-40 storage classes are scheduled to be removed. Existing volumes will not be affected, but the ability to create those legacy volumes will be removed. Please migrate manifests that specify these storage classes to the storage classes prefixed with v2-, which have been available since Kubernetes 1.26 and have been the default since 2024-06-28 (see the announcement). The v1 storage platform was announced as deprecated 2023-12-20 (see the announcement).
Scheduled for upcoming releases:
- We’ll remove the legacy
nodelocaldnswhere still deployed. Relevant only if the cluster was created before v1.26. - Ingress-nginx controller will be fully deprecated from our management, following the news.
- We will not handle migrations of ingresses, but aim to provide an API Gateway controller as addon.
Is downtime expected?
The cluster control plane should remain available during the upgrade; however, pods will be restarted when workloads are migrated to new nodes. Plan for short pod restarts during the upgrade.
Known issues.
Custom node taints and labels lost during upgrade.
Custom taints and labels on worker and control-plane nodes may be lost during the upgrade. We recommend auditing and reapplying any critical custom taints/labels via automation (e.g., cluster bootstrap, configuration management, or a post-upgrade job).
There is a label that is persistent across upgrades that can be used to direct workload to particular nodegroups. Example on how to use it:
spec:
  template:
    spec:
      affinity:
        nodeAffinity:
          requiredDuringSchedulingIgnoredDuringExecution:
            nodeSelectorTerms:
            - matchExpressions:
              - key: nodegroup.node.cluster.x-k8s.io
                operator: In
                values:
                - worker1
Snapshots are not working.
There is currently a limitation in the snapshot controller: it is not topology-aware. As a result, snapshot behavior may be unreliable for topology-sensitive volumes. Avoid depending on snapshots for cross-zone/region recovery until a topology-aware snapshot controller is available or confirm your storage driver’s snapshot semantics.
7.5.3 - Changelog for Kubernetes 1.32
Versions
The deployed Kubernetes patch version varies based on when your cluster is deployed or upgraded. We strive to use the latest versions available.
Current release leverages Kubernetes 1.32. Official release blogpost found here with corresponding official changelog.
Optional addons
Major changes
-
We have announced the deprecation of legacy storageClasses in v1.32. This is postponed to v1.34.
-
Flow control
flowcontrol.apiserver.k8s.io/v1beta3will be removed. The replacementflowcontrol.apiserver.k8s.io/v1was implemented in Kubernetes 1.29 -
More details can be found in Kubernetes official documentation.
Noteworthy changes in coming versions
V1.34
- The 4k, 8k, 16k, and v1-dynamic-40 storage classes are scheduled to be removed. Existing volumes will not be affected. The ability to create legacy volumes will be removed. Please migrate manifests that specify storage classes to the storageclasses prefixed with
v2-, which have been available since Kubernetes 1.26 and have been the default since 2024-06-28 made public in the announcement.
Is downtime expected
The cluster is expected to be up and running during the upgrade however pods will restart when being migrated to a new node.
Known issues
Custom node taints and labels lost during upgrade
All custom taints and labels on worker and control-plane nodes are lost during upgrade.
Snapshots are not working
There is currently a limitation in the snapshot controller not making it topology aware.
7.5.4 - Changelog for Kubernetes 1.31
Versions
The deployed Kubernetes patch version varies based on when your cluster is deployed or upgraded. We strive to use the latest versions available.
Current release leverages Kubernetes 1.31. Official release blogpost found here with corresponding official changelog.
Major changes
In case there are major changes that impacts Elastx Kubernetes cluster deployments they will be listed here.
Noteworthy API changes in coming version Kubernetes 1.32
-
Flow control
flowcontrol.apiserver.k8s.io/v1beta3will be removed. The replacementflowcontrol.apiserver.k8s.io/v1was implemented in Kubernetes 1.29 -
(The 4k, 8k, 16k, and v1-dynamic-40 storage classes will be removed This is postponed to v1.34.). Please migrate to the v2 storage classes, which have been available since Kubernetes 1.26 and have been the default since Kubernetes 1.30.
-
More details can be found in Kubernetes official documentation.
Other noteworthy deprecations
-
Please migrate to the v2 storage classes, which have been available since Kubernetes 1.26 and have been the default since the announcement for existing clusters, and default for new clusters starting at Kubernetes v1.30.
Kubernetes beta topology labels on nodes are deprecated and will be removed in a future release. You can follow the list below to see which labels are being replaced:
Please note: The following changes does not have a set Kubernetes release. However, the replacement labels are already implemented.
beta.kubernetes.io/instance-type->node.kubernetes.io/instance-typebeta.kubernetes.io/arch->kubernetes.io/archbeta.kubernetes.io/os->kubernetes.io/osfailure-domain.beta.kubernetes.io/region->topology.kubernetes.io/regionfailure-domain.beta.kubernetes.io/zone->topology.kubernetes.io/zone
Is downtime expected
The cluster is expected to be up and running during the upgrade however pods will restart when being migrated to a new node.
Known issues
Custom node taints and labels lost during upgrade
All custom taints and labels on worker and control-plane nodes are lost during upgrade.
Snapshots are not working
There is currently a limitation in the snapshot controller not making it topology aware.
7.5.5 - Changelog for Kubernetes 1.30
Versions
The deployed Kubernetes version varies based on when your cluster is deployed. We try deploying cluster using the latest patch release of Kubernetes.
Current release is Kubernetes 1.30.1
Major changes
- New default storageclass
v2-1k - New clusters will only have v2 storage classes available.
nodelocaldnswill be removed for all clusters where it’s still deployed. This change affects only clusters created prior to Kubernetes 1.26, as the feature was deprecated in that version.- Clusters created before Kubernetes 1.26 will have their public domains removed. In Kubernetes 1.26, we migrated to using a LoadBalancer and its IP instead. If you are using an old kubeconfig with an active domain, please fetch a new one.
APIs removed in Kubernetes 1.32
More details can be found in Kubernetes official documentation.
- Flow control
flowcontrol.apiserver.k8s.io/v1beta3. The replacementflowcontrol.apiserver.k8s.io/v1was implemented in Kubernetes 1.29 - The 4k, 8k, 16k, and v1-dynamic-40 storage classes will be removed. Please migrate to the v2 storage classes, which have been available since Kubernetes 1.26 and have been the default since Kubernetes 1.30.
Other noteworthy deprecations
Kubernetes beta topology labels on nodes are deprecated and will be removed in a future release. You can follow the list below to see which labels are being replaced:
Please note: The following changes does not have a set Kubernetes release. However, the replacement labels are already implemented.
beta.kubernetes.io/instance-type->node.kubernetes.io/instance-typebeta.kubernetes.io/arch->kubernetes.io/archbeta.kubernetes.io/os->kubernetes.io/osfailure-domain.beta.kubernetes.io/region->topology.kubernetes.io/regionfailure-domain.beta.kubernetes.io/zone->topology.kubernetes.io/zone
Is downtime expected
The cluster is expected to be up and running during the upgrade however pods will restart when being migrated to a new node.
Known issues
Custom node taints and labels lost during upgrade
All custom taints and labels on worker and control-plane nodes are lost during upgrade.
Snapshots are not working
There is currently a limitation in the snapshot controller not making it topology aware.
7.5.6 - Changelog for Kubernetes 1.29
Versions
The deployed Kubernetes version varies based on when your cluster is deployed. We try deploying cluster using the latest patch release of Kubernetes.
Current release is Kubernetes 1.29.1
Major changes
- Flow control
flowcontrol.apiserver.k8s.io/v1beta2. The replacementflowcontrol.apiserver.k8s.io/v1beta3was implemented in Kubernetes 1.26
APIs removed in Kubernetes 1.32
More details can be found in Kubernetes official documentation.
- Flow control
flowcontrol.apiserver.k8s.io/v1beta3. The replacementflowcontrol.apiserver.k8s.io/v1was implemented in Kubernetes 1.29
Other noteworthy deprecations
Kubernetes beta topology labels on nodes are deprecated and will be removed in a future release. You can follow the list below to see which labels are being replaced:
Please note: The following changes does not have a set Kubernetes release. However, the replacement labels are already implemented.
beta.kubernetes.io/instance-type->node.kubernetes.io/instance-typebeta.kubernetes.io/arch->kubernetes.io/archbeta.kubernetes.io/os->kubernetes.io/osfailure-domain.beta.kubernetes.io/region->topology.kubernetes.io/regionfailure-domain.beta.kubernetes.io/zone->topology.kubernetes.io/zone
Is downtime expected
The cluster is expected to be up and running during the upgrade however pods will restart when being migrated to a new node.
Known issues
Custom node taints and labels lost during upgrade
All custom taints and labels on worker and control-plane nodes are lost during upgrade.
Snapshots are not working
There is currently a limitation in the snapshot controller not making it topology aware.
7.5.7 - Changelog for Kubernetes 1.28
Versions
The deployed Kubernetes version varies based on when your cluster is deployed. We try deploying cluster using the latest patch release of Kubernetes.
Current release is Kubernetes 1.28.6
Major changes
- No major changes
APIs removed in Kubernetes 1.29
More details can be found in Kubernetes official documentation.
- Flow control
flowcontrol.apiserver.k8s.io/v1beta2. The replacementflowcontrol.apiserver.k8s.io/v1beta3was implemented in Kubernetes 1.26
Other noteworthy deprecations
Kubernetes beta topology labels on nodes are deprecated and will be removed in a future release. You can follow the list below to see which labels are being replaced:
Please note: The following changes does not have a set Kubernetes release. However, the replacement labels are already implemented.
beta.kubernetes.io/instance-type->node.kubernetes.io/instance-typebeta.kubernetes.io/arch->kubernetes.io/archbeta.kubernetes.io/os->kubernetes.io/osfailure-domain.beta.kubernetes.io/region->topology.kubernetes.io/regionfailure-domain.beta.kubernetes.io/zone->topology.kubernetes.io/zone
Is downtime expected
The cluster is expected to be up and running during the upgrade however pods will restart when being migrated to a new node.
Known issues
Custom node taints and labels lost during upgrade
All custom taints and labels on worker and control-plane nodes are lost during upgrade.
Snapshots are not working
There is currently a limitation in the snapshot controller not making it topology aware.
7.5.8 - Changelog for Kubernetes 1.27
Versions
The deployed Kubernetes version varies based on when your cluster is deployed. We try deploying cluster using the latest patch release of Kubernetes.
Current release is Kubernetes 1.27.10
Major changes
- Removed API CSIStorageCapacity
storage.k8s.io/v1beta1. The replacementstorage.k8s.io/v1was implemented in Kubernetes 1.24
APIs removed in Kubernetes 1.29
More details can be found in Kubernetes official documentation.
- Flow control
flowcontrol.apiserver.k8s.io/v1beta2. The replacementflowcontrol.apiserver.k8s.io/v1beta3was implemented in Kubernetes 1.26
Other noteworthy deprecations
Kubernetes beta topology labels on nodes are deprecated and will be removed in a future release. You can follow the list below to see which labels are being replaced:
Please note: The following changes does not have a set Kubernetes release. However, the replacement labels are already implemented.
beta.kubernetes.io/instance-type->node.kubernetes.io/instance-typebeta.kubernetes.io/arch->kubernetes.io/archbeta.kubernetes.io/os->kubernetes.io/osfailure-domain.beta.kubernetes.io/region->topology.kubernetes.io/regionfailure-domain.beta.kubernetes.io/zone->topology.kubernetes.io/zone
Is downtime expected
The cluster is expected to be up and running during the upgrade however pods will restart when being migrated to a new node.
Known issues
Custom node taints and labels lost during upgrade
All custom taints and labels on worker and control-plane nodes are lost during upgrade.
Snapshots are not working
There is currently a limitation in the snapshot controller not making it topology aware.
7.5.9 - Changelog for Kubernetes 1.26
Versions
The deployed Kubernetes version varies based on when your cluster is deployed. We try deploying cluster using the latest patch release of Kubernetes.
Current release is Kubernetes 1.26.13
Major changes
- Added support for node autoscaling
- Removed API Flow control resources
flowcontrol.apiserver.k8s.io/v1beta1. The replacementflowcontrol.apiserver.k8s.io/v1beta2was implemented in Kubernetes 1.23 - Removed API HorizontalPodAutoscaler
autoscaling/v2beta2. The replacementautoscaling/v2was introduced in Kubernetes 1.23 - We no longer deploy NodeLocal DNSCache for new clusters
Deprecations
Note that all deprecations will be removed in a future Kubernetes release. This does not mean you need to perform any changes right now. However, we recommend you to start migrating your applications in order to avoid issues in future releases.
- In Kubernetes 1.26 the storage class
4kwill be removed from all clusters. This only affects clusters created prior to Kubernetes 1.23. Instead use the v1-dynamic-40 which is the default storage class since Kubernetes 1.23. This change was originally planned for Kuberntes 1.25 however has been pushed back to 1.26 to allow some extra time for migrations.
APIs removed in Kubernetes 1.27
More details can be found in Kubernetes official documentation.
- CSIStorageCapacity
storage.k8s.io/v1beta1. The replacementstorage.k8s.io/v1was implemented in Kubernetes 1.24
APIs removed in Kubernetes 1.29
More details can be found in Kubernetes official documentation.
- Flow control
flowcontrol.apiserver.k8s.io/v1beta2. The replacementflowcontrol.apiserver.k8s.io/v1beta3was implemented in Kubernetes 1.26
Other noteworthy deprecations
Kubernetes beta topology labels on nodes are deprecated and will be removed in a future release. You can follow the list below to see which labels are being replaced:
Please note: The following changes does not have a set Kubernetes release. The replacement labels are however already implemented.
beta.kubernetes.io/instance-type->node.kubernetes.io/instance-typebeta.kubernetes.io/arch->kubernetes.io/archbeta.kubernetes.io/os->kubernetes.io/osfailure-domain.beta.kubernetes.io/region->topology.kubernetes.io/regionfailure-domain.beta.kubernetes.io/zone->topology.kubernetes.io/zone
Is downtime expected
The cluster is expected to be up and running during the upgrade however pods will restart when being migrated to a new node.
Known issues
Custom node taints and labels lost during upgrade
All custom taints and labels on worker and control-plane nodes are lost during upgrade.
Snapshots are not working
There is currently a limitation in the snapshot controller not making it topology aware.
7.5.10 - Changelog for Kubernetes 1.25
Versions
- Kubernetes 1.25.6
- Nginx-ingress: 1.4.0
- Certmanager: 1.11.0
Major changes
- Pod Security Policies has been removed.
- CronJob API
batch/v1beta1has been removed and is replaced withbatch/v1that was implemented in Kubernetes 1.21 - EndpointSlice API
discovery.k8s.io/v1beta1has been removed and is replaced withdiscovery.k8s.io/v1that was implemented in Kubernetes 1.21 - Event API
events.k8s.io/v1beta1has been removed and is replaced withevents.k8s.io/v1that was implemented in Kubernetes 1.19 - PodDisruptionBudget API
policy/v1beta1has been removed and is replaced withpolicy/v1that was implemented in Kubernetes 1.21 - RuntimeClass API
node.k8s.io/v1beta1has been removed and is replaced withnode.k8s.io/v1that was implemented in Kubernetes 1.20
Deprecations
Note that all deprecations will be removed in a future Kubernetes release. This does not mean you need to perform any changes right now. However, we recommend you to start migrating your applications in order to avoid issues in future releases.
- In Kubernetes 1.26 the storage class
4kwill be removed from all clusters. This only affects clusters created prior to Kubernetes 1.23. Instead use the v1-dynamic-40 which is the default storage class since Kubernetes 1.23. This change was originally planned for Kuberntes 1.25 however has been pushed back to 1.26 to allow some extra time for migrations.
APIs removed in Kubernetes 1.26
More details can be found in Kubernetes official documentation.
- Flow control resources
flowcontrol.apiserver.k8s.io/v1beta1. The replacementflowcontrol.apiserver.k8s.io/v1beta2was implemented in Kubernetes 1.23 - HorizontalPodAutoscaler
autoscaling/v2beta2. The replacementautoscaling/v2was introduced in Kubernetes 1.23
APIs removed in Kubernetes 1.27
More details can be found in Kubernetes official documentation.
- CSIStorageCapacity
storage.k8s.io/v1beta1. The replacementstorage.k8s.io/v1was implemented in Kubernetes 1.24
Other noteworthy deprecations
Kubernetes beta topology labels on nodes are deprecated and will be removed in a future release. You can follow the list below to see which labels are being replaced:
Please note: The following changes does not have a set Kubernetes release. However, the replacement labels are already implemented.
beta.kubernetes.io/instance-type->node.kubernetes.io/instance-typebeta.kubernetes.io/arch->kubernetes.io/archbeta.kubernetes.io/os->kubernetes.io/osfailure-domain.beta.kubernetes.io/region->topology.kubernetes.io/regionfailure-domain.beta.kubernetes.io/zone->topology.kubernetes.io/zone
Is downtime expected
The upgrade drains (move all workload from) one node at the time, patches that node and brings it back in the cluster. First after all deployments and statefulsets are running again we will continue on with the next node.
Known issues
Custom node taints and labels lost during upgrade
All custom taints and labels on worker and control-plane nodes are lost during upgrade.
Custom changes to non -customer security groups will be lost
All changes to security groups not suffixed with “-customer” will be lost during the upgrade.
Snapshots are not working
There is currently a limitation in the snapshot controller not making it topology aware.
7.5.11 - Changelog for Kubernetes 1.24
Versions
- Kubernetes 1.24.6
- Nginx-ingress: 1.4.0
- Certmanager: 1.10.0
Major changes
- The
node-role.kubernetes.io/master=label is removed from all control plane nodes, instead use thenode-role.kubernetes.io/control-plane=label. - The taint
node-role.kubernetes.io/control-plane:NoSchedulehas been added to all control plane nodes.
Deprecations
Note that all deprecations will be removed in a future Kubernetes release. This does not mean you need to perform any changes right now. However, we recommend you to start migrating your applications in order to avoid issues in future releases.
- In Kubernetes 1.25 the storage class
4kwill be removed from all clusters. This only affects clusters created prior to Kubernetes 1.23. Instead use the v1-dynamic-40 which is the default storage class since Kubernetes 1.23.
APIs removed in Kubernetes 1.25
More details can be found in Kubernetes official documentation.
- Pod Security Policies will be removed in Kubernetes 1.25
- CronJob
batch/v1beta1. The new APIbatch/v1was implemented in Kubernetes 1.21 (this is a drop in replacement) - EndpointSlice
discovery.k8s.io/v1beta1. The new APIdiscovery.k8s.io/v1was implemented in Kubernetes 1.21 - Event
events.k8s.io/v1beta1. The new APIevents.k8s.io/v1was implemented in Kubernetes 1.19 - PodDisruptionBudget
policy/v1beta1. The new APIpolicy/v1was implemented in Kubernetes 1.21 - RuntimeClass
node.k8s.io/v1beta1. The new APInode.k8s.io/v1was implemented in Kubernetes 1.20
APIs removed in Kubernetes 1.26
More details can be found in Kubernetes official documentation.
- Flow control resources
flowcontrol.apiserver.k8s.io/v1beta1. The replacementflowcontrol.apiserver.k8s.io/v1beta2was implemented in Kubernetes 1.23 - HorizontalPodAutoscaler
autoscaling/v2beta2. The replacementautoscaling/v2was introduced in Kubernetes 1.23
Other noteworthy deprecations
Kubernetes beta topology labels on nodes are deprecated and will be removed in a future release. You can follow the list below to see which labels are being replaced:
Please note: The following changes does not have a set Kubernetes release. However, the replacement labels are already implemented.
beta.kubernetes.io/instance-type->node.kubernetes.io/instance-typebeta.kubernetes.io/arch->kubernetes.io/archbeta.kubernetes.io/os->kubernetes.io/osfailure-domain.beta.kubernetes.io/region->topology.kubernetes.io/regionfailure-domain.beta.kubernetes.io/zone->topology.kubernetes.io/zone
Is downtime expected
The upgrade drains (move all workload from) one node at the time, patches that node and brings it back in the cluster. First after all deployments and statefulsets are running again we will continue on with the next node.
Known issues
Custom node taints and labels lost during upgrade
All custom taints and labels on worker and control-plane nodes are lost during upgrade.
Custom changes to non -customer security groups will be lost
All changes to security groups not suffixed with “-customer” will be lost during the upgrade.
Snapshots are not working
There is currently a limitation in the snapshot controller not making it topology aware.
7.5.12 - Changelog for Kubernetes 1.23
Versions
- Kubernetes 1.23.7
- Nginx-ingress: 1.3.0
- Certmanager: 1.9.1
Major changes
- A new storage class
v1-dynamic-40is introduced and set as the default storage class. All information about this storage class can be found here. - Worker and control plane nodes now use
v1-c2-m8-d80as their default flavor. You can find a complete list of all available flavors here. - All nodes will be migrated to the updated flavors during the upgrade. All new flavors will have the same specification however the flavor ID will be changed. This affects customers that use the
node.kubernetes.io/instance-typelabel that can be located on nodes. - Control plane nodes will have their disk migrated from the deprecated
4kstorage class tov1-dynamic-40. - Starting from Kubernetes 1.23 we will require 3 control plane (masters) nodes.
Flavor mapping
| Old flavor | New flavor |
|---|---|
| v1-standard-2 | v1-c2-m8-d80 |
| v1-standard-4 | v1-c4-m16-d160 |
| v1-standard-8 | v1-c8-m32-d320 |
| v1-dedicated-8 | d1-c8-m58-d800 |
| v2-dedicated-8 | d2-c8-m120-d1.6k |
Changes affecting new clusters:
- The storage class
4kwill no longer be set-up due to it being deprecated in Openstack. The full announcement can be found here.
What happened to the metrics/monitoring node?
Previously when creating new or upgrading clusters to Kubernetes 1.23 we added an extra node that handled monitoring. This node is no longer needed and all services have been converted to run inside the Kubernetes cluster. This means that clusters being upgraded or created from now on won’t get an extra node added. Clusters that currently have the monitoring node will be migrated to the new setup within the upcoming weeks (The change is non-service affecting).
Deprecations
Note that all deprecations will be removed in a future Kubernetes release. This does not mean you need to perform any changes right now. However, we recommend you to start migrating your applications in order to avoid issues in future releases.
- In kubernetes 1.25 the storage class
4kwill be removed from all clusters created prior to Kubernetes 1.23.
APIs removed in Kubernetes 1.25
More details can be found in Kubernetes official documentation.
- Pod Security Policies will be removed in Kubernetes 1.25
- CronJob
batch/v1beta1. The new APIbatch/v1was implemented in Kubernetes 1.21 (this is a drop in replacement) - EndpointSlice
discovery.k8s.io/v1beta1. The new APIdiscovery.k8s.io/v1was implemented in Kubernetes 1.21 - Event
events.k8s.io/v1beta1. The new APIevents.k8s.io/v1was implemented in Kubernetes 1.19 - PodDisruptionBudget
policy/v1beta1. The new APIpolicy/v1was implemented in Kubernetes 1.21 - RuntimeClass
node.k8s.io/v1beta1. The new APInode.k8s.io/v1was implemented in Kubernetes 1.20
Other noteworthy deprecations
Kubernetes beta topology labels on nodes are deprecated and will be removed in a future release. You can follow the list below to see which labels are being replaced:
Please note: The following changes does not have a set Kubernetes release. However, the replacement labels are already implemented.
beta.kubernetes.io/instance-type->node.kubernetes.io/instance-typebeta.kubernetes.io/arch->kubernetes.io/archbeta.kubernetes.io/os->kubernetes.io/osfailure-domain.beta.kubernetes.io/region->topology.kubernetes.io/regionfailure-domain.beta.kubernetes.io/zone->topology.kubernetes.io/zone
Is downtime expected
The upgrade drains (move all workload from) one node at the time, patches that node and brings it back in the cluster. First after all deployments and statefulsets are running again we will continue on with the next node.
Known issues
Custom node taints and labels lost during upgrade
All custom taints and labels on worker and control-plane nodes are lost during upgrade.
Custom changes to non -customer security groups will be lost
All changes to security groups not suffixed with “-customer” will be lost during the upgrade.
Snapshots are not working
There is currently a limitation in the snapshot controller not making it topology aware.
7.5.13 - Changelog for Kubernetes 1.22
Versions
- Kubernetes 1.22.8
- Nginx-ingress: 1.1.1
- Certmanager: 1.6.3
Major changes
- When our ingress is installed we set it as the default ingress, meaning it will be used unless a custom ingress class is used/specified
- Clusters are now running containerd instead of docker. This should not affect your workload at all
- We reserve 5% RAM on all nodes making it easier to calculate how much is left for your workload
- All components deployed by Elastx have tolerations for
NoScheduletaints by default - Certmanager
cert-manager.io/v1alpha2,cert-manager.io/v1alpha3,cert-manager.io/v1beta1,acme.cert-manager.io/v1alpha2,acme.cert-manager.io/v1alpha3andacme.cert-manager.io/v1beta1APIs are no longer served. All existing resources will be converted automatically tocert-manager.io/v1andacme.cert-manager.io/v1, however you will still need to update your local manifests - Several old APIs are no longer served. A complete list can be found in Kubernetes documentation
Changes affecting new clusters:
- All new clusters will have the cluster domain
cluster.localby default - The encrypted
*-encstorage-classes (4k-enc,8k-encand16k-enc) are no longer available to new clusters since they are deprecated for removal in Openstack. Do not worry, all our other storage classes (4k,8k,16kand future classes) are now encrypted by default. Read our full announcement here
Deprecations
Note that all deprecations will be removed in a future Kubernetes release. This does not mean you need to perform any changes right now. However, we recommend you to start migrating your applications in order to avoid issues in future releases.
APIs removed in Kubernetes 1.25
More details can be found in Kubernetes official documentation.
- Pod Security Policies will be removed in Kubernetes 1.25
- CronJob
batch/v1beta1. The new APIbatch/v1was implemented in Kubernetes 1.21 (this is a drop in replacement) - EndpointSlice
discovery.k8s.io/v1beta1. The new APIdiscovery.k8s.io/v1was implemented in Kubernetes 1.21 - Event
events.k8s.io/v1beta1. The new APIevents.k8s.io/v1was implemented in Kubernetes 1.19 - PodDisruptionBudget
policy/v1beta1. The new APIpolicy/v1was implemented in Kubernetes 1.21 - RuntimeClass
node.k8s.io/v1beta1. The new APInode.k8s.io/v1was implemented in Kubernetes 1.20
Other noteworthy deprecations
Kubernetes beta topology labels on nodes are deprecated and will be removed in a future release. You can follow the list below to see which labels are being replaced:
Please note: The following changes does not have a set Kubernetes release. However, the replacement labels are already implemented.
beta.kubernetes.io/instance-type->node.kubernetes.io/instance-typebeta.kubernetes.io/arch->kubernetes.io/archbeta.kubernetes.io/os->kubernetes.io/osfailure-domain.beta.kubernetes.io/region->topology.kubernetes.io/regionfailure-domain.beta.kubernetes.io/zone->topology.kubernetes.io/zone
Is downtime expected
The upgrade drains (move all workload from) one node at the time, patches that node and brings it back in the cluster. First after all deployments and statefulsets are running again we will continue on with the next node.
Known issues
Custom node taints and labels lost during upgrade
All custom taints and labels on nodes are lost during upgrade.
Custom changes to non -customer security groups will be lost
All changes to security groups not suffixed with “-customer” will be lost during the upgrade.
Snapshots are not working
There is currently a limitation in the snapshot controller not making it topology aware.
7.5.14 - Changelog for Kubernetes 1.21
Versions
- Kubernetes 1.21.5
- Nginx-ingress: 1.0.1
- Certmanager: 1.5.3
Major changes
- Load Balancers are by default allowed to talk to all tcp ports on worker nodes.
New Kubernetes features:
- The ability to create immutable secrets and configmaps.
- Cronjobs are now stable and the new API
batch/v1is implemented. - Graceful node shutdown, when shutting worker nodes this is detected by Kubernetes and pods will be evicted.
Deprecations
Note that all deprecations will be removed in a future Kubernetes release, this does not mean you need to perform any changes now however we recommend you to start migrating your applications to avoid issues in future releases.
APIs removed in Kubernetes 1.22
A guide on how to migrate from affected APIs can be found in the Kubernetes upstream documentation.
- Ingress
extensions/v1beta1andnetworking.k8s.io/v1beta1 - ValidatingWebhookConfiguration and MutatingWebhookConfiguration
admissionregistration.k8s.io/v1beta1 - CustomResourceDefinition
apiextensions.k8s.io/v1beta1 - CertificateSigningRequest
certificates.k8s.io/v1beta1 - APIService
apiregistration.k8s.io/v1beta1 - TokenReview
authentication.k8s.io/v1beta1 - Lease
coordination.k8s.io/v1beta1 - SubjectAccessReview, LocalSubjectAccessReview and SelfSubjectAccessReview
authorization.k8s.io/v1beta1 - Certmanager api
v1alpha2,v1alpha3andv1beta1
Other noteworthy deprecations
Kubernetes beta topology labels on nodes are deprecated and will be removed in a future release, follow the list below to see what labels are being replaced:
Please note: the following change does not have a set Kubernetes release when being removed however the replacement labels are already implemented.
beta.kubernetes.io/instance-type->node.kubernetes.io/instance-typebeta.kubernetes.io/arch->kubernetes.io/archbeta.kubernetes.io/os->kubernetes.io/osfailure-domain.beta.kubernetes.io/region->topology.kubernetes.io/regionfailure-domain.beta.kubernetes.io/zone->topology.kubernetes.io/zone
APIs removed in Kubernetes 1.25
more detail can be found in Kubernetes official documentation.
- Pod Security Policies will be removed in Kubernetes 1.25.
- CronJob
batch/v1beta1, the new APIbatch/v1was implemented in Kubernetes 1.21 (this is a drop in replacement) - EndpointSlice
discovery.k8s.io/v1beta1, the new APIdiscovery.k8s.io/v1was implemented in Kubernetes 1.21 - Event
events.k8s.io/v1beta1, the new APIevents.k8s.io/v1was implemented in Kubernetes 1.19 - PodDisruptionBudget
policy/v1beta1, the new APIpolicy/v1was implemented in Kubernetes 1.21 - RuntimeClass
node.k8s.io/v1beta1, the new APInode.k8s.io/v1was implemented in Kubernetes 1.20
Is downtime expected
The upgrade drains (moving all workload from) one node at the time, patches that node and brings it back in the cluster. First after all deployments and statefulsets are running again we will continue on with the next node.
Known issues
Custom node taints and labels lost during upgrade
All custom taints and labels on nodes are lost during upgrade.
Custom changes to non -customer security groups will be lost
All changes to security groups not suffixed with “-customer” will be lost during the upgrade
Snapshots is not working
There is currently a limitation in the snapshot controller not making it topology aware.
7.5.15 - Changelog for Kubernetes 1.20
Versions
- Kubernetes 1.20.7
- Nginx-ingress: 0.46.0
- Certmanager: 1.3.1
Major changes
- RBAC api
rbac.authorization.k8s.io/v1alpha1has been removed. Instead use the replacementrbac.authorization.k8s.io/v1. - We no longer supports new clusters being created with pod security policy enabled. Instead we recommend using OPA Gatekeeper, in case you have any questions regarding this contact our support and we will help you guys out.
- The built-in Cinder Volume Provider has gone from deprecated to disabled. Any volumes that are still using it will have to be migrated, see Known Issues.
Deprecations
- Ingress api
extensions/v1beta1will be removed in kubernetes 1.22. - Kubernetes beta lables on nodes are deplricated and will be removed in a future release, follow the below list to se what lable replaces the old one:
beta.kubernetes.io/instance-type->node.kubernetes.io/instance-typebeta.kubernetes.io/arch->kubernetes.io/archbeta.kubernetes.io/os->kubernetes.io/osfailure-domain.beta.kubernetes.io/region->topology.kubernetes.io/regionfailure-domain.beta.kubernetes.io/zone->topology.kubernetes.io/zone
- Certmanager api
v1alpha2,v1alpha3andv1beta1will be removed in a future release. We strongly recommend that you upgrade to the newv1api. - RBAC api
rbac.authorization.k8s.io/v1beta1will be removed in an upcoming release. The apis are replaced withrbac.authorization.k8s.io/v1. - Pod Security Policies will be removed in Kubernetes 1.25 in all clusters having the feature enabled. Instead we recommend OPA Gatekeeper.
Is downtime expected
The upgrade drains (moving all workload from) one node at the time, patches that node and brings it back in the cluster. First after all deployments and statefulsets are running again we will continue on with the next node.
Known issues
Custom node taints and labels lost during upgrade
All custom taints and labels on nodes are lost during upgrade.
Custom changes to non -customer security groups will be lost
All changes to security groups not suffixed with “-customer” will be lost during the upgrade
Snapshots is not working
There is currently a limitation in the snapshot controller not making it topology aware.
Volumes using built-in Cinder Volume Provider will be converted
During the upgrade to 1.20 Elastx staff will upgrade any volumes still being managed by the built-in Cinder Volume Provider. No action is needed on the customer side, but it will produce events and possibly log events that may raise concern.
To get a list of Persistent Volumes that are affected you can run this command before the upgrade:
$ kubectl get pv -o json | jq -r '.items[] | select (.spec.cinder != null) | .metadata.name'
Volumes that have been converted will show an event under the Persistent Volume Claim object asserting that data has been lost - this is a false statement and is due to the fact that the underlying Persistent Volume was disconnected for a brief moment while it was being attached to the new CSI-based Cinder Volume Provider.
Bitnami (and possibly other) images and runAsGroup
Some Bitnami images silently assume they are run with the equivalent of runAsGroup: 0. This was the Kubernetes default until 1.20.x. The result is strange looking permission errors on startup and can cause workloads to fail.
At least the Bitnami PostgreSQL and RabbitMQ images have been confirmed as having these issues.
To find out if there are problematic workloads in your cluster you can run the following commands:
kubectl get pods -A -o yaml|grep image:| sort | uniq | grep bitnami
If any images turn up there may be issues. !NB. Other images may have been built using Bitnami images as base, these will not show up using the above command.
Solution without PSP
On clusters not running PSP it should suffice to just add:
runAsGroup: 0
To the securityContext for the affected containers.
Solution with PSP
On clusters running PSP some more actions need to be taken. The restricted PSP forbids running as group 0 so a new one needs to be created, such as:
apiVersion: policy/v1beta1
kind: PodSecurityPolicy
metadata:
  annotations:
    apparmor.security.beta.kubernetes.io/allowedProfileNames: runtime/default
    apparmor.security.beta.kubernetes.io/defaultProfileName: runtime/default
    seccomp.security.alpha.kubernetes.io/allowedProfileNames: docker/default,runtime/default
    seccomp.security.alpha.kubernetes.io/defaultProfileName: runtime/default
  labels:
    addonmanager.kubernetes.io/mode: Reconcile
  name: restricted-runasgroup0
spec:
  allowPrivilegeEscalation: false
  fsGroup:
    ranges:
    - max: 65535
      min: 1
    rule: MustRunAs
  requiredDropCapabilities:
  - ALL
  runAsGroup:
    ranges:
    - max: 65535
      min: 0
    rule: MustRunAs
  runAsUser:
    rule: MustRunAsNonRoot
  seLinux:
    rule: RunAsAny
  supplementalGroups:
    ranges:
    - max: 65535
      min: 1
    rule: MustRunAs
  volumes:
  - configMap
  - emptyDir
  - projected
  - secret
  - downwardAPI
  - persistentVolumeClaim
Furthermore a ClusterRole allowing the use of said PSP is needed:
apiVersion: rbac.authorization.k8s.io/v1
kind: ClusterRole
metadata:
  labels:
    addonmanager.kubernetes.io/mode: Reconcile
  name: psp:restricted-runasgroup0
rules:
- apiGroups:
  - policy
  resourceNames:
  - restricted-runasgroup0
  resources:
  - podsecuritypolicies
  verbs:
  - use
And finally you need to bind the ServiceAccounts that need to run as group 0 to the ClusterRole with a ClusterRoleBinding:
apiVersion: rbac.authorization.k8s.io/v1
kind: ClusterRoleBinding
metadata:
  name: psp:restricted-runasgroup0
roleRef:
  apiGroup: rbac.authorization.k8s.io
  kind: ClusterRole
  name: psp:restricted-runasgroup0
subjects:
- kind: ServiceAccount
  name: default
  namespace: keycloak
- kind: ServiceAccount
  name: XXX
  namespace: YYY
Then its just a matter of adding:
runAsGroup: 0
To the securityContext for the affected containers.
7.5.16 - Changelog for Kubernetes 1.19
Versions
- Kubernetes 1.19.7
- Nginx-ingress: 0.43.0
- Certmanager: 1.2.0
Major changes
-
New security groups are implemented where you can store all youre firewall rules. The new security groups will be persistent between upgrades and called
CLUSTERNAME-k8s-worker-customerandCLUSTERNAME-k8s-master-customer(CLUSTERNAME will be replaced with actual cluster name). With this change we will remove our previous default firewall rules that allowed public traffic to the Kubernetes cluster, this includes the following services:- Master API (port 6443)
- Ingress (port 80 & 443)
- Nodeports (ports 30000 to 32676)
Deprecations
- Ingress api
extensions/v1beta1will be removed in kubernetes 1.22 - RBAC api
rbac.authorization.k8s.io/v1alpha1andrbac.authorization.k8s.io/v1beta1will be removed in kubernetes 1.20. The apis are replaced withrbac.authorization.k8s.io/v1. - The node label
beta.kubernetes.io/instance-typewill be rmeoved in an uppcomig release. Usenode.kubernetes.io/instance-typeinstead. - Certmanager api
v1alpha2,v1alpha3andv1beta1will be removed in a future release. We strongly recommend that you upgrade to the newv1api
Is downtime expected
The upgrade drains (moving all workload from) one node at the time, patches that node and brings in back in the cluster. First after all deployments and statefulsets are running again we will continue on with the next node.
Known issues
Custom node taints and labels lost during upgrade
All custom taints and labels on nodes are lost during upgrade.
Custom security groups will be lost during upgrade
All custom security groups bound inside openstack will be detached during upgrade.
Snapshots is not working
There is currently a limitation in the snapshot controller not making it topology aware.
7.5.17 - Changelog for Kubernetes 1.18
Versions
- Kubernetes 1.18.9
- Nginx-ingress: 0.40.0
- Certmanager: 1.0.3
Major changes
- Moved the
tcp-servicesconfigmap used by our ingress controller to the default namespace.
Deprecations
- Ingress api
extensions/v1beta1will be removed in kubernetes 1.22 - RBAC api
rbac.authorization.k8s.io/v1alpha1andrbac.authorization.k8s.io/v1beta1will be removed in kubernetes 1.20. The apis are replaced withrbac.authorization.k8s.io/v1. - The node label
beta.kubernetes.io/instance-typewill be rmeoved in an uppcomig release. Usenode.kubernetes.io/instance-typeinstead. - Certmanager api
v1alpha2,v1alpha3andv1beta1will be removed in a future release. We strongly recommend that you upgrade to the newv1api - Accessing the Kubernetes dashboard over the Kubernetes API. This feature will not be added to new clusters however if your cluster already has this available it will continue working until Kubernetes 1.19
Removals
- Some older deprecated metrics, more information regarding this can be found in the official Kubernetes changelog: Link to Kubernetes changelog
Is downtime expected
For this upgrade we expect a shorter downtime on the ingress. The downtime on the ingress should be no longer than 5 minutes and hopefully even under 1 minute in length.
The upgrade drains (moving all workload from) one node at the time, patches that node and brings in back in the cluster. First after all deployments and statefulsets are running again we will continue on with the next node.
Known issues
Custom node taints and labels lost during upgrade
All custom taints and labels on nodes are lost during upgrade.
Snapshots is not working
There is currently a limitation in the snapshot controller not making it topology aware.
Resize problem on volumes created before Kubernetes 1.16
Volume expansion sometimes fails on volumes created before Kubernetes 1.16.
A workaround exists by adding an annotation on the affected volumes, an example command:
kubectl annotate --overwrite pvc PVCNAME volume.kubernetes.io/storage-resizer=cinder.csi.openstack.org
7.5.18 - Changelog for Kubernetes 1.17
Versions
- Kubernetes 1.17.9
- Nginx-ingress: 0.32.0
- Certmanager: 0.15.0
Major changes
- We can now combine nodes with multiple different flavors within one cluster
- Fixed a bug where some external network connections got stuck (MTU missmatch, calico)
- Enabled calicos metric endpoint
- New and improved monitoring system
- Ingress does only support serving http over port 80 and https over port 443
- Cert-manager using new APIs: Cert-manager info
Deprecations
- Ingress api
extensions/v1beta1will be removed in kubernetes 1.22 - RBAC api
rbac.authorization.k8s.io/v1alpha1andrbac.authorization.k8s.io/v1beta1will be removed in kubernetes 1.20. The apis are replaced withrbac.authorization.k8s.io/v1. - The node label
beta.kubernetes.io/instance-typewill be rmeoved in an uppcomig release. Usenode.kubernetes.io/instance-typeinstead.
Removals
Custom ingress ports
We no longer supports using custom ingress ports. From 1.17 http traffic will be received on port 80 and https on port 443
You can check what ports you are using with the following command:
kubectl get service -n elx-nginx-ingress elx-nginx-ingress-controller
If you aren’t using port 80 and 443 please be aware that the ports your ingress listen on will change during the upgrade to Kubernetes 1.17. ELASTX team will contact you before the upgrade takes place and we can together come up with a solution.
Old Kubernetes APIs
A complete list of APIs that will be removed in this version:
- NetworkPolicy
extensions/v1beta1
- PodSecurityPolicy
extensions/v1beta1
- DaemonSet
extensions/v1beta1apps/v1beta2
- Deployment
extensions/v1beta1apps/v1beta1apps/v1beta2
- StatefulSet
apps/v1beta1apps/v1beta2
- ReplicaSet
extensions/v1beta1apps/v1beta1apps/v1beta2
Is downtime expected
For this upgrade we expect a shorter downtime on the ingress. the downtime on the ingress should be no longer than 5 minutes and hopefully even under 1 minute in length.
The upgrade are draining (moving all load from) one node at the time, patches that node and brings in back in the cluster. first after all deployments and statefulsets are running again we will continue with the next node.
Known issues
Custom node taints and labels lost during upgrade
All custom taints and labels on nodes are lost during upgrade.
Snapshots is not working
There is currently a limitation in the snapshot controller not making it topology aware.
Resize problem on volumes created before Kubernetes 1.16
Volume expansion sometimes fails on volumes created before Kubernetes 1.16.
A workaround exists by adding an annotation on the affected volumes, an example command:
kubectl annotate --overwrite pvc PVCNAME volume.kubernetes.io/storage-resizer=cinder.csi.openstack.org
8 - Mail Relay
8.1 - Overview
The Elastx Mail Relay service facilitates sending large numbers of emails and is especially suited for applications/services that needs to send emails.
The scope of the service is access to our SMTP server for sending emails.
To use the service you must configure the necessary DNS records on the domain names you wish to use as sender address for your emails.
8.2 - Announcements
2025-01-08 DKIM signing now required for all mail relay customers
Breaking changes
All mail relay customers are now required to implement DKIM signing for the domains they wish to use with our mail relay service. This can be as simple as adding a DNS record, please contact our support to get started. From 2025-04-01 our Mail Relay service will reject mails from domains without DKIM configured.
Background
Forged addresses and content are widely used in spam, phishing and other email frauds. To protect legitimate organisations and end users, more and more email providers are starting to reject mail sent without a valid DKIM signature.
DKIM adds a digital signature to an outgoing message. The receiver can, using this digital signature, verify that an email coming from a specific domain was indeed authorized by the owner of that domain. Usually this verification is done automatically by the receiving mail server and is transparent to end-users.
Impact
From 2025-04-01 we will not accept sender domains without DKIM configured.
If you are already using our DKIM signing service there is no action needed. If you have any questions or want to set up DKIM signing for your domains, please register a support ticket at https://support.elastx.se/.
2024-05-01 DKIM signing service now available
We now offer DKIM signing on emails sent through our mail relay.
What’s new?
Previously the only option for DKIM signed messages sent through our mail relay was to sign the emails before sending them to us. This is still a viable option in case you want to control the key used for signing. As an alternative to the above, you can now contact us to request that Elastx mail relay handles DKIM signing for you.
Background
DKIM adds a digital signature to an outgoing message. Receiving mail servers can, using this digital signature, verify that a message did originate from a trusted source for the sender domain.
Spam and phishing attempts are such a big problem in the industry today that unsigned emails are much more likely to be marked as spam, subject to heavy rate-limits, and/or outright refused on the receiving end.
Impact
There is no impact if you already sign your messages before sending them to our mail relay.
We heavily recommend all customers not already signing their messages, to use our DKIM signing. All mail sent through our mail relay service will be forced to carry a DKIM signature at a future unenclosed date.
If you have any general questions or would like to sign-up please contact us at hello@elastx.se. For any technical questions please register a support ticket at https://support.elastx.se.
8.3 - Email and DNS
DNS plays a vital role in regards to email, there are three types of DNS records that are essential to ensuring your emails reach the recipients without being flagged as spam:
| Type | Purpose |
|---|---|
| DMARC | Policy - what action should be taken if a email does not “pass” DKIM or SPF validation? |
| DKIM | Signing - each email is signed with a private key, the public key is put in DNS for the sender domain |
| SPF | Authorize email servers - what servers (source IPs) are allowed to send emails for this domain name |
Additional reading
External resources that explains how DMARC, DKIM and SPF works:
8.4 - FAQ
Price?
Please see the website.
How many emails can I send?
We recommend a maximum rate of 10 emails per second.
Multiple user accounts?
Yes, a couple of user accounts are fine.
8.5 - Getting started
Overview
In short the required steps are:
- Contact the Elastx Support to get user account and password for the SMTP server
- For each domain you want to send emails from:
- Create DNS record for Elastx challenge token (for each user account)
- Create DNS SPF record
- Create DNS DKIM record
- Create DNS DMARC record
Once these steps are completed you can use our SMTP server to send emails.
If you are unfamiliar with SPF, DKIM and DMARC please see this article.
Terminology and general info
| Term | Description |
|---|---|
| sender address | The sender email address for the emails you send (no relation to user account) |
| user account | Your user account name for our SMTP server (no relation to sender address) |
Please keep in mind that when you create a DNS record for the Elastx challenge token, that user account will be allowed to send emails with any sender address for the domain name.
DNS records
If you use multiple sender domains all domain names will need the below DNS records configured.
Example: You are using sender addresses tom@example.com and alice@example.se - this means the below domain names will need to be configured with the correct DNS records:
example.comexample.se
Elastx Challenge token
This record authorizes a user account to use the domain as sender address for emails.
Each user account will need a record for each domain they should be allowed to use as sender address.
The record is created as a TXT record directly under the sender domain name - ie. domain.com.
A simple DNS lookup should return something like:
$ dig +short domain.com TXT
"elastx-mrs=f7ee5ec7312165148b69fcca1d29075b14b8aef0b5048a332b18b88d09069fb7"
(..)
To generate the value of the elastx-mrs record, take the SHA256 sum of your user account email address:
echo "elastx-mrs=$(echo -n "user@domain.com" | sha256sum | cut -d ' ' -f 1)"
Note that the address used above should be your user account, not your sender address.
SPF record
This record determines what email servers are allowed to use the domain name as sender address.
The record is a DNS TXT record for domain.com where domain.com is your sender address domain name.
A basic value that only allows Elastx email servers:
"v=spf1 include:elastx.email -all"
DKIM record
DNS TXT record should be created for elastx._domainkey.yourdomain.com with value as provided by Elastx. Replace yourdomain.com with your sender address domain name.
Due to the size of the record it will be split into multiple TXT records. Ie. a DNS lookup will show something similar to:
$ dig elastx._domainkey.yourdomain.com TXT
(..)
;; ANSWER SECTION:
elastx._domainkey.yourdomain.com. 1800 IN    TXT     "v=DKIM1; p=MIIBIjANBgkqhkiG9w0BAQEFAAOCAQ8AMIIBCgKCAQEAwHsOJDTnxAkcz/RBek0XDqLaSZov/icY7mZHUSIV7gbHRVLhMWKvWqDV56WdbO+tVo2
Gaf298Jo0WxwGsIUe0zi6dT0WXgv2zhP0KDT5aRu4q34SsLvrDe218xOC677gm6xUcFaqIMeiU73b9osCDlAxnNSwa2pjxx9yeO6py75tfzw86YkKUvPXPUW754E6mu/k+/4q" "z4NeFnGrCyHLr5rlyxpljMyL8eD13VRP3am
kCl3Bcgkzt/JWLLa3/9X+N8gkWbB1W2RHAxacvxErSN5K8UHOAT3cUR3qvPGjE4iIKLoU1IkH7s8Gud5gHkiiY5opgDhdfz2kiILyrSv5DQIDAQAB"
(..)
DMARC record
DNS TXT record should be created for _dmarc.yourdomain.com where yourdomain.com is your sender address domain name.
Elastx does not have any specific requirements for the value, it just needs to be a valid DMARC policy.
Example value:
v=DMARC1; p=quarantine; adkim=r; aspf=r;
SMTP server
Configure your application/service with the address to our SMTP server (below) and your user account + password.
| Property | Value |
|---|---|
| Address | smtp.elastx.email |
| Port | 587 |
| Protocol | SMTP + STARTTLS (preferred) |
9 - OpenStack IaaS
9.1 - Announcements
2026-03-31 Elastx Cloud Platform - Compute, Storage and DBaaS
Pricing adjustment
We have absorbed rising operational costs rather than pass them on to you. Despite significant inflationary pressure across the industry, we have managed to keep our prices stable.
The primary driver for our price adjustment is a sharp increase in hardware costs, which have risen 150–250% in the last 6 months. This is a market-wide development entirely outside our control, and one we have worked hard to shield you from for as long as possible. We have reached a point where continuing to do so would compromise our ability to maintain and develop the platform in a sustainable way.
Effective July 1, we will apply a 10% price adjustment to all Compute, Storage and DBaaS services.
We do not take this decision lightly. It is the first time we have increased the prices on most of these services, and it reflects the reality of today’s hardware market rather than any change in our commitment to you.
This change will take effect starting July 1, 2026.
Pricing adjustments
We will adjust the pricing on the following services.
| Service | Price increase |
|---|---|
| Compute | 10% |
| Block storage | 10% |
| Object Storage | 10% |
| DBaaS | 10% |
2026-02-04 ECP OpenStack IaaS
Mandatory idp for OpenStack IaaS
For a better and more secure user experience we will require all users in OpenStack IaaS to authenticate against the Elastx identity provider (IdP). Multi Factor Authentication (MFA) is required and you can use either TOTP or hardware keys in combination with a password. This is also a preparation for the launch of the Elastx Cloud Console (ECC). With the Elastx IdP you will have one account to access all ECP services.
If you do not already have an Elastx IdP account one will be created for you automatically at 2026-03-30. At this time we will no longer support OpenStack user accounts with Keystone Credentials. The ability to manage users in the OpenStack web UI will also be replaced with user management in Elastx Cloud Console. If you want to enable idp for your user account before this date please contact our support.
All programmatic integrations with OpenStack IaaS must be done with “application credentials”or “ec2 credentials”. If you are currently using a user account with Keystone Credentials (username and password), that integration will fail after all users are migrated to IdP authentication with MFA. This includes integrations with Swift Object storage which is the most common service to integrate with. Here is a guide on how to create application credentials, https://docs.elastx.cloud/docs/openstack-iaas/guides/application_credentials/. Here is a guide on how to create ec2 credentials, https://docs.elastx.cloud/docs/openstack-iaas/guides/ec2_credentials/.
This change will take effect starting March 30, 2026.
2025-09-29 Elastx Compute and Storage
v1 pricing adjustments
We have successfully avoided a general price increase on all services, even though the past years of high inflation. We are investing in new more efficient technology to compensate for the increased operational costs. This is the first time we will increase the price on our first generation compute and volume storage. We have come to a point where we need to do a price adjustment to be able to continue the platform development in a sustainable way. The cost for our second generation (v2) compute and volume storage will stay the same.
The new pricing will apply from 2026-01-01.
We will adjust the pricing on the following services.
| Service | Price increase |
|---|---|
| v1 compute flavors (All flavors starting with v1) | 4% |
| v1 volume types (4k-IOPS, 8k-IOPS, 16k-IOPS, v1-dynamic-40) | 4% |
2025-02-27 ECP Compute
Pricing adjustment
We are trying to avoid a general price increase on all services, even though the past years high inflation have been affecting us hard. We are investing in new more efficient technology to compensate for the increased cost derived from product vendors, utility services, financial service and internal costs. We have identified a few selected services where we need to perform price adjustments to be able to continue the development in a sustainable way.
We will adjust the pricing on the following dedicated instance flavors.
| Flavor | Current price | New price |
|---|---|---|
| d2-c8-m120-d1.6k | 6 890 SEK / month | 7 845 SEK / Month |
| d3-c24-m240-d3.2k | 10 750 SEK / month | 13 450 SEK / Month |
All prices are per month (730h) and VAT excluded.
The new pricing will apply from 2025-06-01.
You can find information, specifications and pricing here, https://elastx.se/se/openstack.
2024-08-19 ECP Compute
New generation v2 flavors
We are excited to announce that the new v2 compute flavor is now available in our Openstack IaaS. This new flavor is based on the AMD EPYC processor. While the price remains comparable to the v1 compute flavor, you can expect up to double the CPU performance.
The v2 flavors are also available for our Database DBaaS and Kubernetes CaaS services. You can migrate your existing instances from v1 to v2 flavors.
This will take effect starting August 19, 2024.
You can find information, specifications and pricing here, https://elastx.se/se/openstack.
2024-04-29 ECP Block Storage
ECP storage price cut
We are happy to announce that we will perform a price cut on our next generation v2 volumes. We launched the v2 volumes at the end of 2023 and it has performed just as good as we had hoped.
The v2 volumes have marked leading performance and are very cost effective and now we will cut the price for volume performance which will make it a market leader. We are cutting the price for volume performance by 40%.
The new v2 Block Storage is available as Volumes in Openstack IaaS, DBaaS and as Persistent Volumes in Kubernetes CaaS.
These are the volume types and pricing.
| Volume type | IOPS | MBPS | Price / GB | Current Price / Volume | New Price / Volume |
|---|---|---|---|---|---|
| v2-1k | 1 000 | 64 | 0.78 kr | 0 kr | 0 kr |
| v2-4k | 4 000 | 128 | 0.78 kr | 300 kr | 180 kr |
| v2-8k | 8 000 | 256 | 0.78 kr | 700 kr | 420 kr |
| v2-16k | 16 000 | 384 | 0.78 kr | 1500 kr | 900 kr |
| v2-32k | 32 000 | 512 | 0.78 kr | 3 100 kr | 1860 kr |
| v2-64k | 64 000 | 1 024 | 0.78 kr | 6 300 kr | 3780 kr |
| v2-128k | 128 000 | 2 048 | 0.78 kr | 12 700 kr | 7620 kr |
All prices are per month (730h) and VAT excluded.
This will apply from 2024-06-01. As a customer you do not need to do anything, the new pricing will be applied and visible on the next invoice.
You can find information, specifications and pricing here, https://elastx.se/se/openstack.
2023-12-20 ECP Block Storage
New v2 Volumes
We are happy to announce our next generation Elastx Cloud Platform (ECP) v2 Block Storage. Due to a technology shift we are now able to provide a market leading Block Storage in both price and performance.
There is a fully redundant storage cluster in each Availability Zone (AZ). Volumes are only accessible from compute instances running in the same AZ. All volumes are encrypted at rest. Snapshot and backup features are available.
The new v2 Block Storage is now available as Volumes in Openstack IaaS and it will soon be available as Persistent Volumes in Kubernetes CaaS and volumes in DBaaS.
These are the volumes and pricing that are currently available.
| Volume type | IOPS | MBPS | Price / GB | Price / Volume |
|---|---|---|---|---|
| v2-1k | 1 000 | 64 | 0.78 kr | 0 kr |
| v2-4k | 4 000 | 128 | 0.78 kr | 300 kr |
| v2-8k | 8 000 | 256 | 0.78 kr | 700 kr |
| v2-16k | 16 000 | 384 | 0.78 kr | 1500 kr |
| v2-32k | 32 000 | 512 | 0.78 kr | 3 100 kr |
| v2-64k | 64 000 | 1 024 | 0.78 kr | 6 300 kr |
| v2-128k | 128 000 | 2 048 | 0.78 kr | 12 700 kr |
All prices are per month (730h).
Deprecated v1 Volumes
The new v2 Volumes are more cost effective and more powerful than the current v1 volumes. Therefore we are now deprecating the following v1 volumes:
- v1-dynamic-40
- 8k-IOPS
- 16k-IOPS
These Volumes will be available at least one year from now. We will announce an End Of Life date at least three months ahead of termination.
Migration to the new v2 Volumes can be done by mounting them in parallel and copying data or using the volume retype function which is an offline data migration tool.
You can find information, specifications and pricing here, https://elastx.se/se/openstack.
2023-05-02 OpenStack IaaS announcement
We are happy to announce these platform news that will help you to run applications on Elastx Cloud Platform with enhanced security.
Object Storage Encryption at Rest
Swift, Elastx object storage in OpenStack, is now fully Encrypted at Rest. We have migrated all data to encrypted disks. You do not need to do anything, both current data and new data is now Encrypted at Rest.
If you have a requirement to encrypt data at rest you can now consume any of our storage services. All storage services in Elastx Cloud Platform, both ephemeral, volume and object storage are now Encrypted at Rest.
Encryption at Rest has been active on Elastx object storage since 2023-04-14
2023-04-26 OpenStack IaaS announcement
Removed dedicated flavor
The following dedicated instance flavor is no longer available:
- d2-c8-m120-d11.6k
2023-03-22 OpenStack IaaS announcement
We are changing the Microsoft licensing model to make it more cost effective and we have also introduced new Load Balancer flavors that have more capacity.
New Microsoft licensing model
We are changing the way we charge for Microsoft licenses in OpenStack IaaS to better align with how Microsoft charges for these licenses and to make it more cost effective for high memory instances. Until now we have based the MS server licenses on the amount of instance RAM. The new license model will be based on the number of instance CPUs which also aligns better with how you typically buy these licenses.
| License | Current Price | New Price |
|---|---|---|
| Microsoft Windows Server | 36.5 SEK / GB RAM / Month | 189 SEK / CPU / Month |
| Microsoft MSSQL Standard | 197.1 SEK / GB RAM / Month | 1229 SEK / CPU / Month |
| Microsoft MSSQL Enterprise | 4821 SEK / CPU / Month | |
| Microsoft MSSQL Web Edition | 79 SEK / CPU / Month |
You need to license at least 4 CPUs per instance for Microsoft MSSQL server. MSSQL licenses are billed per month and any usage change needs to be reported to Elastx Support.
The new pricing will apply from 2023-05-01
New Load Balancer flavors
We have added multiple OpenStack Load Balancer flavors with more capacity to allow more demanding workloads. Until now we have provided a single flavor for all Load Balancers but now you can select a Load Balancer with more capacity if required.
| Load Balancer Flavor | Price per hour | Price per month |
|---|---|---|
| v1-lb-1 (default) | 0.53 kr | 386.90 kr |
| v1-lb-2 | 1.06 kr | 773.80 kr |
| v1-lb-4 | 2.12 kr | 1,547.60 kr |
| v1-lb-8 | 4.24 kr | 3,095.20 kr |
This is a general guideline on traffic capacity but it can differ based on traffic pattern.
v1-lb-1 approximately 200Mbit
v1-lb-2 approximately 400Mbit
v1-lb-4 approximately 800Mbit
v1-lb-8 approximately 1.6Gbit
The new Load Balancer Flavors are available now.
2023-01-27 Elastx Cloud Platform pricing adjustment
To Elastx Customers and Partners,
We are trying to avoid a general price increase on all services, even though the current high inflation is affecting us hard. We are investing in new more efficient technology to compensate for the increased cost derived from product vendors, utility services, financial service and internal costs. We have identified a few selected services where we need to perform price adjustments to be able to continue the development in a sustainable way.
The new pricing will apply from 2023-03-01.
We will adjust the pricing on the dedicated instance flavor d1-c8-m58-d800.
| Flavor | Current price | New price |
|---|---|---|
| d1-c8-m58-d800 | 3950 SEK / Month | 4750 SEK / Month |
We will adjust the pricing on the network Load Balancer as a Service.
| Service | Current price | New price |
|---|---|---|
| Load Balancer as a Service | 250 SEK / Month | 390 SEK / Month |
2022-09-30 Openstack encrypted volumes and deprecated flavor
During 2021 we announced that all volumes in OpenStack are encrypted at no additional cost. We are now changing the end of life date of our legacy encrypted volume types.
We are also deprecating our first dedicated instance flavor. No end of life date will be announced today but there will be limited availability as we will not add any additional capacity.
Encrypted Volumes EOL update
During 2021 we enabled encryption at rest for all volumes in our Openstack IaaS. Prior to this change you could select encryption as an option which cost more than non encrypted volumes. Now all new and existing volumes are encrypted at no additional cost.
There is a function available in OpenStack to migrate data between volume types that can be used to migrate from a legacy encrypted volume to a standard volume type which also is encrypted at rest. We have users requesting to postpone the EOL date and therefore we are now announcing a new EOL date.
The following volume types are deprecated and will be disabled at the latest 2023-09-30.
- 4k-IOPS-enc
- 8k-IOPS-enc
- 16k-IOPS-enc
The price for these volume types will increase by 30% 2023-01-01.
If you are running any of the above volume types you need to migrate the data to other volume types.
When you migrate the legacy encrypted volumes to our standard volumes you will reduce the cost for your volumes. You can change the volume type from a legacy encrypted to a standard volume but it is an offline process. Please contact support if you need any help or recommendation on how to do this.
Deprecated dedicated flavor
The following dedicated instance flavor is now deprecated.
- d1-c8-m58-d800
- v1-dedicated-8 (legacy name)
We will not announce an End Of Life date today and when we do it will be announced at least one year ahead. We will not add any additional capacity to this flavor so there is limited availability. There can be situations where we do not have any available capacity to start new instances with this flavor.
This is also the only flavor that doesn’t have a boot disk with at rest encryption.
2022-06-15 Increased price on Openstack d2 instances
Due to the increased pricing on hardware and power we need to increase the price on d2 instances.
There has been an extreme price increase on hardware and power during the last 6 months which has forced us to increase the price on our OpenStack d2 dedicated instances. Both current and new instances with these flavors will be affected.
The following instances flavors are affected.
| Flavor | Current price | New price |
|---|---|---|
| d2-c8-m120-d1.6k | 5950 SEK / month | 6890 SEK / Month |
| d2-c8-m120-d11.6k | 8249 SEK / month | 9250 SEK / Month |
The new prices will apply from 2022-10-01.
2022-06-14 New OpenStack Instance flavors to better match your workloads.
Elastx is introducing new OpenStack Instance flavors and a new flavor naming standard. The new flavors are memory or cpu optimized flavors that can be used to better match your workload requirements. The new naming standard will make it easier to understand the flavor specification and to support additional flavor types in the future.
New Flavors
Here are all the new flavors that will be available soon.
| Flavor | vCPU | RAM | Disk |
|---|---|---|---|
| v1-c1-m8-d60 | 1 CPU | 8GB RAM | 60GB SSD Disk |
| v1-c2-m4-d60 | 2 CPU | 4GB RAM | 60GB SSD Disk |
| v1-c2-m16-d120 | 2 CPU | 16GB RAM | 120GB SSD Disk |
| v1-c4-m8-d120 | 4 CPU | 8GB RAM | 120GB SSD Disk |
| v1-c4-m32-d240 | 4 CPU | 32GB RAM | 240GB SSD Disk |
| v1-c8-m16-d240 | 8 CPU | 16GB RAM | 240GB SSD Disk |
| v1-c8-m64-d480 | 8 CPU | 64GB RAM | 480GB SSD Disk |
New naming standard
All flavors will get new names, the current flavors will still be available and new flavors with the new naming standard will be created in parallel. The cost for the new flavors will be the same as the current corresponding one.
Here is how the new naming standard works.
First character
v=vm (virtual machine on shared hypervisor)
d=dedicated (virtual machine on dedicated hypervisor)
b=bare metal (bare metal machine)
First number
#=hardware version
The following characters and numbers
c=vCPU amount
m=Memory in GB
d=disk in GB
g=gpu and type of GPU
s=sgx enabled and the amount of sgx RAM in GB
Here are the new naming on the corresponding current flavors
| Flavor | vCPU | RAM | Disk | Current |
|---|---|---|---|---|
| v1-c1-m0.5-d20 | 1 CPU | 0.5GB RAM | 20GB SSD Disk | v1-micro-1 |
| v1-c1-m1-d20 | 1 CPU | 1GB RAM | 20GB SSD Disk | v1-mini-1 |
| v1-c1-m2-d20 | 1 CPU | 2GB RAM | 20GB SSD Disk | v1-small-1 |
| v1-c1-m4-d40 | 1 CPU | 4GB RAM | 40GB SSD Disk | v1-standard-1 |
| v1-c2-m8-d80 | 2 CPU | 8GB RAM | 80GB SSD Disk | v1-standard-2 |
| v1-c4-m16-d160 | 4 CPU | 16GB RAM | 160GB SSD Disk | v1-standard-4 |
| v1-c8-m32-d320 | 8 CPU | 32GB RAM | 320GB SSD Disk | v1-standard-8 |
| d1-c8-m58-d800 | 8 CPU | 58GB RAM | 800GB SSD Disk | v1-dedicated-8 |
| d2-c8-m120-d1.6k | 8 CPU | 120GB RAM | 1600GB SSD Disk | v2-dedicated-8 |
| d2-c8-m120-d11.6k | 8 CPU | 120GB RAM | 11600GB SSD Disk | d2-dedicated-8 |
The new flavors will be available from 2022-06-20.
2022-06-13 Reducing OpenStack volume price with up to 63% and increasing performance with up to 50%.
Elastx is introducing a new volume type that will be more cost effective and can also improve performance with up to 50%. We will also adjust the pricing on some of the current volume types with up to 63% without any change in service levels.
Our OpenStack IaaS volumes are based on redundant SSD persistent storage clusters which are available in all our three availability zones. Our storage clusters are battle proven and have been running with predictable performance and without interruption for almost 10 years! During this period we have expanded, made hardware refreshes and enabled encryption, all without disruption.
New volume type “v1-dynamic-40”
The new volume type is called “v1-dynamic-40”. The performance is dynamic which means iops will be provisioned depending on the size of the volume. There will be a base provisioned iops and then added iops performance for each added GB in size up to a maximum level. The new dynamic volume type will cost less and perform better than the current entry level volume type “4k-IOPS”. This new volume type and all our current volumes are encrypted at rest.
V1-dynamic-40 volume
Base provisioned iops: 4000
Additional iops per GB: 40
Max iops: 24000
Price per GB: 2.90 SEK/GB/month
Base price per volume: 0 SEK/month
Example, a 400GB volume will have 20000 iops (4000+400*40) and cost 1160 SEK / month.
The new “v1-dynamic-40” volume will be available 2022-06-20.
Price change on current volumes.
We will adjust the price on our current static iops volumes to be more cost effective and be aligned with the cost to provisioned iops. These static volumes have a higher base provisioned iops and do not increase in iops performance. To match this with the cost we will lower the price per GB and introduce a base cost for the higher base performance.
8k-IOPS volume
Base provisioned iops: 8000
Additional iops per GB: 0
Max iops: 8000
Price: 2.50 SEK/GB/month
Base price per volume: 150 SEK/month
Example, a 100GB volume will have 8000 iops and cost 400 SEK / month (150+100*2.5).
16k-IOPS volume
The legacy encrypted volumes are deprecated as all volumes are encrypted now.
Base provisioned iops: 16000
Additional iops per GB: 0
Max iops: 16000
Price: 2.50 SEK/GB/month
Base price per volume: 290 SEK/month
Example, a 100GB volume will have 16000 iops and cost 540 SEK / month (290+100*2.5).
8k-IOPS-enc volume (deprecated)
The legacy encrypted volumes are deprecated as all volumes are encrypted now.
Base provisioned iops: 8000
Additional iops per GB: 0
Max iops: 8000
Price: 4.30 SEK/GB/month
Base price per volume: 150 SEK/month
Example, a 100GB volume will have 8000 iops and cost 580 SEK / month (150+100*4.3).
16k-IOPS-enc volume (deprecated)
Base provisioned iops: 16000
Additional iops per GB: 0
Max iops: 16000
Price: 4.30 SEK/GB/month
Base price per volume: 290 SEK/month
Example, a 100GB volume will have 16000 iops and cost 720 SEK / month (290+100*4.3).
The new pricing will be applied from 2022-09-01.
Deprecated volume type
The “4k-IOPS” volume is now deprecated. It will still be available as long as it is in use but we will limit creation of new volumes 2022-12-01. The new volume type v1-dynamic-40 costs less and is faster so we recommend changing current 4k-IOPS volumes to it.
Changing volume type
The volume type on a current volume can be changed without disruption and the new specifications will be applied instantly.
2022-01-17
We are happy to announce that all volumes in OpenStack are now encrypted at no additional cost and we will soon start the upgrade of the OpenStack version with new features and improvements.
Encrypted Volumes
Our goal is to provide the best conditions and tools to run applications in a secure and predictable way. During 2021 we enabled encryption at rest for all volumes in our Openstack IaaS. Prior to this change you could select encryption as an option which cost more than non encrypted volumes. Now all new and existing volumes are encrypted at no additional cost. The option to select encrypted volumes is now obsolete and will be removed shortly.
The following volume types are deprecated and will be disabled 2022-09-30.
4k-IOPS-enc
8k-IOPS-enc
16k-IOPS-enc
If you are running any of the above volume types you need to migrate the data to other volume types.
When you migrate the legacy encrypted volumes to our standard volumes you will reduce the cost for your volumes. You can’t change the volume type from a legacy encrypted to a standard volume, you need to create a new volume and migrate the data. Please contact support if you need any help or recommendation on how to do this.
OpenStack IaaS upgrade
We will soon upgrade our OpenStack platform and this will be performed in three steps. The plan is to start the upgrade in February. We will announce service windows for the upgrade on our status page, https://status.elastx.se. Here you can also subscribe to get notifications about service windows and incidents.
Step 1
OpenStack version will be upgraded to Rocky. There will be disturbance with the OpenStack API but we do not expect any disturbance on running workloads.
Step 2
Upgrade operating system on control plane and compute nodes.
There will be disruption of workloads during the upgrade. We will upgrade one availability zone at a time.
Step 3
OpenStack version will be upgraded to Train. There will be disturbance with the OpenStack API but we do not expect any disturbance on running workloads.
9.2 - Changelog
9.2.1 - Changelog for OpenStack Train
Changelog overview
The purpose of this upgrade is to take the OpenStack platform from the current “Queens” release to the “Train” release. This will include an intermediate upgrade to the “Rocky” release. The “Stein” release is skipped because it isn’t required.
- No public APIs are deprecated by these upgrades
- Support for TLS version 1.1 will be dropped during the upgrade to the “Train” release
Deprecations and dropped support
APIs
None of the public OpenStack APIs will be deprecated by the planned upgrades.
TLS
Support for TLS version 1.1 will be dropped during the upgrade to the “Train” release. This will cause issues for API clients only supporting TLS version 1.1 or below as connections will be rejected. Upgrade and check client configuration before the upgrades!
Horizon (Web UI)
You will no longer be able to download “OpenStack RC File v2” by clicking your username in the top right corner. Only “OpenStack RC File v3” will be available.
Visible changes (Horizon/web UI)
- The “Overview” page will be divided into categories by resource type. It will also contain information about more resources.
- “Server Groups” are now visible under the “Compute” heading.
- “Consistency Groups” and “Consistency Groups Snapshots” have been replaced by “Groups” and “Group Snapshots” under the “Volume” heading.
- It is now possible to manage “Application Credentials” under the “Identity” heading.
New features
The upgrades come with a lot of new features, such as:
- UDP load balancers in Octavia (Train)
- Fine grained access rules can now be defined for “Application Credentials” (Train)
Reference
To get the complete picture you may refer to the release notes found here for the following projects:
9.2.2 - Changelog for OpenStack Ussuri
Changelog overview
The purpose of this upgrade is to take the OpenStack platform from the current Train release to the Ussuri release.
- No public APIs deprecations
- API endpoints are now available over IPv6 (note that IPv6 for compute and loadbalancers is still unsupported)
Deprecations and dropped support
APIs
None of the public OpenStack APIs will be deprecated by the planned upgrades.
New features
The upgrades come with a lot of new features, such as:
- API endpoints are now available over IPv6
- Barbican secrets can now be removed by other users with the Secret Store permission (previously only the creator of the secret could remove it).
Reference
The complete list of changelogs can be found here, and the changelogs for the major projects we use can be seen below.
Please note that not all of the changes may be relevant to our platform.
9.2.3 - Changelog for OpenStack Wallaby
Changelog overview
- Cinder v2 API disabled
- This upgrade contains several security fixes, bugfixes and improvements as well as some new minor features.
Deprecations and dropped support
APIs
- Cinder v2 API, that was deprecated in the Pike release, will be removed
Reference
The complete list of changelogs can be found here, and the changelogs for the major projects we use can be seen below.
Please note that not all of the changes may be relevant to our platform.
9.2.4 - Changelog for OpenStack Yoga
Changelog overview
- No public APIs deprecations
- This upgrade contains several security fixes, bugfixes and improvements as well as some new minor features.
Reference
The complete list of changelogs can be found here, and the changelogs for the major projects we use can be seen below.
Please note that not all of the changes may be relevant to our platform.
9.3 - Overview
ELASTX OpenStack IaaS consists of a fully redundant installation spread over three different physical locations (openstack availability zones) in Stockholm, Sweden. Managed and monitored by us 24x7. You also have access to our support at any time.
The current setup is based on the OpenStack version Yoga.
Services
Our OpenStack environment currently runs the following services:
- Keystone - Authentication service
- Nova - Compute service
- Neutron - Network service
- Heat - Orchestration service
- Horizon - Dashboard
- Glance - Image store. We provide images for the most popular operating systems. All Linux images are unmodified from the official vendor cloud image.
- Barbican - Secret store service which is powered by physical HSM appliances
- Octavia - Load balancer service, barbican integration for SSL termination
- Cinder - Block storage with SSD based block storage and guaranteed IOPS reservations which is integrated with Barbican for optional encrypted volumes.
- Swift - Object storage
- Ceilometer - Metric storage, stores key metrics for the services like cpu and memory utilization
- CloudKitty - Rating service
Quotas
These are our default project quotas, let us know if you wish to change these upon ordering. Contact support to have quotas changed on an existing project.
- VCPUs: 20
- Memory (RAM) 50 GiB
- Volumes: 1000
- Volume snapshots: 1000
- Total size of volumes and snapshots: 1000 GiB
- Security groups: 50
- Security group rules: 1000
- Floating IPs: 10
- Routers: 1
- Networks: 10
- Subnets: 100
- Ports: 500
Differencies and limitations
As every OpenStack cloud has it’s own unique set of features and underlying infrastructure, there are some things that might differentiate in our cluster from others. Down below is a list of what we believe is good to know when working in our OpenStack cloud.
Compute
- Live migration is not supported.
- An instance with volumes attached cannot be migrated to another Availability Zone.
- Machines booting from ephemeral storage cannot use an image larger than 64GiB, especially important if booting from snapshot.
- Machines created with machine type q35, for instance our Windows UEFI images, can only attach one volume while the instance is running. To attach additional volumes, the instance needs to be turned off first.
Dashboard
- Objects in Object store cannot be listed in Horizon once an account has >1000 buckets or >10000 objects in it.
API access
Here is a list of all the Openstack IaaS API endpoints. Make sure you allow traffic to these ports in your firewall.
- Cloudformation https://ops.elastx.cloud:8000
- Compute https://ops.elastx.cloud:8774
- Identity https://ops.elastx.cloud:5000
- Image https://ops.elastx.cloud:9292
- Key Manager https://ops.elastx.cloud:9311
- Load Balancer https://ops.elastx.cloud:9876
- Metric https://ops.elastx.cloud:8041
- Network https://ops.elastx.cloud:9696
- Object Store https://swift.elastx.cloud:443
- Orchestration https://ops.elastx.cloud:8004
- Placement https://ops.elastx.cloud:8780
- Rating https://ops.elastx.cloud:8089
- Registration https://ops.elastx.cloud:5050
- Volumev3 https://ops.elastx.cloud:8776
Load Balancing
- It’s not possible to limit access to a Load Balancer instance with a Floating IP attached to it.
- A Load Balancer cannot be referenced by ID as a source in a Security Group.
Network
- Maximum of one router per project. We only support a single router due to how resources are allocated in our network infrastructure.
- An instance cannot connect to its own Floating IP. Best practice is to use internal IP when communicating internally (e.g. clustering).
- The network
elx-public1is provided by the platform and cannot be removed from a project. You can attach an interface on your router on this network for internet access. This is also used as a pool for requesting Floating IP addresses.
Object store
- To upload objects larger than 5GiB, use of DLO/SLO is necessary to split the object in multiple smaller parts. See https://docs.openstack.org/swift/latest/overview_large_objects.html.
- python-swiftclient is not correctly adding headers to segmented files which cause fragments to remain when using ‘X-Delete-After’ header to automatically delete objects after a certain time has passed. This isn’t unique to our cloud but we feel that it’s important to know. See https://bugs.launchpad.net/python-swiftclient/+bug/1159951.
Secrets
- Secrets can only be deleted by the user that created them.
Storage
- Volumes cannot be attached nor migrated across Availability Zones.
- Encrypted volumes can only be deleted by the user that created them.
- It’s not supported to snapshot the ephemeral volume of dedicated instances (flavour with dedicated in name).
- Encrypted volumes need to be detached and attached manually for instances to discover the new volume size when resizing.
- When making a backup use only single line for description. There is a bug that fails the process if you use more than one line.
9.4 - Network
Overview
The OpenStack tenant networks is implemented as a shared L2 between all availability zones and is tightly integrated with our network infrastructure. Routing is handled by anycast routing in the switch infrastruture which makes the network extremely performant with low consistent latency.
Special considerations
Router Egress NAT
Egress NAT is distributed and handled by the local hypervisor which means that unless a floating ip is associated with a instance it will utilize the public ip-address of the hypervisor where the instance is currently running. If the public ip-address of the instance needs to be known, e.g. needs to be provided to a 3rd party for firewall rules or likewise a floating ip needs to be associated with the instance.
Router Extra Routes API
The current network design does not yet support the use of Extra Routes in Neutron routers. You can configure Extra Routes in both API and Horizon but they will not be applied to datapath. There are possible workarounds depending on what needs to be accomplished.
Neutron ports with allowed-address-pair
The current network design does not yet fully support the use of allowed-address-pair to utilize instances as a gateway for network traffic (e.g. VPN servers). It does currently work for single addresses (/32 prefix) only.
Multicast
Multicast traffic Inter-AZ works but is without any guarantee.
VIP-address
ARP lookups are asynchronous Inter-AZ. When moving VIP-addresses between AZs this can lead to unexpected traffic patterns.
9.5 - Guides
9.5.1 - Adjutant
Overview
OpenStack Adjutant is a service that allows users to manage projects and their users directly from Horizon.
User management
TIP: If you wish to enable MFA for your accounts, you can opt-in to use Elastx IDP. See here for more information.
Please note that you still need to invite the users with their specific roles before opting for Elastx IDP.
Users can be managed directly from the management tab within the dashboard in Horizon.
To invite a new member to your project(s) go to “Management” -> “Access Control” -> “Project Users” in the menu, and then click “Invite User” on the right hand side. A popup will appear with a textbox where you can type the email of the new user. Below the textbox you can chose which roles (described below) to assign that user. Click “Invite” when done and an invite will be sent via email.
Note: If the user doesn’t have an OpenStack account with us already, they will have to follow the email instructions and sign up.
There are a couple of roles that can be assigned to users inside of a project:
- Load Balancer - Allow access to manage load balancers (Octavia).
- Object Store - Allow access to manage objects in object store (Swift).
- Orchestration - Allow access to manage orchestration templates (Heat).
- Project Administrator - Full control over the project, including adding and removing other project administrators.
- Project Member - Allow access to core services such as compute (Nova), network (Neutron) and volume (Cinder).
- Project Moderator - Can invite and manage project members, but not project administrators.
- Secret Store - Allow access to manage objects inside of secret store (Barbican).
9.5.2 - Affinity Policy
Overview
Here is how to avoid that groups of instances run on the same compute node. This can be relevant when configuring resilience.
-
Create an anti affinity group.
Take note of the group UUID that is displayed when created. It is needed when deploying the instance.
openstack server group create --policy anti-affinity testgrouphttps://docs.openstack.org/python-openstackclient/yoga/cli/command-objects/server-group.html
-
(Optional) Read out the affinity policies.
openstack server group list | grep -Ei "Policies|affinity" -
Add the instance to the group when deploying.
openstack server create --image ubuntu-20.04-server-latest --flavor v1-small-1 --hint group=<server_group_uuid> test-instancehttps://docs.openstack.org/python-openstackclient/yoga/cli/command-objects/server.html
Additional links
https://docs.openstack.org/senlin/yoga/user/policy_types/affinity.html
9.5.3 - API access
Introduction
OpenStack provides REST APIs for programmatic interaction with the various services (compute, object storage, etc.). These APIs are used by automation tools such as HashiCorp Terraform and the OpenStack CLI utility.
For advanced programmatic usage, there exist freely available SDKs and software libraries for several languages which are maintained by the OpenStack project or community members.
This guides describes the initial steps required for manual usage of the OpenStack REST APIs.
Authentication
Usage of an application credential for API authentication is recommend due to their security and operational benefits.
Listing endpoints
API endpoints for the OpenStack services can be listed by navigating to “Project” → “API Access” in the Horizon web console or by issuing the following command:
$ openstack catalog list
Endpoints marked as “public” in the command output are intended for customer usage.
Reference documentation
For detailed usage of the of the APIs, see the official OpenStack API reference documentation.
9.5.4 - Application credentials
Overview
This guide will help you getting started with OpenStack application credentials. Application credentials are designed to be used by automation and CLI tools, such as Terraform and the OpenStack command-line client.
Create application credential using web dashboard
Navigate to “Identity” → “Application Credentials” in your target project and press “Create Application Credential”. Once created, you’ll be offered to download the generated credential configuration as an OpenStack RC file (“openrc” version 3) or in the “clouds.yaml” format.
Create application credential using CLI
Note: If you access the CLI already using an application credential, you will not be able to create additional applications credentials unless the one you are accessing with was created with the unrestricted option.
Beware: Please take notes of the risks that entails setting the unrestricted option. This might not be suitable for certain use cases as it allows to regenerate/create application credentials with all the permissions set.
To create a pair of application credentials run the openstack application credential create <name> command. By default the same access as the user running the command will be given. If you wish to override the roles given add --role <role> for each role you want to add.
You can also set an expiration date when creating a pair of application credentials, add the flag --expiration followed by a timestamp in the following format: YYYY-mm-ddTHH:MM:SS.
For more detail you can visit the OpenStack documentation that goes more into detail on all avaible options.
An example that will give access to the most commonly used APIs:
openstack application credential create test --role _member_ --role creator --role load-balancer_member

+--------------+----------------------------------------------------------------------------------------+
| Field        | Value                                                                                  |
+--------------+----------------------------------------------------------------------------------------+
| description  | None                                                                                   |
| expires_at   | None                                                                                   |
| id           | 3cd933bbcf824bdc9f77f37692eea60a                                                       |
| name         | test                                                                                   |
| project_id   | bb301d6172f54d749f9aa3094d77eeef                                                       |
| roles        | _member_ creator load-balancer_member                                                  |
| secret       | ibHyYuIPQCf-IKVN0qOEAgf4CNvDWmT5ltI6mdbmUTMD7OvJTu-5nXX0U6_5EOXTKriq7C7Ka06wKmJa0yLcKg |
| unrestricted | False                                                                                  |
+--------------+----------------------------------------------------------------------------------------+
Beware: You will not be able to view the secret again after creation. In case you forget the secret you will need to delete and create a new pair of application credentials.
Create an openrc file
#!/usr/bin/env bash
export OS_AUTH_TYPE=v3applicationcredential
export OS_AUTH_URL=https://ops.elastx.cloud:5000/v3
export OS_APPLICATION_CREDENTIAL_ID="<ID>"
export OS_APPLICATION_CREDENTIAL_SECRET="<SECRET>"
export OS_REGION_NAME="se-sto"
export OS_INTERFACE=public
export OS_IDENTITY_API_VERSION=3
Available roles
Below you will find a table with available roles and what they mean.
| Role name | Description |
|---|---|
_member_ |
Gives access to nova, neutron and glance. This allowed to manage servers, networks, security groups and images (this role is currently always given) |
creator |
Gives access to barbican. The account can create and read secrets, this permission is also requierd when creating an encrypted volumes |
heat_stack_owner |
Gives access to manage heat |
load-balancer_member |
Gives access to create and manage existing load-balancers |
swiftoperator |
Gives access to object storage (all buckets) |
List application credentials using CLI
To list all existing application credentials available in your project you can run the openstack application credential list command.
Example:
openstack application credential list

+----------------------------------+------+----------------------------------+-------------+------------+
| ID                               | Name | Project ID                       | Description | Expires At |
+----------------------------------+------+----------------------------------+-------------+------------+
| 3cd933bbcf824bdc9f77f37692eea60a | test | bb301d6172f54d749f9aa3094d77eeef | None        | None       |
+----------------------------------+------+----------------------------------+-------------+------------+
Show application credential permissions using CLI
To show which permissions a set of application credentials have you can run the openstack application credential show command followed by the ID of the credential you want to inspect.
Example:
openstack application credential show 3cd933bbcf824bdc9f77f37692eea60a

+--------------+------------------------------------------------------------------------------------+
| Field        | Value                                                                              |
+--------------+------------------------------------------------------------------------------------+
| description  | None                                                                               |
| expires_at   | None                                                                               |
| id           | 3cd933bbcf824bdc9f77f37692eea60a                                                   |
| name         | test                                                                               |
| project_id   | bb301d6172f54d749f9aa3094d77eeef                                                   |
| roles        | creator load-balancer_member _member_                                              |
| unrestricted | False                                                                              |
+--------------+------------------------------------------------------------------------------------+
Delete application credentials using CLI
To delete a pair of application credentials enter the openstack application credential delete command followed by the ID of the credentials you want to remove.
Example:
openstack application credential delete 3cd933bbcf824bdc9f77f37692eea60a
9.5.5 - Application credentials - Access Rules
Overview
This guide will help you get started with how to create different access rules for various resources in OpenStack. The access rules are applied to application credentials and enables a way to set more fine-grained access control for applications to specific resources.
Good to know
Access rules are only applicable to application credentials and not to users of a project. As an example, a user can create an application credential that has read-only access to a specific container in Swift. This type of credentials can later be used by an application to read information from that container. The users within the project can still access all containers with read/write access, if they are a member of the swift operator role. The users also has access to other types of resources, such as virtual machines. If you want to completely separate user access from virtual machines and swift, you can opt-in for a separate swift project. Please see here for more information.
To see more information about the different user roles in our OpenStack, you can find it here.
For more information about application credentials, you find it here
Creating Acces Rules
Access rules are built by specifying the service. for instance Swift, the method to use, i.e type of access, for instance GET and the path to the resource, for example a container.
Rules can be specified in either JSON or YAML format. In this example we are going to use YAML.
Example 1: Read-only access to all objects in a specific container
Start by creating two empty containers. For this to work you need to have the swify operator role.
Go to “Project” > “Containers” and select Container with a plus sign. Name one container-ro and the other container-rw.
Navigate to “Identity” → “Application Credentials” in your project and select “Create Application Credential”.
In the box named “Access Rules” is where you can specify what kind of access and to which resource your application credential should have access to.
Note:
For this to work you will need to specify your project ID after AUTH_
The places of the slashes and asterisks are important.
- service: object-store
  method: GET
  path: /v1/AUTH_<project_id>/container-ro

- service: object-store
  method: GET
  path: /v1/AUTH_<project_id>/container-ro/**

- service: object-store
  method: HEAD
  path: /v1/AUTH_<project_id>/container-ro

- service: object-store
  method: HEAD
  path: /v1/AUTH_<project_id>/container-ro/**
With either openstack-cli or swift-cli, try listing all containers. This should give an Unauthorized failure as the access rules does not allow to list all containers.
$ openstack container list
Unauthorized (HTTP 401) (Request-ID: tx50f94f5e55d049ca8e10b-00694261a3)
When specifying the container directly it should work.
$ openstack container show container-ro
+----------------+---------------------------------------+
| Field          | Value                                 |
+----------------+---------------------------------------+
| account        | AUTH_<project id>                     |
| bytes_used     | 9                                     |
| container      | container-ro                          |
| object_count   | 1                                     |
| storage_policy | hdd3                                  |
+----------------+---------------------------------------+
Accessing objects in that container should also work.
$ openstack object show container-ro testfile
+----------------+---------------------------------------+
| Field          | Value                                 |
+----------------+---------------------------------------+
| account        | AUTH_<project id>                     |
| container      | container-ro                          |
| content-length | 9                                     |
| content-type   | application/octet-stream              |
| etag           | ee321721ddf85e01b4cff48b4fee3c08      |
| last-modified  | Tue, 16 Dec 2025 08:15:55 GMT         |
| object         | testfile                              |
| properties     | Orig-Filename='testfile'              |
+----------------+---------------------------------------+
Trying to upload a file is not permitted since the application credential only has read access to this container.
$ openstack object create container-ro testfile2
Unauthorized (HTTP 401) (Request-ID: tx4065d716470e4e40a2f94-00694268e0)
Example 2: Read-write access to all objects in a specific container
Create an additional application credential and add GET/HEAD/PUT with the path to your second container into the Access Rules box.
Note:
For this to work you will need to specify your project ID after AUTH_
The places of the slashes and asterisks are important.
- service: object-store
  method: GET
  path: /v1/AUTH_<project_id>/container-rw

- service: object-store
  method: GET
  path: /v1/AUTH_<project_id>/container-rw/**

- service: object-store
  method: HEAD
  path: /v1/AUTH_<project_id>/container-rw

- service: object-store
  method: HEAD
  path: /v1/AUTH_<project_id>/container-rw/**

- service: object-store
  method: PUT
  path: /v1/AUTH_<project_id>/container-rw/**
You should not be able to list all containers or the previously created container.
$ openstack container list
Unauthorized (HTTP 401) (Request-ID: tx4b6d3f10baa747148f20d-0069426bef)

$ openstack container show container-ro
Unauthorized (HTTP 401) (Request-ID: tx6e804dda54c5494eae5b5-0069426c0a
Your second container should be accessible.
$ openstack container show container-rw
+----------------+---------------------------------------+
| Field          | Value                                 |
+----------------+---------------------------------------+
| account        | AUTH_8852d8a469ac41ce9a8180ba0fa72595 |
| bytes_used     | 0                                     |
| container      | container-rw                          |
| object_count   | 0                                     |
| storage_policy | hdd3                                  |
+----------------+---------------------------------------+
You can now upload objects since the application credential has write access.
$ echo "some text" > testfile
$ openstack object create container-rw testfile
+----------+--------------+----------------------------------+
| object   | container    | etag                             |
+----------+--------------+----------------------------------+
| testfile | container-rw | ee321721ddf85e01b4cff48b4fee3c08 |
+----------+--------------+----------------------------------+
Show information on your newly created object.
$ openstack object show container-rw testfile
+----------------+---------------------------------------+
| Field          | Value                                 |
+----------------+---------------------------------------+
| account        | AUTH_<project id>                     |
| container      | container-rw                          |
| content-length | 9                                     |
| content-type   | application/octet-stream              |
| etag           | ee321721ddf85e01b4cff48b4fee3c08      |
| last-modified  | Wed, 17 Dec 2025 08:48:54 GMT         |
| object         | testfile                              |
+----------------+---------------------------------------+
Further reading
Openstack documentation on access rules can be found here
9.5.6 - Barbican
Overview
OpenStack Barbican is a key management service for storing highly sensitive data like private keys for certificates and passwords which needs to be available for applications during runtime.
ELASTX Barbican service is backed by physical HSM appliances to ensure that all data is securely stored.
REST API reference can be found here
OpenStack Barbican client can be found here
Secrets in Barbican have a special design with regards to ID, they are always referenced by a “secret href” instead of a UUID! (This will change in a later release!)
Secret types
There are a few types of secrets that are handled by barbican:
- symmetric - Used for storing byte arrays such as keys suitable for symmetric encryption.
- public - Used for storing the public key of an asymmetric keypair.
- private - Used for storing the private key of an asymmetric keypair.
- passphrase - Used for storing plain text passphrases.
- certificate - Used for storing cryptographic certificates such as X.509 certificates.
- opaque - Used for backwards compatibility with previous versions of the API without typed secrets. New applications are encouraged to specify one of the other secret types.
Store and fetch a passphrase using openstack cli
Make sure you have installed the openstack python client and the barbican python client.
Store a passphrase as a secret:
$ openstack secret store --secret-type passphrase --name "test passphrase" --payload 'aVerYSecreTTexT!'
+---------------+-------------------------------------------------------------------------------+
| Field         | Value                                                                         |
+---------------+-------------------------------------------------------------------------------+
| Secret href   | https://ops.elastx.cloud:9311/v1/secrets/d9e88d84-c668-48d9-a051-f0df2e23485b |
| Name          | test passphrase                                                               |
| Created       | None                                                                          |
| Status        | None                                                                          |
| Content types | None                                                                          |
| Algorithm     | aes                                                                           |
| Bit length    | 256                                                                           |
| Secret type   | passphrase                                                                    |
| Mode          | cbc                                                                           |
| Expiration    | None                                                                          |
+---------------+-------------------------------------------------------------------------------+
Get information (only metadata) about the secret
$ openstack secret get https://ops.elastx.cloud:9311/v1/secrets/d9e88d84-c668-48d9-a051-f0df2e23485b
+---------------+-------------------------------------------------------------------------------+
| Field         | Value                                                                         |
+---------------+-------------------------------------------------------------------------------+
| Secret href   | https://ops.elastx.cloud:9311/v1/secrets/d9e88d84-c668-48d9-a051-f0df2e23485b |
| Name          | test passphrase                                                               |
| Created       | 2018-12-18T12:13:34+00:00                                                     |
| Status        | ACTIVE                                                                        |
| Content types | {u'default': u'text/plain'}                                                   |
| Algorithm     | aes                                                                           |
| Bit length    | 256                                                                           |
| Secret type   | passphrase                                                                    |
| Mode          | cbc                                                                           |
| Expiration    | None                                                                          |
+---------------+-------------------------------------------------------------------------------+
Get the actual secret
$ openstack secret get --payload https://ops.elastx.cloud:9311/v1/secrets/d9e88d84-c668-48d9-a051-f0df2e23485b
+---------+------------------+
| Field   | Value            |
+---------+------------------+
| Payload | aVerYSecreTTexT! |
+---------+------------------+
Store and fetch a passphrase using the REST API (curl examples)
First get a keystone authentication token (using openstack token issue for example).
Store a passphrase as a secret:
Note that payloads is always base64 encoded when uploaded!
$ echo 'AnotHeRs3crEtT3xT!' | base64
QW5vdEhlUnMzY3JFdFQzeFQhCg==

$ curl -H "X-Auth-Token: $TOKEN" \
    -H 'Accept: application/json' \
    -H 'Content-Type: application/json' \
    https://ops.elastx.cloud:9311/v1/secrets -d '{
      "name": "Test Passphrase REST",
      "secret_type": "passphrase",
      "payload": "QW5vdEhlUnMzY3JFdFQzeFQhCg==",
      "payload_content_type": "application/octet-stream",
      "payload_content_encoding": "base64",
      "algorithm": "AES",
      "bit_length": 256,
      "mode": "CBC"
  }' | python -m json.tool
{
    "secret_ref": "https://ops.elastx.cloud:9311/v1/secrets/85b2df94-a44b-452b-807b-ddcee83d824b"
}
Get the secret payload
$ curl -H "X-Auth-Token: $TOKEN" \
    -H 'Accept: application/octet-stream' \
    https://ops.elastx.cloud:9311/v1/secrets/85b2df94-a44b-452b-807b-ddcee83d824b/payload
AnotHeRs3crEtT3xT!
9.5.7 - Billing
Overview
We use OpenStack CloudKitty for billing purposes and with it’s open API it is possible to get detailed information about the cost of resources.
NOTE: The billing data engine is ALWAYS 4 hours behind so it is only possible to retrieve rating data up until 4 hours ago! This is to ensure that all billing data is in place before calculating costs.
Prerequisites
To fetch data from cloudkitty using the OpenStack CLI it is neccessary to install the openstack python client and the openstack cloudkitty python client.
pip install python-openstackclient python-cloudkittyclient
As of this writing, version 5.2.2 of the openstack client and 4.8.0 of the cloudkitty client is working well.
Known limitations
As cloudkitty stores data for a long time, retrieval of data where the begin timestamp is omitted, or more than 1 month ago, will take a very long time or even timeout. Even fetching a month worth of data will take at least 10 minutes so do have patience when exploring your data with this API.
Fetch summary for last month
To fetch the total summary for the last month:
$ openstack rating summary get -b $(date --date='1 month ago' -Isecond)
+----------------------------------+---------------+-------------+---------------------+---------------------+
| Tenant ID                        | Resource Type | Rate        | Begin Time          | End Time            |
+----------------------------------+---------------+-------------+---------------------+---------------------+
| 17cb6c5e5af8481e8960d8c4f4131b0f | ALL           | 47511.96316 | 2024-07-28T18:57:28 | 2024-09-01T00:00:00 |
+----------------------------------+---------------+-------------+---------------------+---------------------+
Fetch dataframes for specific resource types
It is also possible to fetch data for specific resources or resource types. This is specifically useful for getting costs for a specific resouce like an instance or volume.
Group by resource type (-g flag):
$ openstack rating summary get -b $(date --date='1 day ago' -Isecond) -g res_type
+----------------------------------+--------------------------+-----------+---------------------+---------------------+
| Tenant ID                        | Resource Type            | Rate      | Begin Time          | End Time            |
+----------------------------------+--------------------------+-----------+---------------------+---------------------+
| 17cb6c5e5af8481e8960d8c4f4131b0f | network-traffic-sent     | 0         | 2024-08-27T19:59:04 | 2024-09-01T00:00:00 |
| 17cb6c5e5af8481e8960d8c4f4131b0f | network-traffic-received | 0         | 2024-08-27T19:59:04 | 2024-09-01T00:00:00 |
| 17cb6c5e5af8481e8960d8c4f4131b0f | image.size               | 0.16569   | 2024-08-27T19:59:04 | 2024-09-01T00:00:00 |
| 17cb6c5e5af8481e8960d8c4f4131b0f | snapshot.size            | 0.22      | 2024-08-27T19:59:04 | 2024-09-01T00:00:00 |
| 17cb6c5e5af8481e8960d8c4f4131b0f | storage.objects.size     | 1.43383   | 2024-08-27T19:59:04 | 2024-09-01T00:00:00 |
| 17cb6c5e5af8481e8960d8c4f4131b0f | router                   | 14.96     | 2024-08-27T19:59:04 | 2024-09-01T00:00:00 |
| 17cb6c5e5af8481e8960d8c4f4131b0f | ip.floating              | 21.12     | 2024-08-27T19:59:04 | 2024-09-01T00:00:00 |
| 17cb6c5e5af8481e8960d8c4f4131b0f | volume.size              | 686.90159 | 2024-08-27T19:59:04 | 2024-09-01T00:00:00 |
| 17cb6c5e5af8481e8960d8c4f4131b0f | instance                 | 688.09399 | 2024-08-27T19:59:04 | 2024-09-01T00:00:00 |
+----------------------------------+--------------------------+-----------+---------------------+---------------------+
Filter on resource type (-s flag):
$ openstack rating summary get -b $(date --date='1 day ago' -Isecond) -s instance
+----------------------------------+---------------+-----------+---------------------+---------------------+
| Tenant ID                        | Resource Type | Rate      | Begin Time          | End Time            |
+----------------------------------+---------------+-----------+---------------------+---------------------+
| 17cb6c5e5af8481e8960d8c4f4131b0f | instance      | 688.09399 | 2024-08-28T05:59:49 | 2024-09-01T00:00:00 |
+----------------------------------+---------------+-----------+---------------------+---------------------+
Fetch raw dataframes
Cloudkitty is built on a concept called dataframes which is the actual data rated. Each dataframe contains the rated value for each resource for an hour interval and can be exported as a CSV which can then be used to summarize the totals per resource.
Example config for generating a CSV that contains all relevant information
$ cat tmp/cloudkitty.csv
# This exact file format must be respected (- column_name: json_path)
# The path is interpreted using jsonpath-rw-ext, see
# https://github.com/sileht/python-jsonpath-rw-ext for syntax reference
- 'Begin': '$.begin'
- 'End': '$.end'
- 'Resource Type': '$.service'
- 'Resource ID': '$.desc.id'
- 'Qty': '$.volume'
- 'Cost': '$.rating'
Get raw dataframes for all instances in the project as a CSV for the last 5 hours.
$ openstack rating dataframes get -b $(date --date='5 hours ago' -Isecond) -r instance -f df-to-csv --format-config-file tmp/cloudkitty.csv
Begin,End,Resource Type,Resource ID,Qty,Cost
2024-09-10T09:00:00,2024-09-10T10:00:00,instance,064e8601-8c83-477c-85c4-f40884ad71b9,1,3.36
2024-09-10T09:00:00,2024-09-10T10:00:00,instance,21bcc6e2-416a-48c8-8684-2cfaa806e0e3,1,0.14
2024-09-10T10:00:00,2024-09-10T11:00:00,instance,064e8601-8c83-477c-85c4-f40884ad71b9,1,3.36
2024-09-10T10:00:00,2024-09-10T11:00:00,instance,21bcc6e2-416a-48c8-8684-2cfaa806e0e3,1,0.14
2024-09-10T11:00:00,2024-09-10T12:00:00,instance,064e8601-8c83-477c-85c4-f40884ad71b9,1,3.36
2024-09-10T11:00:00,2024-09-10T12:00:00,instance,21bcc6e2-416a-48c8-8684-2cfaa806e0e3,1,0.14
From this CSV output it is fairly easy to sum up the Cost per instance id to get the detailed cost per instance for an interval
9.5.8 - Detach & Attach interface on a Ubuntu instance
Overview
If you need to change interface on a Ubuntu instance, then this is the procedure to use.
-
Run the following command in the instance.
sudo cloud-init clean -
Shut down the instance
-
Detach / Attach the network interface
-
Start the instance
-
Reassociate Floating IP with the instance
9.5.9 - EC2 Credentials
Overview
For using the OpenStack S3 API:s you need to generate an additional set of credentials. These can then be used to store data in the Swift Object store for applications that don’t have native Swift support but do support the S3 interfaces.
NOTE: If the application does support Swift natively, using Swift will provide superior performance and generally a better experience.
Create and fetch credentials using openstack cli
Make sure you have installed the openstack python client.
Generate credentials:
$ openstack ec2 credentials create
+-----------------+-----------------------------------------------------------------------------------------------------------------------------------------+
| Field           | Value                                                                                                                                   |
+-----------------+-----------------------------------------------------------------------------------------------------------------------------------------+
| access          | xxxyyyzzz                                                                                                                               |
| access_token_id | None                                                                                                                                    |
| app_cred_id     | None                                                                                                                                    |
| links           | {'self': 'https://ops.elastx.cloud:5000/v3/users/123/credentials/OS-EC2/456'}                                                           |
| project_id      | 123abc                                                                                                                                  |
| secret          | aaabbbccc123                                                                                                                            |
| trust_id        | None                                                                                                                                    |
| user_id         | efg567                                                                                                                                  |
+-----------------+-----------------------------------------------------------------------------------------------------------------------------------------+
Fetch credentials:
$ openstack ec2 credentials list
+----------------------------------+----------------------------------+----------------------------------+----------------------------------+
| Access                           | Secret                           | Project ID                       | User ID                          |
+----------------------------------+----------------------------------+----------------------------------+----------------------------------+
| xxxyyyzzz                        | aaabbbccc123                     | 123abc                           | efg567                           |
+----------------------------------+----------------------------------+----------------------------------+----------------------------------+
Delete credentials
Use the access key to refer to the credentials you wish to delete:
$ openstack ec2 credentials delete xxxyyyzzz
9.5.10 - Getting started with OpenStack
This guide goes through the initial steps on how to get started with creating instances and accessing them via ssh.
In this example we use an ubuntu image and restrict SSH access.
Create Network
- Go to “Project” > “Network” > “Networks”
- Select “Create Network” > set a network name > “Next”
- Set subnet name and network address (10.0.1.0/24 for example) > “Next”
- Make sure that “Enable DHCP” is checked.
- Add “DNS Name Servers” > “Create” (ip of a resolver e.g. dns4eu, Cloudflare, or other depending on your privacy and policy preferences).
Create Router
- Go to “Project” > “Network” > “Routers”
- Select “Create Router” > set a router name and select the public network “elx-public1” > “Create Router”
- Select the router you just created > “Interfaces” > “Add Interface” > select the subnet you created > “Add Interface”
Now the network is up and ready for you to create the first instance.
Create ssh key
- Go to “Project” > “Compute” > “Key Pairs”
- Select “Create Key Pair” > set key pair name > “Create Key Pair”
- Select Key Type -> “SSH Key”
- Save the private key
Create Security Group
- Go to “Project” > “Network” > “Security Groups”
- Select “Create Security Group” > set a name > “Create Security Group”
- Select “Manage Rules” on the security group you created"
- Add IP address under “CIDR” to restrict access > “Add” (e.g. 215.1.1.1/32 to only allow this one IP)
- Select “Add Rule” > set “Port” 22 > add an IP address under “CIDR” to restrict access > “Add”
Create instance
- Go to “Project” > “Compute” > “Instances”
- Select “Launch Instance” > Set instance name > Specify Availability Zone > “Next”
- Select “Image” in “Select Boot Source” > Select “No” in “Create New Volume”
- Select image (ubuntu-24.04-server-latest for example) > “Next”
- Select a flavor (v2-c1-m0.5-d20 for example) > “Next”
- Your network should already be selected > “Next”
- You do not need to select any port > “Next”
- Add the security group you created earlier > “Next”
- The key pair you created earlier should already be selected.
- “Launch instance”
Specifying the Availability Zone is important if you plan on using volumes, as these can’t be attached nor migrated across Availability Zones
Add a public IP to the instance
- Go to “Project” > “Compute” > “Instances” > from the “Actions” menu on the instance you created select “Associate Floating IP”
- Select the “+” button next to the “IP Address” field
- Select “Pool” “elx-public1” > “Allocate IP”
- “Associate”
Log in to your new instance
Use the floating IP and the ssh key you created.
In this example the ssh key pair I created was named mykeypair and the public ip is “1.2.3.4” and the image I used was an Ubuntu image. In this example:
ssh -i mykeypair.pem ubuntu@1.2.3.4
The username is different depending on the Linux flavor you are using but you will always use the keypair and not a password.
This is the generic pattern to login from a Linux client:
ssh -l UserName -i /path/to/my-keypair.pem 1.2.3.4
Default UserName is different depending on distribution:
| Linux Distribution | User |
|---|---|
| AlmaLinux | almalinux |
| CentOS 8-stream | centos |
| CentOS 9-stream | cloud-user |
| Rocky Linux | rocky |
| CoreOS | core |
| Fedora | fedora |
| Redhat | cloud-user |
| Ubuntu | ubuntu |
| Debian | debian |
| Heat instances* | ec2-user* |
- When using Heat to deploy instances the user name will be ec2-user instead.
Changing the default username
In most modern distributions it’s also possible to change the default username when creating a server by utilizing cloud-init.
The sample configuration below would change the deafult username to “yourusername”.
#cloud-config
system_info:
  default_user:
    name: yourusername
9.5.11 - Octavia
This is an example of a minimal setup that includes a basic HTTP loadbalancer. Here is a short explanation of a minimal (configuration) setup from GUI (Horizon).
-
Network -> Loadbalancer -> Create loadbalancer
-
Load Balancer Details: Subnet: Where your webservers live
-
Listener Details: Select HTTP, port 80.
-
Pool Details: This is your “pool of webservers”. Select Algoritm of preference.
-
Pool members: Select your webservers.
-
Finally, proceed to “Create Loadbalancer”.
Note, the loadbalancer will not show up in the Network Topology graph. This is expected.
Octivia features numerous configuration variations. The full reference of variations and CLI guide can be found here.
OpenStack Octavia client can be found here
9.5.12 - Swift getting started
Overview
Swift is Elastx object storage in OpenStack. Swift provides high availability by utilizing all availability zones and is encrypted at rest. This guide will help you get started with the basics surrounding Swift object storage.
Swift/S3 Compatibility
Swift has an s3 compatible API for applications that don’t natively support the Swift API.
You can find a S3/Swift support matrix here.
To get started with Swift/S3, See our guide here for more information.
Getting started with Swift CLI
To use swift cli you’ll need either an application credential or openstack rc file.
Prerequisites
- python-swiftclient installed.
- Application credential. See here on how to get started with application crendentials.
This is required if your account has enabled MFA. - OpenStack rc. Get your rc file by logging into your project, click on your user at the top right and select OpenStack RC File.
This can only be used if your account does not have MFA.
Swift-cli
Start by sourcing your application credential or openstack rc file.
Creating containers and uploading objects
Start by creating a new container:
$ swift post my_container
Upload a file to your container:
$ swift upload my_container ./file1.txt
List containers and objects
To list all containers in your project:
$ swift list
my_container
my_container2
List all objects from a specific container:
$ swift list my_container
file1.txt
Show statistics of your containers and objects
With the stat option, you can get statistics ranging from specific objects to your entire account. To list statistics of a container:
$ swift stat my_container
Account: AUTH_7bf53f20d4a2523a8045c42ae505acx
             Container: my_container
               Objects: 1
                 Bytes: 7
              Read ACL:
             Write ACL:
               Sync To:
              Sync Key:
          Content-Type: application/json; charset=utf-8
           X-Timestamp: 1675242117.33639
         Last-Modified: Wed, 01 Feb 2023 09:15:39 GMT
         Accept-Ranges: bytes
      X-Storage-Policy: hdd3
            X-Trans-Id: tx2f1e73d3b29a4aba99c1b-0063da2e2b
X-Openstack-Request-Id: tx2f1e73d3b29a4aba99c1b-0063da2e2b
            Connection: close
Download objects
You can download single objects or all objects from a specific container or account.
Download a specific object:
$ swift download my_container file1.txt -o ./file1.txt
Download all objects from a specific container:
$ swift download my_container -D </path/to/directory/>
Download all objects from your account:
Beware: If you have a large amounts of objects, this can take some time.
$ swift download --all -D </path/to/directory/>
Delete containers and objects
WARNING: The delete option will execute immediately without any confirmation. This action is irreversible.
Delete specific object from a specified container.
$ swift delete my_container file1.txt
Delete a container with all of its objects.
$ swift delete my_container
Getting started with Swift in Horizon
With Openstacks Horizon you can get a good overview over your object storage. There are limitations in Swifts functionality when using Horizon, to fully take advantage of Swifts functions we recommend you to use the swift cli.
This guide will show you the basics with using Swift object storage in Horizon.
Create your first container
Navigate to “Project” → “Object Store” → “Containers”
Here you will see all the containers in your object storage.
Choose +Container to create a new container:
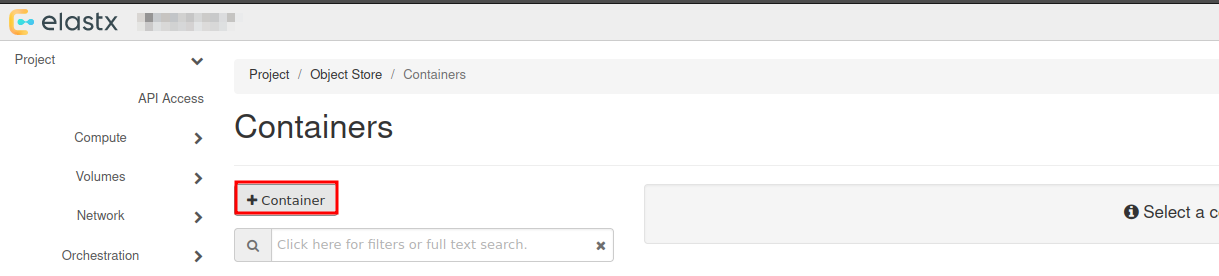
Choose a name for your new container:
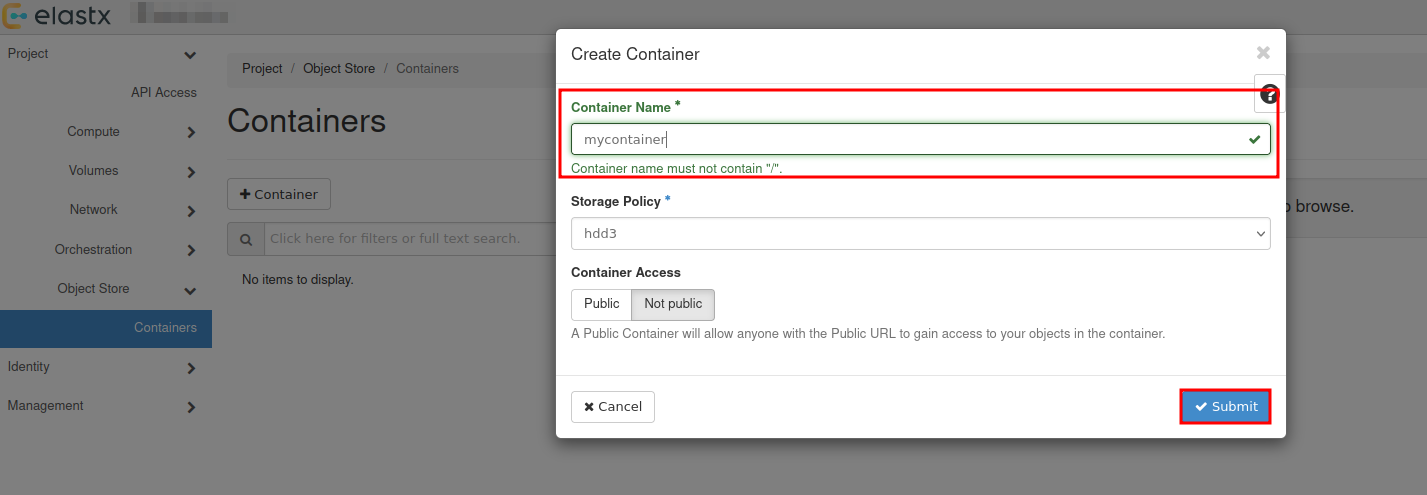
You will se that a new container has been added, which date it was created and that it is empty.
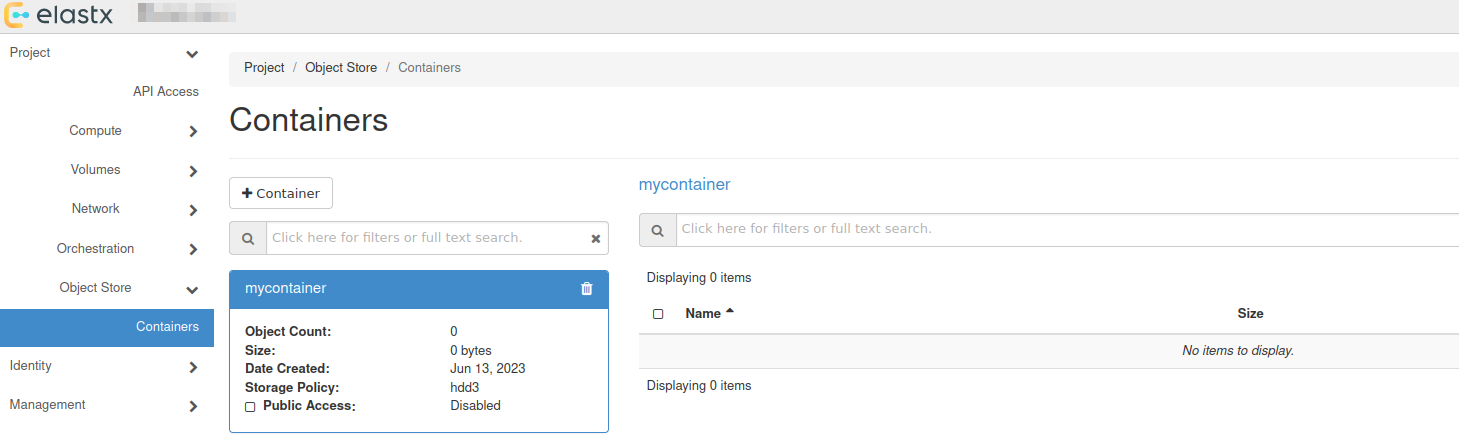
Upload your first file
To upload your first file, press the up arrow next to +Folder:
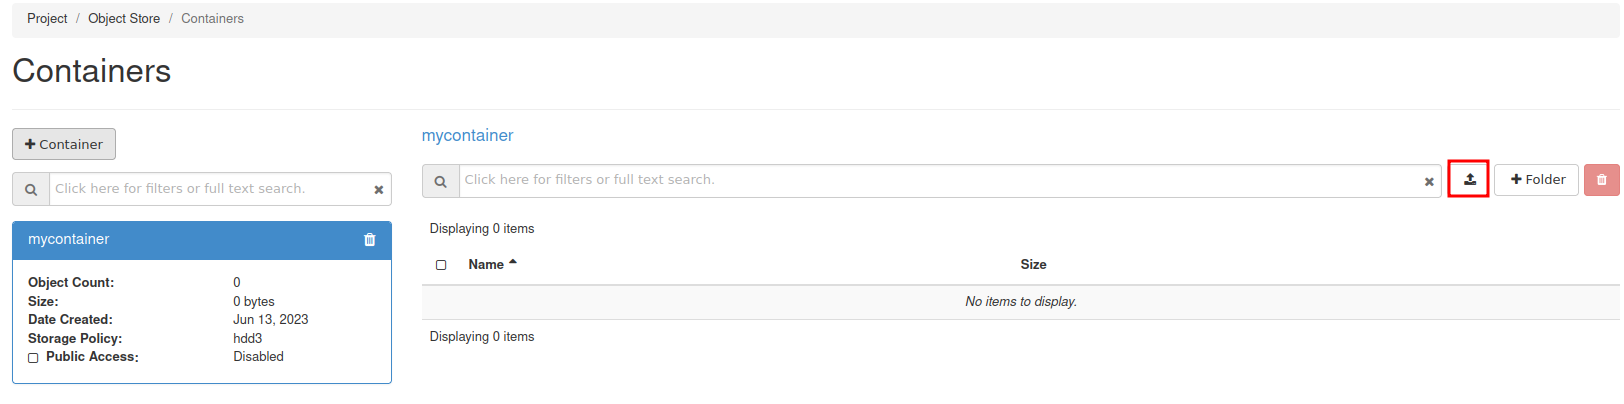
Select the the file you want to upload:
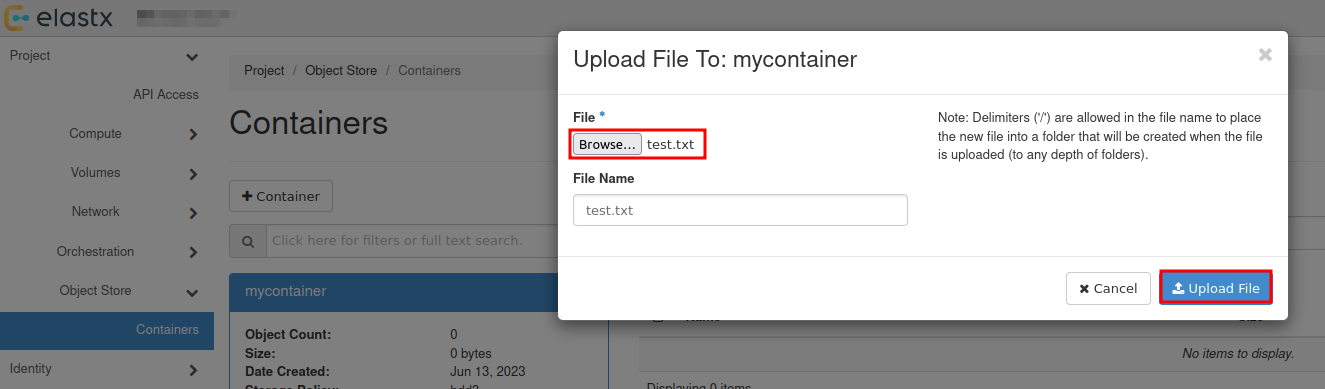
Download file
To download a file, select your container and press Download next to the object.
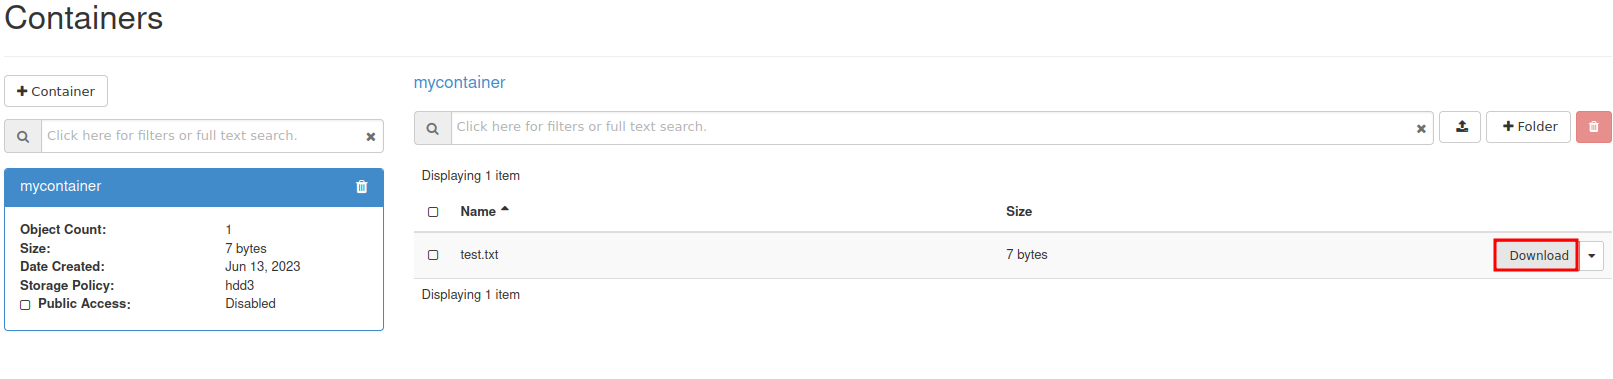
View details of an object
You can view details of an object such as Name, Hash, Content Type, Timestamp and Size.
Select the down arrow next to Download for the object you want to inspect and choose View Details:
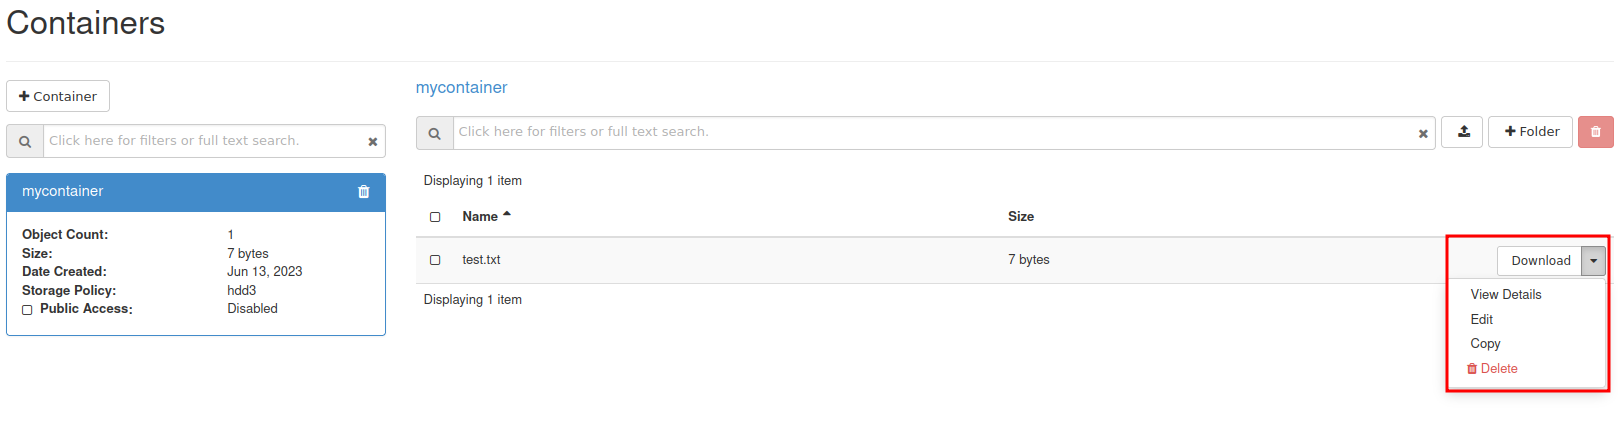

Further reading
- For more advanced features, see the official OpenStack documenation
- Rclone has native support for Swift. You can read more about Rclone’s support for Swift here.
9.5.13 - Swift projects
Overview
There are two main options for access separation in Swift:
- You can use Access rules to manage access to specific containers using application credentials. This alone will not stop the ability for users to create/remove virtual machines. See more information here on how to get started with access rules.
- Dedicated Swift project. Dedicated Swift projects are basically OpenStack projects with reduced access to any resource except swift. This is sometime needed due to the current limitation of how privilege/role management works for users in OpenStack.
Swift Project
In this guide we will go through how to manage user permissions for Swift containers using ACLs in a Swift project.
The purpose of so called “Swift projects” ("
The Swift project can be used in two ways - to store/manage Swift containers and/or manage Swift-only users.
How to manage permissions via ACLs
If you want a user to be able to create, manage and upload/download objects for any Swift containers created in the Swift project, inviting and assigning the user the role “Object Store” (known as “swiftoperator” in the API/CLI) in “Management” -> “Access Control” -> “Project Users” should be sufficient.
If you instead want a user to be able to read and/or write to a specific Swift containter created in the Swift project or any another project you have, you will need to invite the user to the Swift project, assign them the role “Project Member” and configure Swift container ACLs for the target container(s). We’ll go through an example below.
In order to configure Swift ACLs you will need:
- A user with the “Object Store” (“swiftoperator”) role in the project that contains the container you want to restrict/provide access to
- The Swift CLI or another API client capable of configuring ACLs (this is currently not supported through Horizon)
- An OpenStack RC file (openrc), “clouds.yml” or environment variables set for authenticating towards the API as the user used to configure ACLs
- Name of the container you want to configure ACLs for
- ID of the project in which the container is stored and the ID for the Swift project if they are not the same (listed under “Identity” -> “Projects” in Horizon or
openstack project listvia the CLI) - ID of the user you want to restrict/provide access for (accessible through “Identity” -> “Users” in Horizon as that user)
In the following example we’ll use the Swift CLI to configure read/write/list access to a specific container created in the Swift project
# Using variables here to make it easier to follow/adapt to new service users and Swift containers
$ SWIFT_PROJECT_ID="b71cd232c8544cf28a7d7aad797cafe9"
$ SWIFT_CONTAINER_NAME="test-container-1"
$ TARGET_USER_ID="whatever_id_it_has"

# Explicitly specifying project ID here, in-case you use an OpenRC/clouds.yml file downloaded from your other projects
$ OS_PROJECT_ID="${SWIFT_PROJECT_ID}" swift post "${SWIFT_CONTAINER_NAME}" --read-acl ".rlistings,${SWIFT_PROJECT_ID}:${TARGET_USER_ID}" --write-acl "${SWIFT_PROJECT_ID}:${TARGET_USER_ID}"
If you want to provide/restrict access to a container that has been created in another project, the process is similar:
# Specifying the ID for the other project instead
$ OS_PROJECT_ID="<project-id>" swift post "${SWIFT_CONTAINER_NAME}" --read-acl ".rlistings,${SWIFT_PROJECT_ID}:${TARGET_USER_ID}" --write-acl "${SWIFT_PROJECT_ID}:${TARGET_USER_ID}"
Note: Replace <project-id> with the actual Project ID
If you need any clarification, further guidance or have other questions, feel free to reach out to our support.
Known limitations
Currently, cross-project ACLs don’t work if you want to use the S3 compatibility.
Further reading
9.5.14 - Swift S3 compatibility
Overview
Swift provides an S3 compatible API for applications that don’t support the Swift API. Note that you need to create EC2 credentials for this to work.
NOTE: The S3 region must be set to “us-east-1” for compatibility with “AWS Signature Version 4”
NOTE: If the application does support Swift natively, using Swift will provide superior performance and generally a better experience.
Example s3cmd configuration
The configuration below works with s3cmd:
[default]
access_key = 00000000000000000000000000000
secret_key = 00000000000000000000000000000
host_base = swift.elastx.cloud
host_bucket = swift.elastx.cloud
use_https = True
bucket_location = us-east-1
Known Issues
The Swift S3 API has a known bug with sigv4-streaming and chunked uploads. We are aware of an upstream fix that has been merged - but we do not yet have it implemented on our platform.
9.5.15 - Terraform Backend
Overview
Swift is accessable with the s3 backend. To get the access and secret key follow this guide. EC2 credentials
Example configuration
This is what you need to get the s3 backend to work with swift.
backend "s3" {
  bucket = "<The bucket you want to use>"
  key    = "<Path and name to tf state file>"
  endpoint   = "https://swift.elastx.cloud"
  sts_endpoint = "https://swift.elastx.cloud"
  access_key = "<Puth your access key here>"
  secret_key = "<Put your secret key here>"
  region = "us-east-1"
  force_path_style = "true"
  skip_credentials_validation = "true"
}
key variable example: “path/to/tf-state-file”.
This is the path in the bucket.
9.5.16 - Volume Attachment Limits
Overview
If you need to attach more than the default limitation of volume attachments, then this is possible by using a custom image and changing the properties of the image to use a non-default scsi driver.
Please note that any servers created before the image properties are set need to be re-created in order to use the updated driver.
The following properties need to be set in order to achieve this.
hw_disk_bus=scsi
hw_scsi_model=virtio-scsi
Volume attachment limits
| Driver | Max volumes per server |
|---|---|
| Default | 26 |
| virtio-scsi | 128 |
Openstack CLI examples
Creating a new image (note that additional options are also needed when creating images, please refer to the Openstack documentation for more information)
openstack image create --property hw_disk_bus=scsi --property hw_scsi_model=virtio-scsi ${IMAGE_ID}
Updating an existing private image
openstack image set --property hw_disk_bus=scsi --property hw_scsi_model=virtio-scsi ${IMAGE_ID}
9.5.17 - Volume Backup & Restore
Overview
Volume backups in Elastx OpenStack uses Swift as the storage backend. This means that your backups will automatically be placed in all availability zones. This guide will help you get started with how to create volume backups and how to restore them using OpenStack’s Horizon and CLI.
Backup and restrore from Horizon
Backup from Horizon
- Navigate to “Project” → “Volumes” pick the volume you want to backup and choose
Create Backup
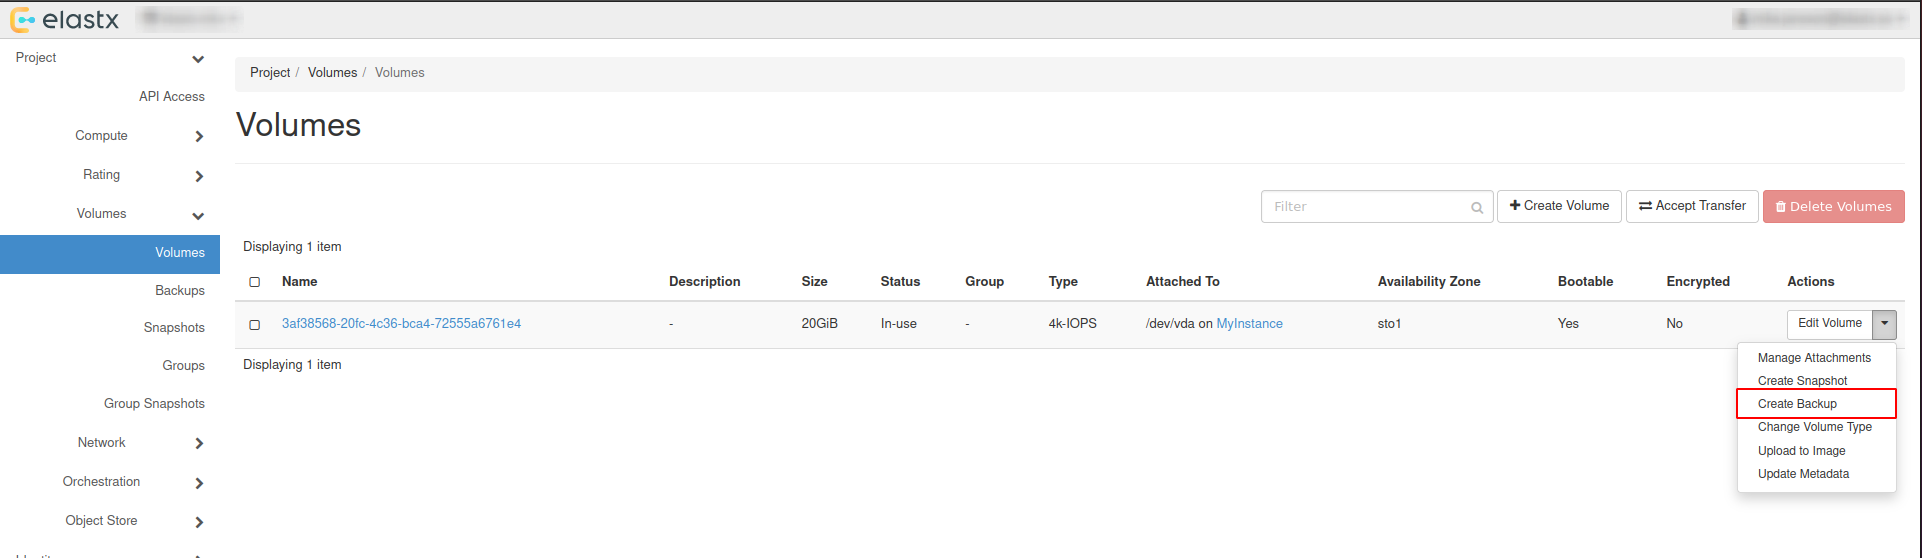
- In the pop-up window, add a name and a description of your liking and press
Create Volume Backup.
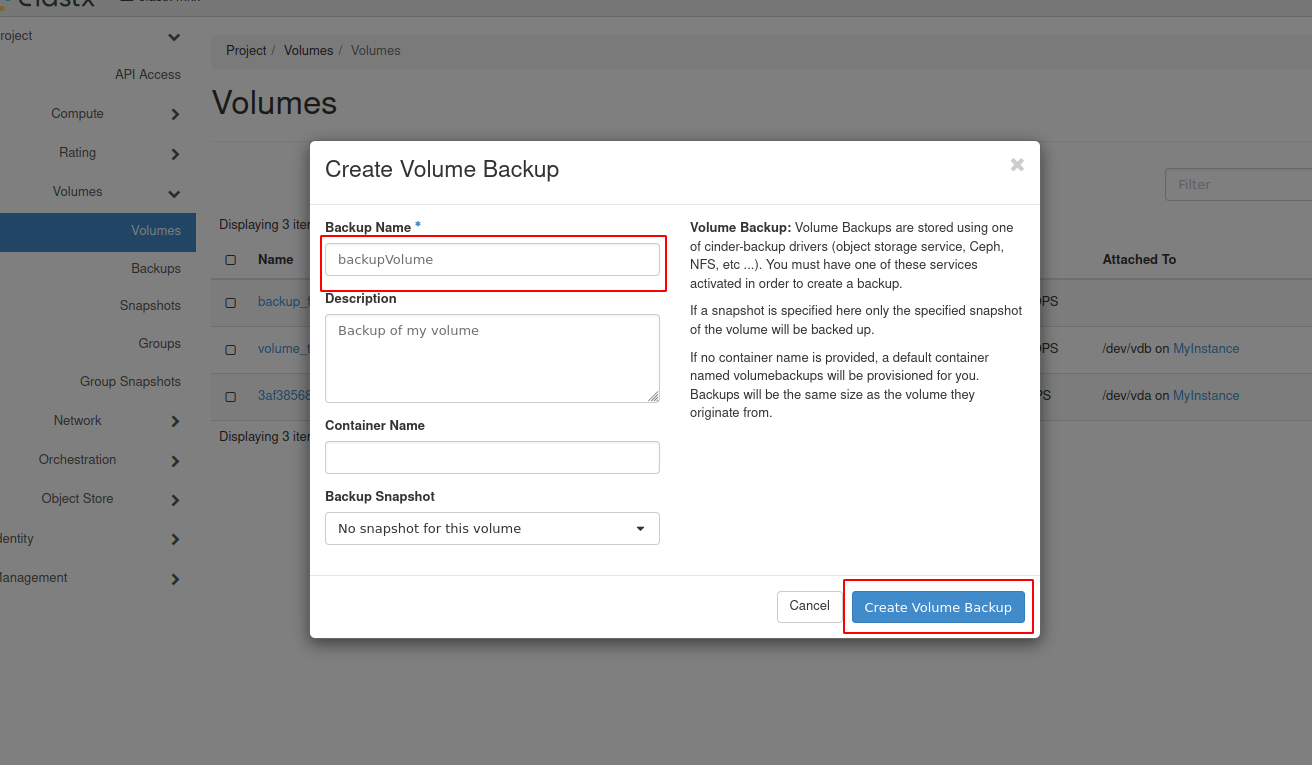
- Navigate to “Project” → “Volumes” → “Backups” to see the backup status.
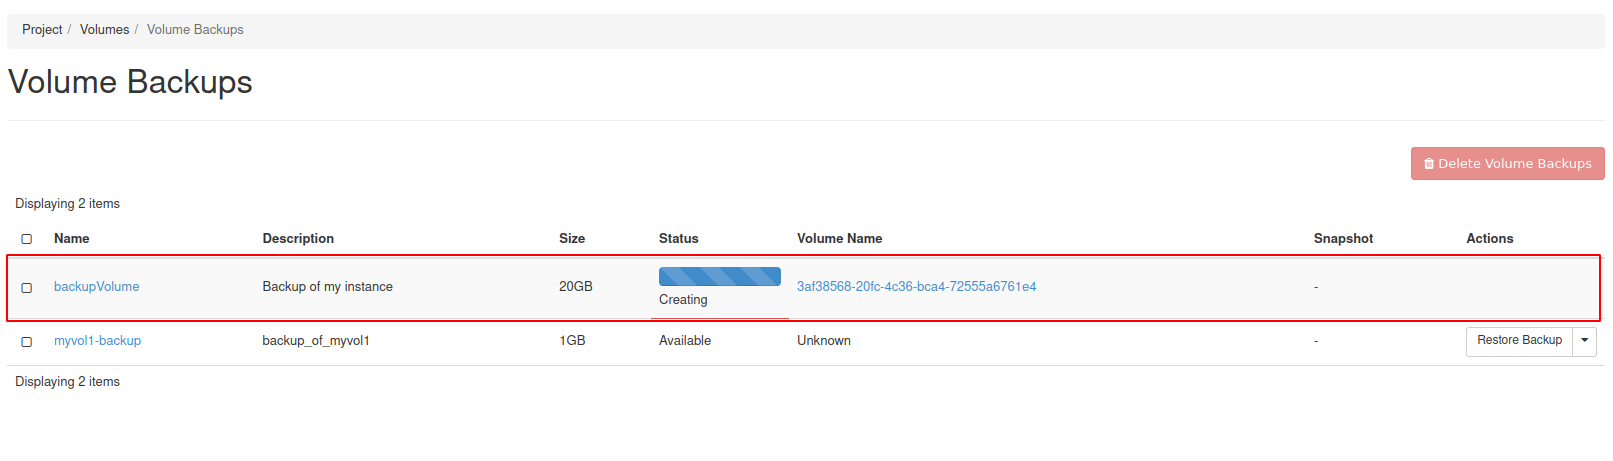
Restore from horizon
Restoring from backups can be done in two ways, one way is to create a new volume manually from the “Project” → “Volumes”, or to have the volume automatically created when restoring from the “Project” → “Volumes” → “Backups”.
Beware: If option two is chosen, the Availability Zone and Size gets chosen automatically. This means that the volume might end up in a different Availability Zone than intended.
Option #1 - Create volume and restore from backup
- Navigate to “Project” → “Volumes” and press
Create Volume.
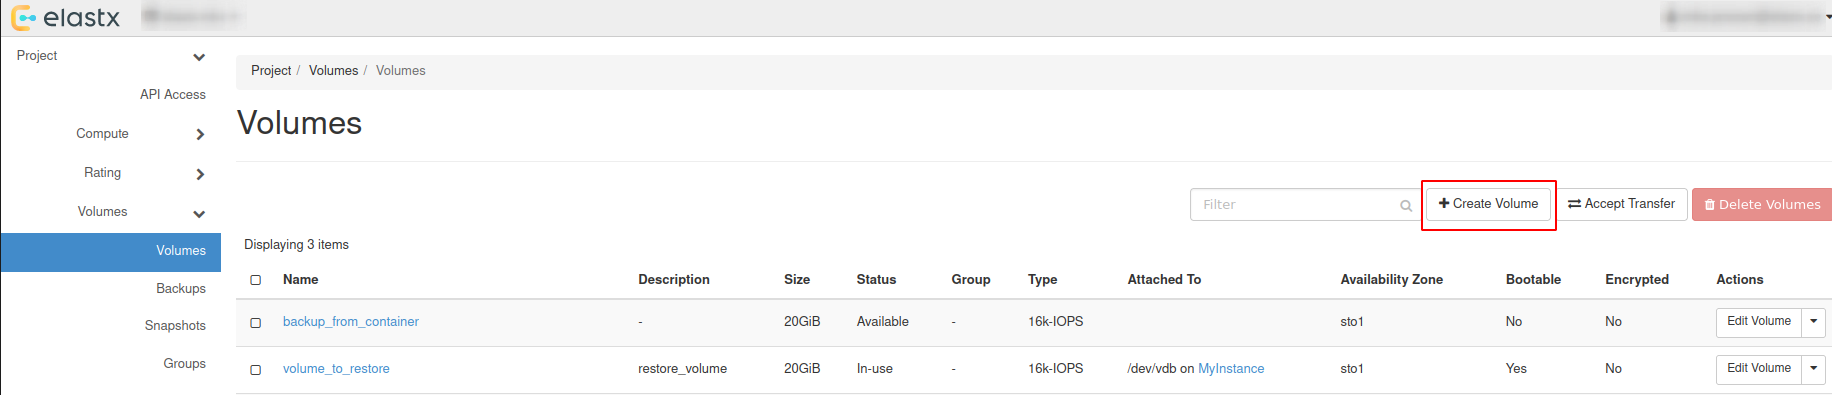
- Choose a name, description and size of your liking for the new volume.
Beware: Volume Size has to be at minimum the size of the backup. The Volume also has to be in the same Availability Zone as the instance it will be attached too.
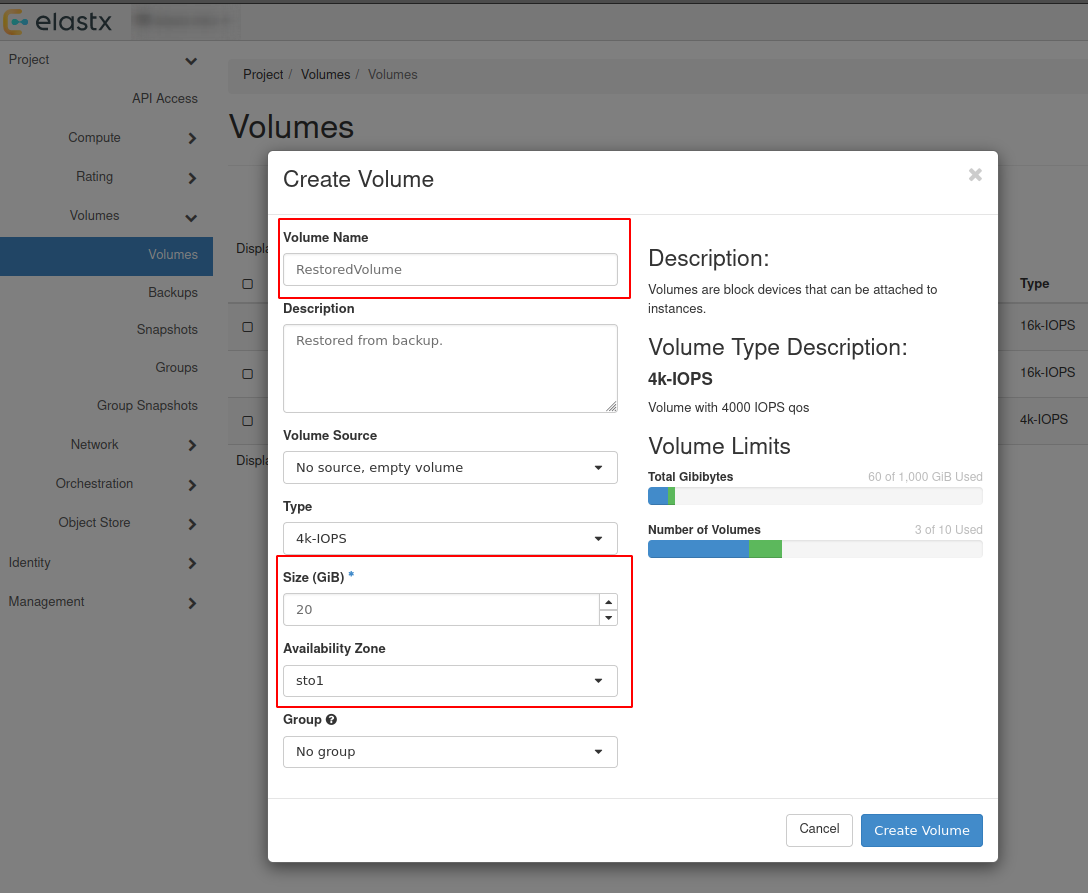
- Navigate to “Project” → “Volumes” → “Backups” and press
Restore Backup.
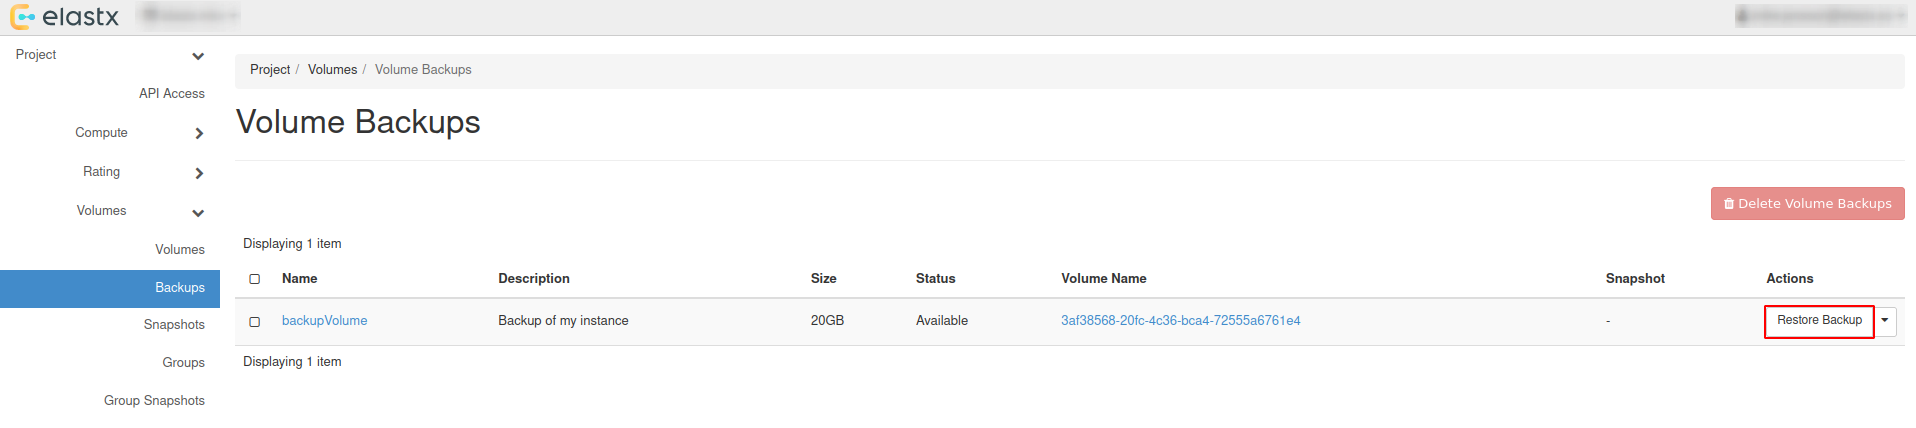
- Select your newly created volume and press
Restore Backup to Volume.
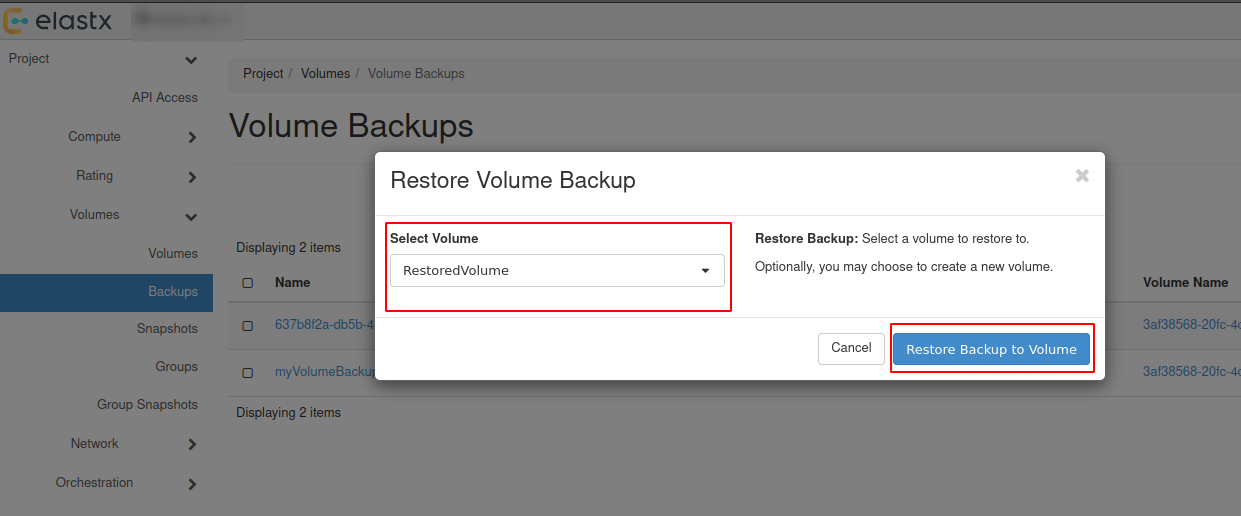
Option #2 - Restore backup without selecting a volume
Beware: See the note about availability zones and sizes above.
- Navigate to “Project” → “Volumes” → “Backups” and press
Restore Backup.
- Select
Create a New Volumeand pressRestore Backup to Volume.
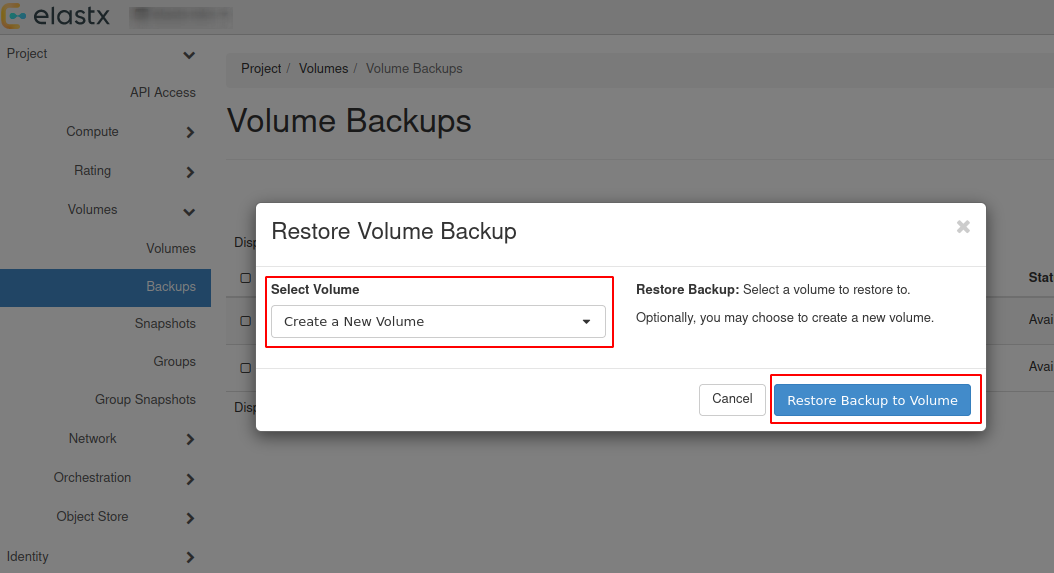
- The restored backup will be available in “Project” → “Volumes”.
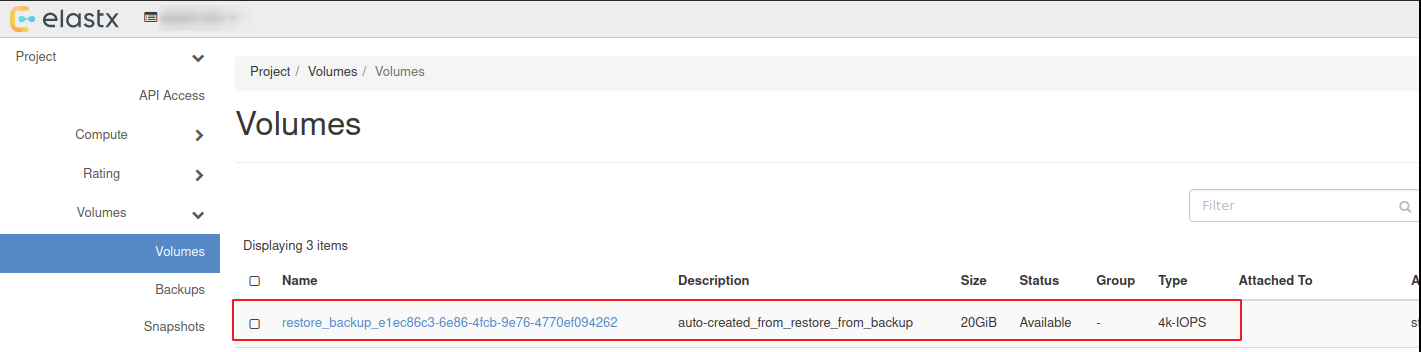
Attach & Detach volumes from horizon
- Navigate to “Project” → “Volumes” and press the ⬇ arrow next to
Edit Volumeon the volume you want to attach and then pressManage Attachments
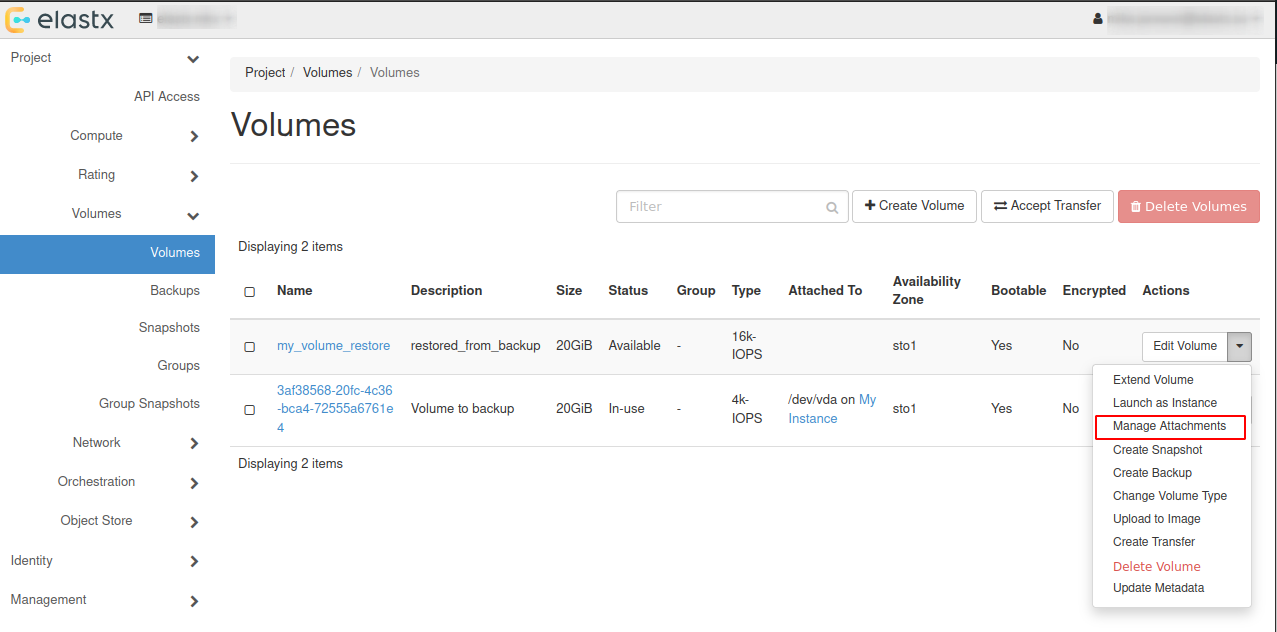
- In the pop-up window choose an instance you want to attach the restored volume to.
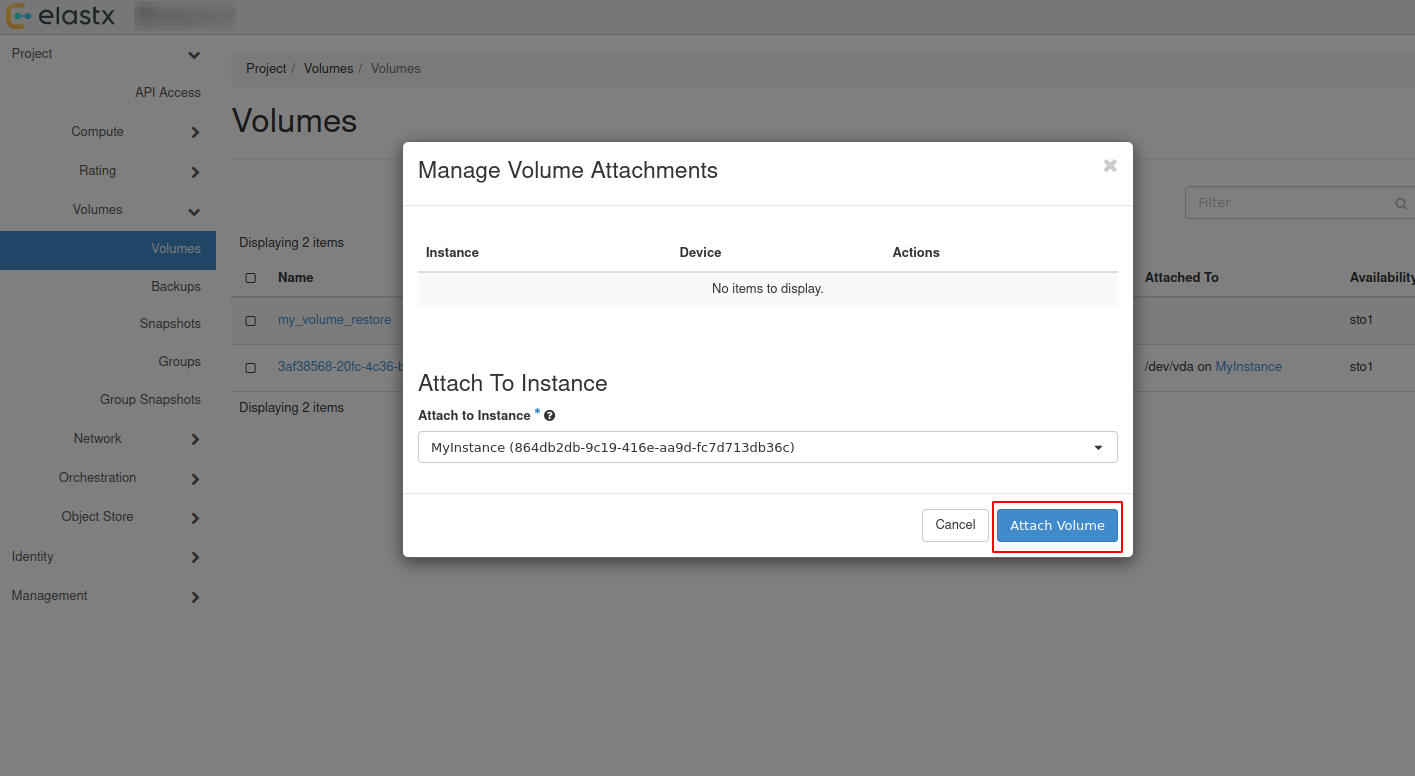
- Check volumes again in “Project” → “Volumes” to see if the volume is attached to the instance.
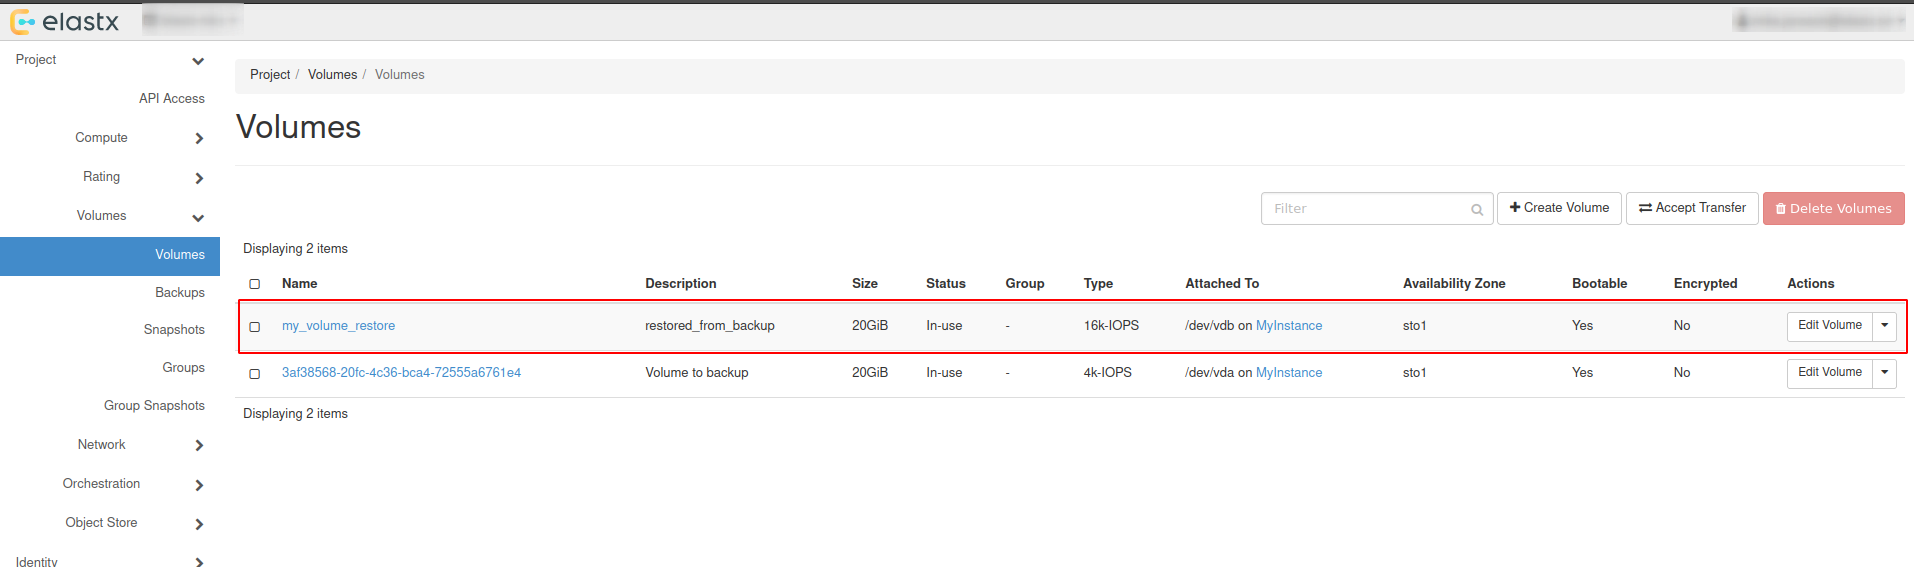
- To detach the volume, Navigate to “Project” → “Volumes” and press the ⬇ arrow next to
Edit Volumeon the volume you want to detach and then pressManage Attachments. In the pop-up window choose the instance you want to detach the volume from.
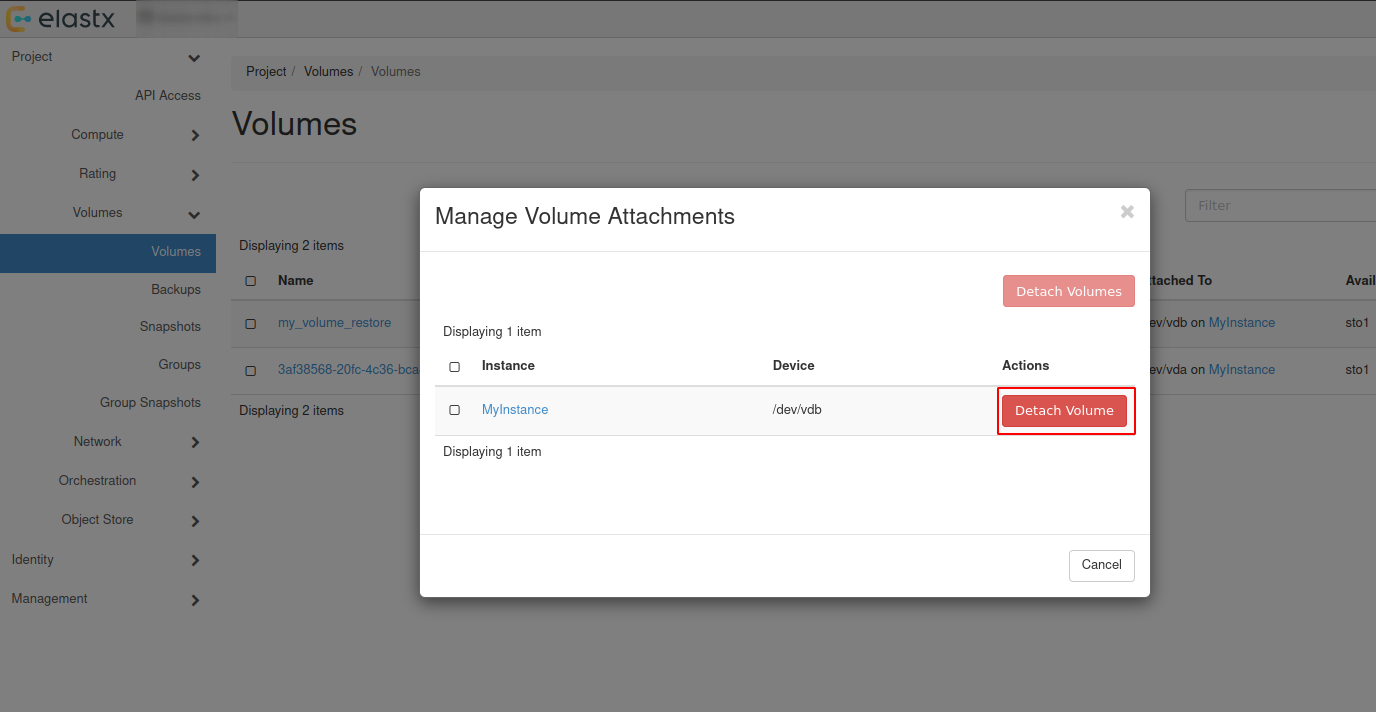
Backup and restore using openstack-cli
Backup using cli
- List all volumes:
$ openstack volume list

+--------------------------------------+----------+--------+------+-------------------------------------+
| ID                                   | Name     | Status | Size | Attached to                         |
+--------------------------------------+----------+--------+------+-------------------------------------+
| ce29137e-d7d7-45a6-ae63-bb6605af5335 | myvolume | in-use |  100 | Attached to myinstance on /dev/vdb  |
+--------------------------------------+--------------------------------------+-----------+------+------+
- Create backup of your selected volume:
Beware: If the volume is attached to an instance you’ll need to detach it first or use
--forcewhen creating the backup.
$ openstack volume backup create ce29137e-d7d7-45a6-ae63-bb6605af5335 --name mybackup --description "my backup" --force

+-----------+--------------------------------------+
| Field     | Value                                |
+-----------+--------------------------------------+
| id        | b014e2c4-42a9-44d5-af9b-60f3cf7ecfc9 |
| name      | mybackup                             |
| volume_id | ce29137e-d7d7-45a6-ae63-bb6605af5335 |
+-----------+--------------------------------------+
- When the backup is finished, the status will change from creating to available.
$ openstack volume backup list --volume ce29137e-d7d7-45a6-ae63-bb6605af5335

+--------------------------------------+----------+-------------+-----------+------+-------------+----------------------------+
| ID                                   | Name     | Description | Status    | Size | Incremental | Created At                 |
+--------------------------------------+----------+-------------+-----------+------+-------------+----------------------------+
| b014e2c4-42a9-44d5-af9b-60f3cf7ecfc9 | mybackup | my backup   | available |  100 | False       | 2026-01-23T11:18:01.000000 |
+--------------------------------------+----------+-------------+-----------+------+-------------+----------------------------+
Restore using cli
Restoring from backups can be done in two ways, one way is to create a new volume manually or to have the volume automatically created when restoring. Size must be at minimum the size of the backup.
Beware: If second option is chosen, the Availability Zone and Size gets chosen automatically. This means that the volume might end up in a different Availability Zone than intended. Volume size must be at minimum the size of the backup.
- List available backups:
$ openstack volume backup list

+--------------------------------------+----------+-------------+-----------+------+-------------+----------------------------+
| ID                                   | Name     | Description | Status    | Size | Incremental | Created At                 |
+--------------------------------------+----------+-------------+-----------+------+-------------+----------------------------+
| b014e2c4-42a9-44d5-af9b-60f3cf7ecfc9 | mybackup | my backup   | available |  100 | False       | 2026-01-23T11:18:01.000000 |
+--------------------------------------+----------+-------------+-----------+------+-------------+----------------------------+
- Create a new volume to restore from the backup:
$ openstack volume create my_volume_restore --availability-zone sto2 --type v2-4k --size 100 --description restored_from_backup

+--------------------------------+--------------------------------------+
| Field                          | Value                                |
+--------------------------------+--------------------------------------+
| attachments                    | []                                   |
| availability_zone              | sto2                                 |
| backup_id                      | None                                 |
| created_at                     | 2026-01-27T08:37:22.083078           |
| description                    | restored_from_backup                 |
| encrypted                      | False                                |
| group_id                       | None                                 |
| id                             | 6b5b8d28-d6c1-4da0-8659-d607670f5ed9 |
| multiattach                    | False                                |
| name                           | my_volume_restore                    |
| size                           | 100                                  |
| status                         | creating                             |
| type                           | v2-4k                                |
| updated_at                     | None                                 |
| volume_type_id                 | 565d82f0-238d-4f90-9aa4-172f0594bd58 |
+--------------------------------+--------------------------------------+
- Restore your selected backup to the newly created volume:
Beware: You’ll need to use –force to be able to restore backup to your newly created volume. Make sure to select the correct volume as this will overwrite any existing data.
$ openstack volume backup restore mybackup my_volume_restore --force

+-------------+--------------------------------------+
| Field       | Value                                |
+-------------+--------------------------------------+
| id          | b014e2c4-42a9-44d5-af9b-60f3cf7ecfc9 |
| volume_id   | 6b5b8d28-d6c1-4da0-8659-d607670f5ed9 |
| volume_name | my_volume_restore                    |
+-------------+--------------------------------------+
- After the backup is fully restored your new volume will show as: available.
$ openstack volume list

+--------------------------------------+-------------------+-----------+------+---------------------------------+
| ID                                   | Name              | Status    | Size | Attached to                     |
+--------------------------------------+-------------------+-----------+------+---------------------------------+
| 6b5b8d28-d6c1-4da0-8659-d607670f5ed9 | my_volume_restore | available |  100 |                                 |
| ce29137e-d7d7-45a6-ae63-bb6605af5335 | myvolume          | available |  100 |                                 |
+--------------------------------------+--------------------------------------+-----------+------+--------------+
Attach & Detach volumes from cli
Attach
List all available volumes:
$ openstack volume list --status available

+--------------------------------------+----------+--------+------+-------------------------------------+
| ID                                   | Name     | Status | Size | Attached to                         |
+--------------------------------------+----------+--------+------+-------------------------------------+
| ce29137e-d7d7-45a6-ae63-bb6605af5335 | myvolume | in-use |  100 | Attached to myinstance on /dev/vdb  |
+--------------------------------------+--------------------------------------+-----------+------+------+
- List all instances:
$ openstack server list

+--------------------------------------+------------+---------+--------------------------------+----------------------------+---------------+
| ID                                   | Name       | Status  | Networks                       | Image                      | Flavor        |
+--------------------------------------+------------+---------+--------------------------------+----------------------------+---------------+
| 3e55aef3-09a6-49e8-87ac-779354a1b7cd | myinstance | ACTIVE  | testnet=192.168.30.19          | ubuntu-24.04-server-latest | v2-c4-m8-d120 |
+--------------------------------------+------------+--------+---------------------------------+----------------------------+---------------+
- Attach your restored volume to an instance:
openstack server add volume <Instance ID/Name> <Volume ID/Name>
$ openstack server add volume myinstance my_volume_restore

+-----------------------+--------------------------------------+
| Field                 | Value                                |
+-----------------------+--------------------------------------+
| ID                    | 6b5b8d28-d6c1-4da0-8659-d607670f5ed9 |
| Server ID             | 3e55aef3-09a6-49e8-87ac-779354a1b7cd |
| Volume ID             | 6b5b8d28-d6c1-4da0-8659-d607670f5ed9 |
| Device                | /dev/vdb                             |
| Tag                   | None                                 |
| Delete On Termination | False                                |
+-----------------------+--------------------------------------+
- Confirm the attachment:
$ openstack volume list

+--------------------------------------+-------------------+-----------+------+-------------------------------------+
| ID                                   | Name              | Status    | Size | Attached to                         |
+--------------------------------------+-------------------+-----------+------+-------------------------------------+
| 6b5b8d28-d6c1-4da0-8659-d607670f5ed9 | my_volume_restore | in-use    |  100 | Attached to myinstance on /dev/vdb  |
| ce29137e-d7d7-45a6-ae63-bb6605af5335 | myvolume          | available |  100 |                                     |
+--------------------------------------+-------------------+-----------+------+-------------------------------------+
Detach
- Detach a volume from an instance:
openstack server remove volume <Instance ID/Name> <Volume ID/Name>.
$ openstack server remove volume myinstance my_volume_restore
- Confirm the detachment:
$ openstack volume list

+--------------------------------------+-------------------+-----------+------+---------------------------------+
| ID                                   | Name              | Status    | Size | Attached to                     |
+--------------------------------------+-------------------+-----------+------+---------------------------------+
| 6b5b8d28-d6c1-4da0-8659-d607670f5ed9 | my_volume_restore | available |  100 |                                 |
| ce29137e-d7d7-45a6-ae63-bb6605af5335 | myvolume          | available |  100 |                                 |
+--------------------------------------+--------------------------------------+---------------------------------+
Further reading
9.5.18 - Volume migration
Overview
To migrate volume data between Availability Zones (sto1|sto2|sto3) you can use Openstacks backup functionality. This backup process uses our Swift object storage, which is available across all Availability Zones.
- Shutdown the instance whose volume will change Availability Zone. Let’s say it’s in sto1 now.
- Take a backup of the volume (this may take some time, depending on the size of the volume).
- Create a new volume in Availability Zone sto2 and select the backup as the source.
- Create a new instance in Availability Zone sto2 and attach the newly created volume.
To get a more in-depth look at how to perform backup and restore of a volume, follow our Volume Backup & Restore guide.
9.5.19 - Volume Retype
Overview
This guide will help you getting started with changing volume type in OpenStack.
For v2 volumes as well as the deprecated ’enc’ volume types you will need to detach the volume from your server before retyping. Either shut down your server or unmount the volume in your operating system before detaching the volume in Openstack.
You cannot change a volume type from v1 to v2 if it has an existing snapshot.
Volume retype from Horizon
In this example, we will use a detached volume with the type 16k-IOPS-enc.
Navigate to “Project” → “Volumes” choose the volume you want to retype and press the ⬇ arrow next to Edit Volume and select Change Volume Type.
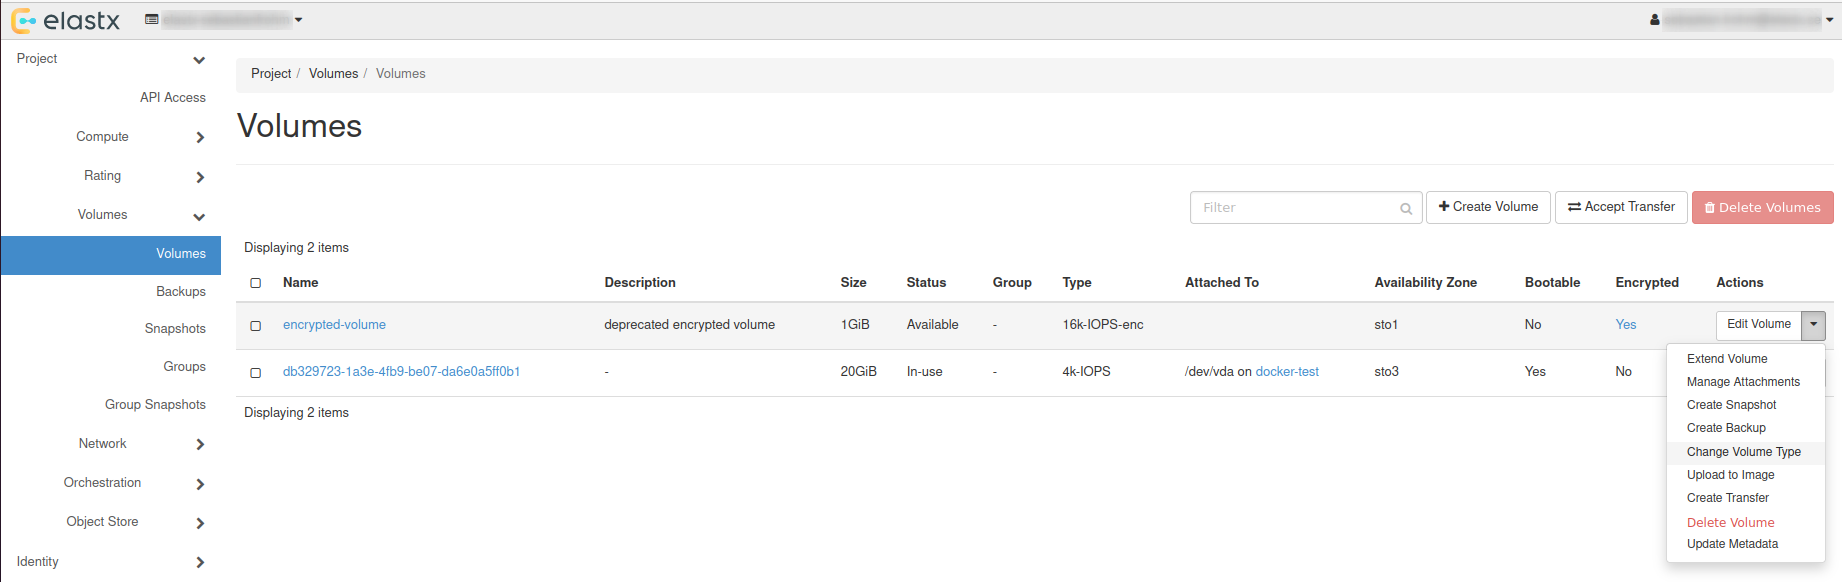
Choose Type
In the pop-up window, choose a new type and set Migration Policy to On Demand.
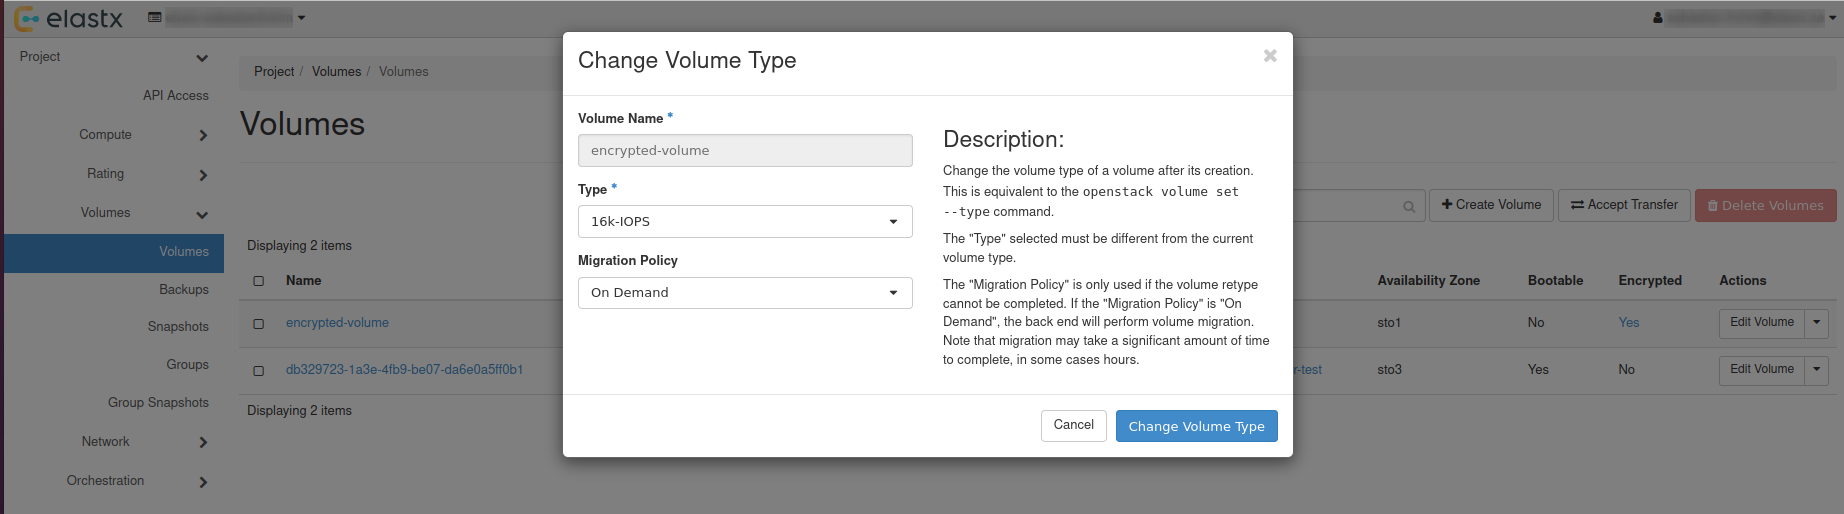
Check status
The volume status will change to retyping, this can take a while depending on the volume size.
After everything is done, the volume will have the status available.
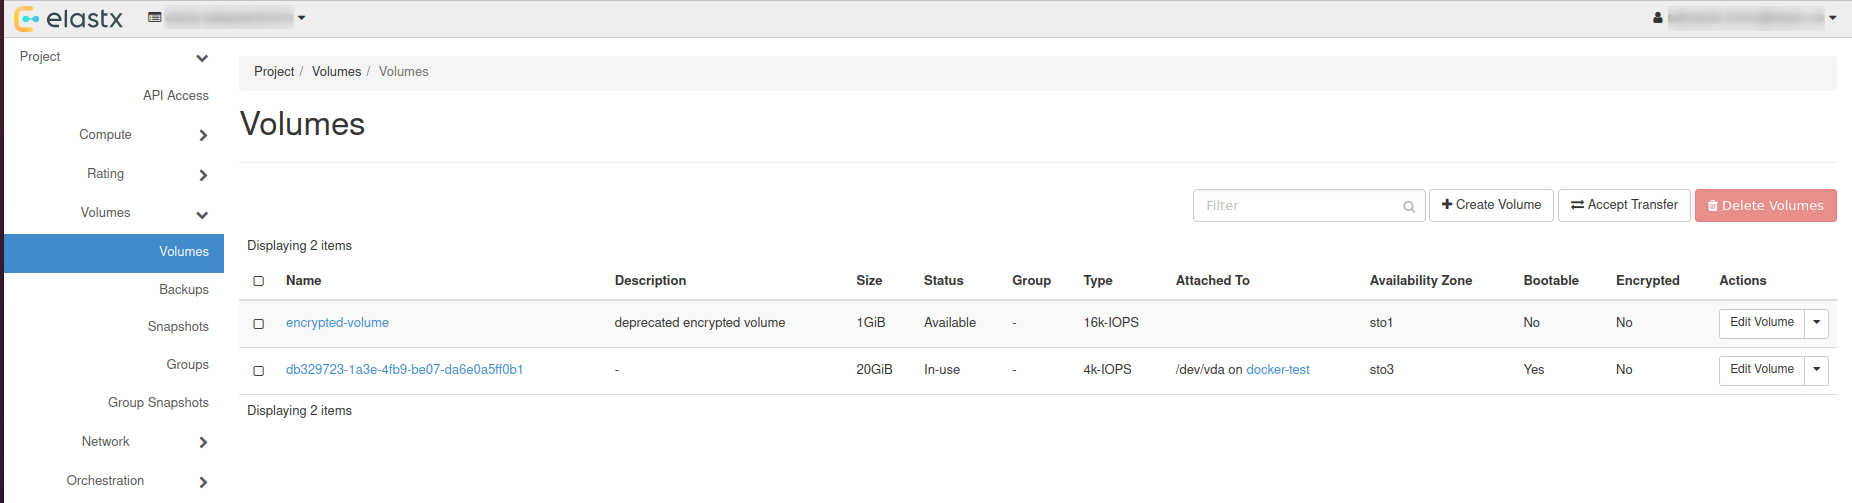
Volume retype using OpenStack CLI
List all available volumes: openstack volume list --long.
openstack volume list --long
+--------------------------------------+------------------+-----------+------+--------------+----------+--------------------------------------+--------------------------------------+
| ID                                   | Name             | Status    | Size | Type         | Bootable | Attached to                          | Properties                           |
+--------------------------------------+------------------+-----------+------+--------------+----------+--------------------------------------+--------------------------------------+
| ad2ca224-78e0-4930-941e-596bbea05b95 | encrypted-volume | available |    1 | 16k-IOPS-enc | false    |                                      |                                      |
| db329723-1a3e-4fb9-be07-da6e0a5ff0b1 |                  | in-use    |   20 | 4k-IOPS      | true     | Attached to docker-test on /dev/vda  | attached_mode='rw', readonly='False' |
+--------------------------------------+------------------+-----------+------+--------------+----------+--------------------------------------+--------------------------------------+
Retype volume with: openstack volume set --type <volume-type> --retype-policy on-demand <Volume ID or Name>.
openstack volume set --type 16k-IOPS --retype-policy on-demand ad2ca224-78e0-4930-941e-596bbea05b95

openstack volume list --long
+--------------------------------------+------------------+----------+------+--------------+----------+--------------------------------------+--------------------------------------+
| ID                                   | Name             | Status   | Size | Type         | Bootable | Attached to                          | Properties                           |
+--------------------------------------+------------------+----------+------+--------------+----------+--------------------------------------+--------------------------------------+
| ad2ca224-78e0-4930-941e-596bbea05b95 | encrypted-volume | retyping |    1 | 16k-IOPS-enc | false    |                                      |                                      |
| db329723-1a3e-4fb9-be07-da6e0a5ff0b1 |                  | in-use   |   20 | 4k-IOPS      | true     | Attached to docker-test on /dev/vda  | attached_mode='rw', readonly='False' |
+--------------------------------------+------------------+----------+------+--------------+----------+--------------------------------------+--------------------------------------+
When retyping is done, status will be shown as: available.
openstack volume list --long
+--------------------------------------+------------------+-----------+------+----------+----------+--------------------------------------+--------------------------------------+
| ID                                   | Name             | Status    | Size | Type     | Bootable | Attached to                          | Properties                           |
+--------------------------------------+------------------+-----------+------+----------+----------+--------------------------------------+--------------------------------------+
| ad2ca224-78e0-4930-941e-596bbea05b95 | encrypted-volume | available |    1 | 16k-IOPS | false    |                                      |                                      |
| db329723-1a3e-4fb9-be07-da6e0a5ff0b1 |                  | in-use    |   20 | 4k-IOPS  | true     | Attached to docker-test on /dev/vda  | attached_mode='rw', readonly='False' |
+--------------------------------------+------------------+-----------+------+----------+----------+--------------------------------------+--------------------------------------+
Further reading
9.5.20 - Windows volume offline after restart
Issue description
In certain circumstances, extra disks can be marked as offline after a hard reboot is performed and have to be manually brought online again.
By default Windows machines will have the SAN policy set to be “Offline Shared”, thus in most virtualization platforms this issue will occur when a disk is completely shut down and started again.
The reason behind this is that the disk may be assigned to a different virtual PCI device in the underlying host which causes the OS to block the volume from going online automatically when using the default policy.
Change SAN policy
The easiest way to change the SAN policy is using diskpart in a command shell or powershell prompt.
-
Enter diskpart
diskpart -
To display the current SAN policy, simply run the following command
san -
Change SAN policy
san policy=OnlineAll
Restore offline volume state
When attempting to initialize a volume you may be seeing the following error
The disk is offline because of policy set by an administrator
-
Start by listing disk information to find out which disk is offline.
list disk -
Select the offline disk.
select disk 1 -
Clear the read-only attribute for the selected disk.
attributes disk clear readonly -
To check that the read-only attribute has been cleared, run the following command.
attributes disk -
Bring the selected disk online again.
online disk
10 - The Vault (Technical Preview)
NOTE: The Vault is in development
Getting Started with Elastx The Vault
Welcome to Elastx The Vault — a secure, S3-compatible object storage service, now available for testing. Built with compliance, security, and flexibility at its core, The Vault is ideal for secondary storage and long-term data retention.
Overview of The Vault
The Vault combines scalable object storage with enterprise-grade security:
- S3-Compatible Object Storage – Easily integrate with existing tools and workflows
- Geographically and Physically Isolated – Hosted in an isolated, dedicated and physically protected region within the Elastx Cloud Platform
- Encryption at Rest – Your data is always secured with encryption
- Immutable Storage – Safeguard against deletion or tampering including Ransomware
- Integrated with Elastx IDP – Centralized identity and access management with MFA
- Purpose-Built for Secondary Storage – Designed for archiving, backups, and compliance-driven storage
Getting Access to The Vault
Before using Elastx The Vault, your organization must designate at least one Customer Admin User.
-
Request an Admin Account
An authorized manager can use Elastx Support Page or email support@elastx.se to request access for your first admin user. -
Activate Your User
Once provisioned follow the instructions to activate your Elastx Identity Provider (IDP) account and setup MFA.
Accessing The Console
Use the Elastx The Vault Console to manage your The Vault configuration (only Customer Admin Users): Elastx The Vault Console
From the console you can setup and manage:
- Buckets and objects for the whole organization
- Your access keys and their policies for users and applications to access The Vault securely
- Immutable settings etc
Note: Access keys are bound to the customer admin who creates them. It’s important to note that in an organization with multiple customer admins, these admins cannot view each other’s keys.
Creating Access Keys and access the API
To enable other users, applications, services to access the The Vault api.
- Log in to the console as an admin
- Create Access Keys for your organization’s users or services
- Store the secret key securely — it is only shown once
- Access the api via: https://vault.elastx.cloud
Start using MinIO - i.e. create a new bucket with Minio Client
Note! Your buckets always need to be named with your organisations unique prefixed uid. I.e. <uid.bucketname>
which is provided by Elastx Support to your Authorized manager
   mc alias set <alias> https://vault.elastx.cloud <accesskey> <secret>
   mc mb <alias>/<uuid>.<bucketname>
Additional User Roles
You may also request WriteOnly and ReadOnly users/accounts via support@elastx.se. These users are pre-assigned with limited policies suitable for:
- WriteOnly – I.e. to upload data into The Vault
- ReadOnly – I.e when the need is only to read from storage
Technical details
The S3 API is rate-limited with max 128 active sessions and 1k requests per second per source IP. This limit is quite low on purpose as the main usage of the system should be to stream large backup/archive objects and not to store millions of small objets. Hitting the limit will trigger a HTTP 429 response which most S3 clients can handle gracefully with exponential backoff.
Learn More
For more complete documentation including how to manage immutability, refer to official documentation, i.e.:
10.1 - Knowledge base
10.1.1 - FAQ
I can’t get the “Object Locking” functionality to work. What is wrong?
Unfortunately there is a bug in the GUI and this functionality can only be accessed via the API.
10.2 - Backup solutions
Introduction
This page describes solutions för running backups against The Vault object storage.
The goal is to create an efficient backup solution especially when you have many small files that you need to backup. This will reduce the number of objects stored and the number of requests needed against The Vault to a minimum.
Juicefs
This solution is a High-Performance, Cloud-Native, Distributed File System. In this case we will primarily use it to reduce the number of requests against The Vault. This is a good solution if you want to backup a large number of small files. Juicefs handles all metadata in a database so all requests during a sync are handled against the database instead of requests in The Vault.
Setup
Install the juicefs binary in a Linux instance.
curl -sSL https://d.juicefs.com/install | sh -
Install sqllite
apt-get install sqlite3
Setup the drive using The Vault and SQLite
juicefs format --storage minio --bucket https://vault.elastx.cloud/<bucket> --access-key <access> --secret-key <secret> "sqlite3://thevaultfs.db" thevaultfs
Mount drive
mkdir /thevaultfs
juicefs mount sqlite3://thevaultfs.db /thevaultfs -d
Now you can sync data using rclone or other tools and to compare content between the primary and The Vault through juicefs does not require any requests on The Vault.
Setup using Swift as storage
Setup the drive using swift s3 (ec2 credentials) and SQLite
juicefs format --storage swift --bucket https://<container>.swift.elastx.cloud --access-key <access> --secret-key <secret> sqlite3://swiftfs.db swiftfs
Mount drive
mkdir /swiftfs
juicefs mount sqlite3://swiftfs.db /swiftfs -d
Veeam
Install a Veeam backup server to take backups of object storage or other resources and store those backups in The Vault.
Create a Bucket in The Vualt with immutable support.
mc mb --with-lock thevault/<bucket-name>
Setup
This is an instruction on how to install the Veeam Software Appliance in Openstack IaaS. Download the VeeamSoftwareAppliance iso file from Veeam. Create an account if you don’t have one and start a trial if you want to test.
Create an openstack image from the iso file using the openstack cli.
openstack image create --container-format bare --disk-format iso --property hw_firmware_type=uefi --file VeeamSoftwareAppliance_13.0.1.1071_20251217.iso VeeamSoftwareAppliance_13.0.1.1071_20251217-iso
Create a volume from the iso file and place the volume in the availability zone where you want to run the Veeam server.
openstack volume create --image VeeamSoftwareAppliance_13.0.1.1071_20251217-iso --availability-zone <az> --type v2-1k --size 15 veeam-iso
Create a boot volume, a data volume and then create an instance that attaches the boot volume, the data volume and the volume with the Veeam iso image. All must be located in the same availability zone. Both the boot and data volume needs to be at least 240 GB in size.
On the boot volume set the following property to make the instance use uefi.
openstack volume set --image-property hw_firmware_type=uefi <veeam-iso-volume-id>
Create the backup server instance.
openstack server create --flavor <flavor-id> --availability-zone <az> --volume <boot-volume-id> --block-device uuid=<data-volume-id>,source_type=volume,destination_type=volume --block-device uuid=<veeam-iso-volume-id>,source_type=volume,destination_type=volume,boot_index=1,device_type=cdrom,disk_bus=sata --nic net-id=<network-id> veeam-server
Follow the instructions and install the Veeam Server Appliance.
11 - Varnish CDN
General
A fully European-hosted CDN with a free tier and enterprise scaling.
Varnish CDN is a content delivery network service that leverages Varnish Cache technology to accelerate web content delivery and improve website performance globally.
The service provides distributed caching infrastructure that stores and serves static and dynamic content from edge locations closer to end users, significantly reducing latency and server load.
Varnish CDN offers advanced caching capabilities with flexible configuration options, real-time cache invalidation, and support for modern web protocols. It includes features such as DDoS protection, SSL/TLS termination, traffic analytics, and intelligent request routing to optimize content delivery.
The platform is designed to handle high-traffic scenarios while maintaining low response times, making it suitable for e-commerce sites, media platforms, and enterprise applications that require reliable, fast content delivery at scale.
Resources
⦁ Product information: https://elastx.se/se/cdn
⦁ Documentation: https://www.varnish-cdn.com/docs/
⦁ Support: https://support.elastx.se
⦁ Status: https://status.varnish-cdn.net
12 - Virtuozzo PaaS
12.1 - Announcements
2025-09-29 Elastx Compute and Storage
Virtuozzo PaaS pricing adjustmen
We have successfully avoided a general price increase on all services, even though the past years of high inflation. We are investing in new more efficient technology to compensate for the increased operational costs. This is the first time we will increase the price on our first generation compute and volume storage. We have come to a point where we need to do a price adjustment to be able to continue the platform development in a sustainable way. The cost for our second generation (v2) compute and volume storage will stay the same.
The new pricing will apply from 2026-01-01.
We will adjust the pricing on the following services.
| Service | Price increase |
|---|---|
| Cloudlets | 4% |
| Storage | 4% |
2025-06-16 Deprecation of Virtuozzo PaaS
For many years Virtuozzo PaaS, previously branded as Jelastic, has been at the core of Elastx cloud services. However, to align with our mission to provide excellent services focusing on business critical data and applications we are confident that our next generation Elastx Cloud Platform is on track to fulfil all requirements for phasing this product out.
Customers leveraging current PaaS will receive further announcements and potentially be contacted individually in advance of any subsequent migration activities.
We will continue to fully support Virtuozzo PaaS until the end of life date and we will offer migration paths to other services.
Virtuozzo PaaS end of life date on Elastx will be 2026-12-31.
We have also published this FAQ related to this annuoncement: Virtuozzo deprecated FAQ
2022-10-06 Jelastic PaaS will be renamed Virtuozzo PaaS
Virtuozzo announced its acquisition of Jelastic on 2021-10-05.
Later, Jelastic PaaS became Virtuozzo Application Platform.
Now it is time for Elastx to rebrand Jelastic PaaS as Virtuozzo PaaS.
With the platform upgrade 2022-09-21, the Jelastic PaaS was rebranded to Virtuozzo PaaS.
During October we will rebrand other places as well.
Documentation for Virtuozzo PaaS can be found here.
Elastx is currently running version 7.3.1.
To get info on service windows and updates, please subscribe to our status page.
12.2 - Guides
12.2.1 - Catch-all VirtualHost with 301 redirect on Apache
Overview
If you want to make sure all traffic only uses your preferred domain name you can create a catch-all VirtualHost in Apache and redirect to the VirtualHost with the preferred domain name.
Configuration
On your apache node select config and edit the httpd.conf file.
Replace the current <VirtualHost ...> section with the following and replace mydomain.com with your domain name.
Note: Before you make any changes, it is always recommended to create a backup copy of the old configuration file.
<VirtualHost *:80>
 DocumentRoot /var/www/webroot/ROOT
 ServerName mydomain.com
 ErrorLog logs/mydomain-error_log
 CustomLog logs/mydomain-access_log common
</VirtualHost>
<VirtualHost *:80>
 ServerName www.mydomain.com
 ServerAlias *
 Redirect 301 / http://mydomain.com/
 ErrorLog logs/redirect-error_log
 CustomLog logs/redirect-access_log common
</VirtualHost>
In this example all traffic that is not http://mydomain.com will be redirected to that domain.
12.2.2 - Change public IP without downtime
Overview
In Jelastic PaaS you can easily switch IP-addresses by yourself without any downtime.
Attach new IP-address
- Expand your environment. If you hover over your Public IPv4-address, an icon for attaching or detaching IP-addresses will appear.
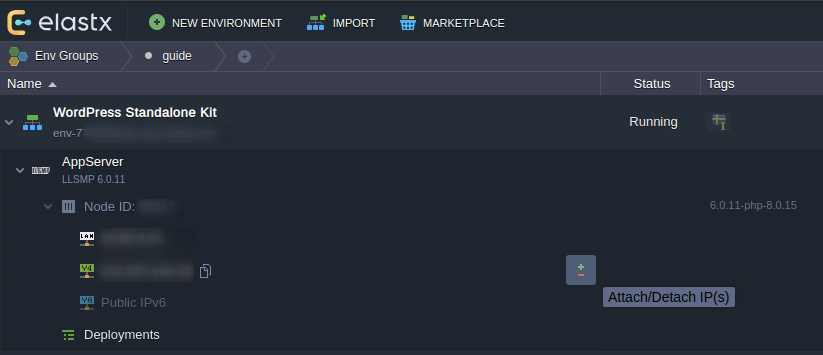
- Attach a new IP by raising the number of IP-addresses to 2.
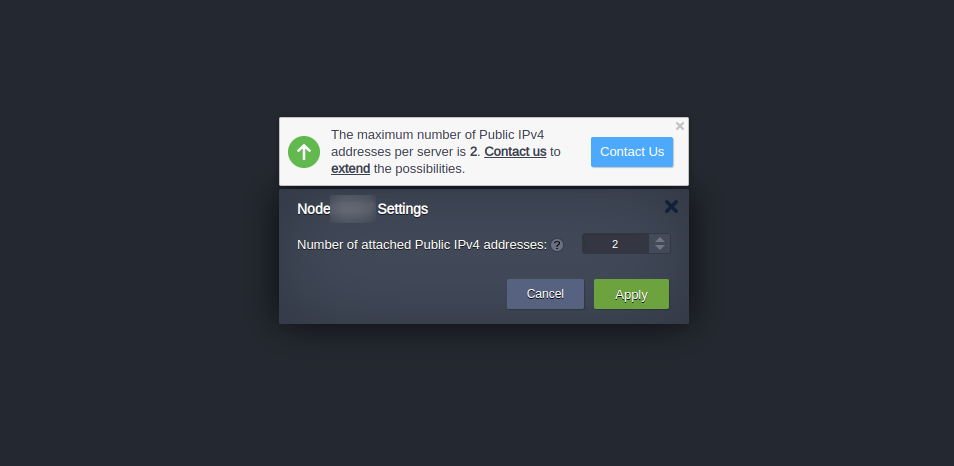
- Verify that your node has been assigned two IP-addresses.
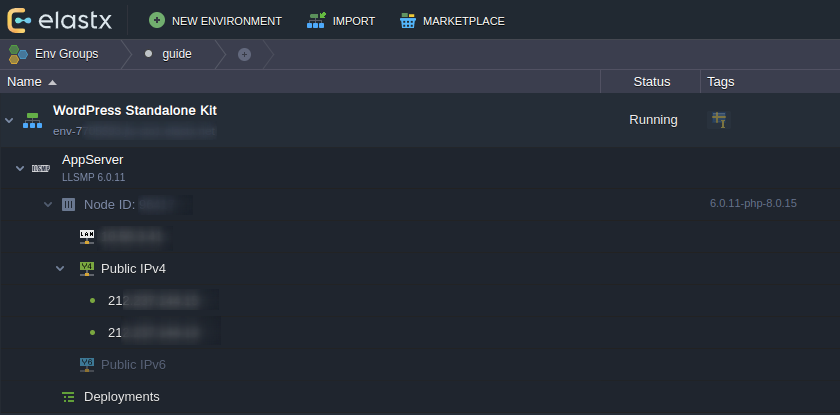
Update DNS-records
- Update relevant DNS records at your DNS provider to point to the new IP address.
Please keep in mind that your DNS change can take up to 24 hours before it’s completely propagated worldwide. You can verify your DNS propagation here: DNS Checker
Detach IP-address
Caution: In this next step we will go through how to detach an IP-address. Once you are ready to remove the IP-address, proceed to the next step.
- Press the Detach IP button to the right of the IP address that you wish to remove from your environment.
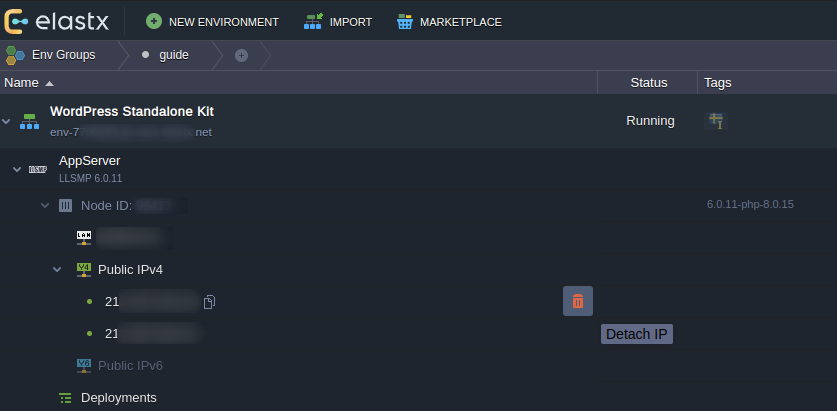
- Confirm the detachment.

That’s it! If something in this guide is unclear or if you have any questions, feel free to contact us.
12.2.3 - Copy a SQL database
Overview
This guide will walk you through the procedure of copying a SQL database between environments using the Jelastic GUI.
Export the database
- Open up phpMyAdmin on the source environment by clicking the icon as shown below
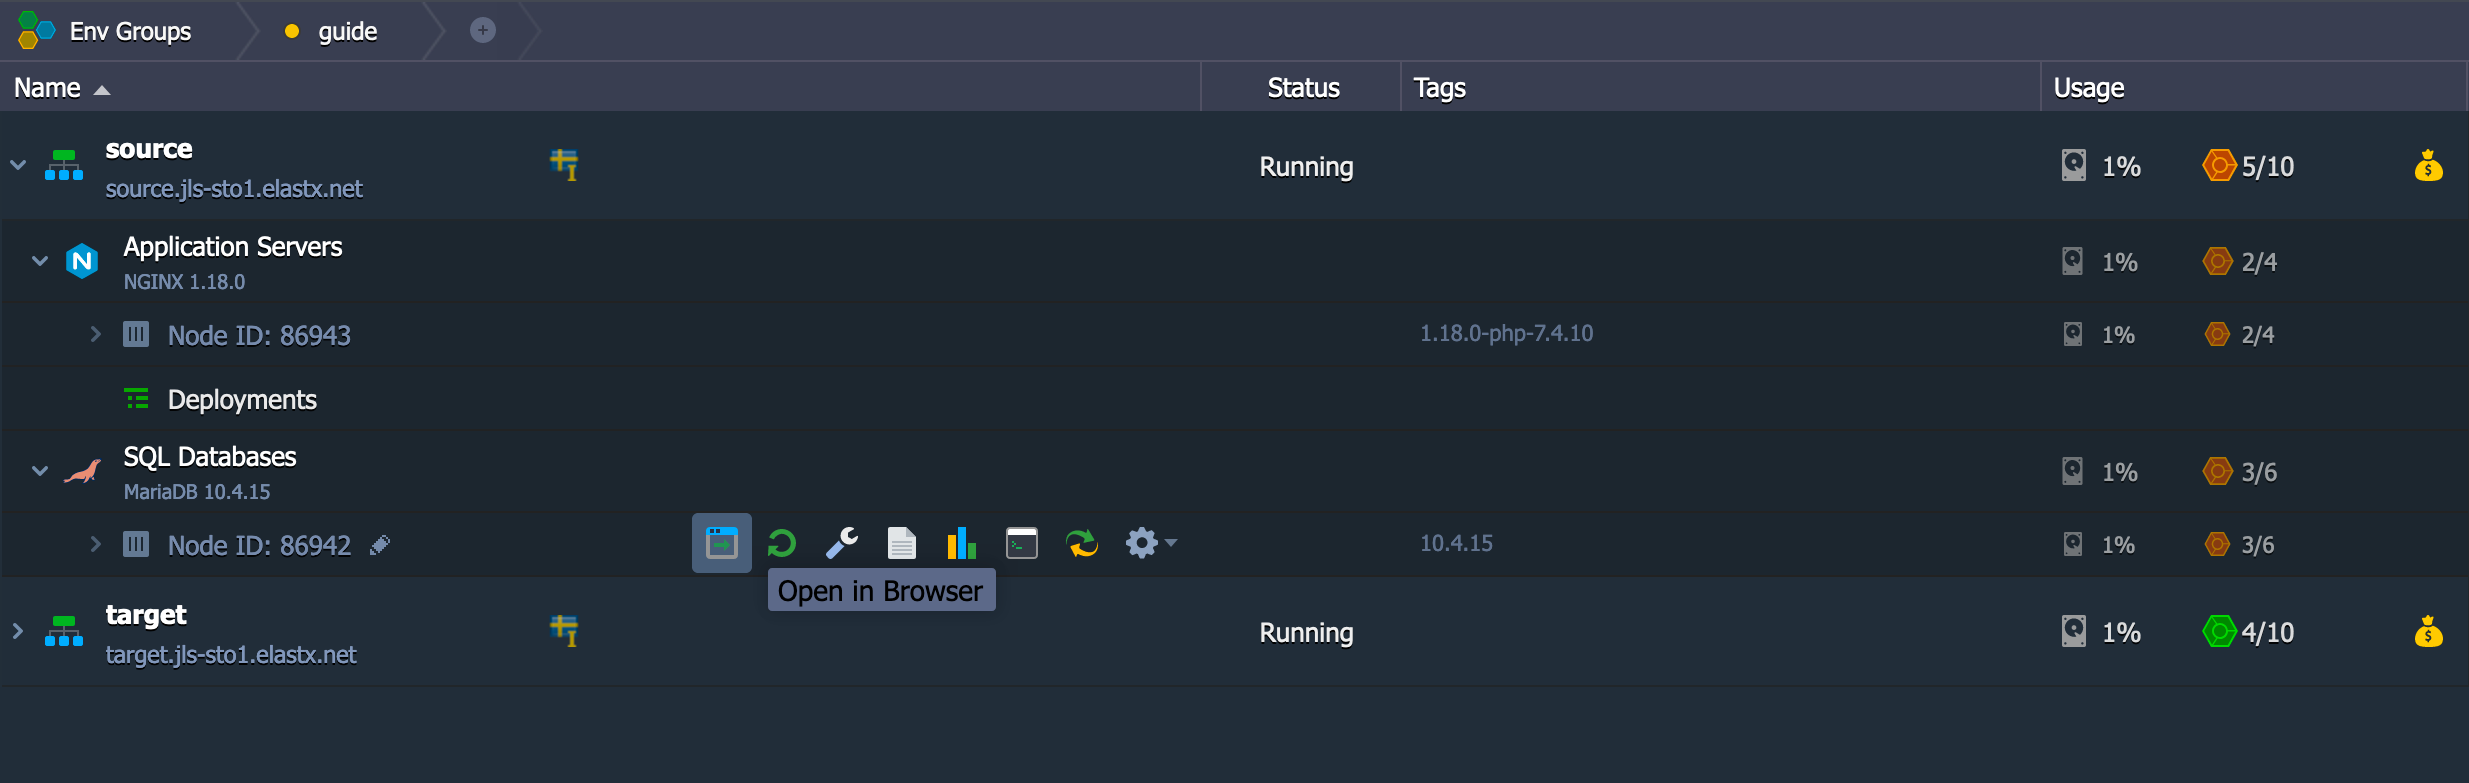
- Export the database by first choosing the database to the left, in our case example, and then click on Export on the top navigation bar. Make sure to check the box where it says “Save on server in the directory /var/lib/jelastic/phpMyAdmin/save” and then click “Go”.
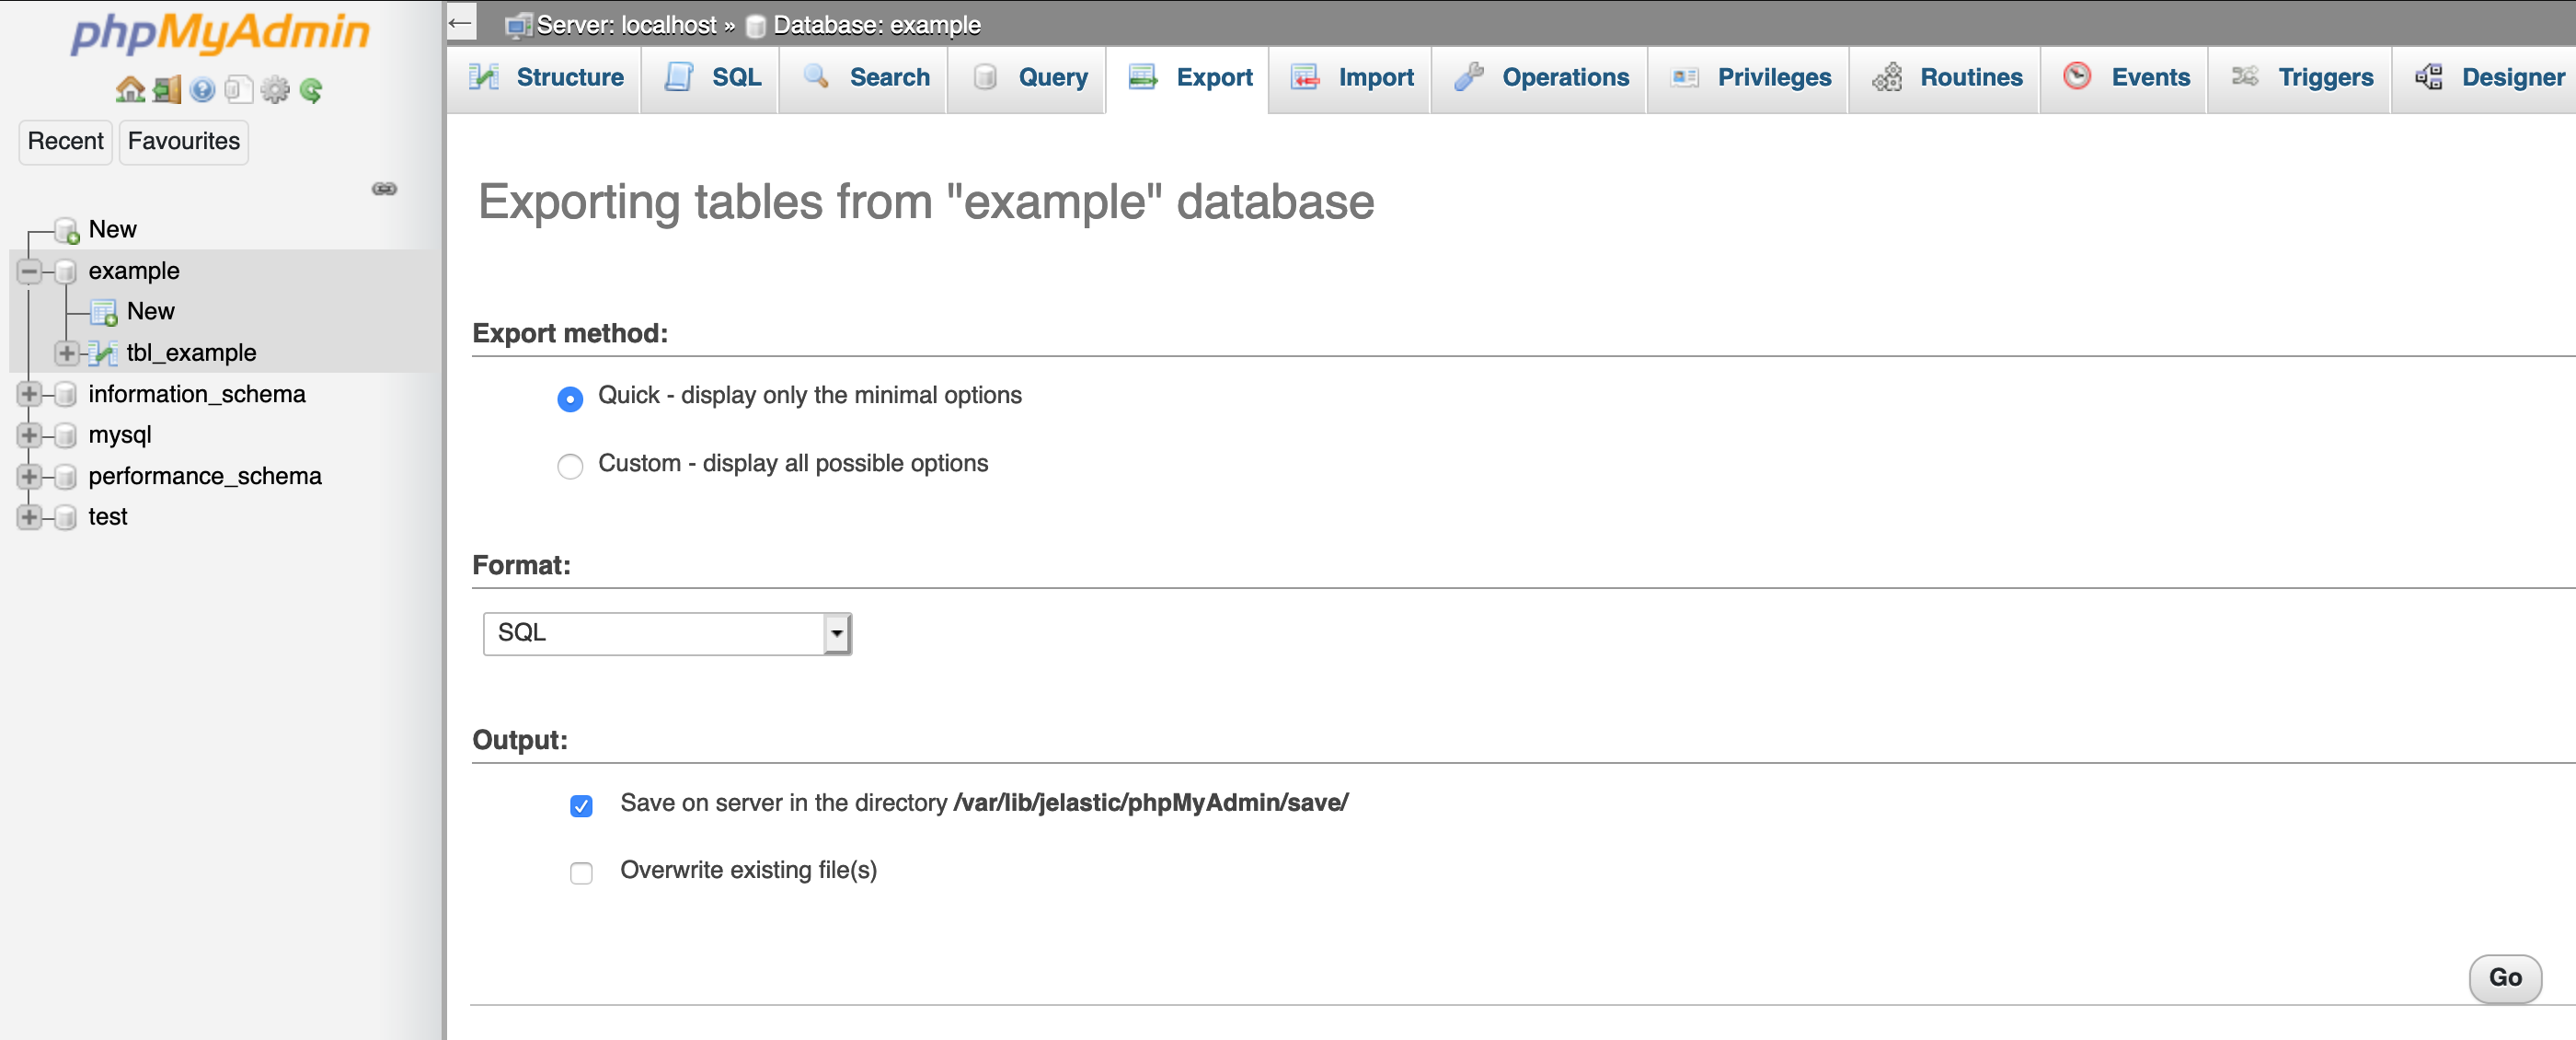
- Now you have exported the database.
Share folder between environments
- Find the configuration wrench on the SQL Databases source node.
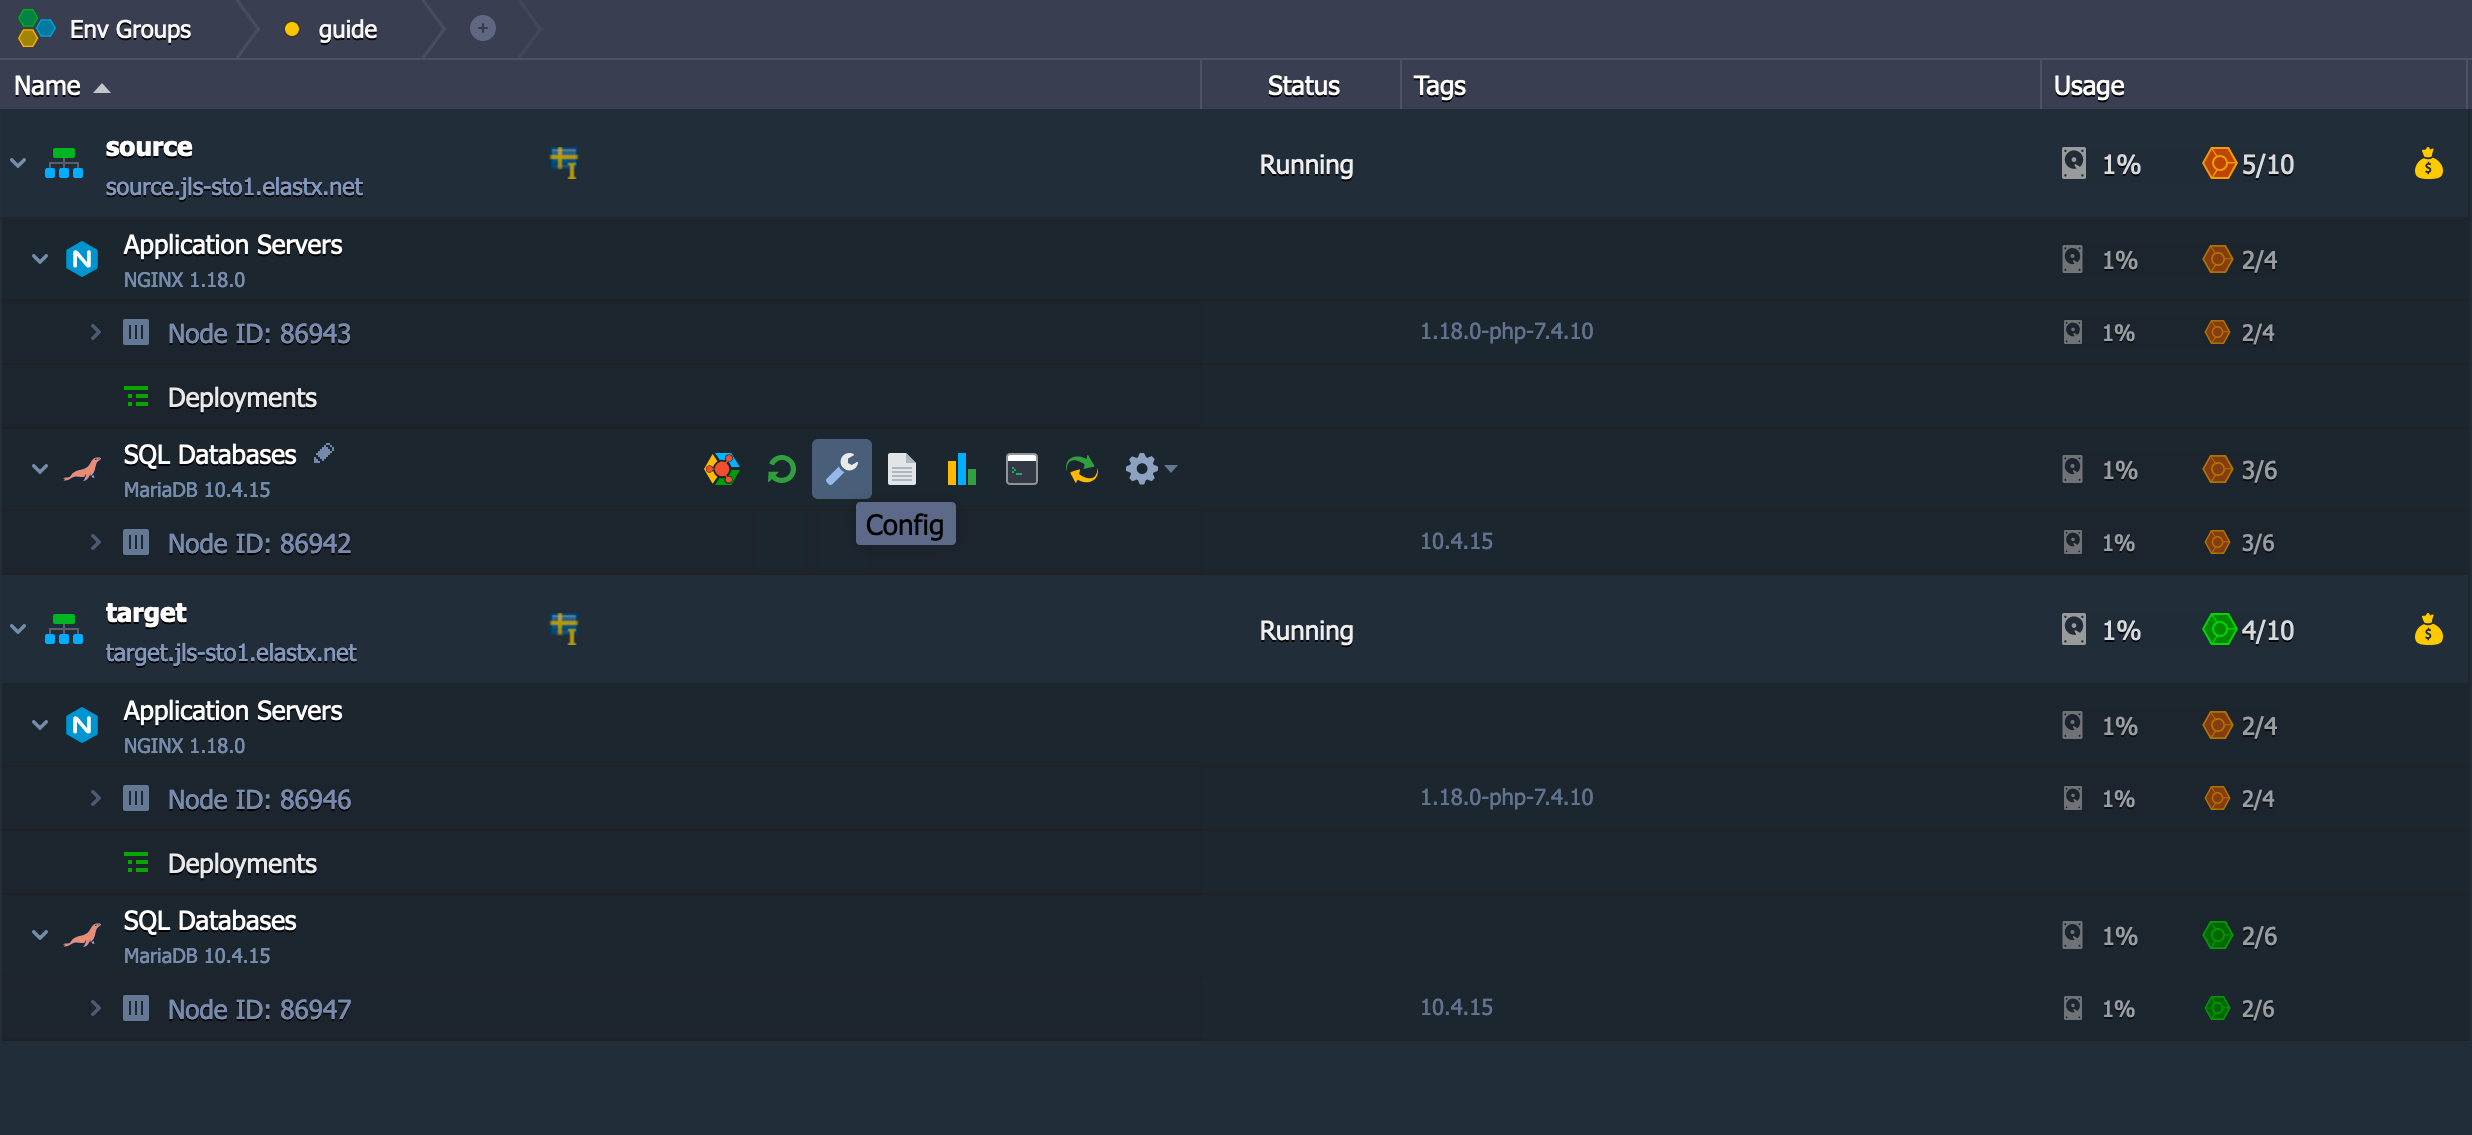
- Go to folder /var/lib/jelastic/phpMyAdmin. Click the cogwheel on the save folder as shown on the image below and choose Export

- Make sure to choose the correct target container where your target SQL database is at.
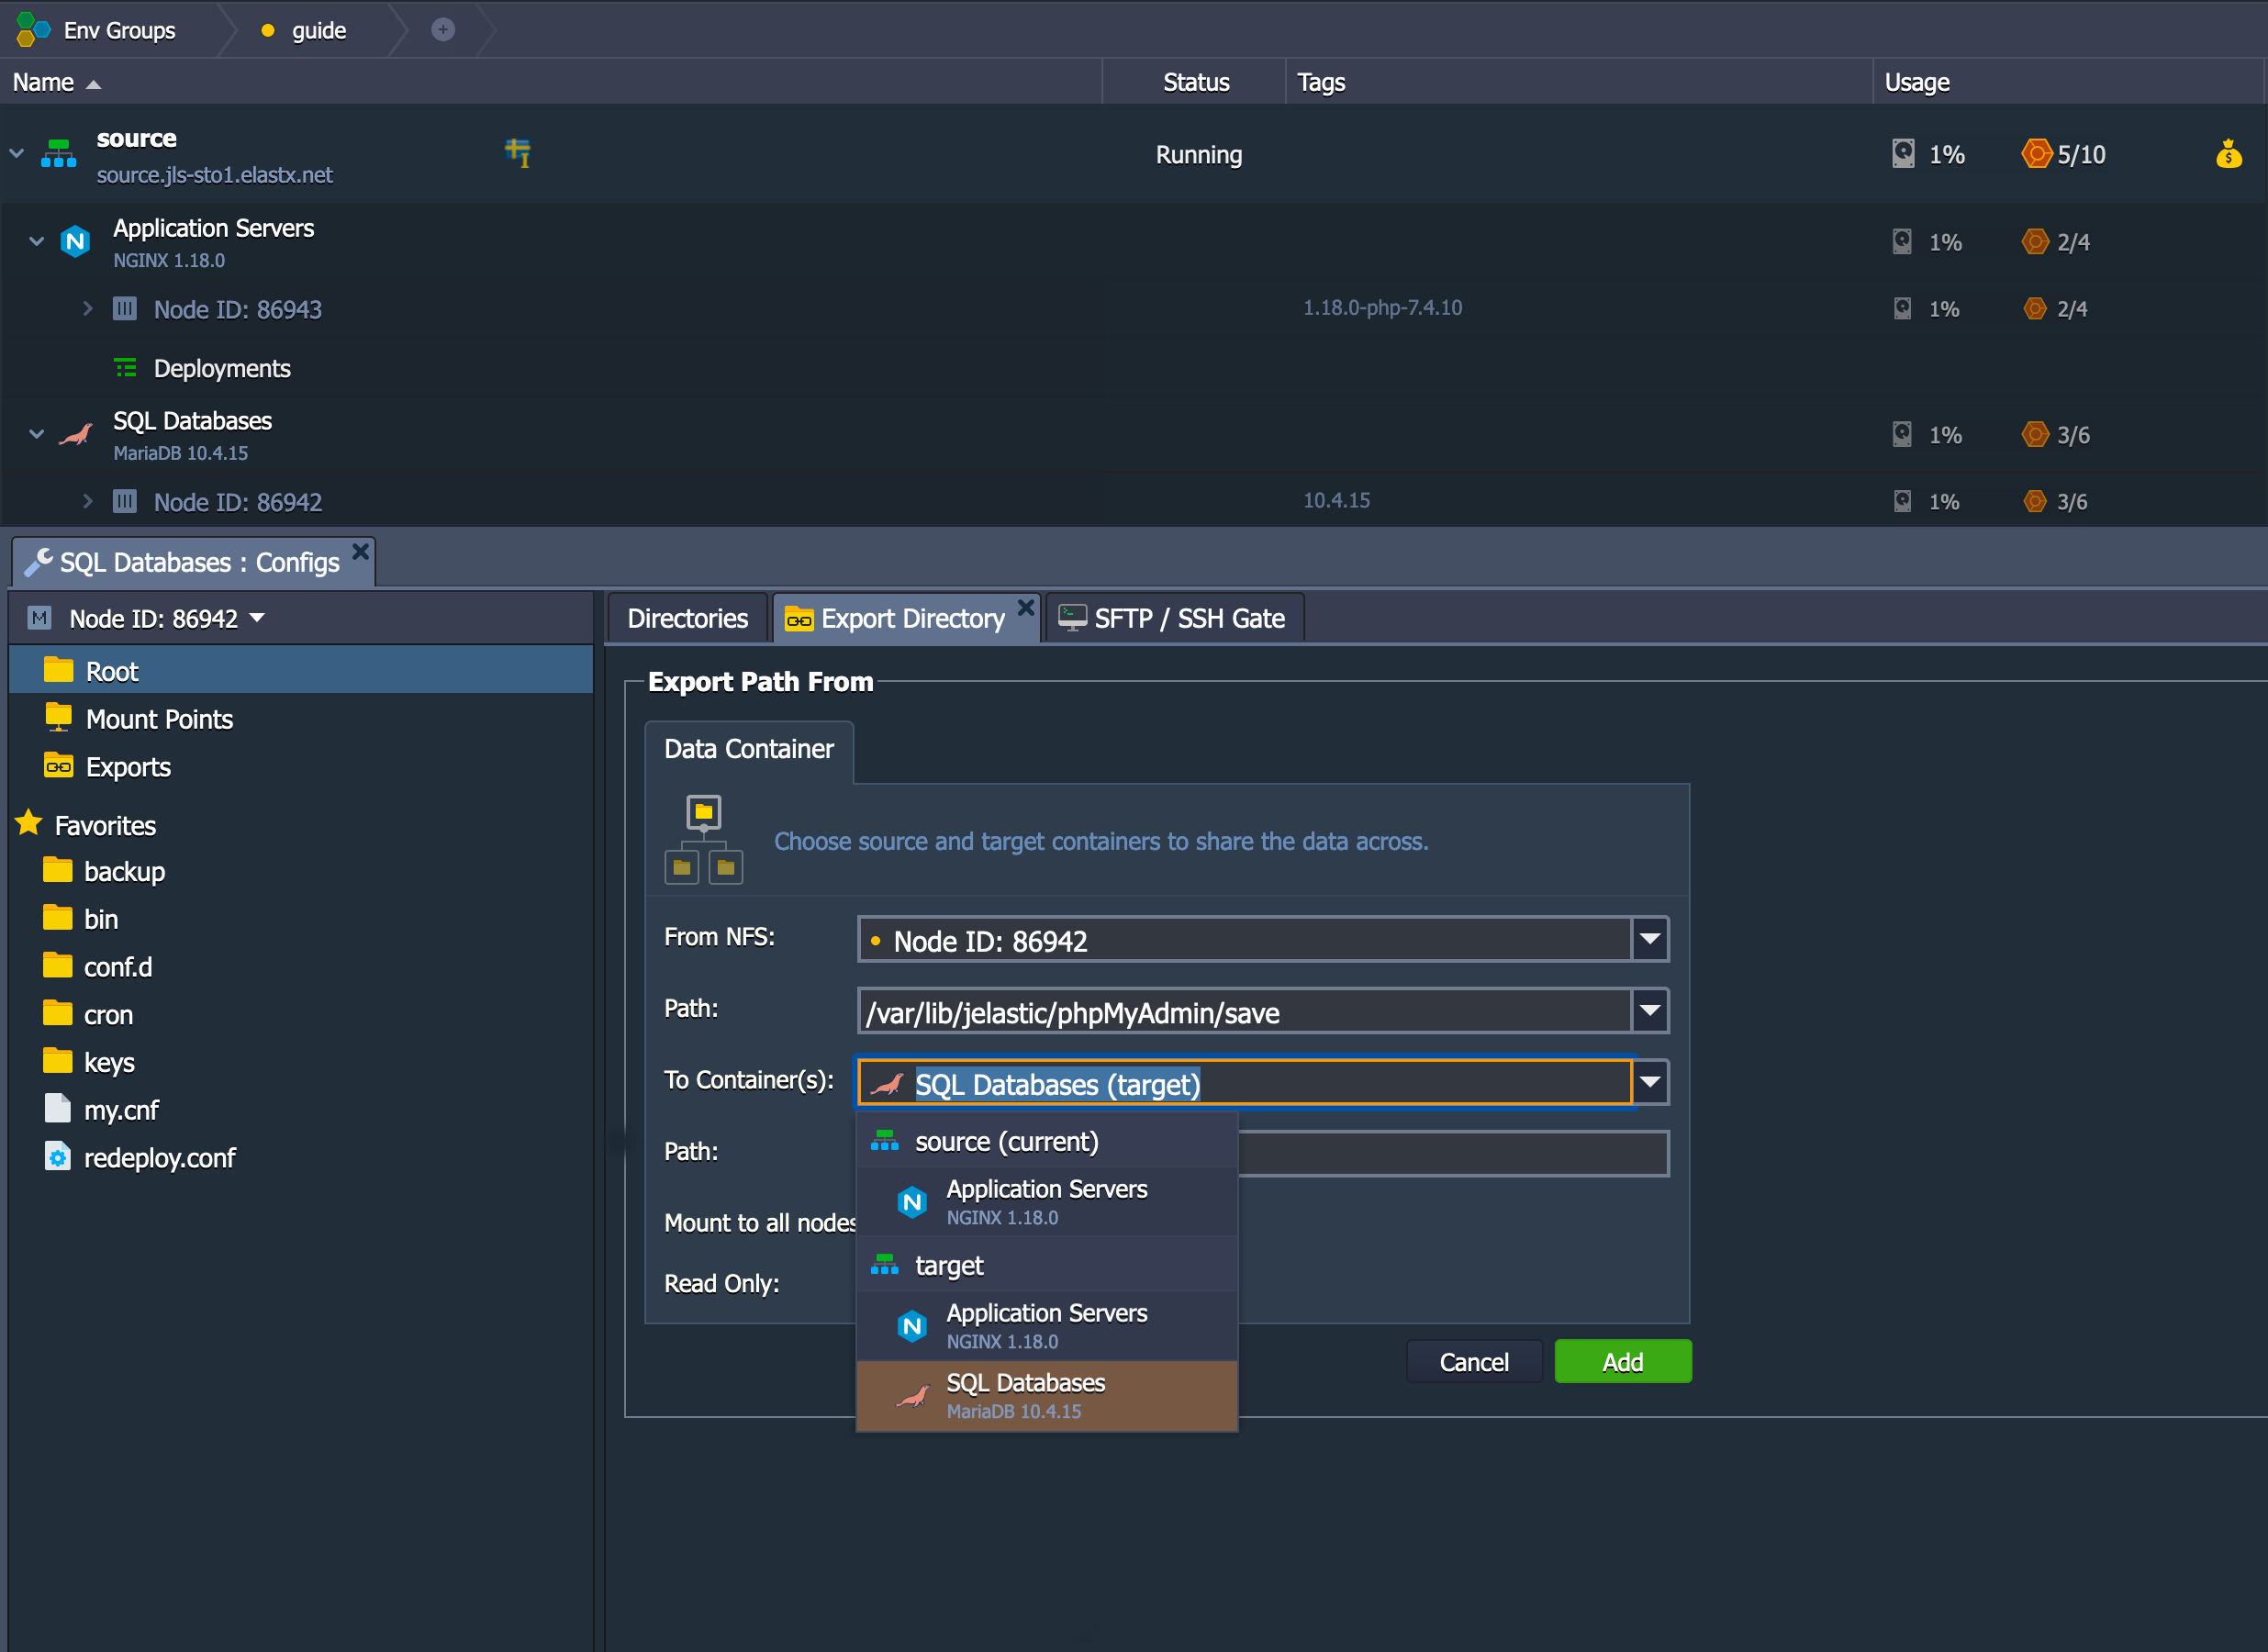
- Make sure to use the path /var/lib/jelastic/phpMyAdmin/upload
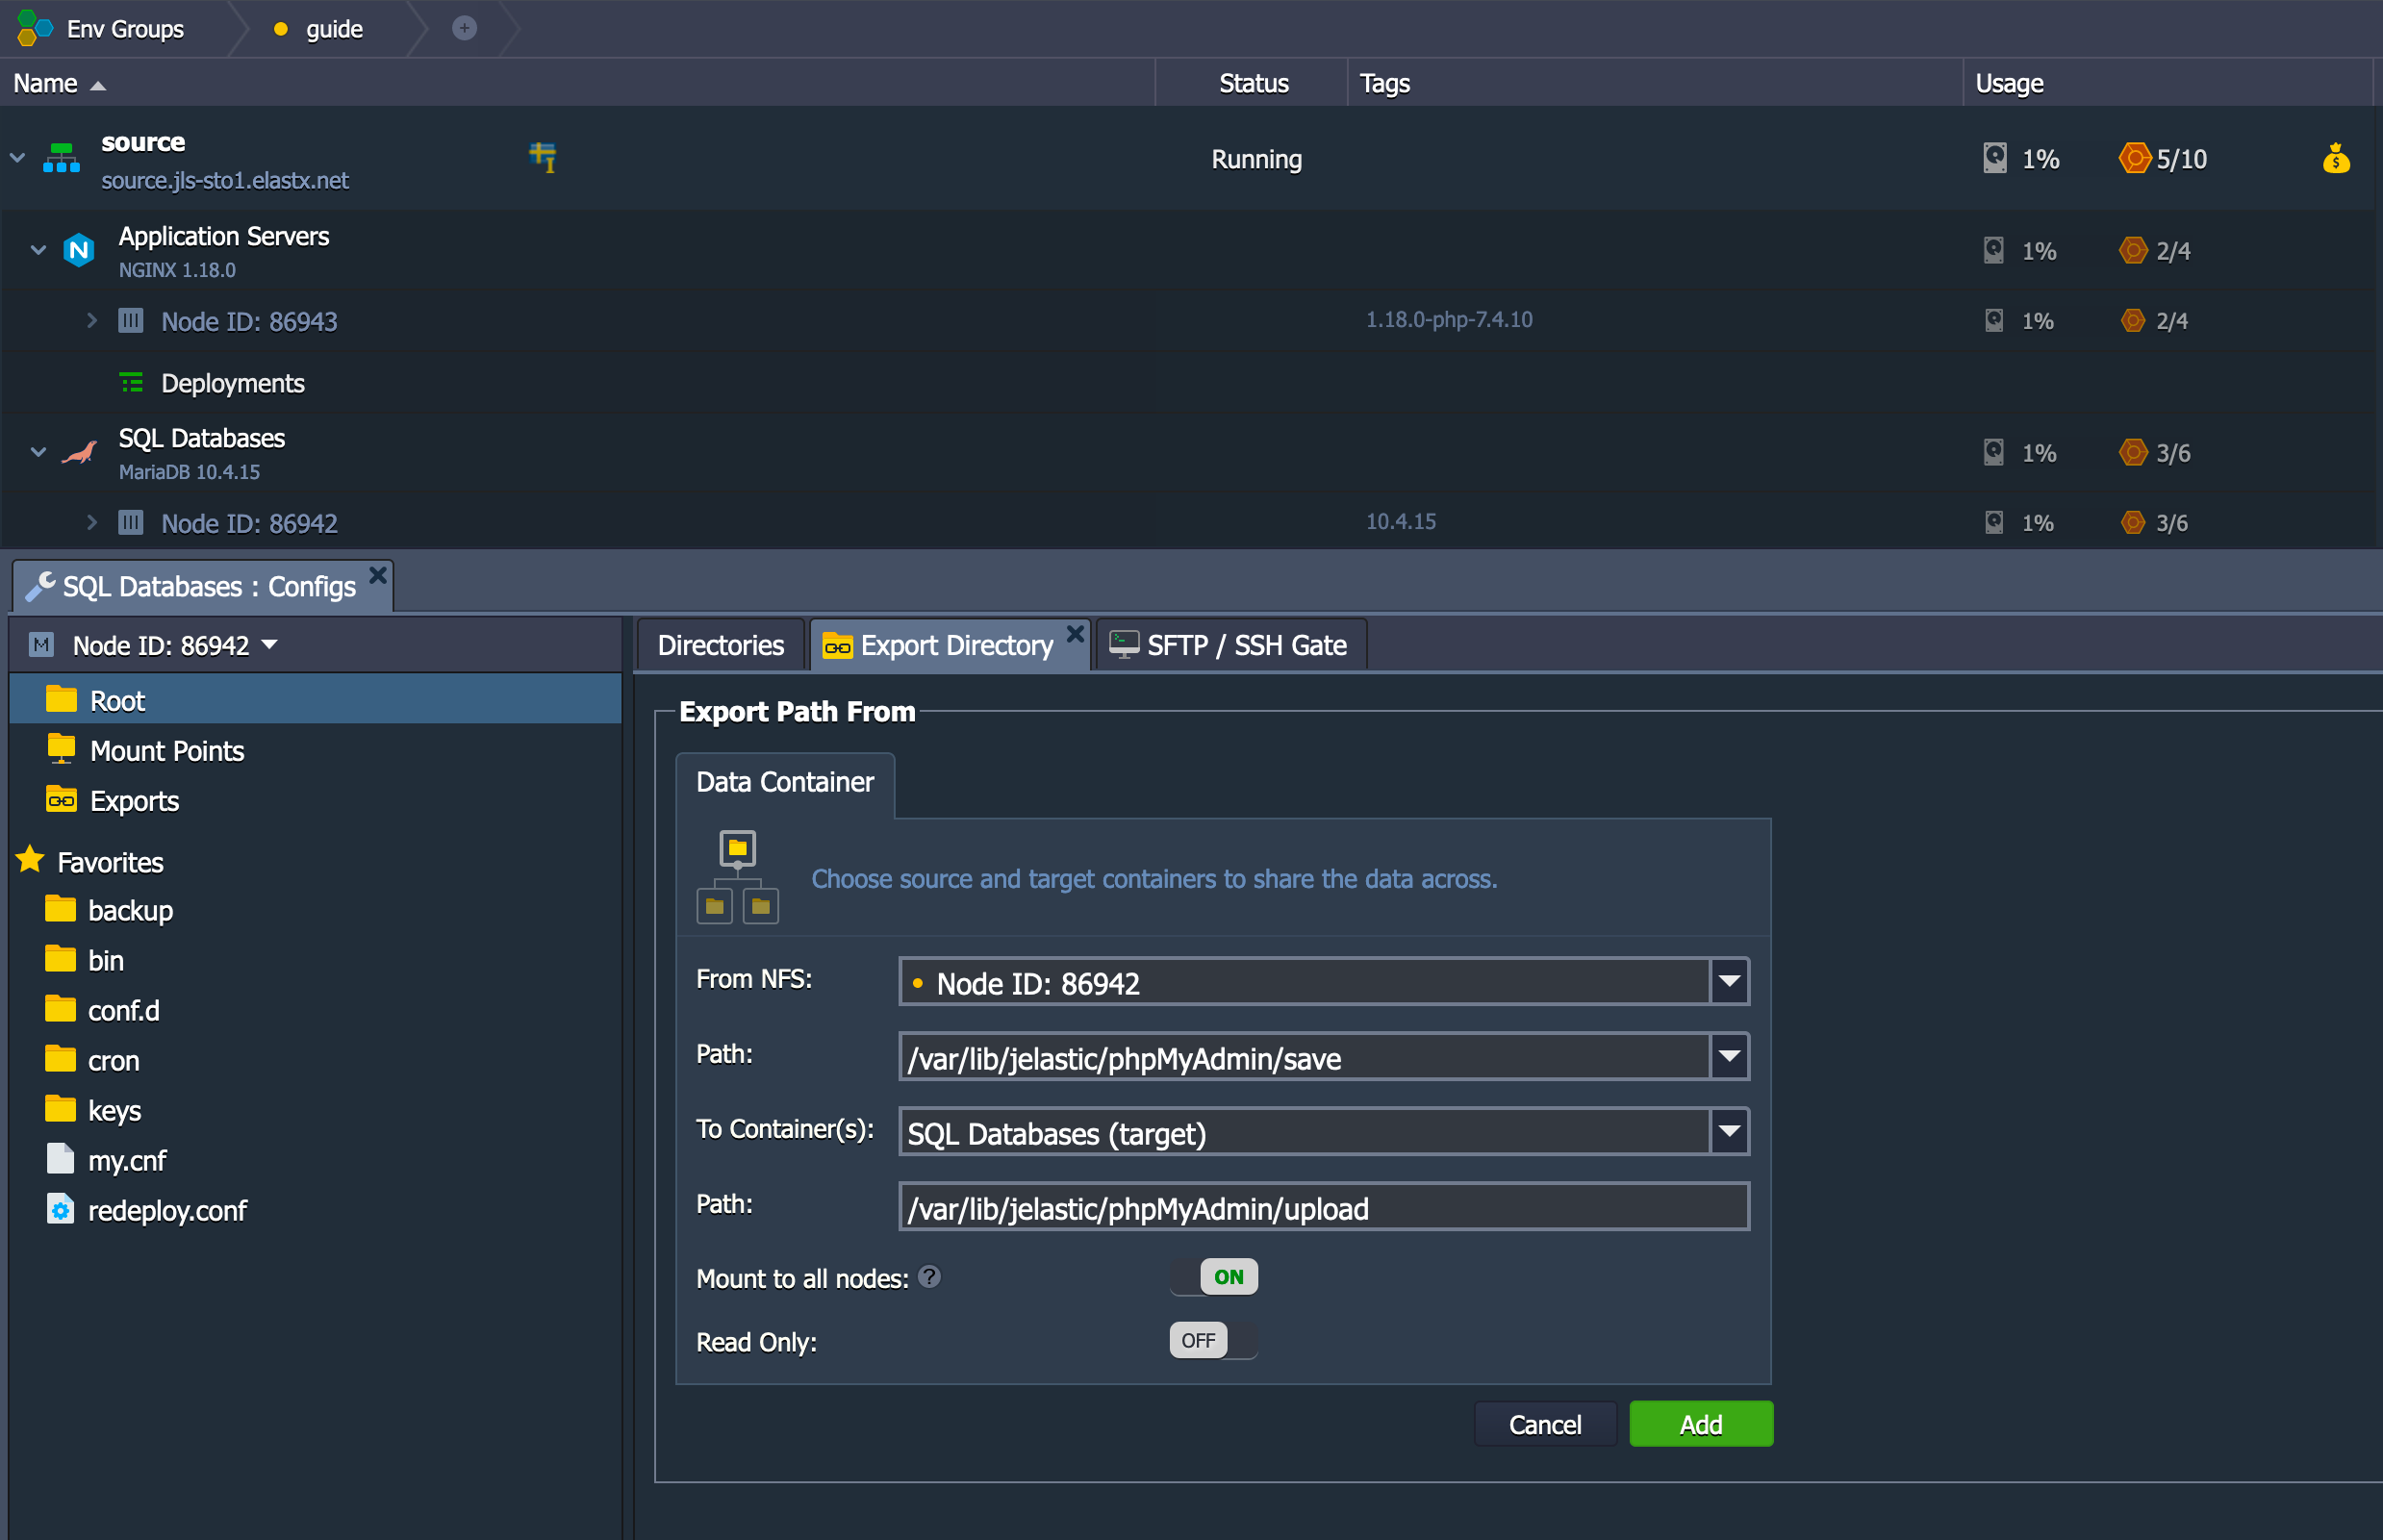
- Now the target environment should have access to a folder on the source environment.
Import the database
- Open up phpMyAdmin on the target environment.
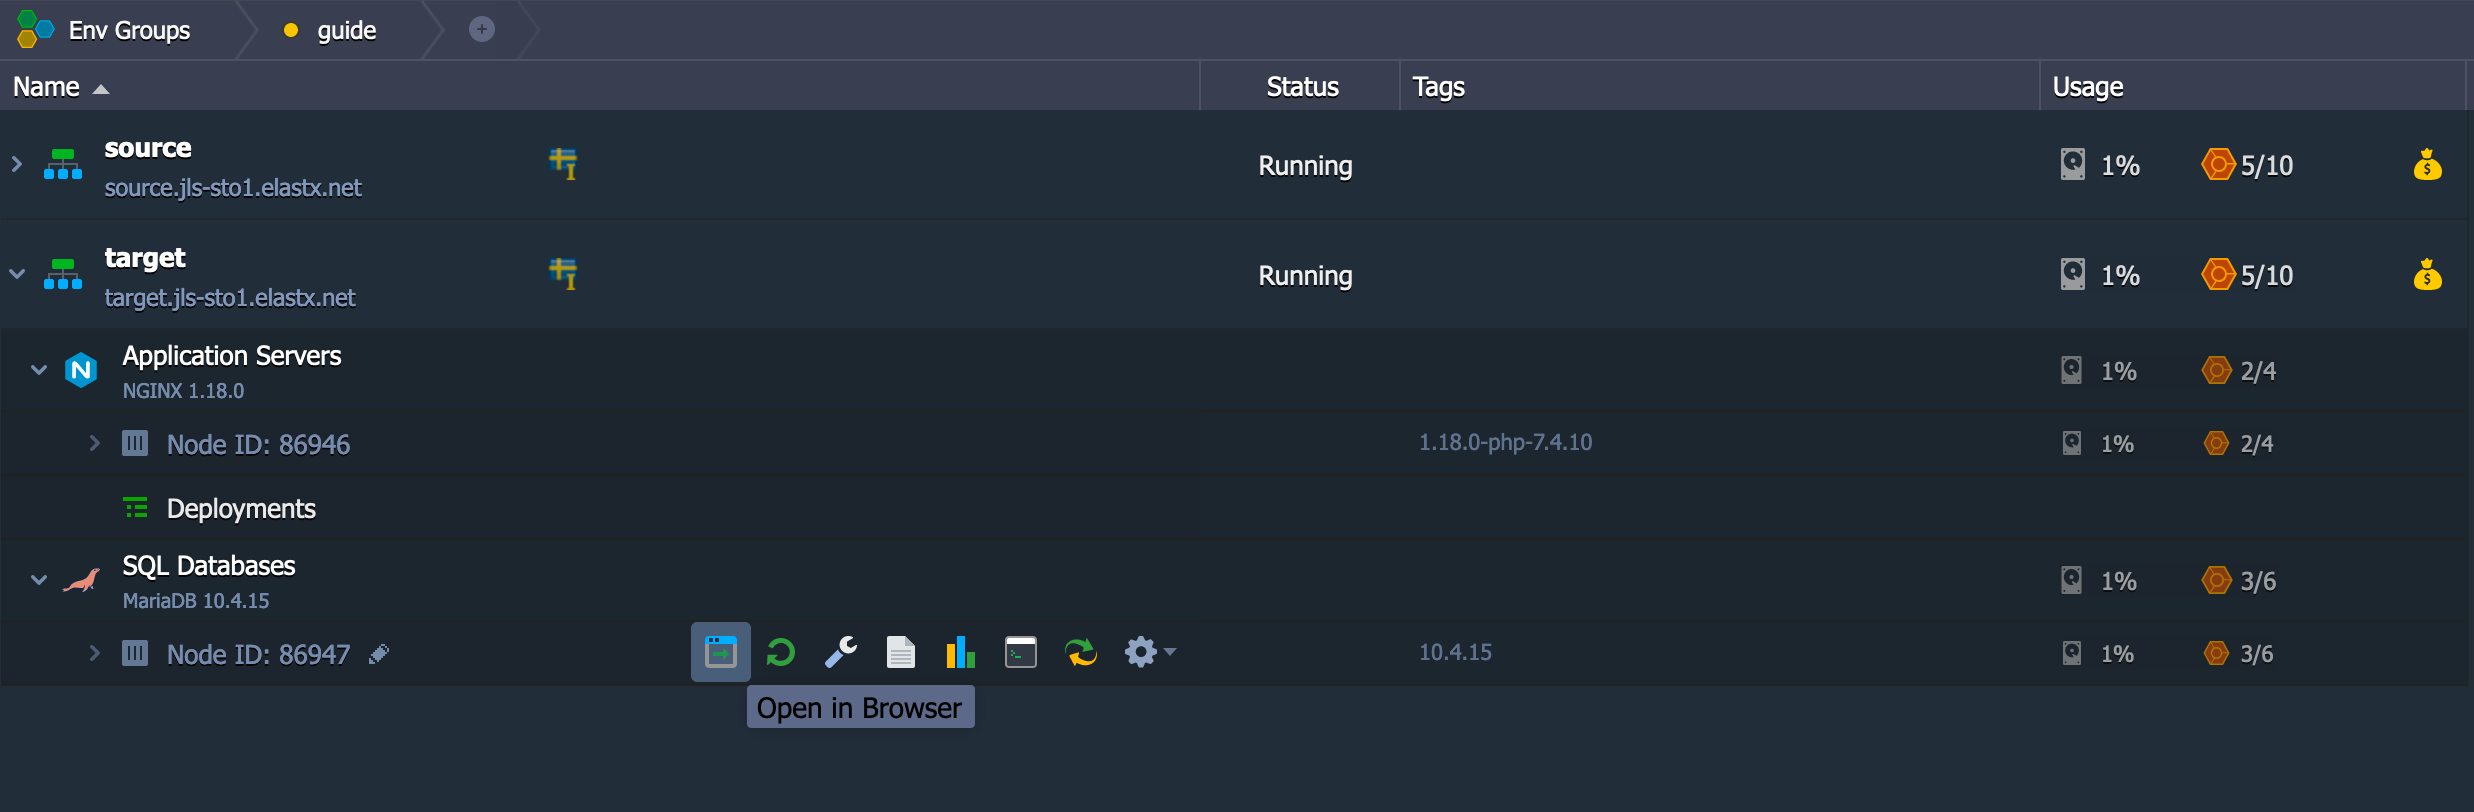
- In order to import the database, we need to create it beforehand as shown below.
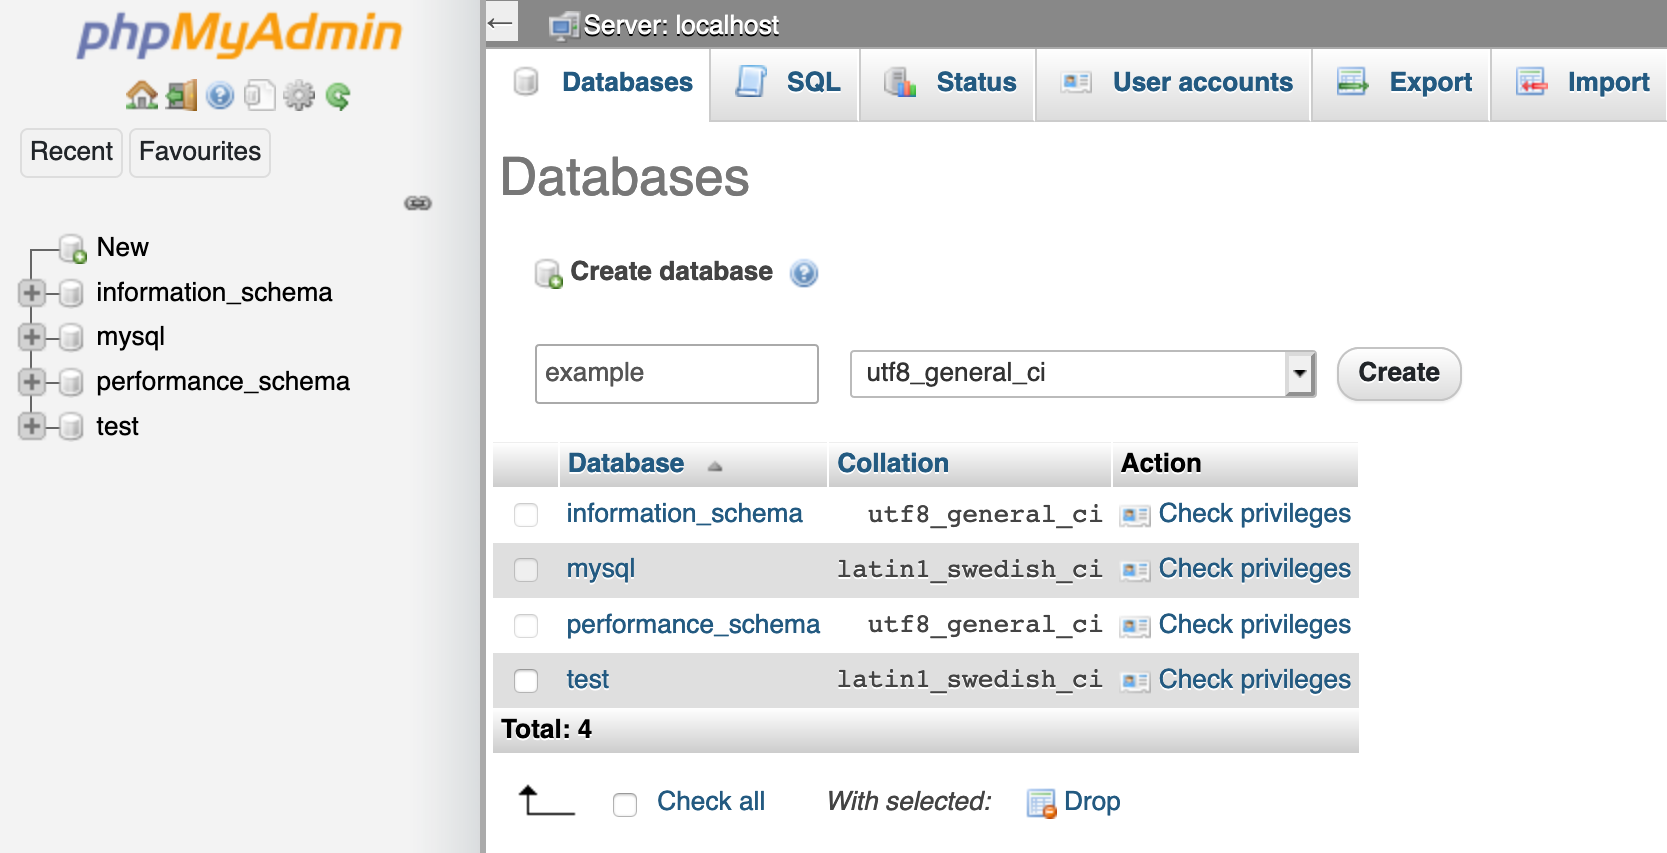
- Since you have mounted the source environments save folder to the target environments upload folder, you have access to the sql files there. So click on “Select from the web server upload directory /var/lib/jelastic/phpMyAdmin/upload/” and click Go to import it.
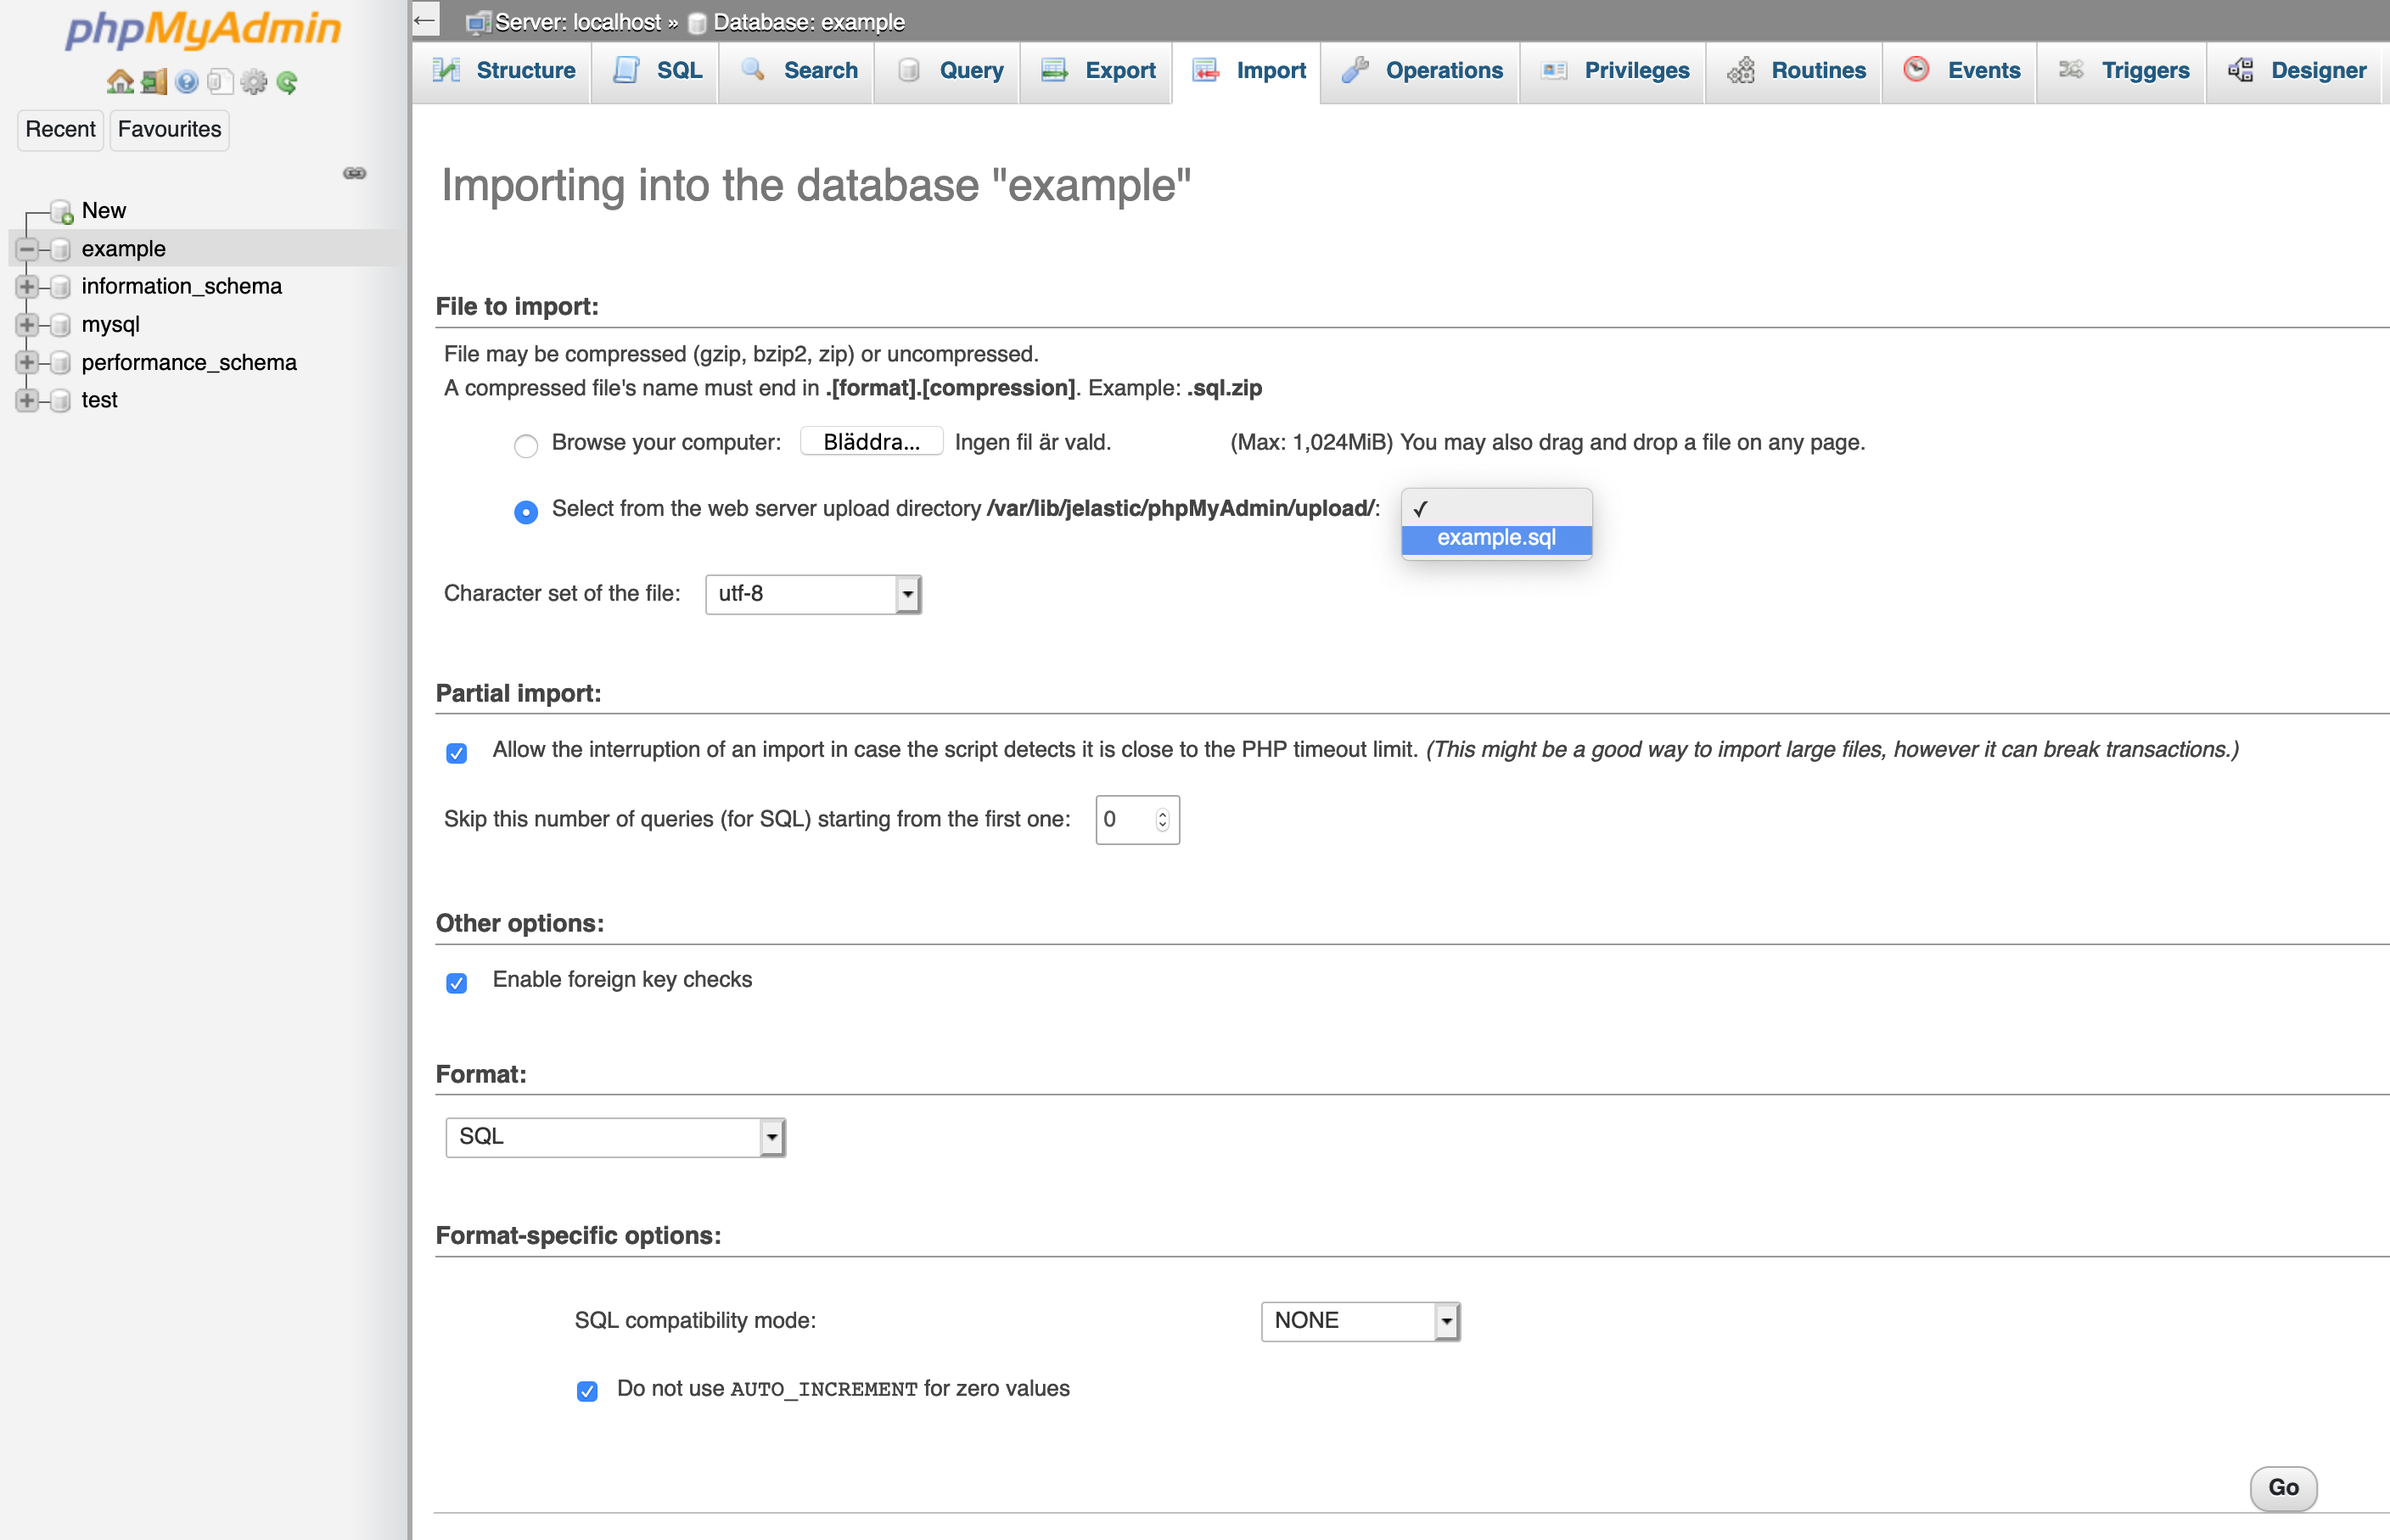
- At this time, you should have a successful import.
Cleanup - unmount the shared folder
- When you are done exporting and importing databases, you should remove the shared folder. Click on the wrench on the target environments database node.
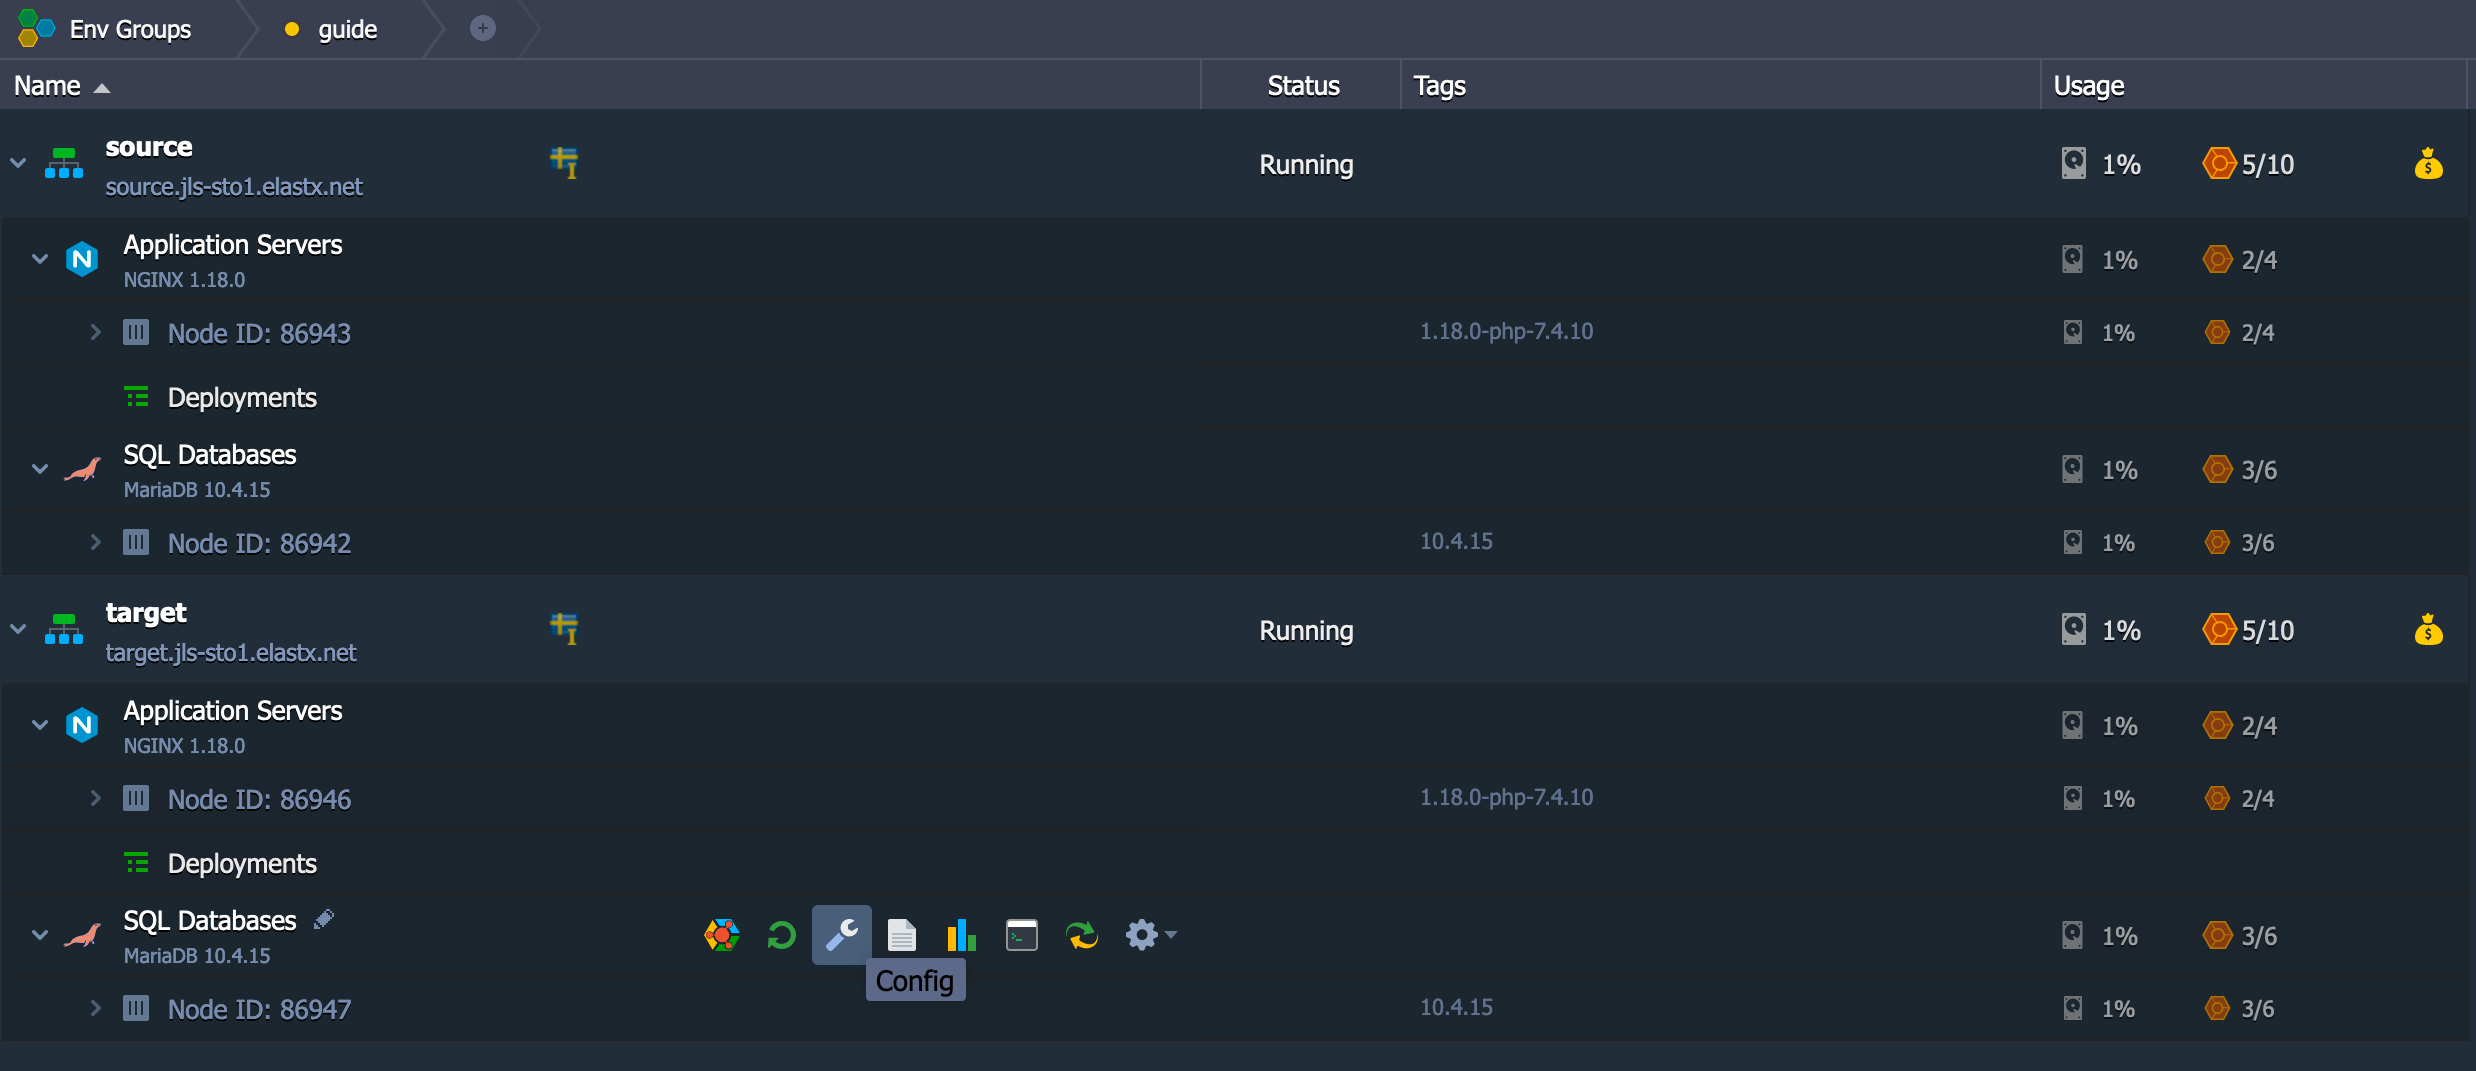
- You should see the upload folder in your Mount Points folder below to the left. Click the cogwheel and unmount, as shown in the image below
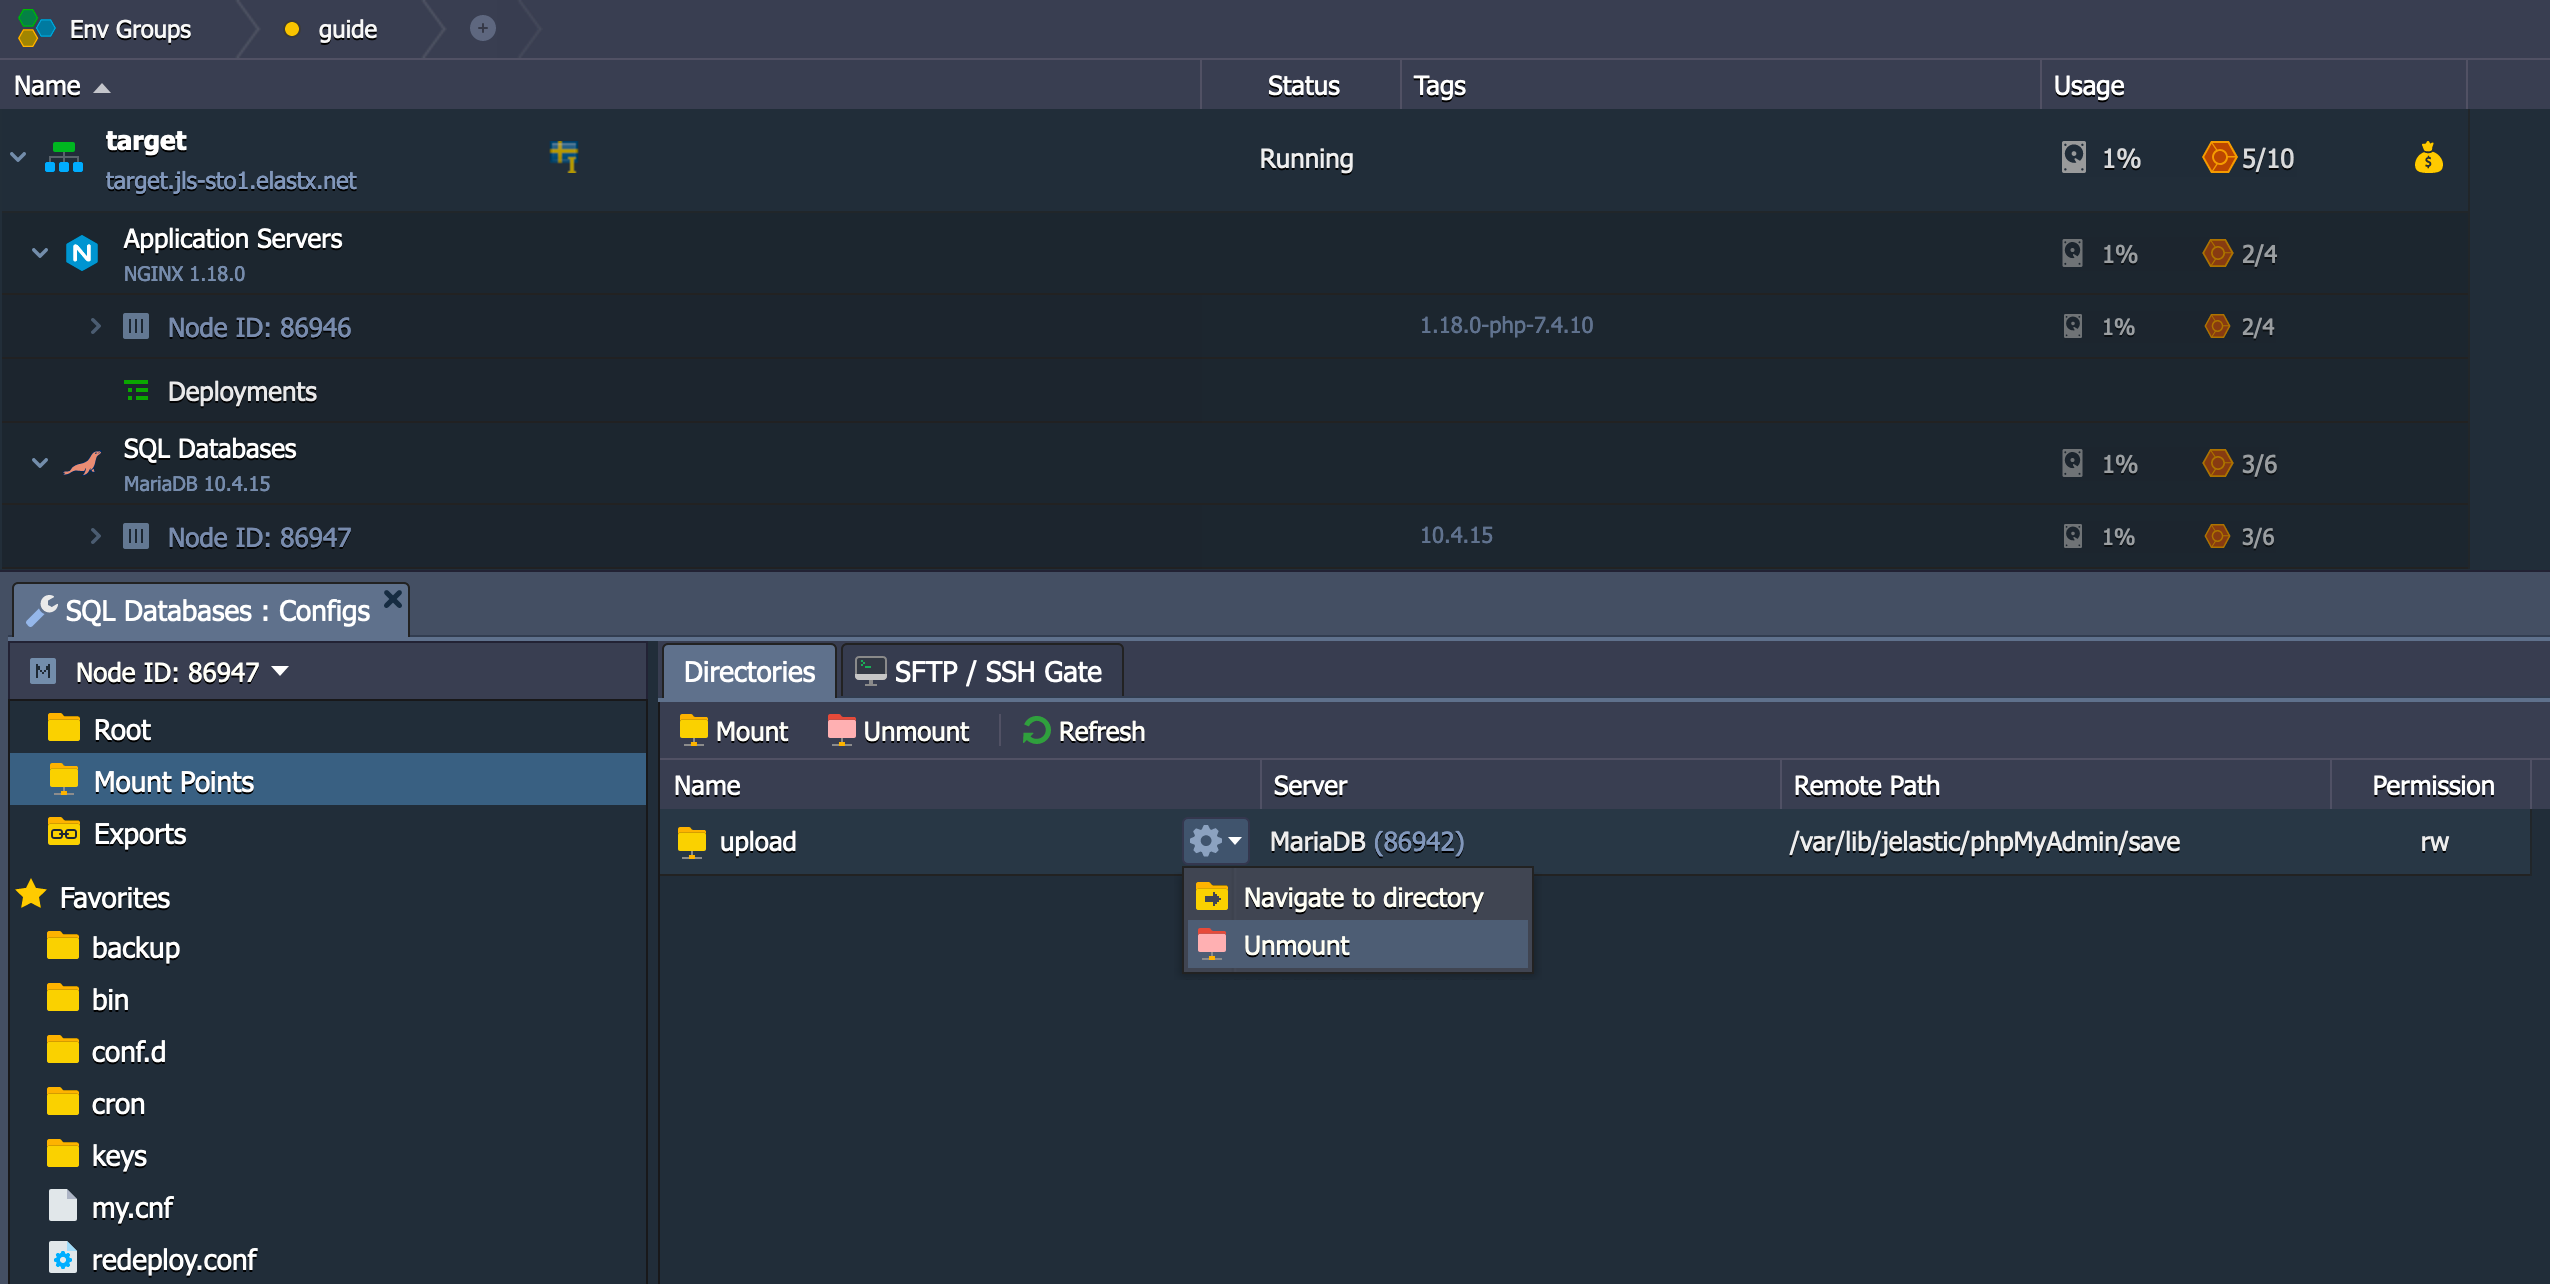
You should be all set!
12.2.4 - Copy files between environments
Overview
This guide will help you getting started with moving files between environments using the Jelastic GUI.
Export directory
- Find the configuration wrench on the Application Servers source node.
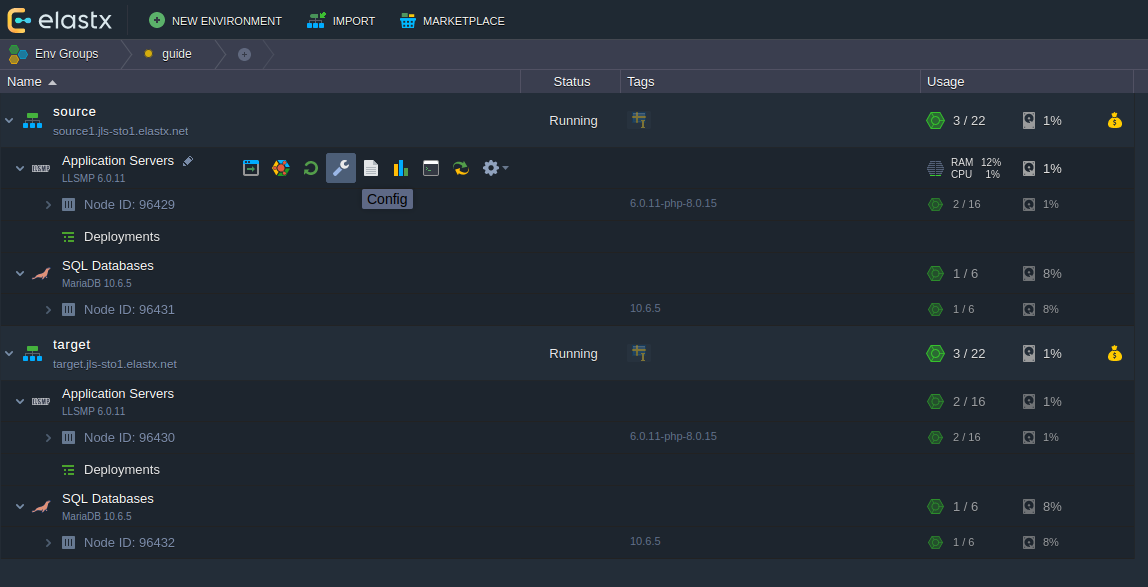
- Go to folder
/var/www/webroot(via favorites to the left). Click the cogwheel on the ROOT folder as shown on the image below and choose Export
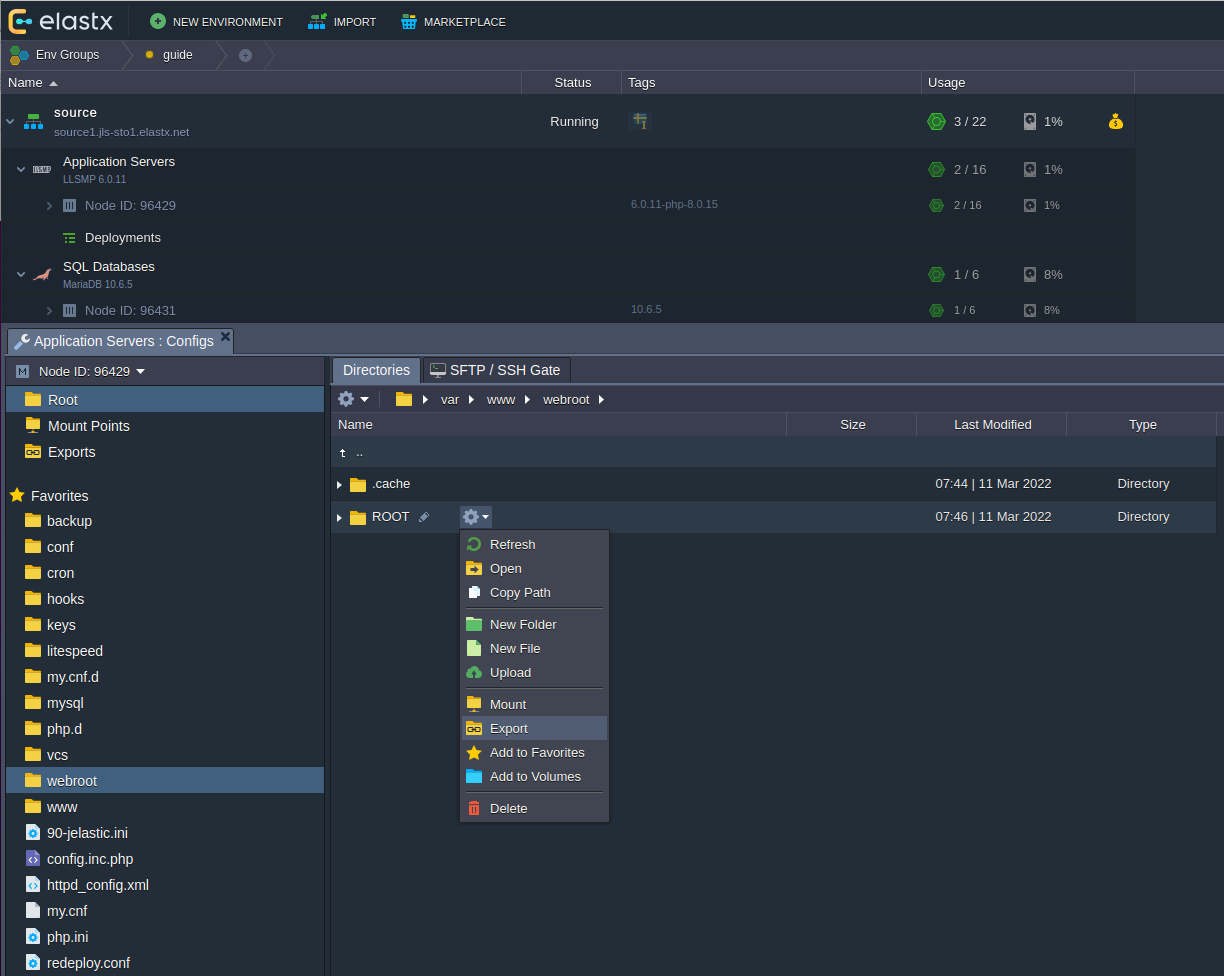
- Make sure to choose the correct target container where your target Application Server is at.
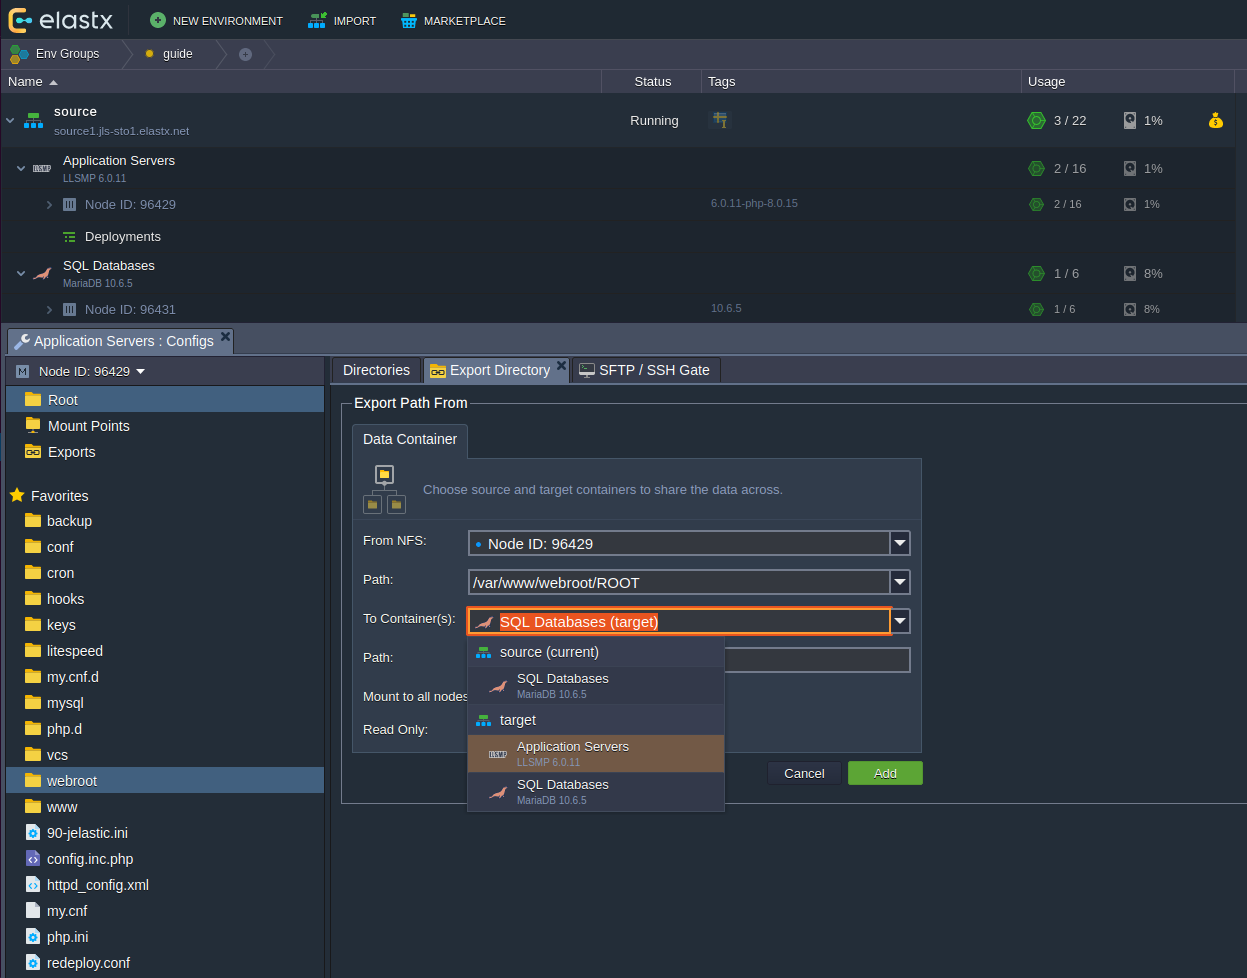
- Here we use the path
/var/www/webroot/FROM_SOURCEwhich will create and mount this folder on the source environments Application Server.
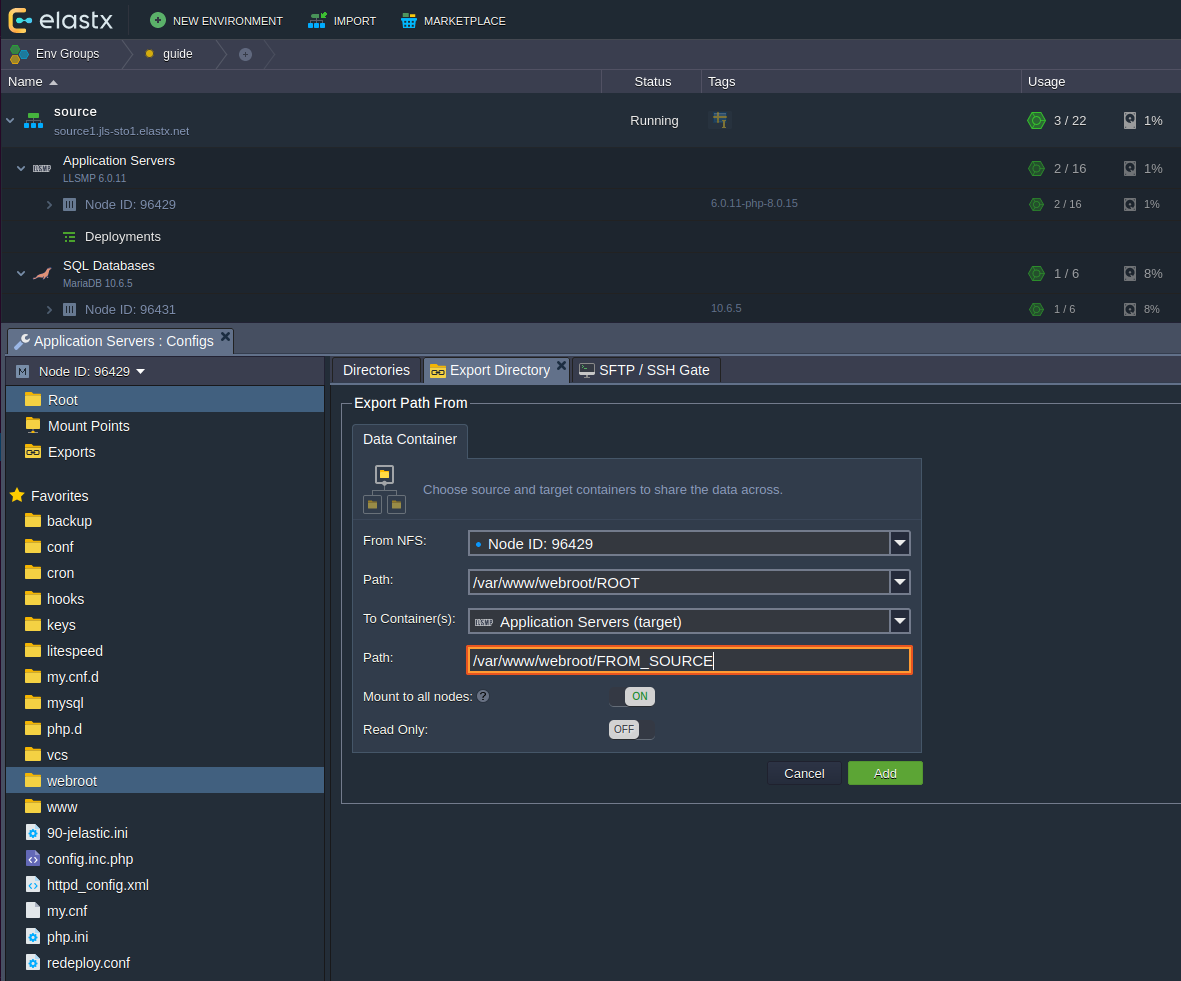
Copy files
- Click the configuration wrench on the target environment’s Application Server.
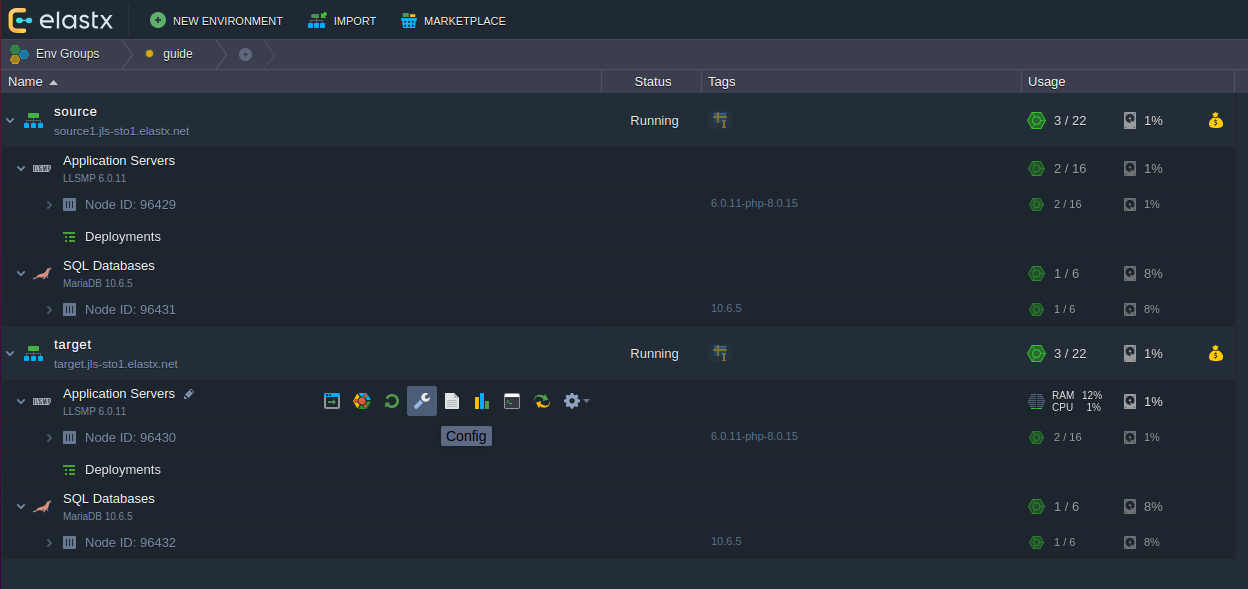
- To the left, click the cogwheel and click Copy Path, which will copy the full path location to your clipboard.
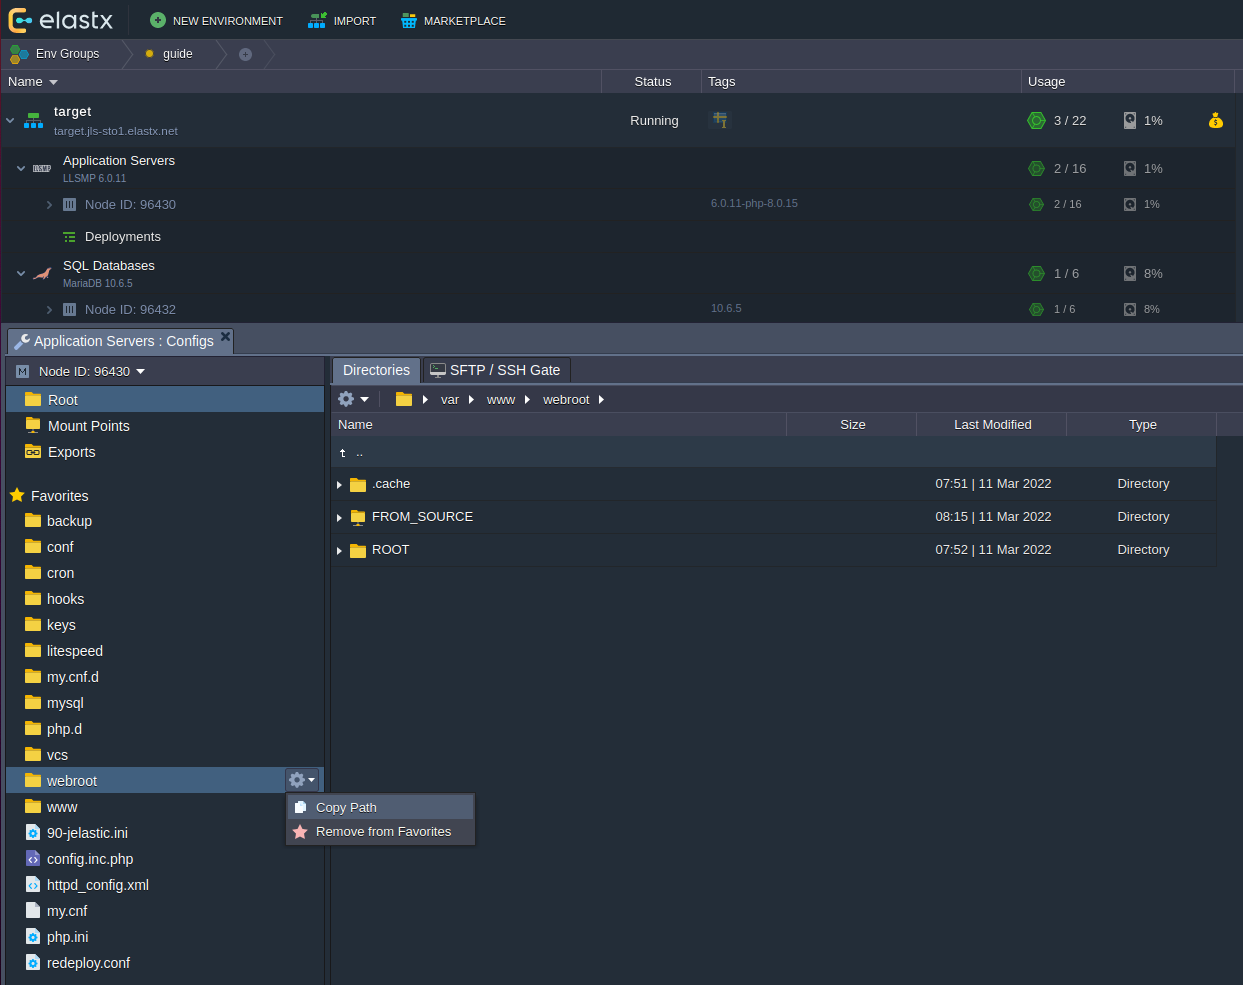
- Click on the terminal icon to engage the Web SSH terminal
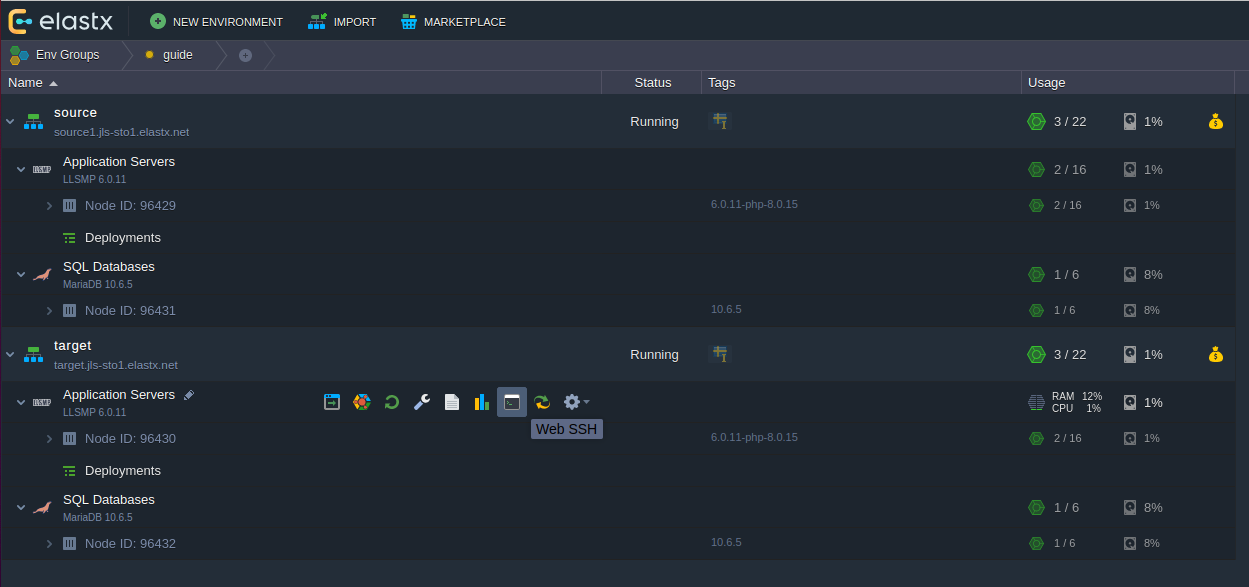
- In the terminal you should write
cdthen paste previously copied path/var/www/webrootand then enter. After that you should see the folderFROM_SOURCEexecutingls -las shown on the image below.
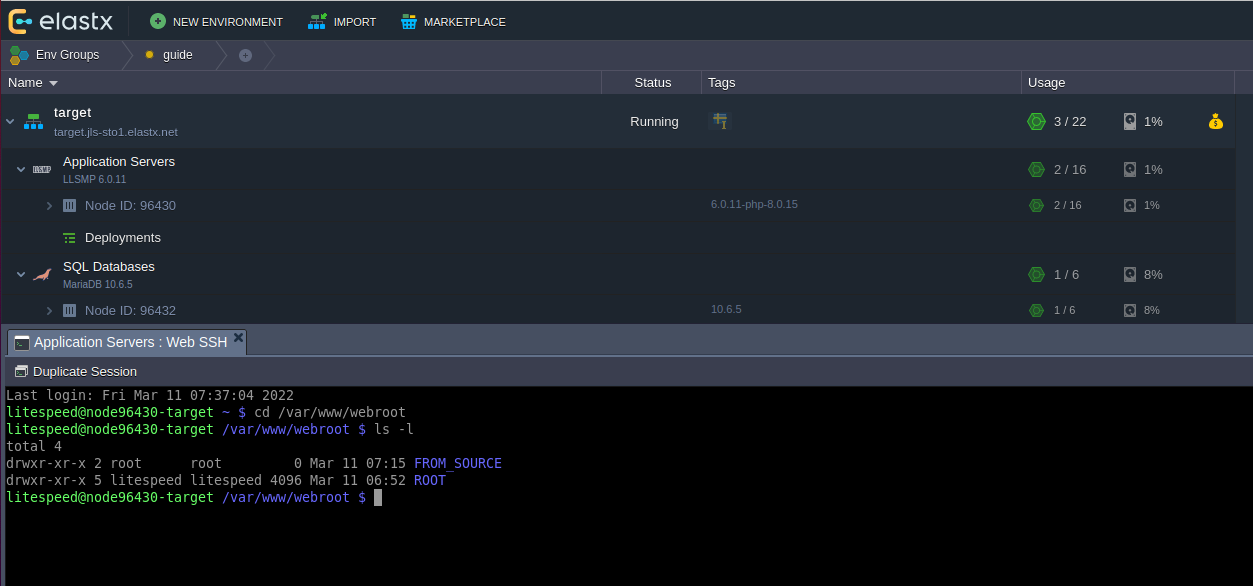
- Now you should be able to copy files as shown below. Using the
--verboseflags gives you this output.
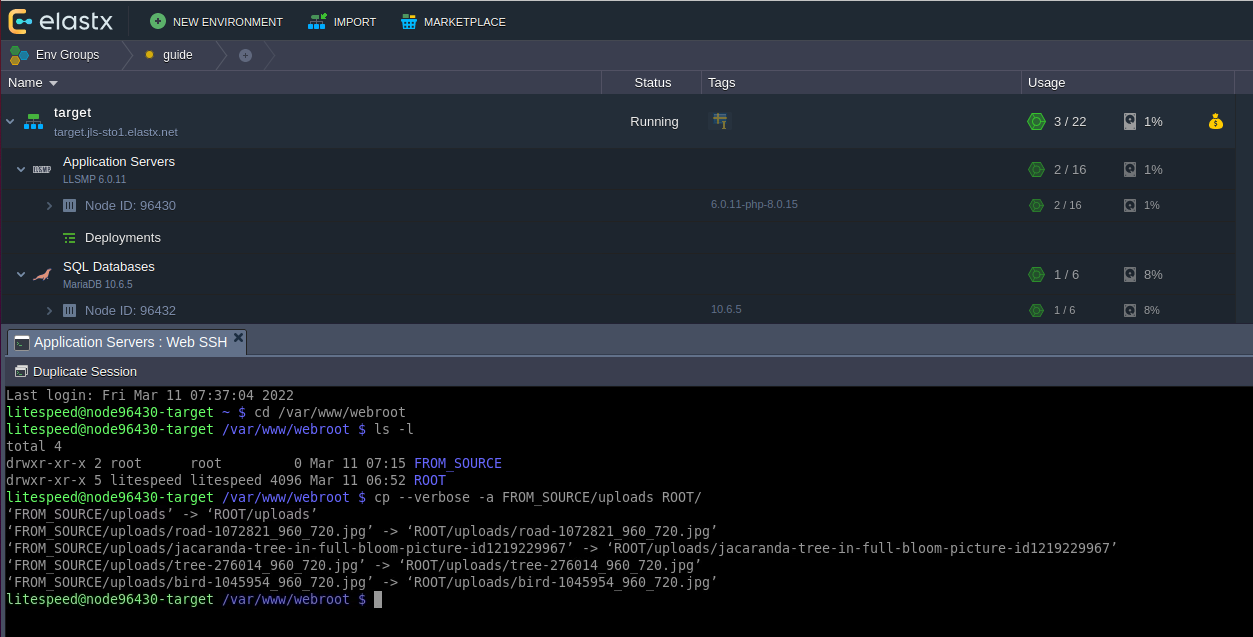
- You can confirm that the files been copied by browsing to that folder in the GUI.
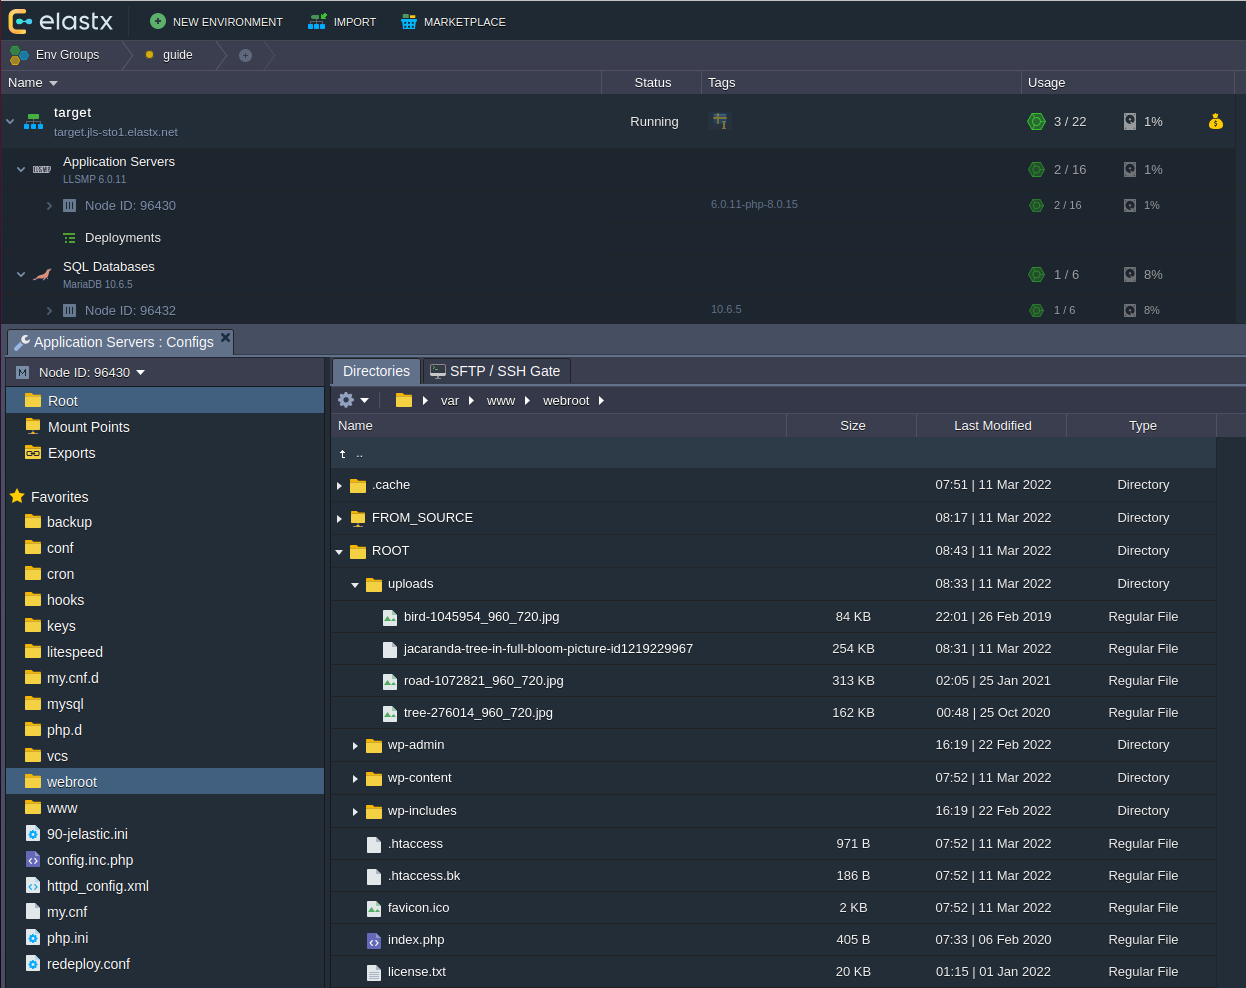
Clean up
- Unmount the exported directory on the target application server as shown below.
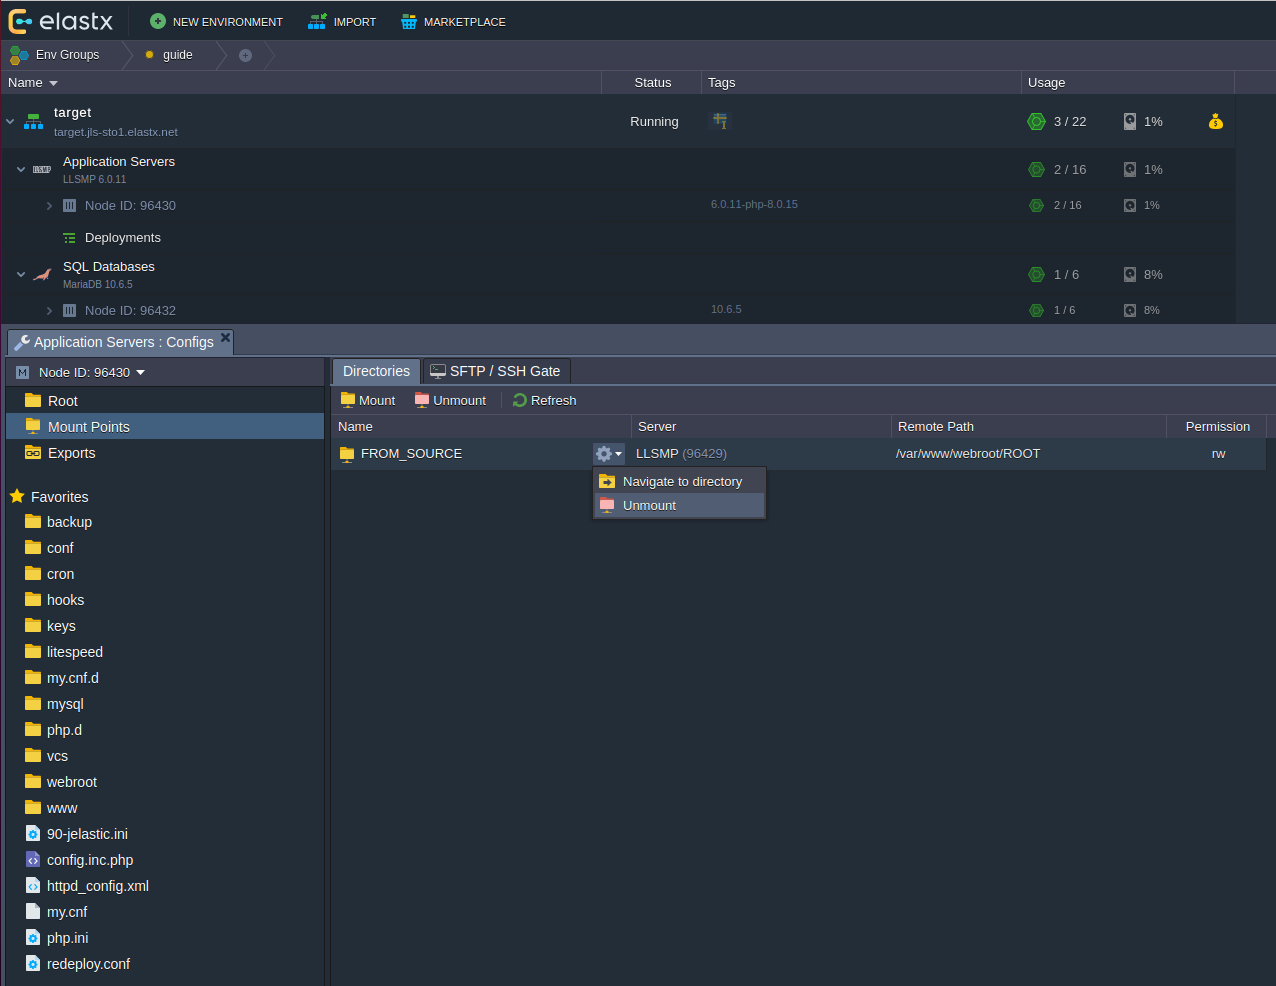
12.2.5 - Enable IPv6
Overview
This guide will help you enable IPv6. Remember that you might need to configure your application to listen on IPv6.
Enabling IPv6
- Expand your environment. If you hover over “Public IP”, an icon for attaching or detaching IP-addresses will appear.
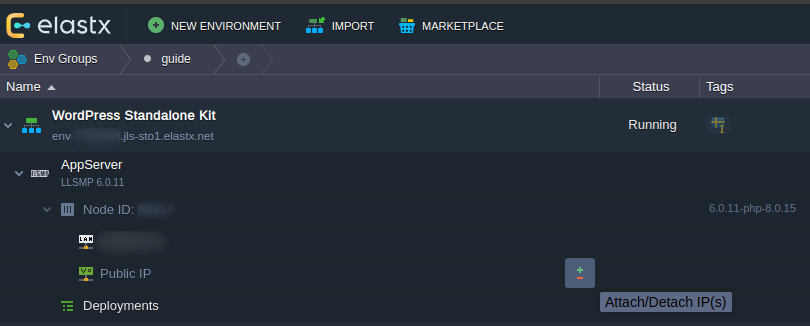
- Here we can choose to attach IPv4-addresses or enable Public IPv6 by switching the toggle to “ON”.

- Verify that your environment have been assigned a new IPv6-address.
That’s it! If something in this guide is unclear or if you have any questions, feel free to contact us.
12.2.6 - Enable X11-Forwarding on VPS
CentOS
Note: This was tested on CentOS 7.9 but should apply to all available versions. Some minor differences may be present.
- Install Xauth with
yum install xorg-x11-xauth - Make sure X11Forwarding is enabled by running
grep X11Forwarding /etc/ssh/sshd_config, the output should look like:X11Forwarding yesIf the output isX11Forwarding no, edit the value in the sshd config withvim /etc/ssh/sshd_configand restart sshdservice sshds restart - Connect to the VPS
ssh -X user@ip - Install an X application to verify that it works (for example:
yum install xclockand then run it withxclock)
Ubuntu
Note: This was tested on Ubuntu 20.04 but should apply to all available versions. Some minor differences may be present.
On a Ubuntu 20.04 VPS the package xauth is already installed by default.
- Make sure X11Forwarding is enabled by running
grep X11Forwarding /etc/ssh/sshd_config, the output should look like:X11Forwarding yesIf the output isX11Forwarding no, edit the value in the sshd config withvim /etc/ssh/sshd_configand restart sshdservice sshds restart - Connect to the VPS
ssh -X user@ip - Install an X application to verify that it works (for example:
apt install xarclockand then run it withxarclock)
Debian
Note: This was tested on Debian 11.2 but should apply to all available versions. Some minor differences may be present.
On a Debian 11.2 VPS the package xauth is already installed by default.
- Make sure X11Forwarding is enabled by running
grep X11Forwarding /etc/ssh/sshd_config, the output should look like:X11Forwarding yesIf the output isX11Forwarding no, edit the value in the sshd config withvim /etc/ssh/sshd_configand restart sshdservice sshds restart - Connect to the VPS
ssh -X user@ip - Install an X application to verify that it works (for example:
apt install xarclockand then run it withxarclock)
12.2.7 - FAQ
Q: We would like to explore migration options already now. How should we think?
A: Elastx provides a range of compute, database and other infrastructure products that can cover your needs. There is specific packaging in Virtuozzo PaaS which we - at this point in time - cannot substitute directly. However, we will present options later this year.
Q: We run one or a few VPS in Virtuozzo PaaS. Can we simply migrate to OpenStack IaaS?
A: Yes, however we strongly recommend that you migrate with the approach of rebuilding your workloads in OpenStack IaaS and migrate data there prior to shifting over your customer traffic. This way you may ensure that things are patched to the latest versions and tests are successful. Contact us at support@elastx.se and we will set up an OpenStack IaaS project for you.
Q: We love Virtouzzo PaaS. Why do you deprecate the product?
A: At Elastx, we pride ourselves that robustness and security are parameters we value before others such as for example abundance of features or the lowest possible price point. Continuously we evaluate and challenge the architecture of Elastx Cloud Platform to be able to deliver on our commitments.
Another piece of the puzzle is that technology never stops evolving.
For these reasons we have made a strategic choice to deprecate Virtuozzo PaaS and replace this with our already existing products and those planned before end of life. This as we are confident that we can provide alternatives for most customers and use cases with additional focus on the mentioned parameters.
Q: When can we expect alternative migration paths and how will this be communicated?
A: Alternative migration paths to our Elastx IaaS, CaaS and DBaaS products are proven for several customers already. We are investigating replacement options that are more one to one as well, however these will not be launched until next year. There will be corresponding announcements as we near launch.
Q: What are the actual products and services that will be deprecated?
A: Virtuozzo PaaS service according to the specifications in this link
Q: How can we leverage Elastx other products and services to deliver the same result?
A: The answer to this question all lies within the scope and details of your environment setup, workloads and applications. In general our Elastx IaaS, CaaS and DBaaS products will be possible to leverage in order to deliver the same result. However, there are specific services that are not available as built-in components as they are in Elastx PaaS.
Q: Will the prices differ when we run Elastx IaaS, CaaS and DBaaS compared to Virtuozzo PaaS?
A: In general, the price points match each other as the product billing is built on consumption per use. There are pricing lists available to review and approximate the costs to run your services on these products.
Q: Do you offer consulting services to help us migrate?
A: Yes. You are welcome to contact us through support@elastx.se and we will certainly assist you with consultative inquiries around for example technical design, scoping and migration activities supported by our Cloud Architect resources.
Q: What will happen on the end of life date - will all data be removed or is it backed up in some way?
A: Elastx will disable the service but store customer data for an additional 180 days before we permanently remove it from our infrastructure. You are welcome to request a copy.
Q: Do you have any case studies with more details that we can read up on?
A: Please contact us with a description of your particular case and we will see whether we have something that matches to share.
12.2.8 - Force HTTPS on Apache behind Nginx load balancer
Edit httd.conf
Add the following configuration in the Apache configuration file httd.conf.
<VirtualHost *:80>
...
RewriteEngine on
RewriteCond %{HTTP:X-Forwarded-Proto} !https
RewriteRule .* https://%{HTTP_HOST}%{REQUEST_URI} [R,L]
</VirtualHost>
12.2.9 - Force HTTPS with Tomcat
Overview
This guide describes how to make Tomcat force all traffic over HTTPS.
Tomcat Configuration
On the Tomcat node, edit the web.xml file and add the following in the <web-app *> section.
    <security-constraint>
        <web-resource-collection>
            <web-resource-name>Protected Context</web-resource-name>
            <url-pattern>/*</url-pattern>
        </web-resource-collection>
        <!-- auth-constraint goes here if you require authentication -->
        <user-data-constraint>
            <transport-guarantee>CONFIDENTIAL</transport-guarantee>
        </user-data-constraint>
    </security-constraint>
With this, Tomcat will attempt to redirect any HTTP request to the specified context and instead use the HTTPS Connector, and as such never serve it under HTTP.
If you are using the shared Jelastic SSL certificate or if you are using a load balancer in front of your Tomcat node, you will need to make the below changes.
This is to make Tomcat understand X-Forwarded-Proto by adding the following text in the Tomcat server.xml <Engine> section.
    <Connector port="8080" protocol="HTTP/1.1"
    connectionTimeout="20000"
    redirectPort="443" />
We also need to adjust the redirectPort on the connector.
It should redirect users to 443 (and not 8443).
Note: 8443 is the internal port Tomcat listens on, but the Jelastic resolver pushes traffic to 443 and it’s translated to the correct Tomcat port for you automatically. So 443 is the correct port for HTTPS requests.
Edit the server.xml file and change the connector redirect to port 443.
    <Connector port="8080" protocol="HTTP/1.1"
    connectionTimeout="20000"
    redirectPort="443" />
Restart the Tomcat node and it should be done.
12.2.10 - Log real client IP behind a proxy
Overview
This guide will demonstrate how to make your web server log your client’s real IP instead of the proxy’s. This is applicable both if your web server is behind your own proxy or our Jelastic resolver.
Nginx Configuration
Replace $remote_addr with $http_x_real_ip in your nginx.conf where the log format is defined.
This is what is should look like:
    log_format  main  '$http_x_real_ip:$http_x_remote_port - $remote_user [$time_local] "$request" '
                      '$status $body_bytes_sent "$http_referer" '
                      '"$http_user_agent" "$http_x_forwarded_for" '
                      '"$host" sn="$server_name" '
                      'rt=$request_time '
                      'ua="$upstream_addr" us="$upstream_status" '
                      'ut="$upstream_response_time" ul="$upstream_response_length" '
                      'cs=$upstream_cache_status' ;
And this is the default value, note that the only change is on the first row.
    log_format  main  '$remote_addr:$http_x_remote_port - $remote_user [$time_local] "$request" '
                      '$status $body_bytes_sent "$http_referer" '
                      '"$http_user_agent" "$http_x_forwarded_for" '
                      '"$host" sn="$server_name" '
                      'rt=$request_time '
                      'ua="$upstream_addr" us="$upstream_status" '
                      'ut="$upstream_response_time" ul="$upstream_response_length" '
                      'cs=$upstream_cache_status' ;
Your nginx access log will now contain the client’s real IP instead of the proxy’s.
Apache Configuration
For Apache you’ll need to change the LogFormat in your httpd.conf to the following:
LogFormat "%{X-Real-IP}i %l %u %t \"%r\" %>s %b \"%{Referer}i\" \"%{User-Agent}i\"" combined
LogFormat "%{X-Real-IP}i %l %u %t \"%r\" %>s %b" common
The default values to be replaced are:
LogFormat "%h %l %u %t \"%r\" %>s %b \"%{Referer}i\" \"%{User-Agent}i\"" combined
LogFormat "%h %l %u %t \"%r\" %>s %b" common
Done, your Apache access log will now contain the client’s real IP instead of the proxy’s.
12.2.11 - Nginx LB HTTP to HTTPS redirect
Overview
If you have an nginx load balancer in you environment and want to redirect all requests to https then you can add the following configuration.
nginx configuration
On the nginx load balancer node select config and create a new file under conf.d named redirect.conf. Add the following configuration to the file, save it and restart nginx.
server {
       listen *:80 default_server;
       access_log /var/log/nginx/redirect.access_log main;
       error_log /var/log/nginx/redirect.error_log info;
       location / {
         rewrite ^ https://$host$request_uri? permanent;
       }
}
12.2.12 - Nginx redirect to HTTPS
Overview
If you have enabled https, have a public IP and want to redirect all traffic from http to https you can change the “/ location {}” section in nginx.conf to the following.
location / {
  rewrite ^ https://$host$request_uri? permanent;
}
If your webserver is located behind a proxy, loadbalancer or WAF (that sends x-forwarded headers) you can simply use the below snippet instead.
if ($http_x_forwarded_proto != "https") {
  rewrite ^ https://$host$request_uri? permanent;
}
12.2.13 - Node.JS NPM Module Problems
Overview
If you have problems with installing node modules via npm and get “unmet dependency” errors then this guide might help.
Solution
Try to remove all installed modules, clear the npm cache and reinstall. Log in to the node with ssh and run the following commands:
cd /home/jelastic/ROOT

npm cache clean --force

rm -r node_modules

npm install
12.2.14 - PHP max upload file size
Overview
This guide demonstrates how to increase (or decrease) the PHP max upload file size. We’ll need to both configure PHP and then the web server if you’re running nginx.
PHP Configuration
In php.ini, find the rows containing upload_max_filesize and post_max_size and change their values to the desired amount.
By default they will look something like this, depending on what type of node you’re running their values might differ:
upload_max_filesize = 100M
post_max_size = 100M          ; Maximum size of POST data that PHP will accept.
Continue with the web server configuration below.
Nginx Configuration
If you are running nginx you will need to edit (or add if it’s missing) the following row with the desired value in the http {} block in nginx.conf.
client_max_body_size 32m;
Restart the node for the changes to take effect.
12.2.15 - Redirect nginx
Overview
If you want to make sure all traffic only uses your preferred domain name you can create a new server {} block that redirects to the preferred domain name.
Edit nginx.conf
On your nginx node select config and edit the nginx.conf file. In this example we’ll redirect my-site.jelastic.elastx.net to https://my-domain.tld
server {
    server_name my-site.jelastic.elastx.net;
    listen 80 default_server;
    return 301 https://my-domain.tld/$request_uri;
}
12.2.16 - Restrict phpMyAdmin access
Overview
If you want to limit access to the database phpMyAdmin you can use a Apache access rule.
Configuration
-
In the Virtuozzo PaaS GUI, select “Config” on the database node.
-
Edit the file /conf.d/phpMyAdmin-jel.conf and make sure your
<Directory /usr/share/phpMyAdmin/>looks like this. Edit the IP to the IP that should be granted access.
<Directory /usr/share/phpMyAdmin/>
     SetEnvIf X-Forwarded-For ^xxx\.xxx\.xxx\.xxx env_allow_1
     Require env env_allow_1
     Require ip xxx.xxx.xxx.xxx
     Require all denied
</Directory>
Note: Make sure to edit the IP in the example to your desired value
- Restart the environment or contact support and we can reload the Apache configuration for you.
12.2.17 - SMTP on port 25 not working
Overview
By default we block traffic to internet on tcp port 25. We do this to prevent abuse, mail abuse is very common and we do our best to prevent this from happening.
Alternatives
If you want to send e-mail from our platform we recommend using our Mail Relay service. All major SMTP services offer their service on other ports than port 25.
This way you can get an automated reliable SMTP service that is very cost effective.
You can read more about our Mail Relay offering here. Contact us if you have any other questions.